
You're standing in socks on a wet kitchen floor, the dishwasher is still humming, and water is darkening the baseboards. You don't need a slogan. You need to know what to do first, what can wait, and how you'll know the house is dry. The water damage restoration process answers those questions in order, with measurements instead of guesswork.
What Happens After Water Hits a Home
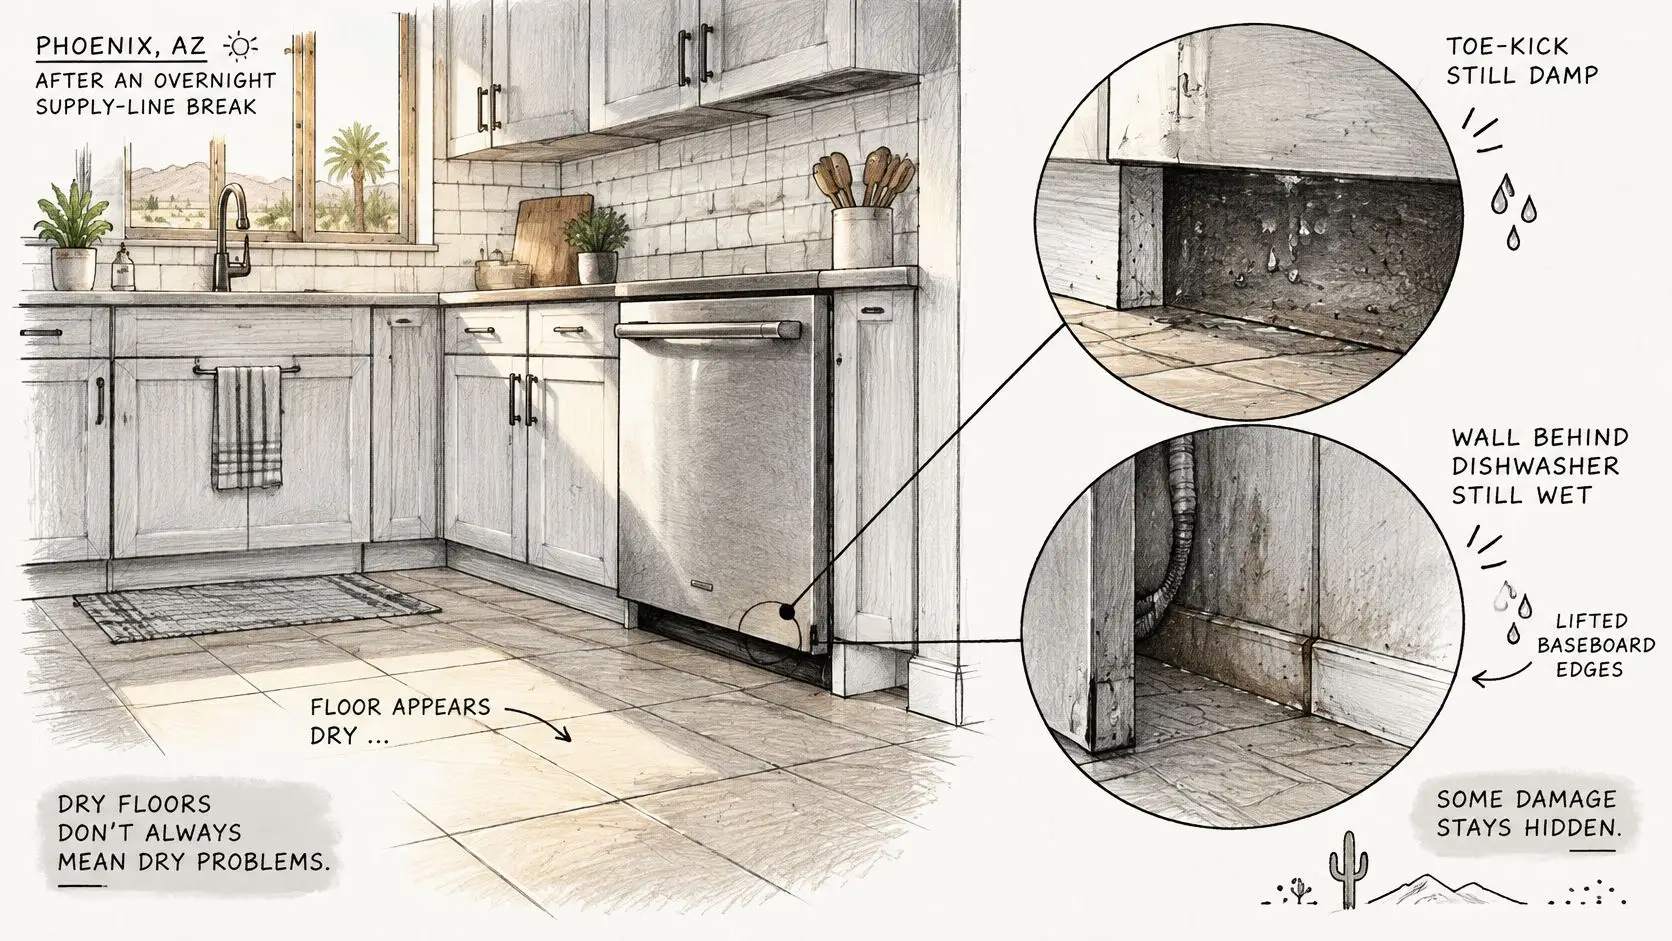
Say a supply line breaks overnight in a Phoenix kitchen. By afternoon, the tile looks dry and the room feels warm. Under the toe kick and behind the dishwasher, though, the particleboard and drywall can still be holding water you can't see or feel.
That's why this work isn't a single pump out visit. It's a measured sequence. A crew reads the water, extracts it, dries the structure with instruments, decides what stays and what goes, and rebuilds only after dryness is documented. Each step protects the next one.
Two Clocks People Mix Up
Clock one is the start window. The U.S. Environmental Protection Agency guidance on mold advises drying water damaged areas and belongings within 24-48 hours to help prevent mold growth, starting by stopping the source and removing standing water. That's when mitigation should begin on a clean water loss, not a promise that mold can't grow.
Clock two is the finish window. It's how long walls, subfloors, and framing take to reach a measured dry standard. In closed or poorly ventilated rooms, that can run for weeks after the surface feels dry.
A dry looking floor tells you almost nothing about the wall cavity behind it.
You can start safely without a crew. Shut off the water if you can reach the valve without stepping into water, stay off wet floors near outlets and cords, and photograph each room before you move belongings. Those photos and that first shutoff protect both the house and the record of what happened.
Restoration Phases and How Long Each Takes
Every job runs the same spine, whatever the source of the water.
| Phase | What happens | Typical timing | Owner's role |
|---|---|---|---|
| Safety and source control | Stop the water, keep people away from electrical hazards | First hours | Shut a safe valve, don't stand in water near power |
| Inspection and moisture mapping | Find category, extent, and hidden wet materials | Same day | Walk the loss and note what failed |
| Extraction and mitigation | Remove standing water, contain the area, protect contents | Day 1 | Clear a path and move valuables if asked |
| Structural drying | Air movement, dehumidification, repeat moisture readings | Days to weeks: well ventilated rooms often run 2-4 weeks, poorly ventilated rooms 4-6 weeks or longer | Keep equipment running and allow daily access |
| Cleaning and selective removal | Clean what can be saved, discard what can't be dried or sanitized | During and after drying | Approve removal of materials and contents |
| Repairs and reconstruction | Replace removed materials only after dryness targets are met | After documented dryness | Review the scope before walls are closed |
| Documentation | Photos, moisture logs, and invoices for the claim file | Throughout the job | Share insurer contacts and keep copies |
Read the table top to bottom and the order makes sense. No one can map moisture while water is still moving in, and no one should close a wall while the framing inside it is still wet. Skipping ahead doesn't save time. It usually means paying to open the same wall twice.
Why the Start Date and Finish Date Differ
The 24-48 hour figure causes most of the confusion. The CDC guidance on water damaged materials recommends drying or removing wet materials within that window to limit mold growth. That number is a deadline to begin, not a prediction of when the house will be dry.
The finish date runs on a different scale. Wet drywall works like a sponge: the face sheds moisture quickly while the core and the stud behind it hold on. A crew treats a material as finished only when the meter reads it as dry for that material. Anything that can't reach a dry reading in a reasonable time comes out and gets replaced. The meter makes the call, not the calendar and not your hand on the wall.
Where the Timeline Changes
Heat fools people in the Phoenix area. A slab or tile surface can feel dry in warm air within hours while the bottom plate of a wall and the insulation above it stay wet. Moisture mapping and repeat readings catch that gap before it turns into odor or swelling weeks later.
Contamination changes the drying row entirely. After sewage or floodwater, airflow has to wait for removal and sanitation, because fans running too early can push bacteria deeper into the house. That stretches the early phases and shrinks what can be saved.
Practical rule: Judge progress by the moisture log, not by whether the floor feels dry when you walk on it.
Documentation runs underneath every row for a reason. If readings, photos, and removal decisions aren't recorded as they happen, nobody can reconstruct later why a wall was opened or why equipment stayed another day.
How Pros Read the Water Before They Dry
Crews don't start with fans. They classify the water first, then they measure how much material it has soaked. Think of a stain on cloth. Category is what caused the stain, and class is how deep it has wicked into the fabric.
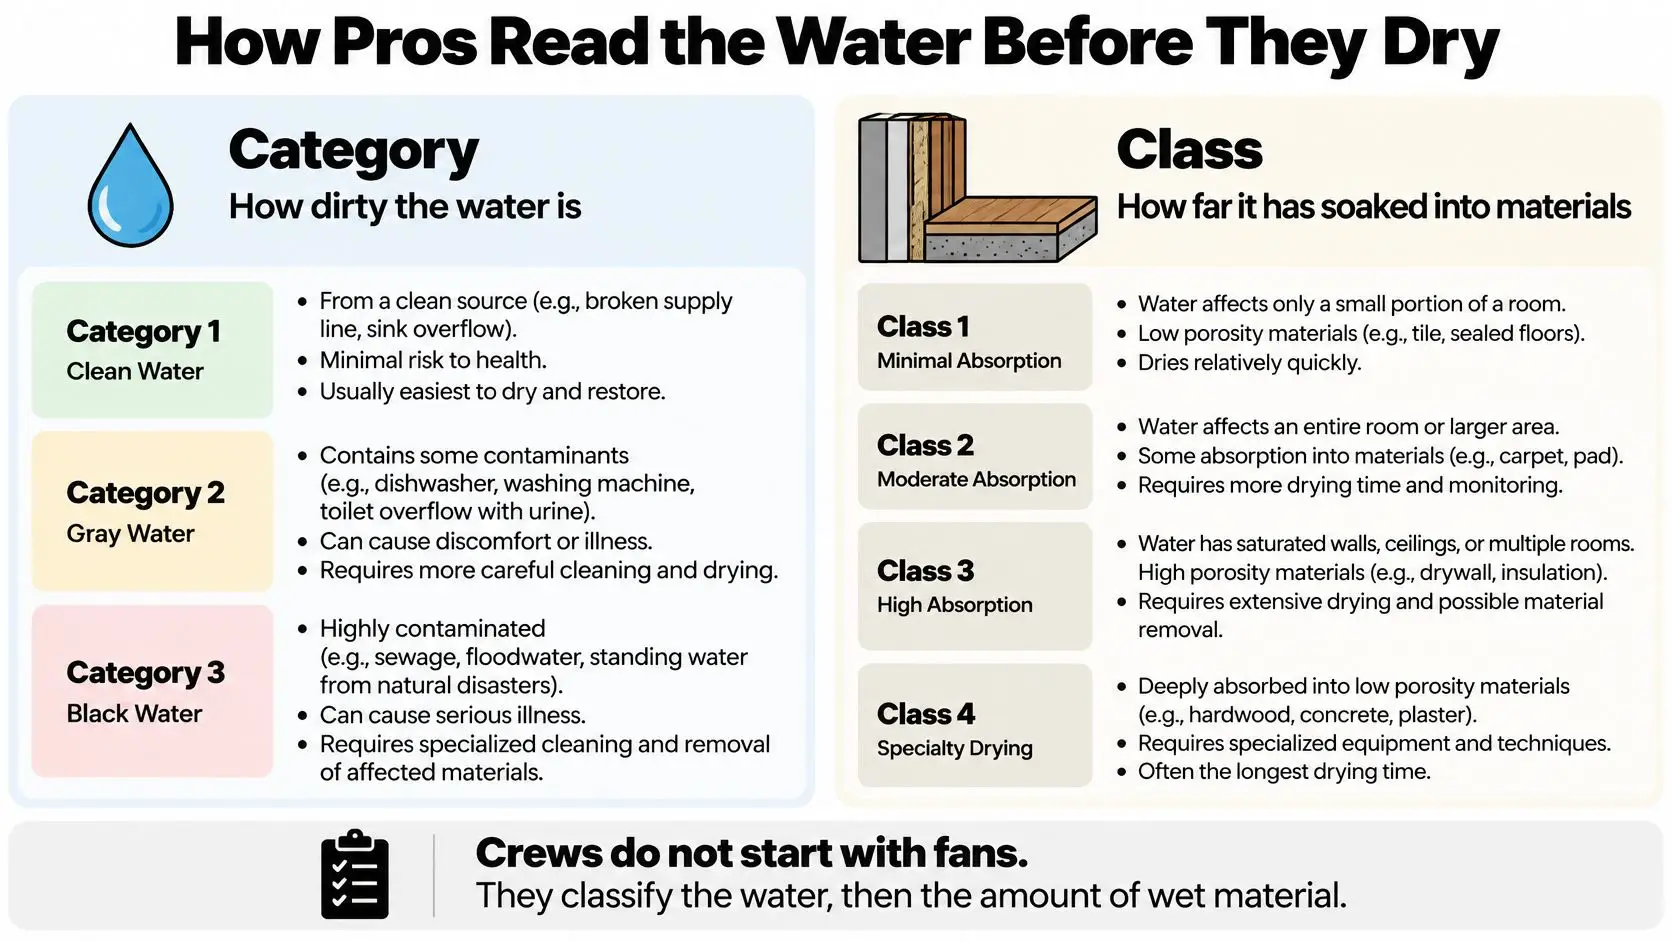
| Category | Typical sources | Response | Porous materials |
|---|---|---|---|
| Category 1 clean water | Supply line breaks, many appliance leaks, some uncontaminated rain | Stop the source, extract, clean, and dry with airflow and dehumidification | May be saved if cleaned and dried in time, still lost if they stay wet |
| Category 2 gray water | Washing machine discharge, dishwasher leaks, toilet overflow with urine | Heavier cleaning and PPE, more removal than a clean leak | Often partly replaced |
| Category 3 black water | Sewage, floodwater, rising groundwater | Remove contaminated drywall and insulation, don't use fans in a way that spreads bacteria | Most soaked porous items are discarded |
A broken supply line is usually the simplest case, but simple doesn't mean automatic. Clean water that sits in carpet pad or wall insulation for days can still ruin those materials. The category tells the crew how to clean. The readings tell them whether drying is working.
This short walkthrough shows how a technician reads a wet room before equipment goes in.
If you're curious what those numbers mean on site, this plain language guide to moisture meter readings for wet materials explains how a pin meter reading compares with a dry control area. That comparison is what turns a guess into a drying goal.
The Safety Gate Comes First
Water and electricity override every schedule. The CDC floodwater safety guidance advises turning off electrical power when standing water or fallen power lines are present, and warns against using electrical tools or appliances while standing in water. If reaching the main breaker requires entering standing water, the CDC recommends calling an electrician.
That rule can pause extraction or demolition until the site is safe. A fast arrival doesn't change it, and neither does a hoped for finish date.
The ANSI/IICRC S500, first published in 1994 and updated through a fifth edition in 2021, is the framework behind this evaluation step. It's why you should expect classification, inspection, and documented drying instead of an improvised mop up. The category chosen on day one decides whether the job proceeds with controlled airflow or starts with removal.
Extraction Drying and Daily Moisture Checks
Drying works as a chain with three links. Extraction removes the liquid mass you can pump or vacuum out. Airflow speeds evaporation off wet surfaces. Dehumidification pulls that vapor out of the room air so evaporation can keep going.
Remove any link and the chain stalls. Fans without dehumidification push moisture into the air until the air can't hold more, like a wet blanket over the room. A dehumidifier without extraction spends days fighting standing water that a pump could've removed in an hour.
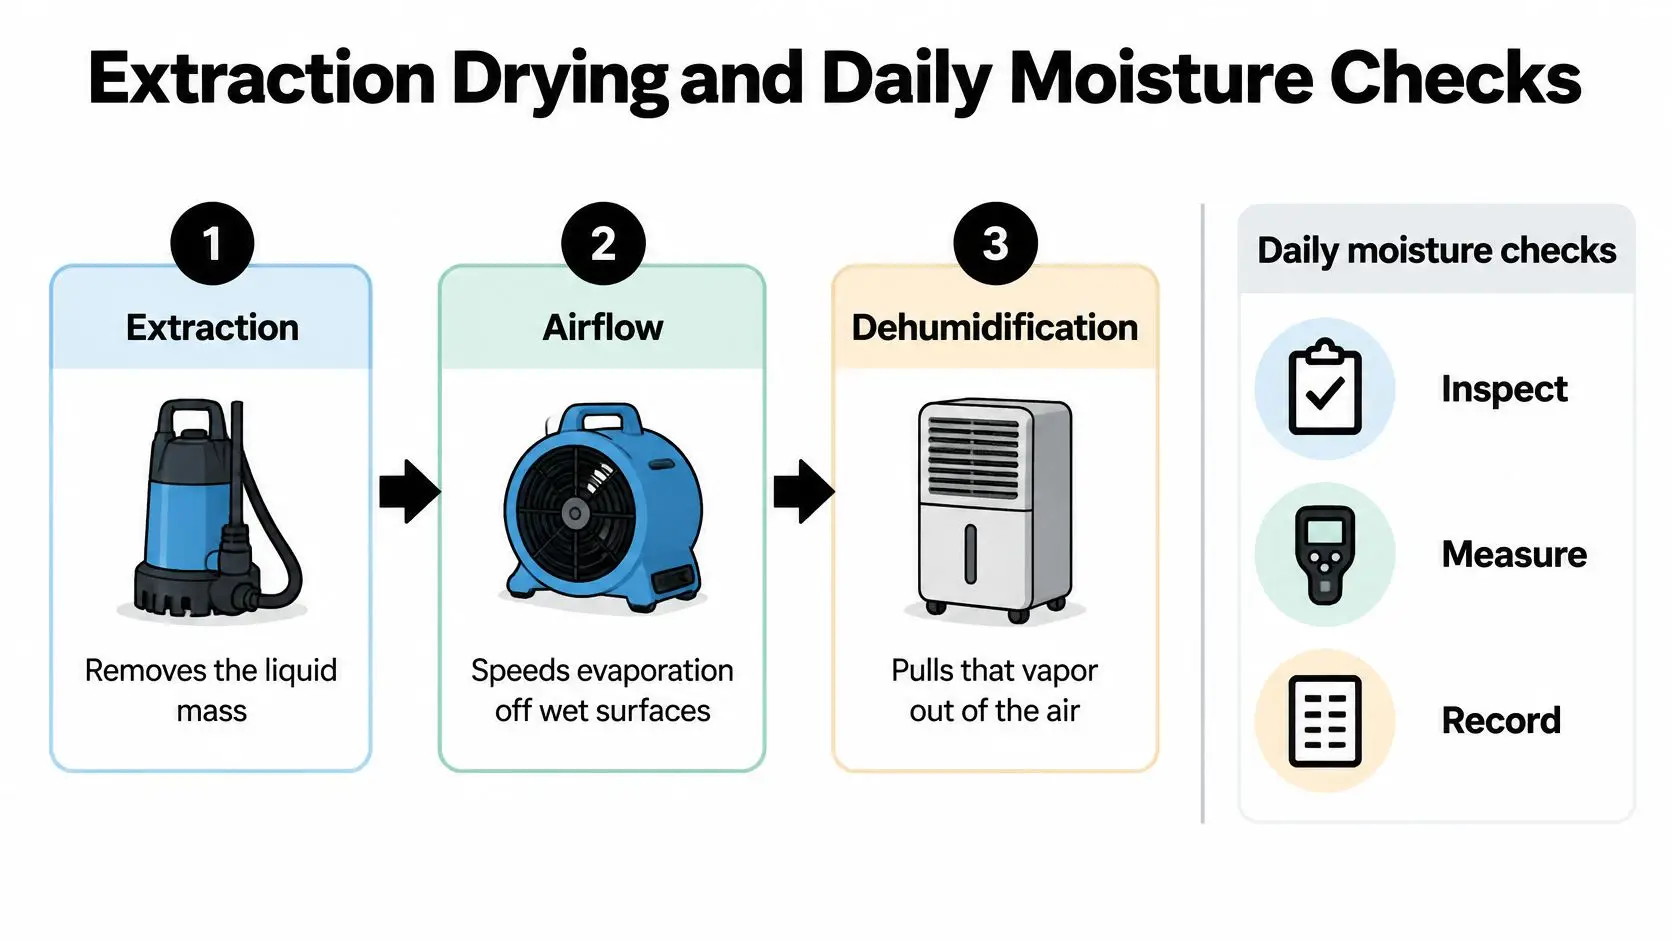
The EPA mold and moisture resource guidance recommends water extraction followed by dehumidifiers and fans, with outdoor ventilation used only when exterior conditions support drying, and maintaining indoor relative humidity below 60% to help prevent mold growth. That humidity target matters in the Phoenix metro during monsoon season or in homes with evaporative cooling, where indoor air can carry a heavy moisture load even when the desert outside looks dry.
The Field Routine in Order
- Confirm safety and stop the source. Power hazards are cleared and the leak is shut off or isolated before hoses go in.
- Extract standing water. Crews pull water from floors, carpet, and carpet backing with pumps and weighted extraction tools.
- Map the moisture. Technicians check the open room, under flooring, and inside wall cavities, plus a dry control area for comparison.
- Set equipment for the materials. Air movers and dehumidifiers are placed for the assemblies involved, with gentle heat and airflow on clean wet wood.
- Keep fans away from contamination. Air movers aren't placed where sewage or floodwater would be blown through the space.
- Record conditions every visit. Temperature, relative humidity, and material moisture go into the log with the date.
- Remove equipment on readings, not appearance. Machines come out when affected materials meet the drying goal, not when a surface merely feels dry.
Some steps are quick. Step two on a small kitchen leak may take an hour with a portable extractor. Step seven is where patience pays, because dense materials like a hardwood floor over a wood subfloor release moisture slowly and need repeat checks at the same marked points.
What a Normal Visit Looks Like
Expect hoses on day one, then a quieter pattern. A technician arrives with a moisture meter and a hygrometer, checks the marked points, empties or checks dehumidifier drainage, and adjusts an air mover if a corner is lagging. You'll get a short update on which readings fell and which didn't.
You'll also be asked to leave equipment running and keep doors to the drying area managed as directed. Turning machines off at night because they're loud resets the humidity balance and stretches the job. If noise is a real problem, say so, and the crew can discuss placement rather than losing a full night of drying.
Walls aren't closed because they look dry. They're closed because the readings say the assembly is dry.
Wood gets prompt dehumidification, gentle heat, and airflow after clean water. Moldy or persistently wet absorbent materials, such as carpet backing and ceiling tile, may need removal if they can't be cleaned and dried completely. The instrument checks across wet and control areas are what separate those two outcomes.
When Owners Can Run Fans Themselves
There's a case where your own fan helps. Say a small supply line leak wets a hard floor, you've stopped the source, and you've removed the standing water with a wet vacuum. A fan pointed across that wet surface, exhausting toward the outside rather than into occupied rooms, speeds evaporation while you wait for an inspection.
Keep it simple and contained. Dry the surface you can see, keep people and pets out of the wet area, and don't pull up flooring or cut drywall to chase water you can't measure. This overview of using fans safely after water damage covers placement basics for that clean water situation.
Four Stop Signs
- Gray or black water is involved. Sewage, floodwater, or an unknown source means no fans until a professional has assessed the contamination, because airflow can spread bacteria through the space.
- Water is near power. Standing water around outlets, cords, or the breaker panel means you leave the power question alone and call an electrician.
- Walls, insulation, or subfloor are wet. You can't judge a wall cavity by touch, so don't close or paint over a surface just because it looks dry.
- Outdoor air is humid. Ventilation helps only when outside conditions support drying, and monsoon air can add moisture faster than a fan removes it.
The threshold is straightforward. If you don't know the water category, or the wet area isn't shrinking under airflow, the job has moved past owner level drying. A full moisture map will show whether you're drying the building or only drying the surface.
What Can Be Saved and What Must Go
Think of a soaked suitcase. The hard shell can be wiped down and dried until you'd trust it again. The paper packed inside that stayed wet can't be made trustworthy, no matter how long it sits in the sun. Building materials split the same way.
| Material | After clean water | After sewage or floodwater |
|---|---|---|
| Carpet and pad | Carpet sometimes cleaned if wetting was brief, pad usually removed | Both usually discarded |
| Drywall | May dry if the cavity is opened and readings fall | Remove and discard contaminated drywall |
| Insulation | Often replaced once wet, especially cellulose | Remove and discard |
| Ceiling tile | Usually replaced | Discard |
| Hardwood flooring | Often dried in place if not swollen or delaminated | Usually removed if contaminated |
| Subfloor | Dried and measured, replaced if swollen or decayed | Replaced when contaminated or structurally compromised |
| Mattress, upholstery, paper | Poor salvage odds once saturated | Discard |
No single rule saves or scraps every item. The CDC disaster cleanup guidance states that porous materials that cannot be adequately cleaned or dried may need to be discarded, including some drywall, insulation, rugs, mattresses, carpeting, upholstered furniture, and paper products, and it specifically advises removing and discarding drywall and insulation contaminated with sewage or floodwater. Contamination, porosity, and whether complete cleaning and drying are feasible drive the decision.
Reading the Table Like a Technician
Carpet is the classic split decision. After a brief clean water wetting, the carpet itself may be cleaned and dried, but the pad underneath holds water against the subfloor and usually comes out. Leave a saturated pad in place and you've left a wet sponge under a clean looking surface.
Drywall depends on access and readings. If you're weighing a small clean leak, this explanation of whether wet drywall can dry in place walks through when opening the cavity makes sense. If the cavity can't be opened or readings won't fall, removal stops being optional.
Hardwood and subfloors sit at the other end. Solid wood that isn't swollen, cupped, or contaminated after clean water can often be dried in place with floor drying mats and dehumidification. It still gets meter checked before any finish or new flooring goes back over it.
Consider a Phoenix edge case. Monsoon water pushes under a garage door and wets the bottom of the wall shared with the house. The painted surface dries within a day in the heat, so it looks finished. Behind the baseboard, the insulation is still holding water against the bottom plate, and only a meter reading or a small inspection opening reveals it.
Ask one question before any demolition. What reading or contamination finding makes this piece unrestorable?
A crew that can answer that question with a number or a category is making a defensible decision. A crew that can't may be removing too much or too little.
Photos Moisture Logs and the Insurance File
Documentation isn't paperwork saved for the end. It's built while the work happens, because once wet drywall is in a dumpster, the file is the only proof of what was there. A complete record lets an adjuster, a contractor, and you look at the same loss and reach the same understanding.
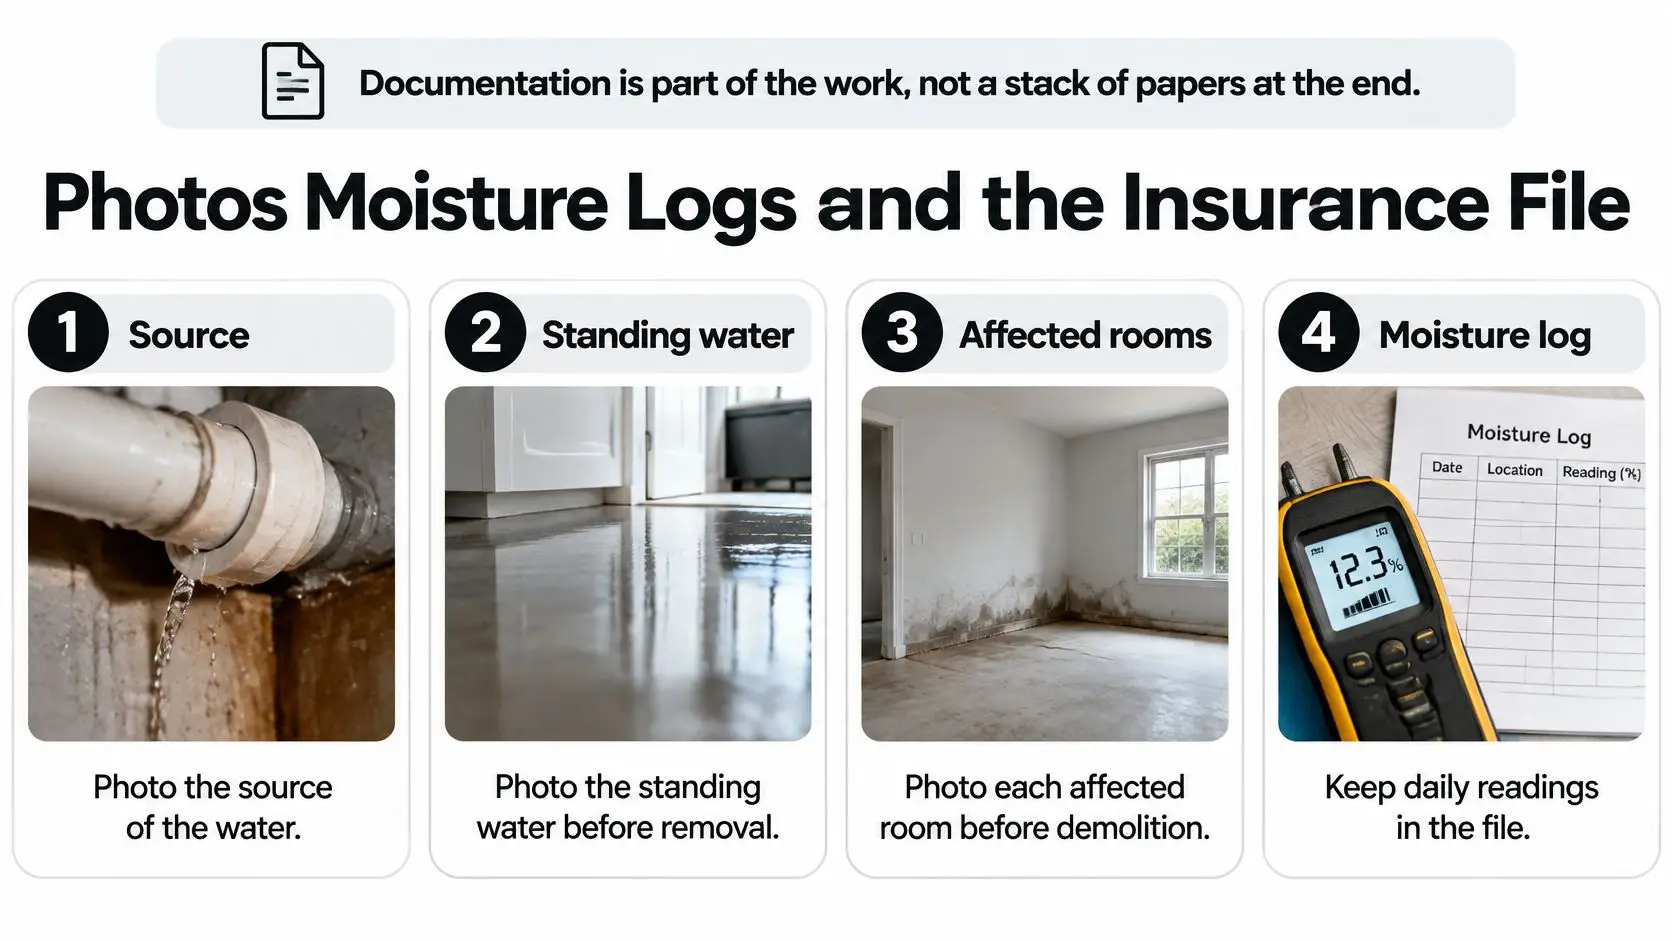
Expect photos of the source, the standing water, and each affected room before demolition. Expect a moisture map with readings from wet areas and a dry comparison area, a visit log with dates, and an inventory of contents moved, cleaned, or discarded. A written scope should separate emergency mitigation from later repairs so the two budgets don't blur together.
A Simple File Routine
- Photograph first. Capture each room and material before anything is thrown away.
- Save the cause. Keep the failed supply line, valve, or a photo of the storm entry point.
- Keep every log dated. Temperature, relative humidity, and material moisture only help if they're tied to a day.
- Match disposal to photos. Every discarded material should appear in an earlier picture.
- Ask for the rebuild trigger. Find out which readings allow reconstruction to start.
This documented workflow has a history. The ANSI/IICRC S500 standard describes restoration procedures and precautions covering evaluation of the loss, extraction of bulk water, drying of structural assemblies and contents, cleaning, and documentation of results. That structure is why consistent inspection and record keeping are the professional norm rather than extra credit.
For a practical checklist you can start today, see this guide to insurance claim documentation for water losses. It helps an insurer understand the loss, but it doesn't decide coverage, payment, or price. Mitigation can still start before an adjuster visit when waiting would worsen the damage, and the log shows everyone exactly what was done and why.
Start With a Safe Call in the Phoenix Area
If water is still flowing and the shutoff is safe to reach, stop it now. If the floor is wet near outlets or the breaker, don't wade in to solve the power question yourself. Leave that call to a qualified electrician, then get the building inspected instead of guessing from a dry looking surface.
Restore Heroes is IICRC certified, licensed, bonded, and insured. Our certified professionals assess the extent of the damage, develop a customized restoration plan matched to the water category, and make sure all moisture is properly removed, checking progress with moisture readings rather than appearance. We offer a free onsite estimate and a free inspection, available 24/7 through our contact form or by calling 480-690-5277.
If you're comparing providers, this page on choosing a water damage restoration contractor in the Phoenix area explains what an onsite assessment should cover. Restoration businesses reading this who field emergency calls around the clock can also handle restoration calls with Mercateer so an after hours leak reaches a person instead of voicemail.
Keeping mitigation, drying, and later repairs with one team keeps the moisture log and the rebuild scope in a single file. That continuity matters when an adjuster asks why a material was removed three weeks earlier.
The visit has honest limits. It doesn't promise insurance coverage, a payment amount, a price, or a finish date, because water category, hidden moisture, and site hazards change the work. What you get is a mapped loss, a plan matched to the water, and readings you can follow until the building is ready to close up.
If you're standing in a wet room anywhere in the Phoenix metro, Restore Heroes can map the moisture, extract the water, dry the structure to documented readings, and carry the repairs that follow. You don't have to guess whether a dry looking wall is safe to close. Visit Restore Heroes to request your free onsite inspection and get a plan built around your loss.