When you find water in your home, the first thought that rushes through your mind is almost always, how long is this going to take to fix? It’s a completely understandable question. While every situation is a little different, most residential water damage restoration projects fall somewhere between a few days and several weeks.
The key is to think of it less like a quick fix and more like a carefully managed process. It's a marathon, not a sprint, with specific stages designed to bring your home back to its pre-damage condition safely and thoroughly.
Breaking Down The Water Damage Restoration Timeline
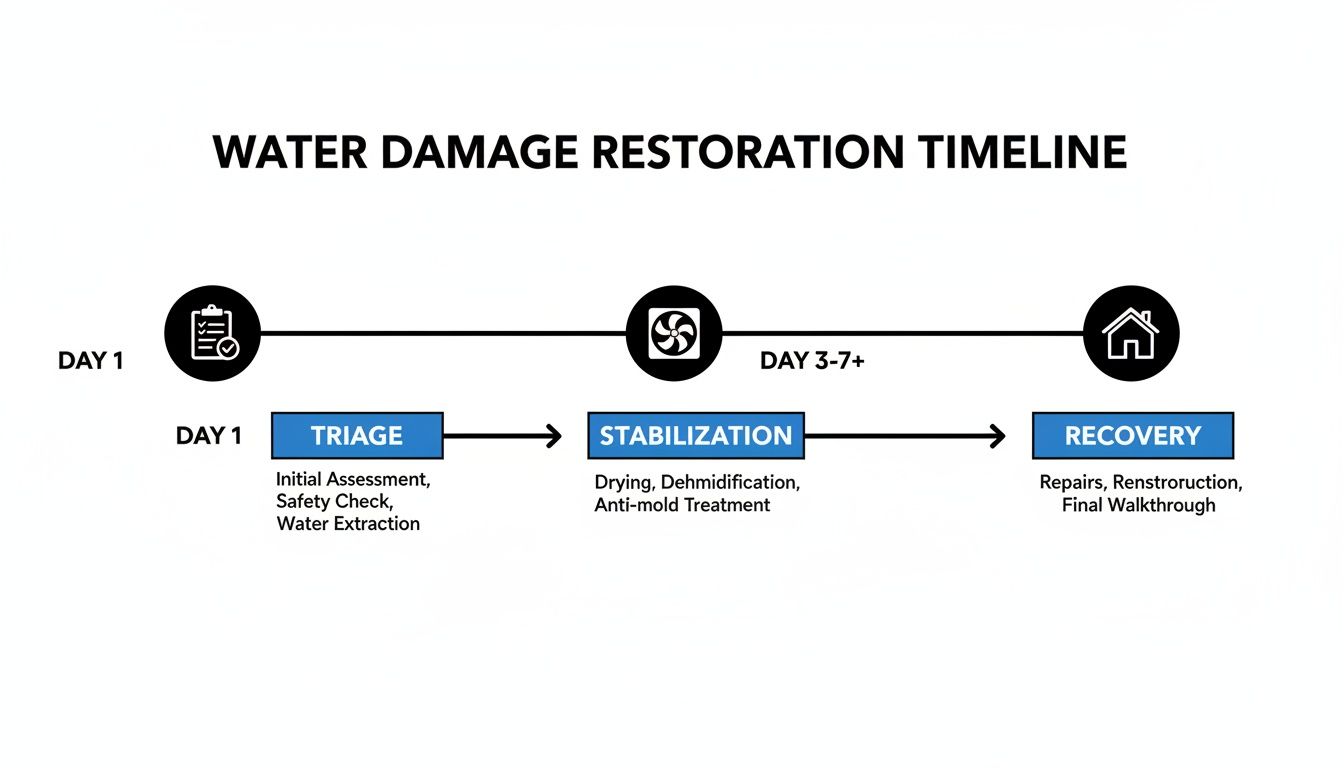
Think about the process like a medical response. First, there's triage to assess the situation and stop the bleeding. Then, you stabilize the patient to prevent things from getting worse. Finally, you move into the recovery phase to heal and rebuild.
This is exactly how professionals approach water damage. It’s about more than just soaking up puddles and aiming a fan at a wet spot. It's a scientific process of extracting water, properly dehumidifying the structure, and repairing what was lost. The real goal isn't just to make things look dry—it's to make them structurally sound and safe from future problems, like mold.
The Three Core Phases Of Restoration
The journey from a water-logged mess back to a comfortable home can be broken down into three main stages. Each one is built on the one before it, ensuring nothing gets missed.
- Triage (Emergency Response & Assessment): This is the "stop the damage" phase. Technicians arrive, find and stop the source of the water, and get a clear picture of how far it has spread. This critical first step typically happens within the first 24 hours.
- Stabilization (Mitigation & Drying): Once the situation is understood, the focus shifts to stabilization. This means removing all standing water and setting up high-powered equipment like industrial air movers and dehumidifiers. This active drying stage is often the longest part of the initial response, usually taking 3-5 days.
- Recovery (Repairs & Reconstruction): After monitoring equipment confirms everything is appropriately dry, the rebuilding can begin. This could be as simple as replacing a section of drywall or as complex as installing new flooring and cabinetry. The timeline for this phase can vary the most.
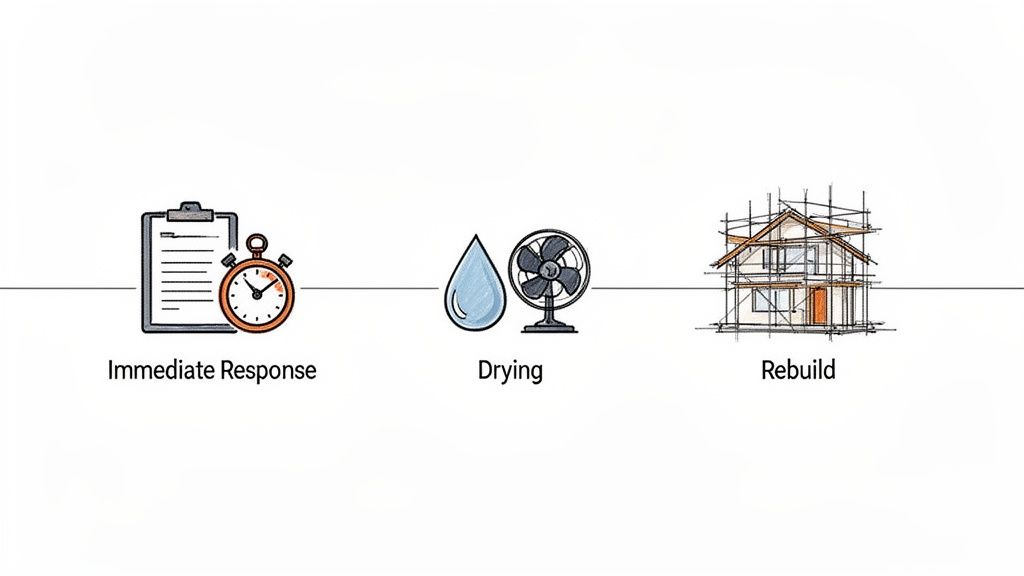
This simple, three-part approach is the foundation of any professional restoration job.
As you can see, the process moves logically from immediate damage control to the final, detailed work of putting your home back together.
What To Expect For Different Scenarios
To give you a clearer picture, here’s a quick look at how timelines can differ based on the severity of the water damage. Keep in mind these are just estimates—every job has its own unique challenges.
| Estimated Restoration Timelines by Damage Level |
|---|
| This table provides a general overview of potential restoration timelines for common water damage scenarios. These are estimates and actual times can vary. |
| Damage Scenario | Typical Mitigation Time (Extraction & Drying) | Typical Repair Time | Estimated Total Time |
|---|---|---|---|
| Minor Leak (e.g., sink overflow) | 1-3 Days | 1-5 Days | 2-8 Days |
| Burst Pipe (affecting one room) | 3-5 Days | 1-2 Weeks | 1.5-3 Weeks |
| Significant Basement Flood | 4-7 Days | 2-4 Weeks | 3-5 Weeks |
| Major Storm/Flood Damage (multiple levels) | 1-2 Weeks | 4-8+ Weeks | 1-3+ Months |
Again, these are just ballpark figures. Factors like material types, demolition needs, and insurance approvals can all influence the final timeline. The most important thing to remember is that the initial mitigation—stopping the water and starting the drying—happens fast to prevent any further issues.
The Critical First 72 Hours, Day by Day
When your home is hit with water damage, how quickly you act makes all the difference. Those first three days are a sprint against the clock to prevent much worse problems, like rot and mold, from setting in. Knowing what to expect day-by-day can take a lot of the stress and mystery out of the situation.
Think of this initial phase less like a renovation and more like a visit to the ER for your house. The first job isn't to rebuild; it's to stabilize everything and stop the damage from spreading.
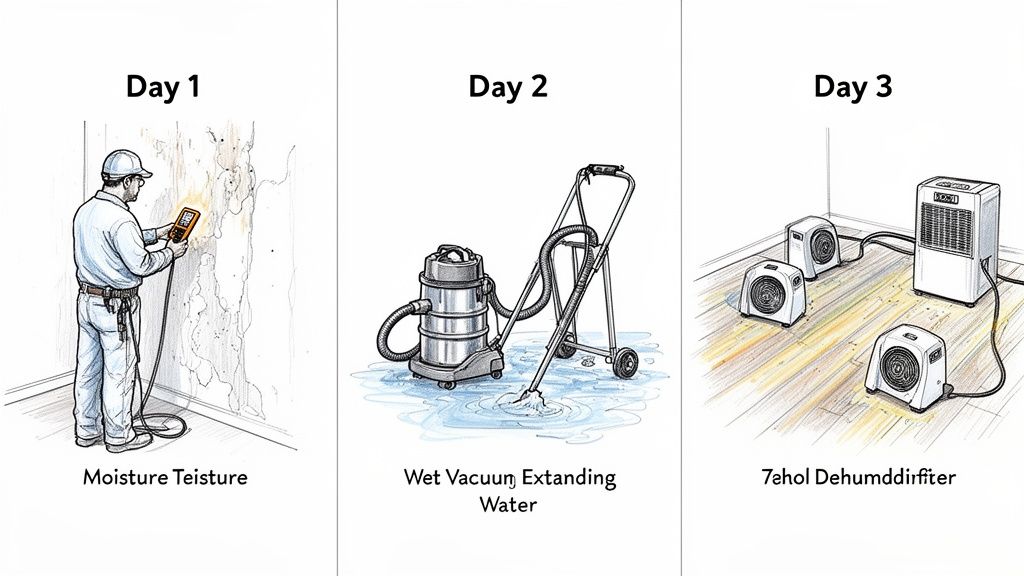
Day 1: Emergency Response and Assessment
The moment a team arrives, their first priorities are making the area safe and figuring out exactly what they're dealing with. This initial 24-hour period is all about moving from chaos to a controlled, methodical game plan.
First things first, they find and stop the source of the water if you haven't already. Then, they begin a thorough inspection to grasp the full extent of the damage. This goes way beyond just looking around—they use specialized tools like moisture meters and thermal imaging cameras to see what the naked eye can’t.
These instruments help them answer some crucial questions:
- Where did the water go? It can sneak up inside walls or seep under floors, completely hidden from view.
- What's actually wet? They need to know if the damage is limited to carpet and drywall or if it has reached the subfloor and framing.
- What kind of water is it? It is classified as Clean, Gray, or Black. This tells them what safety gear to use and which cleaning methods are required.
Once they have these answers, they map out a detailed drying strategy and start the first mitigation steps right away.
Day 2: Water Extraction and Setting Up Equipment
With a solid plan in place, day two is about one thing: aggressive water removal. The goal is to pull every last drop of standing water out of the property before it can soak deeper into porous materials like wood and drywall.
Heavy-duty equipment is brought in for this—powerful, truck-mounted extractors and submersible pumps that can remove massive amounts of water in a hurry. They're far more powerful than any shop vac you could rent.
The faster standing water is removed, the less time it has to saturate your home's structure. This single step is huge for preventing long-term issues and can seriously shorten the overall drying time.
After the water is gone, a professional drying system is immediately set up. This involves strategically placing high-velocity air movers (think industrial-strength fans) and commercial-grade dehumidifiers. The fans push moisture from the wet surfaces into the air, and the dehumidifiers pull that moisture right out. For a deeper dive into this, our guide on how to dry out a flooded basement breaks down the basics.
Day 3: The Active Drying Process Kicks In
By the third day, the real science of drying is underway. The equipment is now running 24/7, working to pull the deep, trapped moisture out of your home’s materials. This is where expertise in psychrometry—the science of air and moisture—really matters.
Technicians will be back on-site every day to check on the progress. They take constant readings of the temperature, humidity, and the moisture content of the affected materials to make sure everything is on track. If a spot is being stubborn, they’ll reposition fans or bring in more dehumidifiers to target it.
This active drying phase, which is absolutely essential for preventing mold, usually takes 3 to 5 days for a typical situation. Standing water is usually removed within the first 24-48 hours. This daily monitoring isn't optional; it's how a team confirms your home is being returned to a safe, dry standard, preventing hidden moisture from causing problems down the road.
What Can Slow Down (or Speed Up) Your Restoration Timeline?
So, we've seen that the first 72 hours are a flurry of activity, but what makes one job wrap up in a week while another stretches into a month? The simple truth is that no two water damage situations are identical. Several key variables are at play, each one influencing the scope, complexity, and ultimately, how long your water damage restoration will take.
Knowing what these factors are helps set realistic expectations from the get-go. Think of it like a road trip: your fully restored home is the destination, but the ETA depends on the route you have to take, how much traffic you hit, and any unexpected detours along the way.
The Category of Water Involved
One of the biggest factors is the kind of water involved. In the restoration world, water is classified into three categories based on its contamination level, following standards from the IICRC (Institute of Inspection, Cleaning and Restoration Certification).
- Category 1 (Clean Water): This comes from a sanitary source, like a broken water supply line or a sink that overflowed. Since it poses no immediate health risk, the cleanup is usually much faster and more straightforward.
- Category 2 (Gray Water): This water is a bit murky, containing some level of contamination. Think of water from a washing machine overflow or a leaky dishwasher. It might have soaps or bacteria, which means the process must be more thorough with cleaning and disinfection.
- Category 3 (Black Water): This is the most serious. It's grossly contaminated water from sources like a sewage backup or river flooding. Black water can be filled with dangerous pathogens and requires strict safety protocols, which can significantly extend the timeline.
Bottom line? The dirtier the water, the longer and more intensive the cleanup. A black water job often requires the removal of more building materials and deep sanitation, adding a good chunk of time to the project.
How Far the Damage Spread and What Got Wet
The sheer scale of the problem is another huge driver of the timeline. A small leak contained to one corner of a room is a world away from a flood that has soaked multiple floors of your home. The more area that needs to be covered, the more time is needed for water extraction, drying, and the final repairs.
But it’s not just about square footage. The type of materials that got wet is just as important. Different materials absorb and release moisture at very different speeds.
Porous materials like drywall, carpet, insulation, and unfinished wood are like sponges—they soak up water in a flash. On the other hand, dense materials like concrete, hardwood floors, or plaster take much, much longer to dry out completely.
For example, a saturated concrete slab in a basement might need weeks of continuous, targeted dehumidification to get back to a safe moisture level. Compare that to a soaked area rug, which can often be dried or just replaced in a few days. Getting that hidden moisture out of dense materials is a big reason why the drying phase can take longer than people expect. And if you let it stay wet, you’re inviting other problems. You can learn more about the risks of mold damage and see why getting professionally dry is so critical.
Delays That Are Out of Our Hands
Even with the best crew and top-of-the-line equipment, some things can pop up that are simply outside of a team's direct control. These logistical hurdles can easily add days or even weeks to the schedule.
Property Access: Can technicians get into the property whenever they need to? Limited access can really slow down the daily moisture monitoring and equipment checks that are essential to the drying process. It's always easier to work in a vacant home than one where a team has to navigate around furniture and family life.
Insurance Adjustments: The insurance claims process can sometimes become a waiting game. Before major repairs can start, an adjuster usually has to come out, inspect the damage, and approve the plan. Just lining up schedules and waiting for that official green light can put the project on pause, especially before the reconstruction phase.
Permit Requirements: If the damage is severe and requires major structural repairs—like replacing big sections of drywall or rebuilding parts of the home's frame—it might be necessary to get permits from the city. The application and approval timeline for building permits can vary wildly and adds an unavoidable waiting period.
When you understand these key variables—the water, the materials, and the external factors—you get a much clearer picture of what your specific restoration journey will look like. It helps explain why there's no single, simple answer to the question, "how long will this take?"
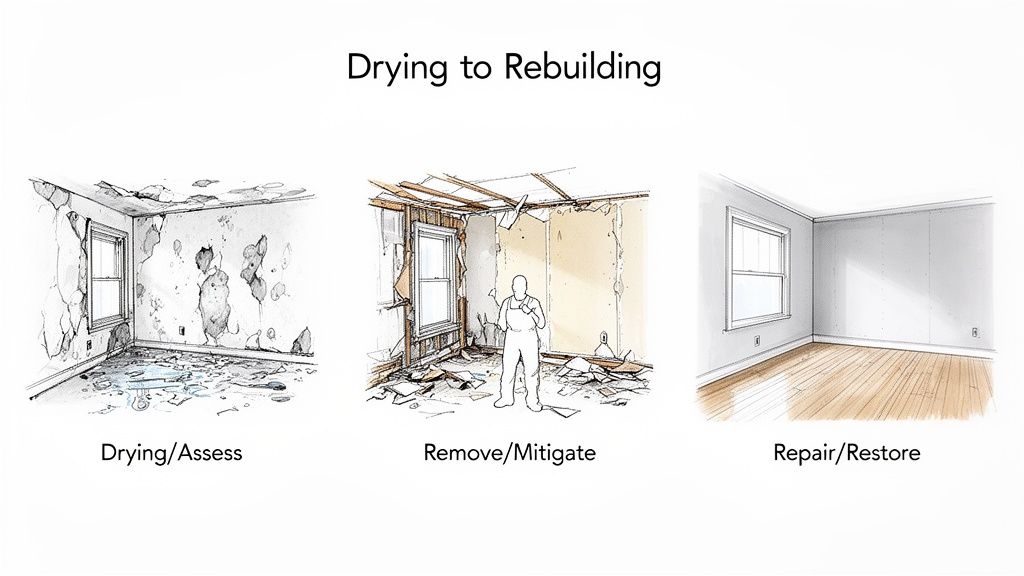
From Drying to Rebuilding: The Full Restoration Process
When the industrial fans finally power down and the house falls silent, it's a huge relief. It feels like the ordeal is over. But while the most critical drying work is done, that’s really only halftime. Now the process pivots from damage control to the actual rebuilding—the meticulous process of putting your home back together.
It's helpful to think of it as a two-act play. The emergency response and drying was Act I, the frantic, behind-the-scenes work to stabilize the situation. The rebuilding is Act II, where skilled craftspeople take the stage to restore your home, making sure every detail is right before the final curtain call. This is the part where your house truly starts to feel like your home again.
Clearing the Way for a Fresh Start
Before a single new board is installed, the old must be cleared out. This isn't a wrecking ball demolition; it’s a surgical removal of anything too damaged to be saved. The goal is to create a clean, solid foundation to build upon.
This almost always means removing materials that just can't be salvaged after being saturated. Common culprits include:
- Drywall: Once the paper and gypsum core of drywall get soaked, the material gets soft and crumbly. More importantly, it becomes a perfect breeding ground for mold.
- Insulation: Wet insulation is useless. It clumps together, loses all its insulating ability (R-value), and can trap moisture inside your walls for months, creating a hidden problem.
- Flooring: Things like carpet, the underlying pad, and laminate flooring are usually a total loss. Water causes them to warp, break down, and trap contaminants.
As these materials are removed, technicians also treat the exposed framing and subfloor with antimicrobial agents. This is a crucial preventative measure to stop any potential mold before it can even think about starting. It’s about making sure your home is healthy from the inside out.
Rebuilding Your Home, Step by Step
With the damaged materials gone and the area treated, the real rebuilding can get underway. The timeline here can vary wildly. A small patch of drywall might be done in a day, but rebuilding a kitchen or bathroom could easily take several weeks.
It's a carefully sequenced process. You can’t have the painters show up before the drywallers are finished, and the drywall can’t go up until the new insulation is in.
Think of it this way: you can't paint a wall before the drywall is installed and mudded. Every step in reconstruction has to happen in the right order. It's this methodical approach that helps ensure a quality, long-lasting repair.
A typical rebuilding sequence looks like this:
- Structural Repairs: First things first. Any compromised wood framing, subfloors, or other structural elements are repaired or replaced to ensure your home is solid.
- Insulation and Drywall: With the structure sound, new insulation is installed. Then, new drywall is hung, taped, and finished to create perfectly smooth surfaces.
- Painting: After the drywall joint compound has had time to cure properly, primer and fresh coats of paint are applied to bring the room back to life.
- Flooring Installation: New flooring goes in next, whether it’s carpet, tile, vinyl, or hardwood.
- Finishing Touches: This is the final step. Baseboards, trim, doors, and any cabinets or fixtures that were removed are reinstalled, putting the last pieces of the puzzle into place.
Each of these stages requires skill and, often, time for materials to dry or cure. This disciplined, step-by-step method helps see that your home isn't just patched up, but truly restored to the way it was before.
Navigating the Insurance Process
When your home is underwater, the last thing you want to think about is paperwork and phone calls. But dealing with your insurance company is a huge part of the recovery process, and honestly, it’s often a major factor in how long water damage restoration will take.
The good news is you don’t have to go it alone. A little preparation on your end, combined with the expertise of a professional restoration team, can make all the difference. The goal is to avoid delays by giving your insurance provider a clear, well-documented story of what happened.
Your First Steps: Documentation is Key
As soon as you find the water—and after you’ve ensured the source is stopped—it’s time to switch into detective mode. Before a single thing is moved or thrown away, start documenting everything. This initial evidence is pure gold for your insurance claim.
Here's what you should capture:
- Photos and Videos: Don't just take one or two pictures. Get wide shots of every affected room, then move in for close-ups of saturated carpets, warped baseboards, and ruined furniture. A video walkthrough where you talk through what you're seeing is even better.
- Detailed Inventory: Start a list of everything that's been damaged. For each item (think couches, TVs, books, clothes), write down what it is, roughly how old it was, and what condition it was in before the water hit.
- A Written Log: Grab a notebook and start a running log. Note the date and time you found the leak, what caused it, and keep track of every call you make to your insurance agent and the restoration company.
Think of it this way: the more proof you have, the fewer questions the insurance adjuster will need to ask. This simple act of record-keeping can shave significant time off your claim's approval process.
Working with Your Insurance Adjuster
Soon after you file a claim, your insurance company will assign an adjuster to your case. Their job is to visit your home, assess the scope of the damage, and determine what your policy covers. This is where a professional restoration company can be a valuable partner.
Restoration pros often work directly with insurance adjusters. They speak their language and can provide the hard data needed to approve the work, including:
- Moisture Readings: They use professional-grade moisture meters and thermal cameras to generate reports showing exactly where the water went—even inside walls.
- Drying Logs: Teams keep daily records that track the drying progress, proving that they’re hitting industry-standard goals and not just guessing.
- Professional Estimates: They create a detailed, line-by-line estimate for the entire job using specialized software that adjusters know and trust.
This direct, professional-to-professional communication can be a game-changer. It eliminates guesswork and helps ensure the scope of work is approved correctly, preventing the kind of back-and-forth that can stall a project for days or weeks.
By acting as your advocate, a certified restoration company can help get the green light faster. This partnership keeps the project moving forward, which means you get your home—and your life—back to normal that much sooner.
How to Know the Job Is Truly Complete
When the last fan is switched off and the crew drives away, it’s easy to breathe a sigh of relief. But how can you be absolutely certain the job is done right? A truly finished project isn't just about fresh paint and new floors—it's about confirming your home is structurally dry and safe from future problems.
A home that looks repaired on the surface can still hide moisture deep inside walls or under flooring. That’s why professionals don’t just rely on a visual inspection. Real completion is verified with science.
It's All About the Numbers
The only surefire way to know the restoration is complete is to verify that all the waterlogged materials have hit their drying goals. This isn't just a hopeful guess; it’s a specific, measurable target.
Technicians use professional moisture meters to test everything from wood studs and subfloors to drywall. They compare these readings to the moisture levels in an undamaged part of your house, which gives them a "dry standard" or baseline. When the affected areas are back to that normal baseline, the job is done.
A home that looks dry isn’t necessarily structurally dry. Hidden moisture is a breeding ground for mold and rot. The best way to be certain is to rely on the data from moisture meters, not just what you can see or feel.
Trust Your Senses: The Final Checks
While instruments give us the hard data, your own senses are fantastic for that final gut check. A properly restored home should look, feel, and smell exactly like it did before the water damage ever happened.
When you do the final walkthrough with a project manager, keep an eye (and nose) out for these clues:
- No Musty Smells: A lingering damp or musty odor is a huge red flag. It’s a tell-tale sign that moisture is still trapped somewhere, creating a perfect environment for mold. If you're concerned about this, our guide to professional mold removal has more info.
- Normal Air Feel: The air in the restored area shouldn't feel heavy, sticky, or humid. It should feel just as dry and comfortable as the air in any other room in your house.
- A Clean Visual Finish: Take a close look at the craftsmanship. Drywall patches should be invisible, baseboards should be flush, and floors should be perfectly flat without any signs of buckling or warping.
The Final Walkthrough Is Key
Think of this last tour as your chance to get total peace of mind. Ask questions. Point out anything that doesn't seem quite right. A reputable restoration team will be happy to walk you through everything, show you the final moisture readings, and make sure you’re completely satisfied.
This final step is what truly closes the book on the water damage incident, giving you the confidence to move forward knowing your home is safe, dry, and fully back to normal.
Your Top Questions About the Restoration Timeline Answered
Even with a roadmap, you're bound to have questions about what this all means for your day-to-day life. We get it. Here are some straightforward answers to the questions we hear most often from Phoenix homeowners dealing with water damage.
Can I Live in My House While You Work?
For smaller leaks that are caught early and contained to one room, you can usually stay put. But if we're talking about major damage affecting large areas of your home, or if you're dealing with contaminated Category 3 water, it’s often safer and frankly, more comfortable, to find a temporary place to stay. The noise alone from all the drying equipment can be pretty disruptive.
Why Do Those Fans and Dehumidifiers Have to Run 24/7?
This is a big one. That equipment needs to run nonstop because it is pulling moisture out from deep inside materials like your wood studs and drywall. If it's turned off, even for a short time, that moisture immediately starts to settle back in. It’s a huge setback that not only prolongs the drying process but also creates the perfect environment for mold to take hold.
Think of it this way: constant operation is the only way to win the race against moisture. It allows the team to hit scientific drying targets efficiently, which prevents secondary damage and gets you back to normal that much faster.
Is My Insurance Going to Cover Everything?
This really comes down to your specific policy and what caused the damage in the first place. Most standard policies cover sudden, accidental events—a burst pipe is a classic example. On the other hand, damage from a slow, gradual leak or major flooding from a storm typically requires separate coverage. The best thing to do is call your insurance agent right away to get a clear picture of what your policy covers.
What Can I Do to Keep Things Moving?
Your involvement can make a huge difference in keeping the project on schedule. The biggest helps are ensuring the team has easy access to the house for daily checks, being ready to make timely decisions on repair materials (like new flooring or paint colors), and staying in close contact with the team and your insurance adjuster. Clear communication and quick decisions are the best way to avoid hitting any speed bumps.
If water has found its way into your Phoenix-area home, don't wait for the problem to get worse. The expert team at Restore Heroes is ready to go 24/7 to start the mitigation and get things back to normal, fast. We work with insurance carriers and can help you understand what's happening every step of the way. Contact us now for a free, no-obligation inspection at https://www.restoreheroesaz.com.