That sinking feeling you get when you open the basement door and see standing water is something no homeowner wants to experience. But in that moment, what you do in the first hour is critical. The key isn't just acting fast—it's acting safely. Your focus needs to be on immediate hazards, figuring out where the water is coming from, and getting a clear record of the damage before any cleanup begins.
Your First Moves After Finding a Flooded Basement
The immediate urge is to rush in and start saving things, but that’s the most dangerous mistake you can make. Water and electricity are a deadly mix, and the water itself could be hiding all sorts of hazards. A calm, step-by-step approach is your best bet for staying safe and setting yourself up for a smoother recovery.
It might feel like this only happens to other people, but a shocking 14,000 people in the U.S. deal with a water damage emergency at home or work every single day. That’s a lot of burst pipes and flooded basements. It highlights just how important it is to know what to do when it happens to you.
Assess the Situation from a Safe Distance
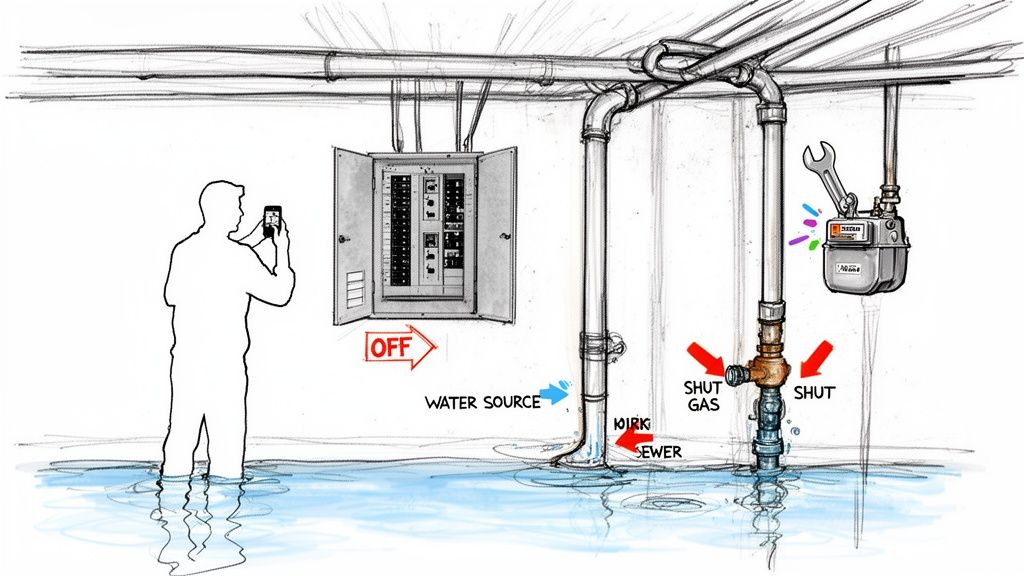
Before you even think about stepping into that water, stop. Your first move is to eliminate the risk of electrocution.
If you can get to your breaker box without walking through water, kill the main power to your house immediately. If the box is in the flooded area, don't even try. Call a licensed electrician right away—it's not worth the risk.
The same goes for natural gas. If you smell gas or even suspect a leak, get everyone out of the house and call your utility company from a safe distance. These aren't suggestions; they're essential safety rules.
This checklist breaks down those first critical actions. It's designed to help you navigate the initial shock and focus on what truly matters: safety.
Immediate Safety and Damage Control Checklist
| Action Item | Why It Is Critical | Important Note |
|---|---|---|
| Do NOT enter standing water | Electrocution is a real and present danger. Unseen debris can also cause injury. | Stay at a safe distance and assess the scene before taking any further action. |
| Shut off the main electricity | Prevents electrical shock from submerged outlets, appliances, and wiring. | Only if you can access the breaker box safely. If not, call an electrician. |
| Shut off the main gas line | Prevents potential gas leaks if floodwaters have damaged pipes or pilot lights. | Only if you smell gas or suspect a leak. Call the gas company from outside your home. |
| Stop the water source (if possible) | Prevents more water from entering and causing further damage. | This may involve shutting off the main water valve to your house for a burst pipe. |
| Document the damage | Provides crucial evidence for your insurance claim before anything is moved. | Use your phone to take extensive photos and videos from a safe vantage point. |
Once you’ve made the area safe, you can move on to the next steps with a bit more peace of mind.
Identify the Water Source
Next, try to figure out where the water is coming from. This is huge because the source tells you what you're up against in terms of contamination and what your next steps should be.
- Clean Water (Category 1): This is the "best-case" scenario, coming from a broken supply line or an overflowing tub. It’s not immediately harmful, but it can turn nasty if it sits for too long and starts growing bacteria.
- Gray Water (Category 2): Think water from a washing machine or dishwasher overflow. It's definitely contaminated with soaps and grime and can make you sick if you come in contact with it.
- Black Water (Category 3): This is the worst-case scenario. It's water from a sewer backup or overland flooding, and it’s teeming with bacteria, viruses, and other dangerous pathogens. Black water situations are a serious health hazard and almost always require professional help.
A critical takeaway: If you have any doubt, especially if the water is from a sewer line or has been standing for more than 48 hours, treat it as black water. The health risks are too high to take chances.
Document Everything Meticulously
Before you move a single box or start pumping out water, grab your phone. Take more photos and videos than you think you need. Get wide shots of the whole basement, close-ups of the water line on the walls, and shots of any damaged items. Be as thorough as possible.
This visual evidence is gold for your insurance claim. It’s your proof of what the damage looked like at its worst, which is something you can't re-create later. Once you have your documentation, you can see how professionals tackle these situations by reviewing a structured approach to restoration.
Getting the Standing Water Out of Your Basement
With the immediate dangers handled, your next priority is getting that water out. Fast. Every hour that water sits is another hour it's soaking into your foundation, framing, and drywall, creating a much bigger problem down the road. Time is absolutely not on your side here.
The right way to tackle this really boils down to how much water you're dealing with. A few puddles from a burst pipe is one thing; a few inches across the entire floor is a whole different ballgame. Choosing the wrong tool for the job will just waste critical time you don't have.
Picking the Right Tool for the Job
If you're only looking at an inch or less of water, a good old-fashioned wet/dry vacuum can be your best friend. It’s perfect for getting into corners and tight spaces. Just be ready for some serious work. That canister fills up fast, and you'll be hauling and dumping it over and over again.
A wet/dry vac is a fantastic starting point, but its limits become obvious pretty quickly. If you have to empty a 10-gallon tank 20 times just to make a dent, it’s time to bring in the heavy machinery.
For anything more than an inch or two, you need a submersible pump. You can rent one from just about any home improvement store, and they are designed to move a massive amount of water in a short time.
To get the most out of it:
- Find the deepest spot in the basement and set the pump there.
- Run a long discharge hose outside, well away from your house.
- Crucially, make sure the hose runs downhill the entire way so water doesn't just flow back in.
Pro Tip: Always drain floodwater somewhere it can't just circle back to your foundation. A storm drain or a low point in your yard far from the house is ideal. Just be sure to check local rules—and never, ever drain it into a sanitary sewer.
What About All the Mud and Gunk?
Floodwater is never clean. It's a nasty cocktail of silt, mud, leaves, and who knows what else. All that debris can easily clog up your equipment.
Here's a trick I've learned: if you're using a submersible pump, try placing it inside a 5-gallon bucket with a bunch of holes drilled in the sides. The bucket acts as a pre-filter, stopping the big stuff from getting sucked in and burning out the motor.
Once the pump gets the water level down, you'll be left with a thick layer of sludge it can't handle. Now it's back to the wet/dry vac, shovels, and buckets to get the last of the muck out. This is often the point where people realize just how big the job really is.
The sheer physical effort of hauling water and shoveling sludge can be overwhelming. When you're facing that kind of mess, calling in professional water damage restoration services is often the smartest move. You can see how an expert team deals with large-scale water damage and understand the difference that industrial-grade equipment makes.
When Is It Time to Call in the Pros?
So, how do you know when you're in over your head? Ask yourself these questions:
- How deep is the water? If you have more than a foot of water, the truck-mounted extractors the pros use will blow a rental pump out of the water.
- What kind of water is it? If there's any chance it's contaminated with sewage or groundwater chemicals (Category 2 or 3 water), you need to let professionals with the right safety gear handle it.
- Can you physically handle it? Be honest. This is back-breaking work.
Professional restoration companies use incredibly powerful, truck-mounted vacuums that can pull out hundreds of gallons per hour. That speed is your biggest ally against mold and permanent structural damage. They know exactly how to dry out a flooded basement to minimize the long-term impact.
The Critical Process of Drying and Dehumidifying
Getting the standing water out is a huge relief, but don't celebrate just yet. The real challenge is tackling the moisture you can't see—the water that has seeped into the concrete floor, soaked into the wood framing, and wicked up the drywall. This hidden dampness is a ticking time bomb for mold growth and long-term structural damage.
You might be tempted to just open up a few windows, but that can actually backfire, especially during Phoenix's humid monsoon season. Letting in damp outside air can make the problem worse. What you need is a closed, controlled drying environment that aggressively pulls moisture out of every nook and cranny.
Creating a Vortex of Dry Air
To get your basement truly dry, you need to get the air moving—and I don't mean with a few old box fans. We're talking about a strategic combination of high-velocity air movers and commercial-grade dehumidifiers. Together, they create a powerful cycle: the fans pull moisture from wet materials into the air, and the dehumidifier yanks that moisture out of the air.
Here's how it works in practice:
- Air Movers: These are not your average fans. They blast air at high speed across wet surfaces like floors and the base of your walls. This creates a low-pressure zone that dramatically speeds up evaporation, convincing trapped water to leave the materials it has soaked into.
- Dehumidifiers: As the air gets heavy with all that evaporated moisture, the dehumidifier becomes the hero. It sucks in the humid air, cools it down to condense the water vapor back into liquid, and then pumps out warmer, drier air to continue the cycle.
This one-two punch is the engine of any effective drying job. It’s a systematic process that won’t stop until your basement's structure is back to its normal, pre-flood moisture level.
While the infographic below focuses on the initial water removal, this is the phase that sets the stage for the all-important drying process that follows.
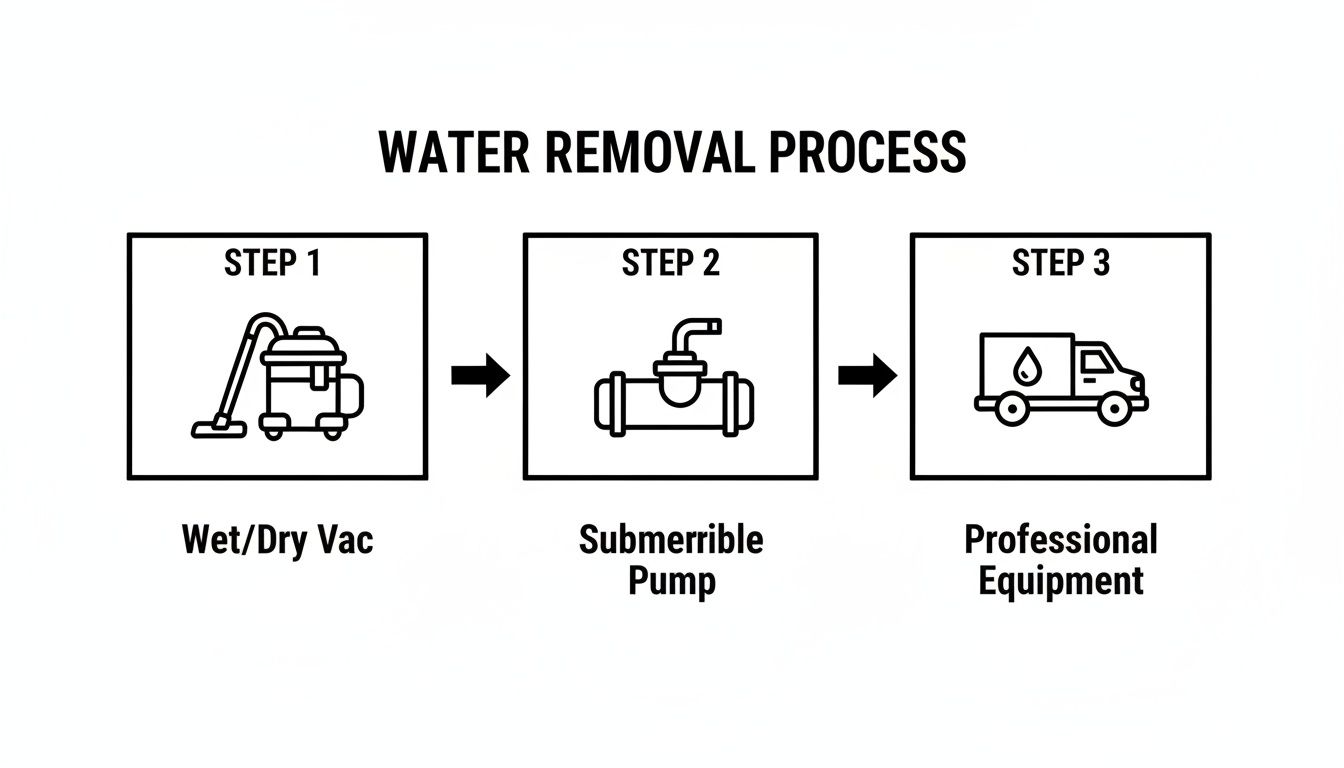
It’s a great visual for how the tools scale with the problem, from a small shop vac job to a full-blown flood requiring professional gear.
Strategic Equipment Placement
Where you put the equipment makes all the difference. Don't just toss a fan in the middle of the room and call it a day.
For the best results, place your air movers around the perimeter of the room to create a circular airflow, or a "vortex." Aim them at the base of the walls, angled at about 45 degrees. This forces air across both the floor and the walls at the same time, maximizing evaporation.
Your dehumidifier should go right in the center of the basement. This allows it to pull in moist air equally from all directions. A pro tip: run its drain hose directly into a floor drain or sump pump pit. If you don't, you'll be stuck emptying its collection bucket every couple of hours, day and night.
Professional restorers treat this like a science. Many use psychrometric charts to track temperature and humidity, mapping out a plan to drop the relative humidity from a soupy 100% down to a safe 35% in just a few days.
Knowing When It's Truly Dry
So, how do you know when you're actually done? Your hands will lie to you. Concrete and wood can feel dry to the touch long before they are truly dry on the inside. It's this deep, hidden moisture that fuels mold and causes wood to rot from within.
The only way to know for sure is with a moisture meter. This is the tool of the pros. You can press its probes into drywall, wood studs, and subflooring to get a precise reading of the moisture content.
Take readings all over the basement, paying special attention to the areas that were hit the hardest. Then, find an unaffected area of your home—like an upstairs closet—and test a similar material to get a "dry standard" or baseline reading. The job isn't finished until every affected spot in your basement matches that baseline.
There’s a reason the water restoration industry is now a $43.5 billion business. Getting the drying process wrong is expensive. In fact, improper or delayed drying can cause project costs to skyrocket by 200% or more due to secondary damage like widespread mold. If you're dealing with extensive flooding, it's wise to understand the scientific approach used by professional residential restoration services to ensure the job is done right the first time.
Cleaning, Sanitizing, and Stopping Mold Growth
After days of fans and dehumidifiers roaring away, a quiet, dry basement can feel like a huge victory. But don't be fooled. Just because the standing water is gone doesn’t mean the danger has passed. Floodwater leaves behind a nasty cocktail of silt, bacteria, and invisible mold spores that are just waiting for a chance to take over.
This is where you shift from drying to disinfecting. It’s not just about wiping things down; it’s about making some tough calls on what can be saved and what’s got to go to protect your home and your health. This step is absolutely critical for preventing long-term problems.
Sorting Salvageable from Scrap
Your first, and honestly, most difficult task is to be ruthless. You need to go through everything in your basement—from furniture to the building materials themselves—and decide what stays and what goes. The hard truth is that porous items that have been soaked in floodwater are nearly impossible to fully clean and sanitize.
You’ll almost certainly need to tear out and throw away these items:
- Carpet and Padding: The padding is like a giant sponge. Once it's been saturated, you'll never get it completely clean or dry. It has to go.
- Drywall: Water wicks up drywall faster than you'd think. A common rule of thumb is to cut away at least a foot above the highest water line. This helps ensure you’ve removed all the compromised material.
- Insulation: Whether it’s fiberglass batts or foam, wet insulation loses its insulating properties and becomes a perfect breeding ground for mold inside your walls.
- Upholstered Furniture and Mattresses: These items absorb contaminated water deep into their core. There's no coming back from that.
Things like metal shelves, plastic bins, or solid wood furniture might be salvageable. But they’ll need a serious, deep clean and disinfection before they can come back into the space.
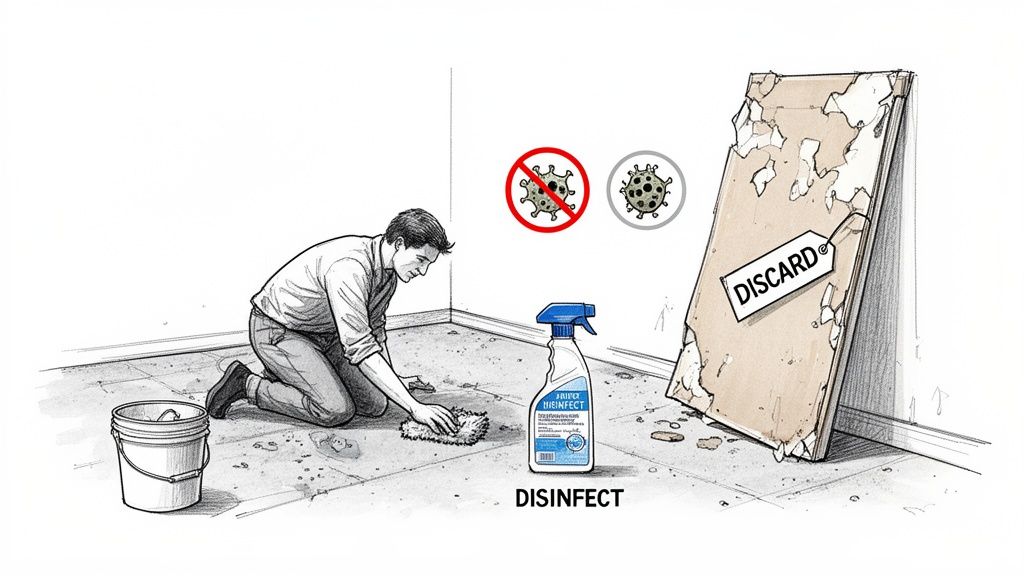
The Deep Clean and Disinfection Process
With all the ruined materials out of the way, you can finally focus on cleaning the structure itself. Start by getting rid of that fine layer of silt and grime that floodwater always leaves behind.
Use a shop vac to clear away the loose debris. Then, get to scrubbing. Hit every surface—the concrete floors, wood studs, and any subflooring—with a good, non-sudsing cleaner. This initial scrub gets rid of the muck that mold and bacteria cling to, which makes the next step far more effective.
After a thorough cleaning, it's time to sanitize. A lot of people grab the bleach, but it’s not always the best choice for porous surfaces like wood studs. A better option is an EPA-registered disinfectant. For hard surfaces like concrete, a solution of one cup of household bleach to one gallon of water can do the job.
Here’s the thing you can’t forget: Mold can start growing in as little as 24 to 48 hours after water exposure. That’s why aggressive cleaning and immediate sanitizing aren't just suggestions—they are non-negotiable for preventing a massive mold problem later on.
This tight timeline is why you have to move fast. Every hour you wait gives mold a better foothold.
Proactive Mold Prevention Strategies
Sanitizing kills the immediate threat, but the long-term goal is making sure it never comes back. Once the basement is clean and you've confirmed with a moisture meter that everything is bone dry, think about applying an antimicrobial or mold-inhibitor spray to the exposed wood framing and subfloor. These products make the surfaces inhospitable to new mold growth.
Long-term moisture control is also essential. Keep your dehumidifier running until the relative humidity in your basement is stable, ideally between 30% and 50%. Anything higher than that, and you're rolling out the welcome mat for mold.
If you find significant mold growth during this process, or if you're just worried about what might be hiding in the walls, it's time to call in a professional. Understanding the complexities of effective mold removal and remediation can be the difference between a one-time fix and a recurring nightmare. A certified specialist has the tools and expertise to address mold issues—both visible and airborne—safely.
Navigating Insurance and When to Call for Help
Just when you think things can't get any more stressful, you remember the insurance claim. It’s easy to feel overwhelmed by the thought of paperwork on top of everything else. But getting this part right—from documenting the damage to knowing when to bring in a professional—is absolutely critical for a smooth recovery.
This isn't just about mopping up water. It's about protecting your home's value and ensuring it's safely and properly restored. One wrong move here can lead to denied claims, lingering damage, and major headaches down the road.
Document Everything for Your Claim
Before you move a single thing, your first move should be to grab your phone or a camera. Insurance companies need proof, and your photos and videos are the most powerful evidence you can provide.
Your goal is to create a detailed visual diary of the damage. Start with wide shots that show the entire basement, capturing the full extent of the flooding. Then, get up close.
Make sure you photograph:
- The Water Line: Get clear pictures showing how high the water came up on walls, furniture, and any appliances. This is a crucial detail for your adjuster.
- Damaged Items: Take pictures of every single thing the water touched, from the sofa and bookshelves down to smaller personal items.
- Structural Damage: Don't forget to document soaked drywall, warped baseboards, peeling paint, or any other damage to the structure itself.
This initial photo session creates your baseline. From here on out, keep a dedicated folder for every single receipt related to the flood—rental equipment, cleaning supplies, professional invoices, everything.
Red Flags That Signal It's Time for Professionals
I get it, the DIY spirit is strong. But some situations are just too big, too complex, or too dangerous to tackle on your own. Knowing where to draw that line is key to protecting both your property and your health.
The financial stakes here are massive. Water damage from flooded basements is a part of a $13 billion annual problem for property owners in the U.S. alone. And with 23.7 million properties sitting at high risk for flooding, the restoration industry—which now includes over 60,000 businesses—is more essential than ever. You can read more about the scale of the restoration industry and its importance on Restoration1Franchise.com.
Without the right equipment, a small problem can quickly spiral into a $10,000 to $50,000 repair bill. That’s why the pros use gear that can pull out hundreds of gallons per hour.
My best advice: The second you suspect the water is contaminated, see signs of major structural issues, or simply feel in over your head, it’s time to call a pro. Waiting only invites more expensive and complicated secondary damage.
When to Call a Restoration Company
So, how do you know when you've crossed from "I can handle this" to "I need help"? A few clear signals should have you reaching for the phone.
- Contaminated Water: If the water came from a sewer backup or overland flooding, it’s what we call Category 3 or "black water." This stuff is a hazardous cocktail of bacteria, viruses, and other pathogens. Handling it requires specialized gear and disposal protocols that are far beyond a typical DIY project. In many cases, this requires true biohazard cleanup services to ensure the space is safe again.
- Deep Saturation: Water that’s been sitting for more than 24 hours has had plenty of time to soak deep into wood framing, subflooring, and even concrete. A professional crew uses sensitive moisture meters to find this hidden water and has the industrial-strength drying equipment to get it all out.
- Significant Electrical Risk: Is your breaker box in the flooded area? Are appliances submerged? Don't go anywhere near it. A restoration company can coordinate with a licensed electrician to safely shut down power and manage the electrical risk before any cleanup work begins.
- You Feel Overwhelmed: Let’s be honest—this is a huge job, both physically and emotionally. A certified restoration team doesn’t just bring the right equipment; they bring a proven process. They can manage everything from the initial water extraction to coordinating with your insurance adjuster, which can be an enormous weight off your shoulders.
Have Questions About Your Flooded Basement? We Have Answers.
When your basement is underwater, your mind is probably flooded with questions. It’s a stressful, confusing situation, and you need clear answers fast to make the right calls. Let's walk through some of the most common things homeowners ask us when they're facing a cleanup.
We get it. You want to know what you're up against. Most people start by asking about the timeline—and for good reason.
How Long Does It Take to Dry a Flooded Basement?
There’s no one-size-fits-all answer here. The timeline really depends on how much water you're dealing with and what got wet.
For a small leak that leaves an inch or so of water, you might be looking at 3 to 5 days of continuous drying with the right equipment. But if we're talking about a serious flood that soaked deep into the drywall and wooden studs, it could easily take a week, sometimes longer, even for a professional crew.
The absolute key is not to rush it. This is where experience makes a difference. Professionals use moisture meters to get readings deep inside the materials. A wall can feel bone-dry to the touch but still be holding enough moisture to cause rot and mold. Trust the meters, not just your hands.
Can I Just Use Bleach to Kill the Mold?
This is probably one of the biggest myths in water damage cleanup. While it seems like a quick fix, reaching for the bleach bottle is often a mistake. Bleach is fine for hard, non-porous surfaces like concrete or tile, but it’s pretty useless on porous materials like drywall and wood.
Here’s why: the chlorine in bleach can't soak into the wood. The water in the bleach, however, can. So you end up killing the surface mold while feeding the roots deeper inside the material, which can actually make the problem worse down the road. Professionals use special EPA-registered antimicrobial treatments that are designed to safely and completely kill mold on all kinds of surfaces.
Is This Covered by My Homeowners Insurance?
Ah, the insurance question. This is where things can get tricky, and it all comes down to where the water came from.
Your standard homeowners policy will typically cover damage from a sudden, internal source. Think a burst pipe, a failed water heater, or an overflowing washing machine.
But what it almost certainly won't cover is water that comes from the outside—groundwater seeping in, storm surges, or general flooding. For that kind of event, you’d need a separate flood insurance policy, which most people get through the National Flood Insurance Program (NFIP). Sewer backups are another gray area; sometimes they're covered, but often you need a special add-on to your policy.
The very first thing you should do is call your insurance agent. Don't wait. They can pull up your policy and tell you exactly what’s covered and what isn't, which is crucial information to have before you start spending money on the cleanup.
What are the Biggest Cleanup Mistakes I Should Avoid?
Knowing what not to do is just as critical as knowing what to do. Steering clear of these common mistakes will save you from a world of hurt later on.
- Waiting too long. Don't hesitate. Mold can start growing in as little as 24-48 hours. What starts as a water problem quickly becomes a much bigger mold problem.
- Leaving saturated stuff behind. Some things just can't be saved. Soaked carpet padding, soggy insulation, and waterlogged baseboards are impossible to dry properly. They have to go.
- Trying to dry with heat. It feels like the right move, but cranking up the thermostat just adds humidity to the air. You’ll create a swampy, tropical environment—perfect for mold growth. Dehumidifiers and air movers are the right tools for the job.
- Quitting too early. This goes back to our first point. Just because it feels dry doesn't mean it is dry. Pulling the equipment out too soon is the number one cause of secondary damage like mold and wood rot that appears months later.
When you're facing a flooded basement, you need a team you can count on. Restore Heroes offers 24/7 emergency services with the expertise to handle water damage situations, helping your home get dried, cleaned, and restored correctly. For a free onsite inspection and immediate help, visit us online.