
The drying fans are gone, the dehumidifiers are off, and the house is quiet again. Maybe you're standing in a hallway that still smells a little damp, or you're staring at a patch of fresh paint and wondering whether the wall behind it is actually dry. That moment, after the crew leaves but before you relax, is where post remediation verification matters most.
In a Phoenix home, that question often shows up after a monsoon leak in stucco, a toilet overflow that soaked a cabinet base, or an upstairs AC condensate line that dripped for days before anyone caught it. The cleanup may look finished, but visible cleanup and real closure are not the same thing. Verification is the step that tells you whether the source was addressed, whether moisture is gone, and whether the problem is likely to stay gone when the next heat cycle, HVAC startup, or storm rolls through.
The Moment the Equipment Leaves and the Real Work Begins
A Scottsdale homeowner can feel “done” before the building is really ready. The crew has carried out the air movers, the affected drywall is gone, and the room looks cleaner than it has in weeks. But a clean-looking room can still hide a wet stud bay, a damp base plate, or dust in a duct chase that nobody sees during a rushed walkthrough.
That's why the final stage matters so much. Post remediation verification is the point where a project stops being about removal and starts being about proof. The question is no longer, “Did the contractor work?” It becomes, “Did the building return to a condition that supports normal use?”
A practical way to think about the handoff
A good remediator can tell you what was removed and where. Verification asks for the next layer of evidence, whether the structure is dry, whether the air is back in range, and whether the work held up after the first round of drying. In a hot-dry market, that last part matters more than people expect, because hidden moisture can sit undetected until an AC cycle or a late-season storm changes conditions.
Practical rule: if the only proof is that the job looked finished at pickup, you've got a handoff, not verification.
The UK contaminated land process reflects the same logic in a broader environmental context, remediation is followed by a verification report and, if needed, long-term monitoring and maintenance. That sequencing shows the core principle clearly, cleanup is not complete until independent evidence confirms the source was addressed and the site is back to an acceptable condition. For mold work, independent protocols use the same idea, but with building-specific methods and samples that show whether the indoor environment has normalized.
If you want a visual check of where this process fits in the broader home inspection picture, thermal imaging inspection is one of the tools that can help expose hidden moisture paths before someone assumes the problem is over.
What Post Remediation Verification Actually Is
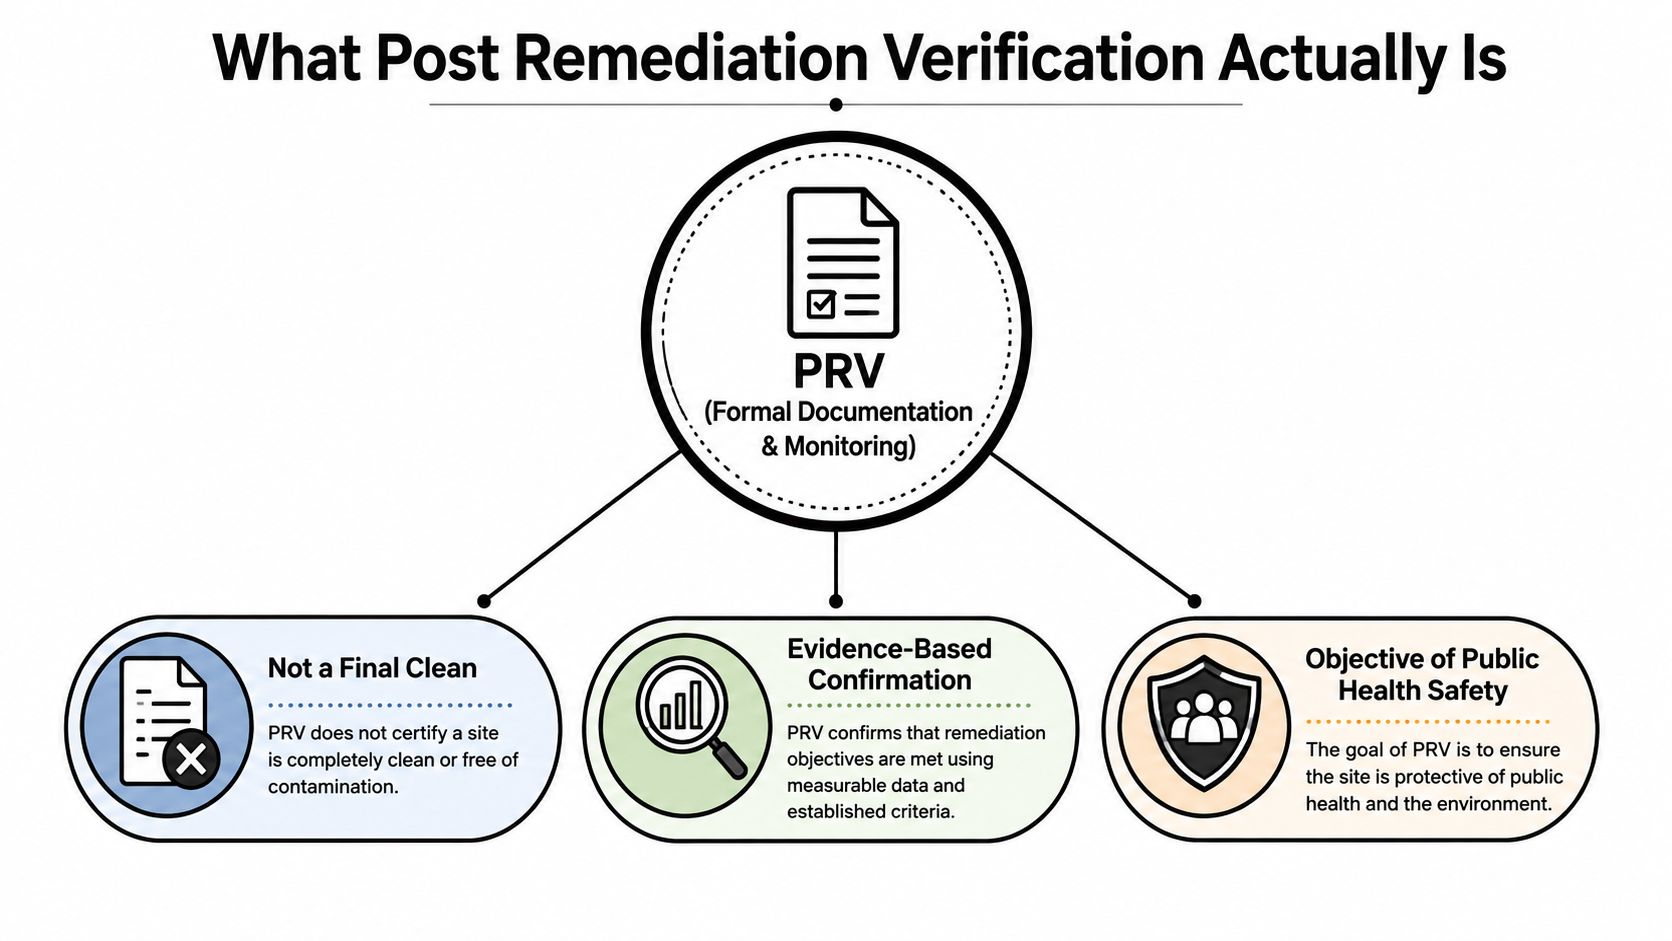
Post remediation verification is a formal documentation and monitoring step. It is not just a last look around the room. Under IICRC S520, PRV is an inspection and assessment by an independent Indoor Environmental Professional that can use visual, olfactory, and sampling methods to confirm that a building, system, or contents have returned to Condition 1, meaning normal fungal ecology rather than active contamination (SCRT FAQ on PRV).
Why independence matters
The logic is simple. The person who removed the damage should not be the only person deciding whether the repair worked. Independent verification gives the owner, the manager, and the insurer an outside check on the work, and Texas treats that as a licensing issue, not a casual preference. Under 16 Tex. Admin. Code § 78.140, a licensed mold assessment consultant must conduct a post-remediation assessment for clearance, using visual, procedural, and analytical methods (Texas rule text).
That legal structure matters because it shows what PRV is really for, not just to satisfy paperwork, but to document that the space is ready for the next step in the chain. In practical terms, that often means a verification report becomes the bridge between remediation work, tenant re-entry, and insurance closure.
What Condition 1 means in plain language
Condition 1 means the indoor environment has returned to normal fungal ecology. It doesn't mean the house is sterile, and it doesn't mean no mold exists anywhere. It means the indoor environment is behaving like an ordinary indoor environment, not one that still shows signs of active contamination or a leftover moisture problem.
If you're comparing service language across vendors, the details matter. A contractor can say the job is “done,” but PRV asks whether the condition of the building supports that claim with evidence. If you're also comparing service scopes, mold testing services can help you think through where verification fits relative to inspection and cleanup.
The Four Verification Methods and What Each One Proves
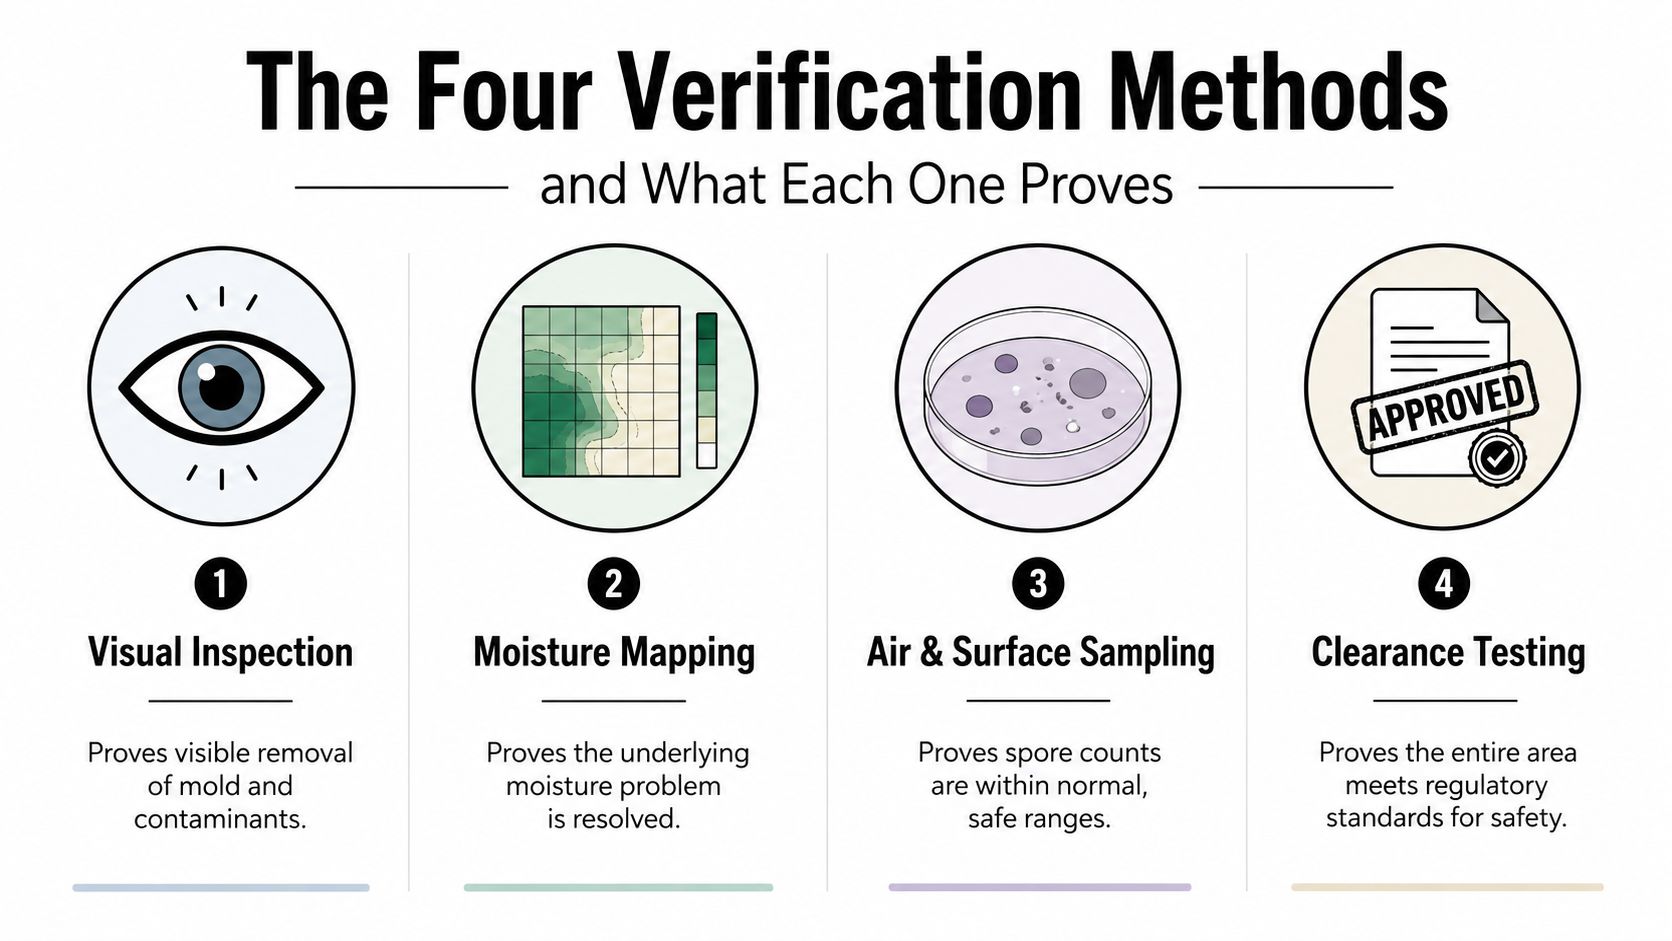
Verification works best when it uses more than one tool. A single clean glance doesn't tell you whether a wall cavity stayed wet, and a dry meter reading doesn't tell you whether airborne debris settled elsewhere. The point is to match each method to the question it can answer.
Visual inspection tells you what was removed
Visual inspection confirms scope completion. It checks whether contaminated material is gone, whether surfaces were cleaned, and whether obvious growth is still present. If the wall behind a vanity was opened and treated, visual inspection tells you whether the visible work matches the remediation plan.
Moisture mapping tells you whether the substrate dried
Moisture checks matter because mold problems begin with water, not with appearance. Industry guidance for verification commonly uses a concrete benchmark, wood framing is typically expected to be below 19% moisture content during verification (National Mold Remediation Authority). That kind of threshold is useful because it gives you a measurable condition instead of a vague “feels dry” impression.
Sampling tells you whether the indoor environment is back in range
Air and surface sampling are about comparison. In fungal remediation, the indoor result should generally look comparable to the outdoor reference environment, with taxonomies broadly aligned and concentrations not showing a disproportionate indoor problem. If the indoor profile still looks abnormal, the space may not be back to Condition 1.
For readers who want a wider sense of how risk testing gets organized in other fields, find testing methods for microbial risks offers a useful parallel: the method matters because each test answers a different question about contamination and control.
Clearance testing assembles the record
Clearance testing pulls the evidence together into a pass or fail decision. It's not just a sample result, it's the documented conclusion that the project met the stated criteria. That's why the paperwork matters as much as the reading itself, because the report shows what was checked, when it was checked, and what standard was used.
Good verification doesn't ask one test to do everything. It asks each method to prove one part of the story, then checks whether all the parts line up.
For homeowners who want to compare how vendors describe this step, mold remediation specialists is a helpful way to think about who should be doing each part of the work and why independence matters.
Meaningful Acceptance Criteria
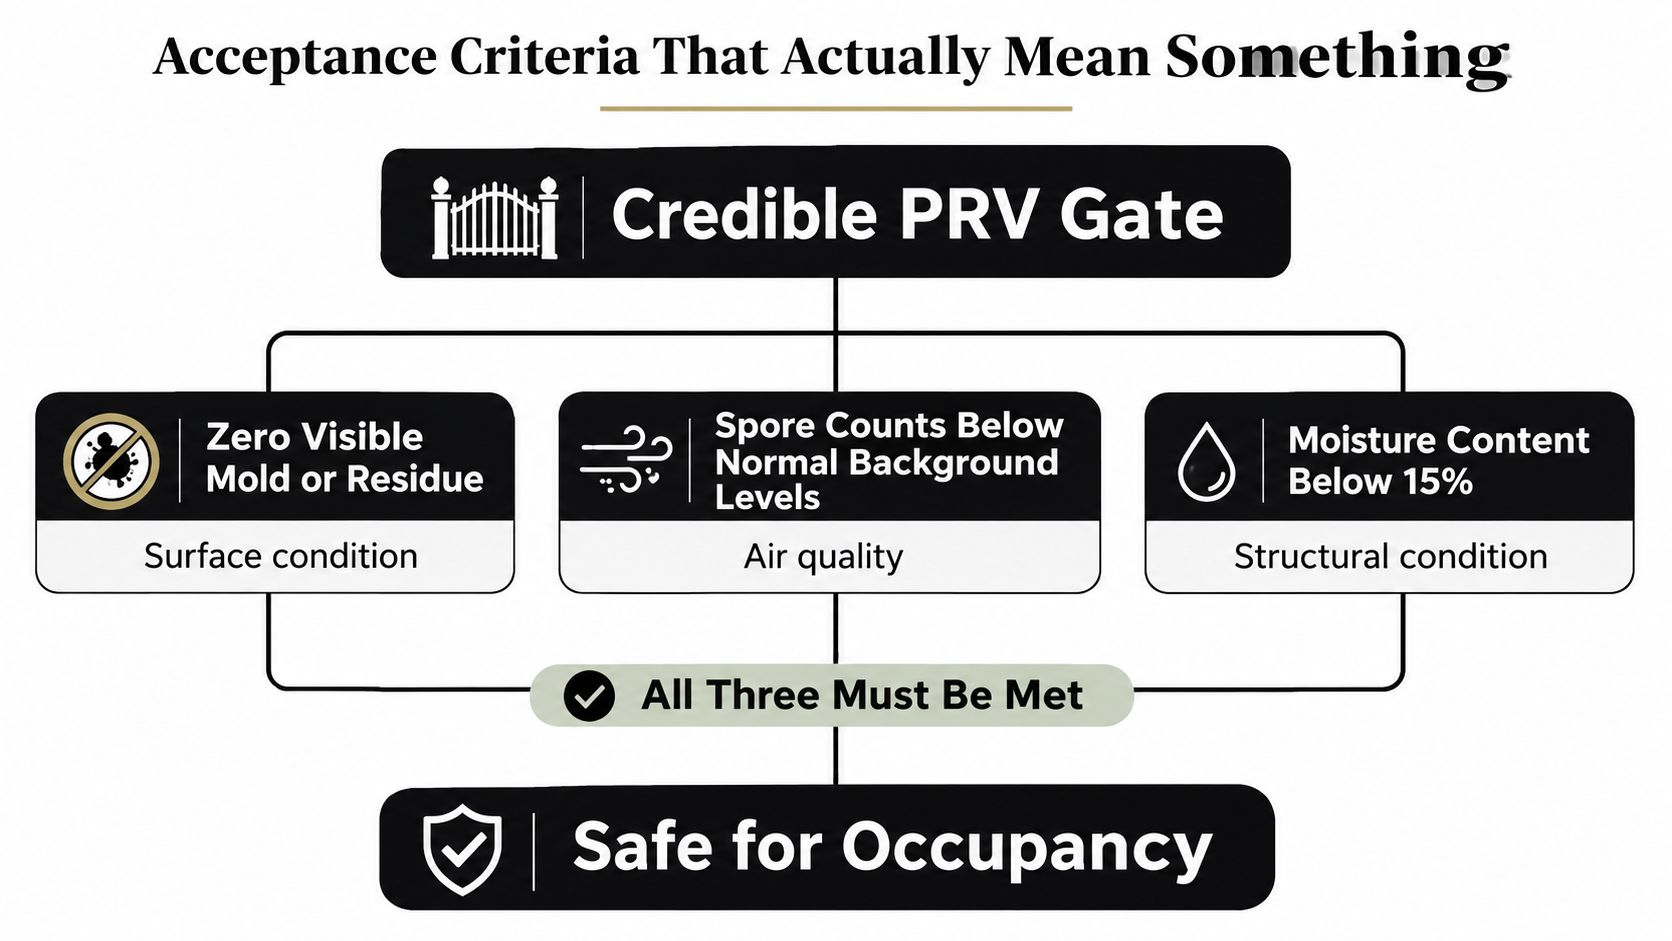
A passing result only means something if the yardstick was set before anyone started writing notes. Good verification does not run on hope or a quick look around the room. It depends on a chain of conditions that has to fit together, visible removal, dry materials, and sampling that matches the building's normal outdoor context.
The main checkpoints
- Zero Visible Mold or Residue. The surface should show that contaminated material was removed and cleaning was completed.
- Spore Counts Below Normal Background Levels. Indoor air should not look disproportionate compared with the outdoor reference.
- Moisture Content Below 15%. Structural materials need to be dry enough that the same problem does not restart after the crew leaves.
These criteria work together because a space can look clean and still hold enough hidden moisture to support regrowth. It can also test clean once and still be vulnerable if the wall cavity or nearby material never dried properly. The result you want is a building that no longer supports the same growth pattern, not a report that only looks neat on paper.
Why the score matters less than the logic behind it
Some protocols use composite tools like HERTSMI-2. In one published verification protocol, a score of 10 or below indicates acceptable conditions after the delayed verification phase. That score can help, but only when it sits alongside visual findings and moisture checks, since a low score by itself does not prove the structure is dry or stable.
The UK contaminated land guidance follows the same logic in a different setting, measuring contaminants removed and monitoring concentrations over time to show treatment effectiveness (UK government contaminated land guidance). The point is the same in a crawlspace, a wall cavity, or a finished room. Pass or fail should rest on observed conditions, not on the fact that someone wrapped up the job.
If you are reviewing paperwork after a project, moisture meter readings help show whether a structure is still holding water or has settled into a dry state. That matters because moisture is the part that can keep feeding a problem long after the visible cleanup is done.
Timing Rules and the Two-Checkpoint Approach
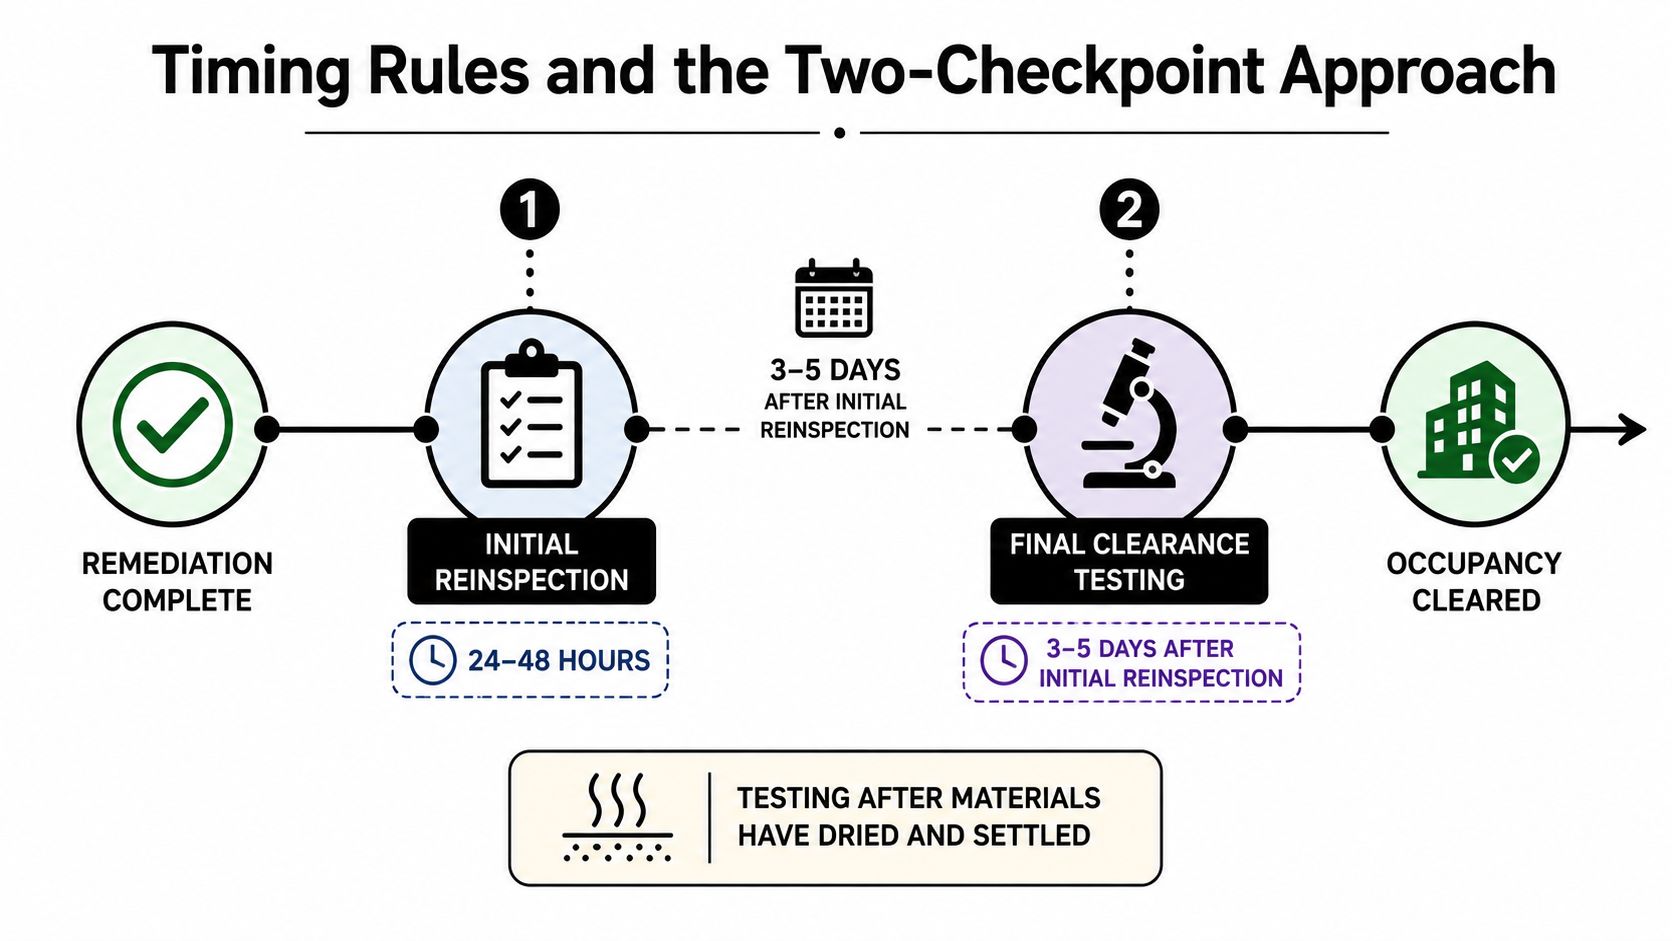
A clearance report can look tidy and still miss the core question. Was the work finished at the right moment, and did the building stay stable after the cleanup crew left? Those are different checks, and timing decides whether the answer means anything.
For a homeowner, this is the part that often gets blurred together. A contractor may say the area is “done,” but if inspection happens after barriers come down or after rebuilding starts, the result only shows what the space looked like at that later point. It does not show whether the remediation itself was completed cleanly or whether hidden moisture was still present when the work ended.
Early verification confirms the job was completed
One independent mold clearance protocol says testing should happen 24 to 48 hours after remediation completion while containment is still in place and before reconstruction begins (STL Mold Testing). Another published protocol places the first phase 1 to 4 days after remediation, with visual inspection and moisture verification (Airwell Now PRV protocol). The timing may vary by protocol, but the purpose is the same. The first checkpoint confirms that the original scope was completed and that the area was still being checked in its post-work state.
That early look is like checking a repaired roof before the ceiling drywall goes back up. You are not proving the house will never leak again. You are proving the repair was finished, the visible contamination was removed, and the space still met the conditions required for the next phase.
Delayed verification checks for stability
A second checkpoint can happen 6+ weeks later, using settled-dust analysis and a HERTSMI-2 score, with 10 or below indicating acceptable conditions in that protocol (Airwell Now PRV protocol). That later look matters because a room can seem fine right after cleanup and still reveal a problem once normal occupancy, HVAC cycling, or seasonal humidity comes back.
In Phoenix, that second checkpoint has extra value. Dry air can make a space look predictable for a long stretch, then a monsoon event, a leaking appliance, or a restarted system can uncover moisture that stayed trapped behind finishes. A test that passes before the building is back under normal stress does not show that the fix will hold through the next weather swing.
A separate review by a mold remediation specialist team can help translate that second look into practical terms. The point is not merely whether a number or sample came back clean. The point is whether the repaired area stayed dry, whether the hidden materials held up, and whether normal use exposed anything the first inspection could not see.
The strongest verification answers two questions, did the contractor finish the work, and did the space stay stable after the work was finished?
That is why PRV works best as a durability check, not just a clearance check. A passing result matters, but it matters more when it shows the pathway was closed, the hidden reservoirs were addressed, and the building remained stable after it returned to ordinary use.
What Different Stakeholders Should Actually Ask For
Different people need different paperwork. A homeowner wants clarity and peace of mind. A property manager wants tenant-safe documentation and a clean handoff. An insurance adjuster wants a record that can survive a file review later. The right request depends on the role, but the core idea stays the same, ask for the evidence that shows the job was verified, not just claimed.
| Stakeholder | Key Documentation | Verification Question |
|---|---|---|
| Homeowner | Verification report, photos, moisture readings, sampling summary | What proof shows the problem is gone and the space is dry? |
| Property manager | Clearance documentation, timeline notes, reoccupancy guidance | What can I show a tenant if they ask why the unit is ready? |
| Insurance adjuster | Assessment record, lab results if used, scope confirmation | Does the file show a defensible, independent clearance decision? |
A homeowner who wants to push back on vague language can ask whether the report shows visual findings, moisture values, and any sampling results in one place. A landlord should focus on whether the documents support safe re-entry and whether the verification happened before rebuilding closed up the work. An adjuster usually needs the same core facts, but organized so the claim file shows exactly what was checked and when.
If you're comparing contractors or trying to understand who handles the technical side, documentation requirements is the phrase that tends to separate a polished handoff from a real record.
A Practical PRV Checklist From Scope to Clearance Letter
A real project moves in order, and each step protects the next one. If one step is skipped, the whole record gets weaker. That's why a good checklist reads like a chain of evidence, not a list of random tasks.
Use this sequence
- Confirm the scope. Make sure the remediation plan says what areas were affected and what was removed.
- Verify containment. Check that the work area stayed isolated before anyone opens it up for testing.
- Inspect visually. Confirm contaminated material is gone and visible residue isn't left behind.
- Measure moisture. Document whether affected materials are dry enough to support a stable outcome.
- Photograph conditions. Keep a visual record of the space before it gets altered again.
- Collect outdoor reference samples. Use them as the comparison point for indoor results when sampling is part of the plan.
- Take indoor air samples. Confirm whether the indoor environment looks comparable to the reference condition.
- Take surface samples when indicated. Use them when the site conditions justify a closer look at residues or settled material.
- Maintain chain of custody. Preserve the paperwork from collection to lab to report so the results remain defensible.
- Review lab analysis and issue the determination. Decide whether the project passes, and document why.
Avoid the shortcut that ruins good work. If testing happens after reconstruction, or after containment is gone, you may be measuring a changed environment instead of the one you meant to verify.
The most common weak spots are easy to spot once you know where to look. Outdoor reference samples get skipped, moisture is assumed instead of measured, or someone tries to use a late test as proof that an earlier problem never mattered. None of that helps a homeowner make a real decision.
If you're the person collecting the paperwork, mold remediation documentation requirements is the part of the job that keeps the file useful after everyone has moved on.
From Clearance Letter to Confidence That the Fix Will Hold
A clearance letter is useful, but it's not magic. It proves that the space met the stated criteria at the time of verification. It does not prove that every hidden cavity was opened, every adjacent system was checked, or every future water event has been prevented.
That's why durability is the key question. Did the original pathway get closed, or is there a backup route in a wall, duct, or shared system that can wake back up when the AC kicks on or the next monsoon drives water against the structure? A clean-looking test result can miss a concealed moisture pocket that hasn't shown itself yet.
If your concern is whether a result will hold after normal life starts again, the question is smarter than “Did it pass?” Ask what evidence shows the source is gone, what evidence shows no alternate reservoir remains, and what evidence shows the space stayed stable after reoccupancy or HVAC cycling. That's the difference between a paperwork win and a durable fix.
For a homeowner trying to recover files after a water event, even something like damaged hard drive recovery can become part of the bigger picture, because the same discipline applies: don't trust a quick surface check when the risk is hidden inside.
FAQ
What does a clearance letter prove? It proves the site met the verification criteria at the time of the inspection or testing. It doesn't guarantee the building will never have another moisture problem.
How long are PRV results valid? They're valid as a snapshot of conditions at the time of testing. If the building changes, gets reworked, or takes on new moisture, the old result doesn't describe the new condition.
Does insurance require PRV? Sometimes the claim file will need it, especially when the loss involved mold or water damage. The exact requirement depends on the policy file and the documentation standard being used.
What if a retest fails? The project usually needs more drying, more source removal, or a closer look at hidden areas before another verification attempt. A failed result is useful because it tells you the building still needs work.
If you want a team that handles remediation with the documentation mindset this process demands, contact Restore Heroes to talk through your situation, ask what evidence you should expect, and get help from a local crew that treats verification as part of the job, not an afterthought.