Mold is a persistent threat for any property owner, but in the unique climate of the Phoenix area, with its intense summer heat and monsoon moisture, the risks are distinct. A small, undetected leak can quickly escalate into a significant mold problem, hiding within walls, attics, or HVAC systems. Simply looking for visible spots on the wall is not enough to protect your investment.
A thorough inspection requires a systematic approach, knowing exactly where to look and what signs indicate trouble. This detailed mold inspection checklist is designed specifically for Phoenix-area homeowners and property managers who want to be proactive. It breaks down the entire process into manageable, actionable steps to help you identify potential mold threats before they become major issues that could affect your property's value and indoor air quality.
This guide will walk you through a professional-level assessment you can perform yourself, covering critical areas often overlooked. We will cover:
- HVAC systems and ductwork
- Moisture in walls and concealed cavities
- Foundation and below-grade areas
- Roof integrity and water intrusion points
- Window and door seals
- Insulation condition
- Relative humidity and ventilation
- Plumbing systems and hidden leaks
Think of this as your strategic guide to proactive property maintenance. It provides the knowledge to spot red flags with confidence and understand when it is necessary to call for professional assistance. By following this checklist, you can take a significant step toward safeguarding your home or commercial building.
1. Visual Inspection of HVAC Systems and Ductwork
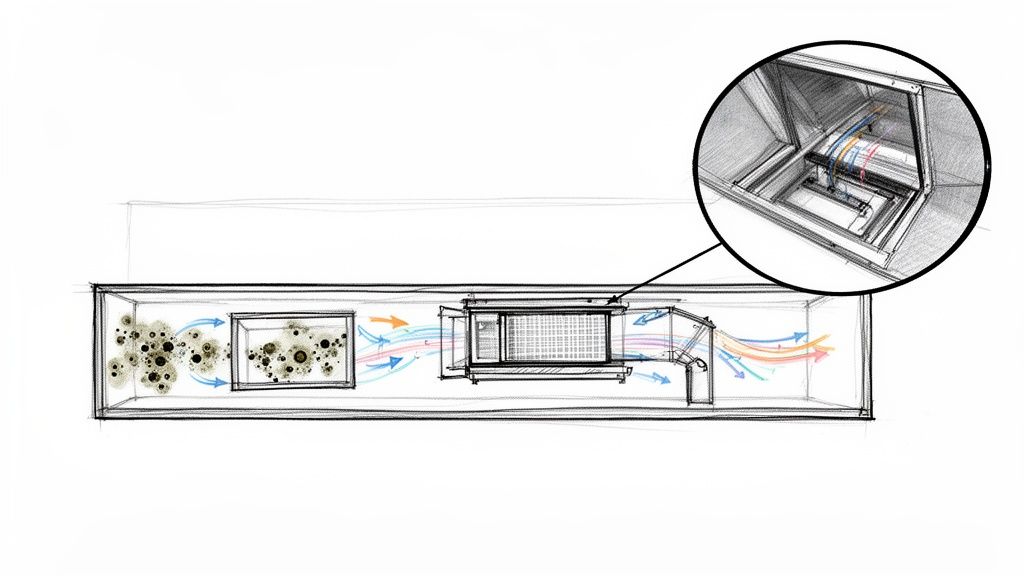
Your heating, ventilation, and air conditioning (HVAC) system is the respiratory system of your property. A thorough mold inspection checklist must begin here, as the HVAC system can be a primary source of mold growth and the main distribution network for spreading spores throughout your home or commercial building. This step involves a detailed visual check of all accessible components-from filters and coils to ducts and drain pans-for any signs of moisture, microbial growth, or contamination.
Neglecting the HVAC system during an inspection is a critical oversight. Even if you remediate mold in one room, a contaminated system can simply reintroduce spores, perpetuating the problem. This is especially true in the Phoenix area, where air conditioners run for a significant portion of the year, constantly circulating air.
Why This Inspection Is Critical
A contaminated HVAC system doesn't just spread mold; it can become a breeding ground. Condensation naturally forms on evaporator coils and in drain pans. If not drained properly, this standing water can create a suitable environment for mold to flourish.
- For Phoenix Homeowners: Older HVAC units, common in established neighborhoods, often have condensate drains that clog with dust and debris. During Arizona's monsoon season (June to September), the combination of high humidity and constant AC use can quickly lead to blockages and water backup, feeding mold growth directly within the air handler.
- For Commercial Properties: Large, centralized HVAC systems in office buildings or retail centers can become super-spreaders. A single moisture event in one part of the system, if not professionally addressed, can disseminate mold spores to every corner of the building, affecting air quality for all occupants.
- Post-Water-Damage: After a flood or leak, ductwork that has been exposed to moisture can show mold colonization in as little as 48-72 hours. Simply drying the structure without addressing the HVAC system is an incomplete solution.
Key Takeaway: A clean bill of health for your property may not be possible without a clean HVAC system. It is the first and most important place to look during any mold inspection.
Actionable Inspection Tips
To effectively inspect your HVAC system, follow these practical steps:
- Check the Condensate Drain Line: Visually inspect the drain line for any blockages, algae, or slime. During monsoon season, check it monthly to ensure water is flowing freely away from the unit.
- Inspect the Air Filter: Remove and examine the air filter. Look for spotting, discoloration, or musty odors. A dirty, damp filter can become a food source for mold. Be sure to document its condition with photos to establish a baseline.
- Examine Coils and the Drain Pan: With the power turned off, carefully open the access panel to the indoor unit. Use a flashlight to inspect the evaporator coils and the drain pan beneath them for visible mold, rust, or standing water.
- Look Inside Supply and Return Vents: Remove a few vent covers throughout the property. Use a flashlight to look inside the ductwork for any dark spotting, fuzzy growth, or signs of moisture.
2. Moisture Assessment in Walls, Crawl Spaces, and Concealed Cavities
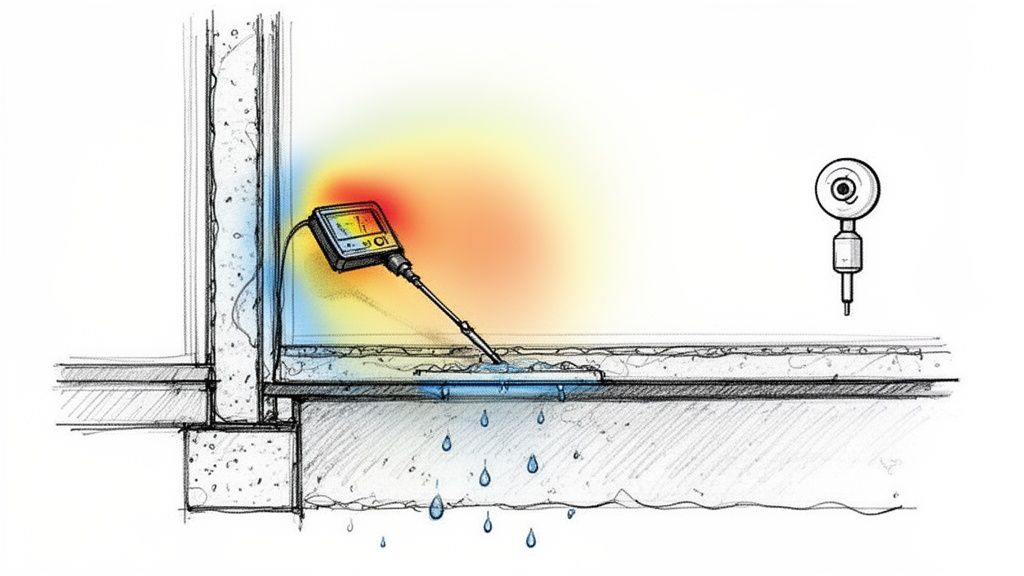
Mold cannot grow without moisture. A complete mold inspection checklist must go beyond what the eye can see to systematically evaluate moisture levels in structural cavities, crawl spaces, and areas hidden from view. This step uses tools like moisture meters, thermal imaging, and humidity sensors to pinpoint the water sources that fuel mold growth, often long before visible signs appear. It is essential for identifying condensation, leaks, and vapor drive that create the ideal conditions for mold colonization.
Simply looking for visible mold is not enough; a professional inspection finds the underlying moisture problem. If you only clean the surface mold without fixing the water source, the mold will likely return. Detecting and documenting hidden moisture is the key to developing an effective, long-term remediation plan.
Why This Inspection Is Critical
Hidden moisture is the primary driver of persistent mold issues. It can saturate building materials for weeks or months without any obvious surface evidence, allowing mold to flourish undisturbed inside walls, under floors, and in attics. Understanding the hidden signs of mold in walls is crucial for a thorough assessment.
- For Phoenix Homeowners: The intense summer heat can cause condensation issues inside cooler, air-conditioned wall cavities, especially on exterior-facing walls. Flat roofs, common in the area, can also develop slow leaks during monsoon season that saturate attic insulation and drywall from above, with no visible water stains for months.
- For Commercial Properties: In Scottsdale and surrounding areas, large commercial buildings often have mechanical rooms and concealed spaces where HVAC inefficiency creates condensation. This moisture can lead to widespread mold problems in areas that are not regularly inspected, impacting indoor air quality for everyone in the facility.
- Post-Water-Damage: After a pipe burst or appliance leak in a Mesa or Gilbert home, water can wick upward through drywall and framing. Even after the surface seems dry, moisture can remain trapped inside the wall cavities for weeks, creating a perfect environment for mold to grow unseen.
Key Takeaway: Finding and measuring hidden moisture is non-negotiable. It moves an inspection from a simple visual check to a scientific diagnosis of the property's health.
Actionable Inspection Tips
To effectively assess concealed moisture, use a methodical approach and the right tools.
- Establish a Baseline: Before you begin, take moisture readings on materials in a known dry area of the property. This gives you a "dry standard" to compare against as you inspect other areas.
- Use a Moisture Meter: Test multiple surfaces in areas of concern, such as drywall, wood studs, and concrete. Focus on areas prone to moisture: baseboards, around windows, under sinks, and near plumbing fixtures.
- Inspect Crawl Spaces and Attics: Pay close attention to the perimeter of the crawl space for signs of moisture wicking from the soil. In the attic, check insulation for dampness or compression, especially below roof valleys and penetrations.
- Consider a Borescope: For high-suspicion areas without visible damage, a small hole can be drilled to insert a borescope camera. This allows for direct visual inspection inside a wall cavity with minimal disruption.
- Document Everything: Take clear photos of all moisture meter readings. Record the location, date, and reading for each test point. This documentation is vital for both remediation planning and any potential insurance claims.
3. Inspection of Foundation, Basement, and Below-Grade Areas
Basements, crawl spaces, and any part of a structure below ground level are naturally susceptible to moisture, making them primary hotspots for mold. A complete mold inspection checklist must include a detailed assessment of these areas, as water intrusion from soil, poor drainage, and condensation can create a favorable environment for microbial growth. This step focuses on identifying both active water sources and the lingering damage from past moisture events.
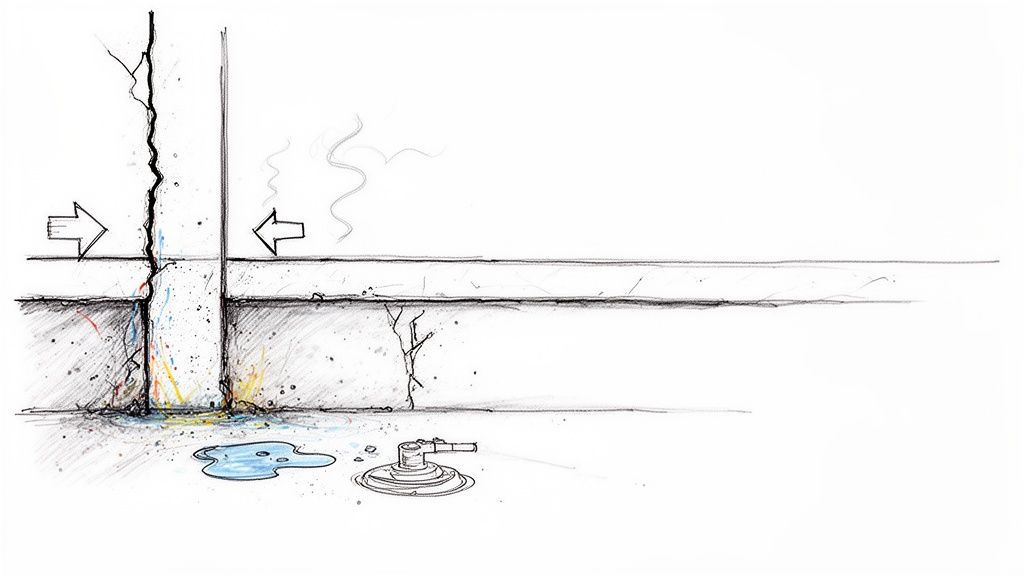
Gravity and pressure work against below-grade areas, pulling groundwater and surface runoff toward your foundation. Small cracks or failures in water management systems can quickly lead to significant moisture problems that go unnoticed until musty odors or visible mold appears.
Why This Inspection Is Critical
Moisture in a basement or crawl space doesn't just stay there; it can wick up into walls and subfloors, spreading mold throughout the property. The soil surrounding a foundation is a constant source of water, especially in specific weather conditions.
- For Phoenix Homeowners: While full basements are less common, many properties have below-grade rooms or foundations susceptible to monsoon flooding. During intense summer storms, saturated soil can force water through even minor foundation cracks, leading to hidden mold growth behind finished basement walls.
- For Commercial Properties: Basements in commercial buildings in Scottsdale or Mesa often house critical infrastructure like HVAC units, water heaters, and plumbing lines. A small leak or condensate drain failure in these unattended areas can fuel extensive mold colonization before it is ever discovered.
- Crawl Space Vulnerability: Crawl spaces in Chandler and Tempe without proper vapor barriers are notorious for mold. Moisture from the earth evaporates and condenses on cooler wood joists and rim boards, creating a breeding ground for black mold that can compromise structural integrity and indoor air quality.
Key Takeaway: An uninspected basement or crawl space is a major liability. These hidden areas can silently harbor mold that affects the health of the entire building and its occupants.
Actionable Inspection Tips
A systematic check of below-grade areas can uncover problems before they escalate. Use these steps to guide your inspection:
- Use a High-Intensity Flashlight: Dark surfaces in basements and crawl spaces can easily hide dark-colored mold. A powerful flashlight is essential to illuminate corners, joists, and wall bases to spot subtle signs of growth.
- Check Sump Pump and Drainage: If a sump pump is present, test its functionality. Ensure the discharge line moves water at least six feet away from the foundation to prevent it from cycling back in.
- Look for Water Stains and Efflorescence: Water staining on concrete walls or floors indicates past or present moisture intrusion. White, chalky deposits (efflorescence) are a sign that water has evaporated from the surface, leaving mineral salts behind.
- Note Musty Odors: Your nose is a powerful tool in a mold inspection. A persistent musty or earthy smell strongly suggests active microbial growth, even if you can't see it. For those looking for more information on managing these damp environments, you can learn more about how to avoid mold in your basement.
- Document Everything with Photos: Take clear pictures of any cracks, stains, visible mold, or drainage issues. Use the flash to highlight texture and color variations that may not be obvious otherwise.
4. Roof Inspection for Leaks, Penetrations, and Water Intrusion Points
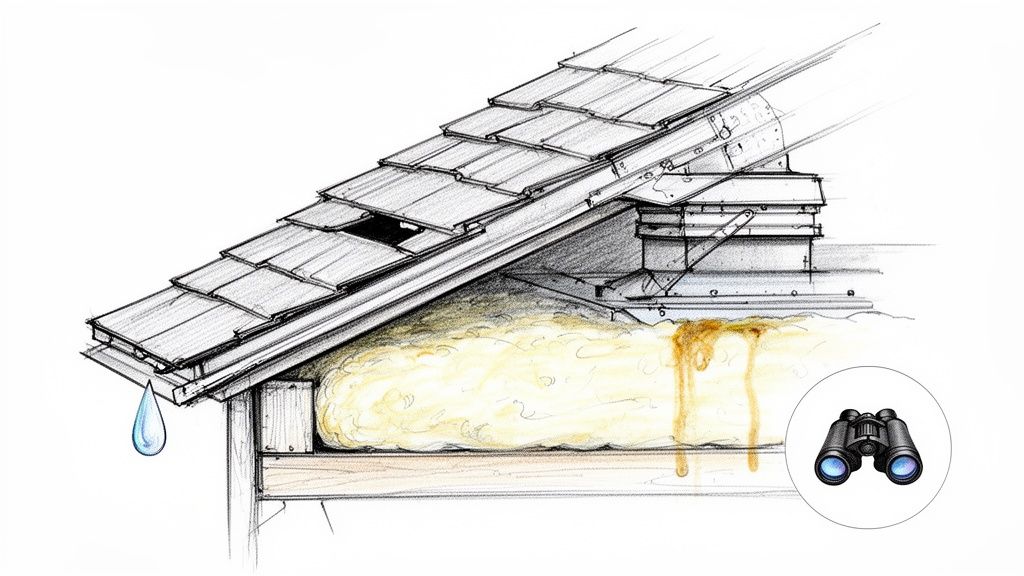
Your roof is the primary shield against the elements, and even a minor compromise can introduce moisture that leads to significant mold problems. This part of the mold inspection checklist involves a careful examination of the roof structure, materials, flashing, and drainage systems to find actual or potential water entry points. Because roof leaks often seep into hidden attic spaces, they can go unnoticed for months, allowing mold to thrive in dark, undisturbed areas before the damage becomes visible inside your living space.
A proactive roof assessment is crucial because water doesn't always drip straight down; it can travel along rafters and beams before soaking into insulation and drywall. This makes tracing the source of a problem difficult once it’s established. By inspecting the roof itself, you address the cause, not just the symptom.
Why This Inspection Is Critical
A roof leak provides a consistent moisture source, which is the key ingredient mold needs to grow. What starts as a small drip can saturate insulation, wood framing, and ceiling materials, creating a perfect habitat for mold colonies.
- For Phoenix Homeowners: Arizona's intense sun can degrade asphalt shingles, causing them to become brittle and crack. During the monsoon season (June to September), heavy downpours can exploit these weaknesses, leading to widespread water staining and mold growth in attics across Mesa and Gilbert. Hail damage also creates micro-fractures that are hard to see but allow slow, steady water intrusion.
- For Commercial Properties: Flat-roofed commercial buildings in areas like Scottsdale are particularly susceptible. Obstructed drains or scuppers can cause water to pool on the roof, exerting pressure on seams and flashing. This can lead to persistent leaks and extensive mold contamination in the structure above tenant spaces.
- Post-Storm Damage: After a significant storm, it’s vital to check for damage. A few missing shingles or lifted flashing can be all it takes for water to get in. Over time, this moisture can lead to visible issues, and it's important to recognize the common signs of water damage on a ceiling as early indicators of a roof-related problem.
Key Takeaway: The attic is a primary hotspot for hidden mold growth, and the roof is its most common entry point. A thorough roof inspection stops mold at its source.
Actionable Inspection Tips
To effectively identify potential water entry points before they lead to mold, consulting a comprehensive guide to roof inspections for Arizona homes can be invaluable. Here are some steps you can take:
- Inspect the Attic First: The safest and most effective first step is to enter your attic with a powerful flashlight, especially after a heavy rain. Look for active drips, dark stains on wood framing, damp or compressed insulation, and any visible mold growth.
- Use Binoculars for a Ground-Level Check: Before climbing on a roof, use binoculars to safely scan for obvious damage like missing, cracked, or curled shingles. Pay close attention to areas around vents, chimneys, and skylights.
- Check All Penetrations: The points where pipes, vents, or chimneys penetrate the roof are common failure points. Examine the flashing-the metal seals around these objects-for signs of rust, gaps, or degraded sealant.
- Evaluate Gutters and Drainage: Clogged gutters cause water to back up and seep under the edge of the roof. Ensure your gutters are clear of debris and that downspouts direct water far away from the foundation. Document all findings with photos for your records.
5. Window and Door Frame Inspection for Water Intrusion and Sealant Degradation
Windows and doors are primary points of entry, not just for people, but for unwanted moisture. A complete mold inspection checklist must include a systematic examination of these openings, including frames, sills, and surrounding sealants. This step focuses on identifying water entry points, condensation problems, and conditions that promote mold growth in frame cavities and adjacent walls.
Intense Arizona sun, monsoon downpours, and daily temperature swings all put tremendous stress on sealants and frames. This makes windows and doors common sources of water intrusion. Mold frequently colonizes window frames, sills, and the hidden wall cavities where water collects and dries very slowly, creating a persistent problem.
Why This Inspection Is Critical
Degraded seals and improper drainage around windows and doors can lead to slow, chronic leaks that go unnoticed for months or even years. The resulting water intrusion gets trapped inside walls, providing a constant moisture source for mold to thrive.
- For Phoenix Homeowners: The intense UV exposure in the Phoenix area can cause caulking around windows to crack and fail in as few as 5 to 7 years. This deterioration allows water from monsoon storms or sprinkler systems to seep directly into the wall structure.
- For Commercial Properties: In older commercial buildings around Scottsdale, it's common to find mold growing on window sills. This often happens when condensation accumulates during cool mornings, and poor ventilation prevents the moisture from drying, leading to microbial growth.
- Post-Monsoon Damage: Properties in areas like Gilbert and Mesa have shown significant water intrusion and mold within window frame cavities after a strong storm, even with no obvious exterior damage. The wind-driven rain forces its way through tiny failures in the window's seal.
Key Takeaway: Failed window and door seals are silent invitations for water intrusion and mold. Inspecting these areas is crucial for catching hidden moisture problems before they cause widespread structural damage.
Actionable Inspection Tips
To thoroughly check your windows and doors for mold-conducive conditions, follow these practical steps:
- Look for Water Stains and Damage: Visually inspect the frames, sills, and surrounding drywall. Look for any discoloration, water staining, peeling paint, or soft, spongy wood, which are clear signs of water intrusion and possible rot.
- Assess Sealant and Weatherstripping: Examine the caulk and weatherstripping around every window and door. It should be flexible and free of cracks or gaps. Deteriorated seals allow both water infiltration and air leakage, which can complicate indoor humidity control.
- Check Sill Drainage: Ensure window sills are properly sloped to shed water away from the structure. If water ponds on the sill, it will eventually find a way inside.
- Document Condensation Patterns: Pay attention to where condensation forms. Moisture on the inside of the glass often points to high indoor humidity, while condensation between panes indicates a failed window seal.
- Photograph Conditions: Take close-up photos of sealant degradation and wider shots of any stained areas. This documentation creates a valuable baseline for future reference and can be useful for insurance claims.
6. Inspection of Insulation Condition, Saturation, and Contamination
Insulation is the unseen thermal shield of your property, but it can quickly turn into a hidden hazard. A complete mold inspection checklist must include a detailed assessment of insulation in attics, walls, and crawl spaces. Because of its absorbent nature, insulation can retain moisture for long periods, losing its thermal properties and becoming an ideal substrate for extensive mold colonization.
This step involves physically checking insulation materials for water saturation, visible mold growth, compression, and other forms of contamination. Ignoring damp insulation after a leak is a common mistake that allows a contained moisture problem to evolve into a widespread air quality issue.
Why This Inspection Is Critical
Saturated insulation is a ticking time bomb for mold. Once wet, materials like fiberglass, cellulose, and spray foam can hold moisture against structural wood and drywall, promoting decay and microbial growth deep within walls and ceilings where it isn't immediately visible.
- For Phoenix Homeowners: After a roof leak from a monsoon storm, attic insulation can become colonized with mold within weeks if not promptly removed and replaced. Similarly, homes in Mesa and Gilbert affected by plumbing failures often have saturated wall insulation that requires complete removal.
- For Commercial Properties: In larger buildings, such as those in Scottsdale with complex plumbing and HVAC systems, moisture issues can lead to moldy insulation around basement rim joists. This can spread undetected into concealed cavities, affecting the entire structure.
- Post-Water-Damage: Simply drying the air is not enough after a water event. Wet insulation rarely dries completely in place. Failing to address it means you are leaving a perfect food source and breeding ground for mold. Understanding the process of professional water damage restoration can clarify why material removal is often necessary.
Key Takeaway: Wet insulation is a liability. It not only fails to insulate your property but also actively supports mold growth, compromising structural integrity and indoor air quality.
Actionable Inspection Tips
To properly assess the condition of your insulation, use these specific inspection techniques:
- Look for Visible Contamination: Use a flashlight to search for black, green, or white spotting on insulation surfaces. These discolored patches indicate active microbial growth. Also, check for rodent droppings or nesting materials, which present a separate biohazard.
- Assess for Saturation and Compression: Feel the insulation (while wearing gloves) for dampness. Look for areas where it appears compressed, matted down, or shrunken, as this can be a sign of past or present water damage.
- Assume Saturation Above the Water Line: In properties with known water damage, it's safest to assume insulation is wet at least a foot above the visible water line due to wicking. This is critical information to document for insurance claims.
- Photograph Everything: Take clear photos of any stained, wet, or visibly moldy insulation. Document its location and the extent of the damage to support any insurance claims and guide remediation efforts.
- Focus on Vapor Barrier Areas: In Arizona, pay close attention to insulation near vapor barriers, on north-facing walls, or around HVAC components. These areas can trap condensation, leading to moisture buildup.
7. Assessment of Relative Humidity Levels and Ventilation Adequacy
Visible water is an obvious problem, but the invisible moisture in the air-relative humidity (RH)-is a silent partner to mold growth. A complete mold inspection checklist must include measuring RH and evaluating how well your property's ventilation systems remove this airborne moisture. Mold can begin to grow when relative humidity consistently stays above 50-55%, making this assessment a crucial step in preventing colonization before it starts.
This part of the inspection identifies whether your home or business has the right conditions for mold to flourish, even if no active leak is present. It helps determine if you need to improve mechanical ventilation, add dehumidifiers, or make simple behavioral changes to keep indoor air dry and healthy.
Why This Inspection Is Critical
High humidity creates a microclimate on surfaces that allows mold spores to germinate. Inadequate ventilation traps this moist air, preventing it from evaporating and creating a persistent high-humidity environment perfect for mold.
- For Phoenix Homeowners: Even in Arizona's dry climate, certain areas create their own humidity. A bathroom in a Phoenix home can easily reach 70-80% RH after a shower. If the exhaust fan is broken, undersized, or vents into the attic instead of outside, that moisture gets trapped, leading to ceiling or wall mold.
- For Commercial Properties: In Scottsdale office buildings, mechanical rooms or storage areas with poor air circulation can develop elevated humidity, fostering mold growth that goes unnoticed until it affects air quality or spreads to adjacent spaces.
- Post-Water-Damage: During structural drying in a Mesa or Gilbert property, simply running fans is not enough. Elevated RH (often 60-70%) can persist in the air, allowing mold to colonize materials that are still drying. Measuring humidity guides the proper placement and sizing of dehumidifiers.
Key Takeaway: Controlling airborne moisture is just as important as fixing leaks. Measuring humidity and checking ventilation are proactive steps that address the root cause of many mold problems.
Actionable Inspection Tips
To effectively assess humidity and ventilation, use a hygrometer (humidity meter) and perform these checks:
- Take Baseline Readings: Measure and document humidity levels in multiple locations at different times of day, like the cool, humid morning and the warm, dry afternoon. This helps establish a baseline and identify problem areas.
- Test Exhaust Fans: Turn on the bathroom and kitchen exhaust fans. A simple test is to hold a single square of toilet paper up to the vent; a properly functioning fan should hold it firmly in place. Ensure the fan vents to the exterior, not just into an attic or crawl space.
- Identify Humidity Sources: Be mindful of activities that add moisture to the air. Long showers, boiling water without an exhaust fan, numerous indoor plants, and indoor clothes drying can significantly raise RH.
- Monitor During Drying: After a water leak, monitor humidity daily. The goal is to keep RH below 50% to stop mold from taking hold while the structure dries out. This data helps determine if your dehumidifiers are sufficient.
- Assess Dehumidifier Size: If you use dehumidifiers, make sure they are correctly sized for the space. A small bedroom unit will not manage the moisture in a large basement, which may require a unit rated for more pints per day.
8. Plumbing Inspection for Leaks, Water Damage, and Moisture Accumulation
Plumbing systems are the lifelines of any property, but even a minor failure can become a major source of mold. A complete mold inspection checklist must include a detailed examination of all visible plumbing, as slow, hidden leaks are one of the leading causes of destructive mold growth. This step involves methodically checking supply lines, drain pipes, fixtures, and water heaters for active leaks, signs of past water damage, and moisture that can fuel mold in concealed areas.
An undetected leak under a sink or behind a wall can saturate insulation and drywall for weeks or months. By the time a musty odor becomes noticeable, a significant mold colony may have already formed within the structure, requiring much more extensive remediation.
Why This Inspection Is Critical
A slow drip is all it takes to create the perfect, consistently damp environment mold needs to thrive. Unlike a major pipe burst that gets immediate attention, these small leaks provide a steady water source that can go unnoticed in dark, rarely seen areas like wall cavities, under cabinets, and in crawl spaces.
- For Phoenix Homeowners: Many homes in the valley have supply lines hidden in cabinets or behind appliances. A small leak from a connection can seep into the wall cavity or subfloor, creating a hidden mold problem that only becomes apparent when a strange odor emerges.
- For Older Properties: Homes in established areas like Mesa and Gilbert may have older galvanized pipes that are prone to corrosion and pinhole leaks. These tiny, slow leaks can cause water to accumulate inside walls, leading to structural damage and widespread mold.
- Post-Water-Damage: After fixing a known leak, it's crucial to inspect the entire plumbing system. The event that caused the initial damage, such as a pressure surge, might have stressed other fittings or pipes, creating new, undiscovered vulnerabilities. If you suspect a major failure, it's important to understand the signs of a burst pipe to act quickly.
Key Takeaway: Consistent moisture from plumbing leaks is a direct invitation for mold. A thorough plumbing check is non-negotiable for identifying and stopping mold at its source.
Actionable Inspection Tips
To effectively inspect your plumbing and catch potential mold-causing issues early, follow these practical steps:
- Feel for Moisture: Systematically run your hand along all accessible pipes, fittings, and surrounding surfaces. Feel for dampness, active drips, or "sweating" pipes, which indicate condensation issues that also contribute moisture.
- Inspect Under Sinks: Use a high-powered flashlight and a small mirror to inspect the underside of every sink cabinet. Look for water stains, discoloration, peeling paint, or warped wood, which are all signs of a past or current leak.
- Note Water Stain Colors: Pay attention to the color of any stains you find. Brown or rust-colored stains often point to older, slow leaks where water has oxidized metal components. Lighter, less distinct stains may indicate a more recent water issue.
- Check for Odors: When inspecting under sinks, in basements, or near water heaters, pay close attention to any musty or earthy smells. These odors are a strong indicator of active microbial growth, even if you can't see visible mold.
8-Point Mold Inspection Checklist Comparison
| Inspection Type | Implementation Complexity 🔄 | Resource Requirements ⚡ | Expected Outcomes ⭐📊 | Ideal Use Cases 💡 | Key Advantages ⭐ |
|---|---|---|---|---|---|
| Visual Inspection of HVAC Systems and Ductwork | Moderate — visual + borescope; may need shutdown | HVAC tools, borescope, thermal camera, trained tech; potential cleaning costs | Detects contamination in distribution pathways; informs cleaning vs replacement | Post-water damage, unexplained IAQ issues, pre/post-remediation checks | Targets primary spore distribution; non‑invasive diagnosis |
| Moisture Assessment in Walls, Crawl Spaces, and Concealed Cavities | Moderate–High — sensors, thermal imaging, occasional invasive access | Moisture meters (pin/pinless), thermal camera, humidity loggers; skilled interpretation | Identifies hidden moisture before visible mold; documents drying progress | Preventive surveys, after water events, baseline monitoring for insurance | Early detection prevents structural remediation; objective data |
| Inspection of Foundation, Basement, and Below-Grade Areas | Moderate — confined access; may need structural evaluation | Flashlight, moisture meter, sump pump checks, possible engineer consultation | Finds intrusion points, drainage failures, and active seepage; informs mitigation | Flood‑prone sites, basements/crawlspaces, monsoon-affected properties | Prevents structural damage; reduces long‑term moisture sources |
| Roof Inspection for Leaks, Penetrations, and Water Intrusion Points | Moderate–High — requires roof/attic access and safety precautions | Ladder/binoculars, thermal imaging, PPE, roofing contractor coordination | Locates leaks and vulnerable penetrations; prevents attic mold and downstream damage | Aged roofs, post-storm assessments, recurring attic moisture | Saves on major repairs via early detection; extends roof life |
| Window and Door Frame Inspection for Water Intrusion and Sealant Degradation | Low — visual + borescope or small openings when needed | Caulking tools, mirror/borescope, minor repair materials; low cost fixes | Detects seal failures and frame rot early; prevents cavity moisture | Routine maintenance, sealant aging, visible draft or staining | Cost‑effective prevention; accessible and actionable repairs |
| Inspection of Insulation Condition, Saturation, and Contamination | Moderate — may require invasive removal to confirm saturation | PPE, removal/disposal, replacement insulation, moisture testing | Identifies saturated/contaminated insulation needing replacement; restores thermal performance | After water events, attic/basement inspections, energy‑efficiency upgrades | Improves IAQ and energy efficiency; defines remediation scope |
| Assessment of Relative Humidity Levels and Ventilation Adequacy | Low — measurements and airflow checks; may need monitoring | Hygrometers, ventilation testing, dehumidifiers; ongoing maintenance | Provides objective RH risk profile; guides dehumidification/ventilation fixes | Chronic humidity areas (bathrooms, basements), drying phase after water damage | Non‑invasive; behavior and system fixes often cost‑effective |
| Plumbing Inspection for Leaks, Water Damage, and Moisture Accumulation | Low–Moderate — visual checks; concealed leaks may need pressure testing | Flashlight, moisture meter, plumber coordination, possible invasive access | Identifies active and historical leaks; enables direct root‑cause repairs | Musty odors, slow drains, visible staining, post-water incidents | Often straightforward fixes that prevent extensive remediation |
From Inspection to Action: Your Next Steps in Mold Management
You’ve now worked through a detailed, room-by-room mold inspection checklist, moving from your HVAC system and attic insulation to your foundation and window seals. This proactive approach is the single most important step you can take to protect your Phoenix property’s value and the health of its occupants. By systematically searching for visible signs, hidden moisture, and musty odors, you have created a baseline understanding of your building's current condition.
The power of this process lies not just in finding potential mold, but in identifying the conditions that allow it to grow. Remember, mold is a symptom of a larger moisture problem. The small drip under the sink, the patch of missing caulk around a window, or the poorly graded soil against your foundation are all invitations for water intrusion. Addressing these seemingly minor issues now can prevent a major remediation project down the line.
Distinguishing DIY Fixes from Professional Necessities
Your completed mold inspection checklist will likely fall into one of two categories: minor maintenance or significant concern.
- Minor Maintenance: If you found small, isolated issues like a slow-draining AC condensate line, cracked sealant on a shower door, or a gutter that needs cleaning, these are typically manageable DIY tasks. Fixing them promptly is a cost-effective way to prevent moisture buildup.
- Significant Concerns: Conversely, discovering widespread visible mold (especially if it covers more than 10 square feet), persistent musty smells with no obvious source, or extensive water damage from a past event are clear red flags. These situations often indicate a deeper problem that requires specialized tools and expertise.
Key Takeaway: Your goal is to be a vigilant property owner, not necessarily a mold remediation expert. Knowing the difference between a simple repair and a hazardous contamination scenario is crucial for a safe and effective outcome.
The Critical Role of Documentation and Professional Assessment
The notes and photographs you took during your inspection are invaluable. This documentation serves as a detailed record for your maintenance plan and can be essential for supporting an insurance claim. Clear, dated photos of water stains, damaged materials, and visible growth provide objective evidence of the conditions you discovered.
When your inspection uncovers significant issues, the next step is to contact a certified professional. IICRC-certified technicians possess advanced equipment, such as thermal imaging cameras and moisture meters, to trace water to its source-even behind walls or under flooring. In severe cases, a major plumbing failure like a burst pipe under your house requires immediate attention to prevent extensive water damage and mold growth. A professional can accurately map the full extent of moisture and contamination, which is something a visual inspection alone cannot accomplish.
It is important to remember that professional restoration companies do not make guarantees of service, coverage, or pricing. A formal assessment and a detailed, written scope of work are necessary to create a remediation plan specific to your property's unique situation. Attempting to clean large-scale mold problems without proper containment and personal protective equipment (PPE) can risk cross-contaminating unaffected areas and expose you to harmful spores.
By completing this checklist, you have moved from being reactive to proactive. You are no longer waiting for a problem to appear; you are actively seeking out and eliminating the conditions that cause them. This shift in mindset is the foundation of smart, long-term property management and is the best defense against the destructive potential of unchecked moisture.
When your mold inspection checklist reveals more than you can handle, it's time to call in the experts. Restore Heroes is an IICRC-certified, insurance-preferred contractor specializing in safe and effective mold remediation for Phoenix-area properties. Contact Restore Heroes for a professional assessment and to ensure your property is returned to a safe, healthy condition.