That small, brownish stain on your living room ceiling might seem like a minor cosmetic issue, but it's often the first warning sign of a much larger problem lurking above. In the Phoenix area, water damage can sneak up on homeowners, whether from a powerful monsoon storm, a leaky pipe, or an overworked AC unit struggling with the summer heat. Ignoring these early warnings can lead to significant structural issues, hazardous mold growth, and costly repairs down the line.
This guide details eight critical signs of water damage ceiling you should never overlook. We'll break down what each sign means, from subtle discoloration and bubbling paint to more alarming indicators like sagging and musty odors. You will learn to identify common and hidden clues, understand their potential causes, and know what immediate steps you can take to mitigate the damage.
Understanding these indicators empowers you to act quickly and protect your property. This information is for educational purposes; a professional evaluation is crucial for a definitive diagnosis and solution. For specific advice, always consult with a certified professional who can assess your unique situation.
1. Water Stains and Discoloration
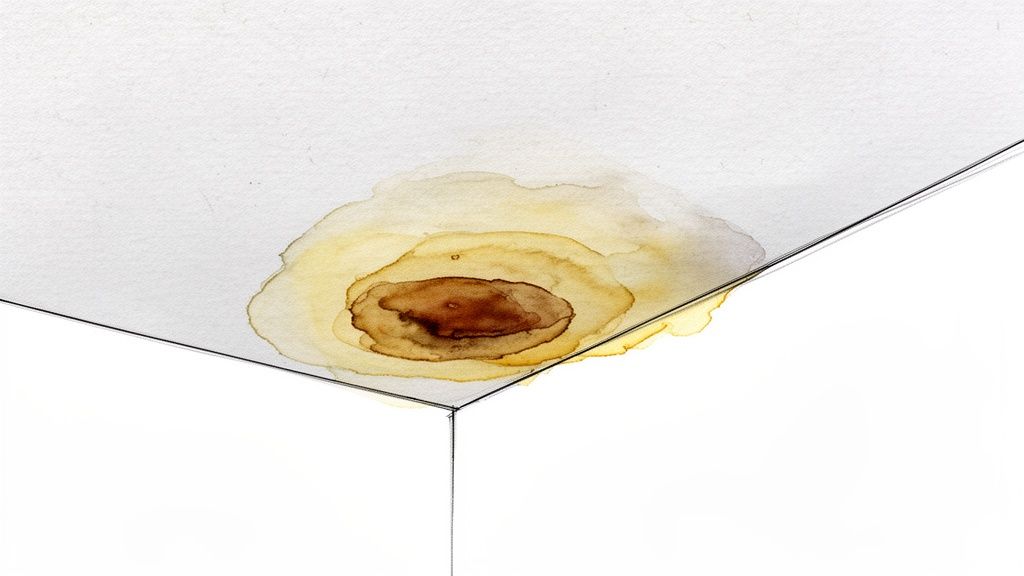
The most obvious and common of all signs of water damage ceiling issues are unsightly stains. These markings typically appear as yellow, brown, or rust-colored patches on your drywall or ceiling tiles. They form when water, carrying minerals from building materials or rust from pipes, seeps through and then evaporates, leaving the discoloration behind. The stain’s appearance can tell a story; fresh, active leaks often create a lighter stain with a distinct, wet-looking edge, while older, dried stains tend to be darker and more uniform in color.
Common Scenarios and What They Mean
The location and shape of the stain can often point directly to the source. A round, concentrated stain in a bathroom ceiling might indicate a slow leak from the toilet wax ring on the floor above. In a kitchen, a long, linear stain could be from a failing refrigerator water line. In Phoenix, it's common to see ceiling stains near AC vents caused by a clogged HVAC condensation line, a frequent issue during our intense summer months.
Actionable Steps to Take Immediately
Discovering a water stain requires quick action to prevent further damage. Painting over it is only a cosmetic fix that traps moisture and allows mold to grow unseen. Instead, follow these steps:
- Document Everything: Take clear photos of the stain from multiple angles. Note its size, color, and location. This documentation is crucial for any potential insurance claims.
- Monitor for Growth: Gently outline the stain's edges with a pencil. Check it daily to see if the stain is expanding, which signals an active leak that needs immediate attention.
- Locate the Source: If it's safe to do so, check the area directly above the stain, such as an attic or the floor above, for obvious signs of moisture or dripping.
- Consult a Professional: Contact a licensed restoration company immediately. Certified technicians can trace the moisture source, assess the full extent of the damage (which often goes beyond the visible stain), and begin the drying process. Addressing the issue early can significantly impact the overall water damage repair cost.
2. Sagging or Bulging Ceiling Materials
Beyond discoloration, one of the most alarming signs of water damage ceiling problems is a physical change in its shape. A ceiling that is sagging, bulging, or drooping is a clear warning that a significant amount of water has accumulated. As materials like drywall and insulation become saturated, their structural integrity is compromised, and the immense weight of the trapped water pulls them downward. This is not just a cosmetic issue; it represents a serious structural hazard that signals an advanced stage of water damage and an increased risk of collapse.
Common Scenarios and What They Mean
A sagging ceiling often points to a catastrophic and ongoing leak. In a Phoenix-area home, this could be a kitchen ceiling bulging due to a slow, multi-day leak from an upstairs bathroom plumbing failure that has thoroughly soaked the subfloor and insulation. It might also manifest as a sagging section in a garage ceiling after a monsoon storm compromises the roof, or from a burst water heater in the attic that rapidly releases a large volume of water. The severity of the sag directly correlates to the amount of water and the duration of the leak.
Actionable Steps to Take Immediately
A bulging or sagging ceiling is a critical emergency that requires you to prioritize safety above all else. Do not attempt to touch, poke, or repair the area yourself, as this could trigger a sudden collapse.
- Evacuate the Area: Immediately clear the room of all people and pets. Cordon off the area to prevent anyone from walking underneath the compromised ceiling.
- Document from a Distance: If it is safe to do so, take photos and videos of the damage from a distance. This documentation is vital for insurance purposes.
- Call for Emergency Help: Your first call should be to a 24/7 water damage restoration company. Certified professionals are equipped to handle hazardous situations, safely release the water, and begin the mitigation process. The speed of this response is critical.
- Understand the Timeline: Addressing severe structural damage takes time. You can get an idea of the process by learning more about what water damage restoration involves.
3. Peeling or Bubbling Paint
When paint begins to blister, bubble, or peel away from your ceiling, it’s a clear sign that moisture has penetrated the surface. This happens when water gets trapped between the drywall and the paint layer, breaking the paint's bond and causing it to lift. These bubbles, often filled with water, are one of the earlier signs of water damage on a ceiling, frequently appearing before significant staining or structural issues become obvious.
Common Scenarios and What They Mean
The location of the peeling paint can help identify the cause. Bubbling paint on a bathroom ceiling, for instance, could result from a slow roof leak combined with constant humidity from showers. In a laundry room, peeling paint might point to condensation issues from an improperly sealed dryer vent. Seeing paint failure on a ceiling directly below an upstairs kitchen or bathroom is a strong indicator of a slow leak from an appliance water line or a drain pipe.
Actionable Steps to Take Immediately
Like water stains, peeling paint signals a deeper problem that needs more than just a cosmetic fix. Scraping and repainting will not solve the underlying moisture issue and will likely fail again. Instead, take these critical steps:
- Document the Damage: Take detailed, dated photos of the bubbling and peeling areas. Capture both close-up shots and wider views to show the full context of the damage for potential insurance documentation.
- Do Not Puncture Bubbles: Resist the urge to pop any water-filled blisters. Puncturing them can release water, potentially spreading moisture and making it harder for professionals to trace the leak's origin.
- Perform a Gentle Check: Carefully probe the area with your hand. If the drywall or plaster beneath the paint feels soft, soggy, or cool to the touch, it confirms the presence of significant moisture.
- Call for Professional Assessment: Contact a certified water damage restoration company. They have specialized moisture meters to determine the extent of the water saturation behind the paint and can safely address both the water source and the resulting damage. Early intervention can prevent the need for more extensive and costly repairs.
4. Visible Mold Growth
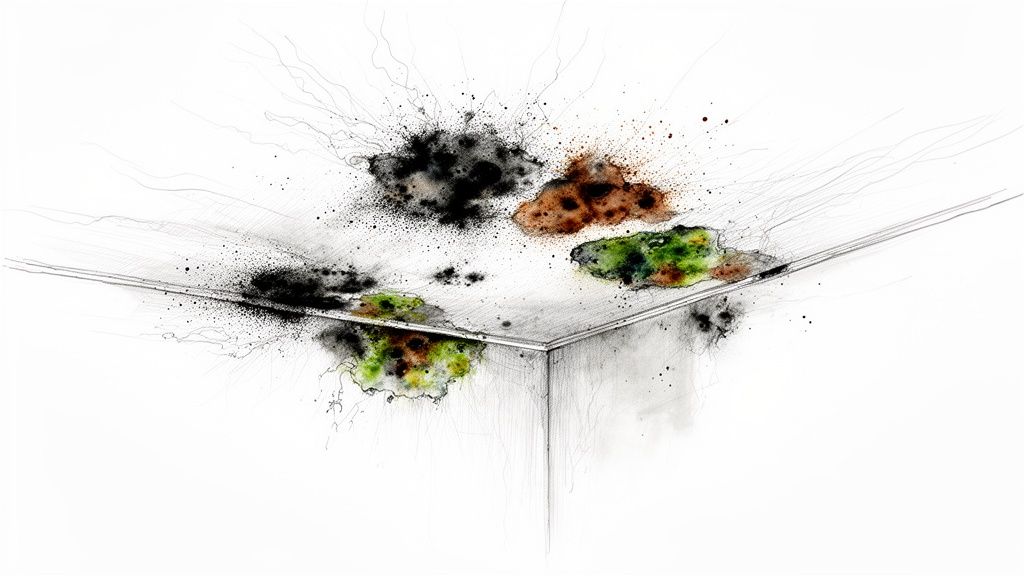
Beyond simple stains, one of the most alarming signs of water damage ceiling issues is the appearance of visible mold. Mold colonies can present as black, green, or even white fuzzy or slimy patches on your ceiling surfaces. Their presence is a definitive red flag, indicating that a moisture problem has persisted long enough for microbial growth to take hold. Mold thrives on moisture, organic material (like the paper on drywall), and darkness, a perfect storm found within a damp ceiling cavity.
Common Scenarios and What They Mean
Visible mold growth is a secondary sign of damage that confirms a long-term water source. In a bathroom, black spots on the ceiling often point to a chronic, slow leak from plumbing fixtures combined with high humidity from showers. In a commercial building, mold near an HVAC return could be caused by a condensation line backup creating constant dampness. In Phoenix homes, attic mold is often a result of a roof leak from monsoon storms, compounded by poor ventilation that traps humid air.
Actionable Steps to Take Immediately
Discovering mold is a serious issue that requires a careful and immediate response to protect both your property and your health. Disturbing mold colonies can release spores into the air, worsening the problem.
- Document the Scene: Take clear, well-lit photos of all visible mold from various angles. This documentation is vital for insurance purposes and for the remediation professionals.
- Avoid the Area: Limit access to the affected room, especially for individuals with respiratory issues, allergies, or compromised immune systems. Do not attempt to clean or disturb the mold yourself.
- Shut Down Airflow: Turn off your HVAC system and any ceiling fans in the area to prevent the circulation of mold spores throughout your property.
- Contact Certified Professionals: Immediately call a licensed and IICRC-certified restoration company. Professional mold removal involves specialized containment, air filtration, and remediation techniques to safely and effectively eliminate the hazard and address the underlying moisture source.
5. Soft or Spongy Ceiling Material
Beyond what you can see, what you can feel is a critical indicator of water damage. Drywall, plaster, or acoustical tiles that feel soft, spongy, or give way easily under gentle pressure have likely been saturated with moisture. Building materials are designed to be rigid; when they absorb water, their internal structure breaks down, causing them to lose integrity and become pliable. This tactile sign often reveals significant moisture penetration that might not yet be visible as a stain, acting as an early warning before the material fails completely.
Common Scenarios and What They Mean
A soft spot in the ceiling is a direct clue that water has soaked the material, often from a persistent, slow leak. In a bathroom, a soft acoustical tile could be absorbing drips from a leaking toilet seal on the floor above. A kitchen soffit that feels spongy might hide a slow leak from a refrigerator's icemaker line. In Phoenix, it’s not uncommon for drywall near an attic access point to soften due to a condensation leak from an HVAC unit operating overtime during the summer, a problem that can go unnoticed for weeks.
Actionable Steps to Take Immediately
Discovering a soft or spongy ceiling signals that the material's structural integrity is compromised, requiring a careful and immediate response. Do not push hard on the area, as it could easily collapse.
- Perform a Gentle Touch Test: Wearing gloves, carefully and gently press on the suspected area. If it feels damp or compresses, you have confirmed saturation. Avoid applying forceful pressure.
- Document and Measure: Take photos of the affected section and measure its dimensions. This documentation is vital for tracking the problem and for any potential insurance discussions.
- Clear the Area Below: Remove furniture, electronics, and any valuables from directly beneath the soft spot. This is a safety precaution in case the ceiling material gives way.
- Contact a Restoration Professional: This is one of the most serious signs of water damage ceiling because it indicates advanced saturation. A professional restoration team can safely assess the structural risk, identify the hidden water source, and begin a safe removal and drying plan before further damage or collapse occurs.
6. Odor Indicators (Musty or Moldy Smells)
Sometimes the first warning sign of water damage on a ceiling isn't something you see, but something you smell. A persistent musty, earthy, or moldy odor is a strong indicator of hidden moisture and microbial growth. This smell is caused by the metabolic gases, or microbial volatile organic compounds (MVOCs), released by mold, mildew, and bacteria as they consume and decompose wet building materials like drywall, wood, and insulation. Since the odor can permeate through materials before any visible signs appear, trusting your sense of smell can be key to early detection.
Common Scenarios and What They Mean
The timing and location of the odor can help pinpoint the problem. A musty smell in a bathroom that gets stronger after a storm could point to a roof leak that has saturated the attic insulation above. In a commercial building, a strange odor coming from ceiling vents might be from a slow leak in an HVAC condensation line within the ceiling plenum. Phoenix homeowners might notice this smell in a laundry room, which could be a sign of a slow-leaking washing machine hose inside the wall cavity that is causing moisture to wick up into the ceiling joists.
Actionable Steps to Take Immediately
An unexplained musty odor should never be ignored or covered up with air fresheners. Masking the smell only allows the underlying moisture and mold problem to worsen. Take these proactive steps:
- Trust Your Senses: If you smell something musty that doesn't have an obvious source and doesn't go away, assume there is a moisture problem until it's proven otherwise.
- Note the Details: Pay attention to where the smell is strongest and when you notice it most. Is it more pungent after a monsoon rain or when the AC has been running all day? This information is valuable for professionals.
- Avoid DIY Mold Removal: Do not attempt to open up walls or ceilings to find the source yourself. Disturbing a hidden mold colony can release a high concentration of spores into your living or working space, creating a significant health hazard.
- Call for a Professional Assessment: The presence of a persistent musty odor warrants an immediate call to a certified restoration company. Technicians use specialized equipment like moisture meters and thermal imaging cameras to locate the hidden water source and assess the extent of the contamination without unnecessary demolition. Understanding the complexities of mold damage is the first step toward effective and safe remediation.
7. Rust Stains or Discoloration on Metal Components
When water repeatedly meets metal, rust is the inevitable result. Finding reddish-brown or orange stains on metal components in or near your ceiling, such as fasteners, ductwork, or light fixtures, is a strong indicator of prolonged moisture exposure. Metal oxidation needs both oxygen and water, so these rust stains are clear signs of water damage ceiling problems that may have been developing for some time, often hidden from immediate view. The rust itself can also stain adjacent drywall, creating a tell-tale trail pointing back to a persistent leak.
Common Scenarios and What They Mean
The location of the rust often reveals the water source. Rust on roof support fasteners in an attic points to a roof leak, a common issue after intense Phoenix monsoon storms. In a commercial building or basement, rust on HVAC ductwork or electrical conduit is frequently caused by a backed-up condensation line or high humidity. You might also notice rust forming around the base of a ceiling light fixture, which could indicate a leak from a bathroom or plumbing line directly above it.
Actionable Steps to Take Immediately
Rust indicates a chronic issue that can compromise structural integrity and electrical systems, so it requires a thorough investigation. Ignoring it can lead to component failure and more extensive damage.
- Document and Photograph: Take detailed photos of the rusted components and any surrounding stains. Note the exact location and try to capture the extent of the corrosion.
- Assess the Damage: If it’s safe, check whether the rust is just on the surface or if it's causing the metal to corrode and weaken. Gently probe the area with a stiff brush to see if the metal flakes or crumbles, which indicates deep corrosion.
- Trace the Moisture Path: Look "uphill" from the rust stains. Check attics, crawlspaces, or mechanical areas above the ceiling for the source of the water causing the oxidation.
- Bring in Specialists: Do not delay in contacting professionals. A restoration company can identify the water source and begin drying. For significant rust on structural elements or HVAC systems, you may also need to consult with HVAC contractors or structural engineers to assess the components' integrity and safety.
8. Dripping Water or Active Moisture Seepage
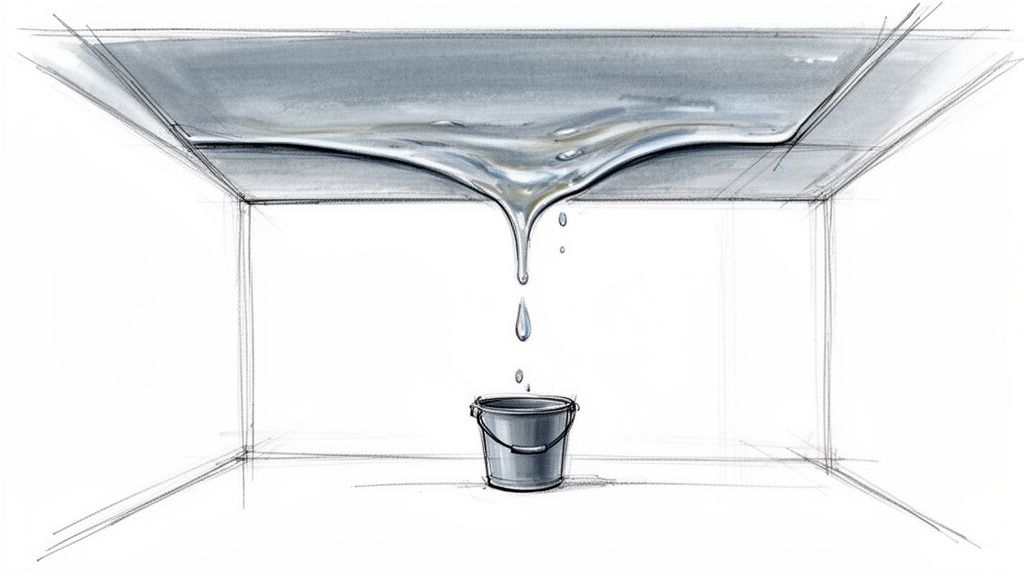
Perhaps the most alarming and urgent of all signs of water damage ceiling problems is the presence of active dripping. Visible water droplets forming on, seeping through, or dripping from your ceiling materials signals an immediate and ongoing water intrusion event. Unlike a static stain, dripping water means that damage is actively accumulating in real-time, saturating insulation, drywall, and potentially affecting structural components. This is not a situation to observe; it's a clear emergency that demands a rapid response.
Common Scenarios and What They Mean
The rate and location of the dripping can provide critical clues about the source and severity. A steady, continuous drip from a bathroom ceiling likely points to a catastrophic plumbing failure above, such as a burst supply line or a completely failed toilet seal. In an attic or top-floor room, dripping that only occurs during a rainstorm is a clear indicator of a significant roof leak. Here in Phoenix, a common culprit is a backed-up HVAC condensation pan in the attic, which can produce a surprisingly fast and steady drip, often mistaken for a plumbing leak.
Actionable Steps to Take Immediately
When you see water actively dripping from your ceiling, every second counts. Your immediate goal is to mitigate damage and ensure safety before professional help arrives.
- Contain the Water: Immediately place buckets, pans, or waterproof tarps directly under the drip to catch the water. This simple step can prevent secondary damage to your flooring, furniture, and belongings.
- Shut Off the Source (If Possible): If you suspect a plumbing issue is the cause, shut off the main water valve to your home to stop the flow. For a suspected roof or HVAC leak, this may not be possible, but controlling the plumbing is a critical first step.
- Document with Video: Use your phone to take a video of the dripping. Capturing the rate and volume of the water provides invaluable evidence for insurance adjusters and helps restoration professionals gauge the severity of the situation.
- Call for Emergency Help: This is not a DIY repair. Contact a certified restoration company immediately. They have the specialized equipment and expertise to handle active water intrusions safely and effectively, much like the process needed to handle a major flood. For more information on professional water removal techniques, you can learn about the steps for a flooded basement on restoreheroesaz.com.
- Ensure Safety: If the ceiling is sagging heavily or the dripping is severe, evacuate the area immediately. A water-logged ceiling can collapse without warning. Avoid using any lights or electrical appliances in the affected room to prevent the risk of electrical shock.
8-Sign Ceiling Water Damage Comparison
| Indicator | 🔄 Implementation complexity | ⚡ Resource requirements | 📊 Expected outcomes | Ideal use cases | ⭐ Key advantages / 💡 Tips |
|---|---|---|---|---|---|
| Water Stains and Discoloration | Low — visual detection; source tracing may add complexity | Low — camera, moisture meter, attic access | Locate approximate leak; document for claims; may need cosmetic repair | Routine inspections; early leak detection; insurance documentation | High visibility; early warning. ⭐⭐⭐ 💡 Photograph, mark edges |
| Sagging or Bulging Ceiling Materials | High — emergency structural assessment and mitigation | High — pumps, shoring, crew, rapid response | Prevent collapse; likely material removal/replacement | Acute leaks showing deformation; collapse risk scenarios | Unambiguous urgent sign. ⭐⭐⭐ 💡 Evacuate area; call 24/7 pros |
| Peeling or Bubbling Paint | Low–Moderate — trace moisture source before repairs | Low — moisture meter, basic repair tools; may need drying | Early detection; cosmetic repair possible after source remediation | Bathrooms, kitchens, areas with humidity or minor leaks | Early indicator before structural damage. ⭐⭐ 💡 Probe bubbles; document extent |
| Visible Mold Growth | High — containment, testing, certified remediation required | High — PPE, HEPA filtration, negative pressure, licensed crew | Health-risk mitigation; removal and possible rebuild; air-quality restored | Long-standing leaks, musty odors, visible colonies | Clear health hazard; triggers remediation. ⭐⭐⭐ 💡 Do not disturb; call certified pros |
| Soft or Spongy Ceiling Material | Moderate — safe access and structural evaluation needed | Moderate — moisture meters, ladders, replacement materials | Confirms saturation; often necessitates material replacement | Hidden leaks found during inspection; prevents collapse | Tactile confirmation of moisture. ⭐⭐ 💡 Gently press; document locations |
| Odor Indicators (Musty/Moldy Smells) | Moderate — odor tracing may require thermal imaging and testing | Moderate — air sampling, thermal camera, moisture detection tools | Reveals hidden contamination; guides targeted remediation | Suspected hidden mold or post-flood assessments | Early non-visual warning. ⭐⭐ 💡 Note timing/patterns; don't mask odors |
| Rust Stains on Metal Components | Moderate — inspect mechanical/attic systems; may need specialists | Moderate — visual inspection, brushes, HVAC/structural consults | Indicates corrosion and prolonged moisture; possible system replacement | Attics, mechanical rooms, HVAC maintenance checks | Shows long-term moisture impact on systems. ⭐⭐ 💡 Check corrosion depth; involve specialists |
| Dripping Water / Active Moisture Seepage | High — immediate leak stop, extraction, and safety measures | High — pumps, extraction equipment, rapid-response crew, repair teams | Immediate mitigation to prevent cascading damage; strong claim evidence | Burst pipes, active roof leaks, HVAC failures | Most urgent indicator; direct leak source. ⭐⭐⭐ 💡 Place containers, shut off water, call emergency services |
Your Next Steps: How to Respond to a Damaged Ceiling
Identifying the signs of water damage ceiling is a victory in itself, but it marks the beginning, not the end, of protecting your property. You are now equipped to spot everything from a faint, yellowish stain to the more urgent issues of a sagging drywall panel or the distinct musty odor of hidden moisture. Each sign we've covered, whether it's bubbling paint, rust on vent covers, or active dripping, is your ceiling’s way of signaling a problem that needs immediate attention. Ignoring these warnings allows moisture to migrate, leading to structural decay, widespread mold contamination, and significantly more complex and costly repairs down the road.
The key takeaway is that your response should match the severity of the sign. A small, dry stain might prompt a cautious DIY investigation into a potential slow leak, but a bulging ceiling is a structural and safety emergency. Proactive intervention is always the most effective strategy. Acting quickly minimizes the damage, prevents secondary issues like mold growth, and ultimately protects the value of your property and the health of its occupants. This is especially true here in Phoenix, where a minor roof leak from a monsoon storm or a slow drip from an overworked AC unit can quickly escalate in our climate.
Your Action Plan for Ceiling Water Damage
Once you've spotted one or more signs, your next steps are critical. Here is a simplified, actionable plan to guide you:
- Safety First: If the ceiling is sagging or bulging, immediately clear the area below. Turn off the electricity to the affected area at the circuit breaker if there are lights or fixtures nearby to prevent electrical hazards.
- Document Everything: Before you touch anything, take clear photos and videos of the damage from multiple angles. This documentation is invaluable for insurance claims and provides a baseline for restoration professionals.
- Control the Source (If Possible): If you can safely identify and access the source of the water, such as a leaky pipe under a sink on the floor above, shut off the local water supply valve. For roof leaks or unknown sources, place buckets to catch drips and protect your flooring.
- Seek Professional Assessment: Do not delay in contacting a certified restoration specialist. An IICRC-certified team has the advanced tools, like thermal imaging cameras and moisture meters, to accurately trace the extent of the water intrusion without unnecessary demolition. This professional assessment is crucial for understanding the full scope of the problem, which often extends far beyond what is visible.
Remember, what you see on the surface is often just a fraction of the actual problem. Water can travel along ceiling joists and inside wall cavities, creating hidden pockets of moisture that become breeding grounds for mold. A professional inspection can help ensure nothing is missed, providing a clear path forward for effective restoration. While we accept all insurance, we cannot make any guarantees of coverage; a detailed professional assessment will provide the necessary documentation to support your claim. By taking these decisive steps, you shift from reacting to a problem to proactively managing a solution, ensuring your home or business is returned to a safe, healthy, and stable condition.
Don't let water damage compromise your property's safety and value. The certified professionals at Restore Heroes specialize in water damage restoration, using advanced technology to quickly assess and mitigate ceiling damage throughout the Phoenix metro area. Contact us for a free onsite inspection and expert guidance on your next steps.