
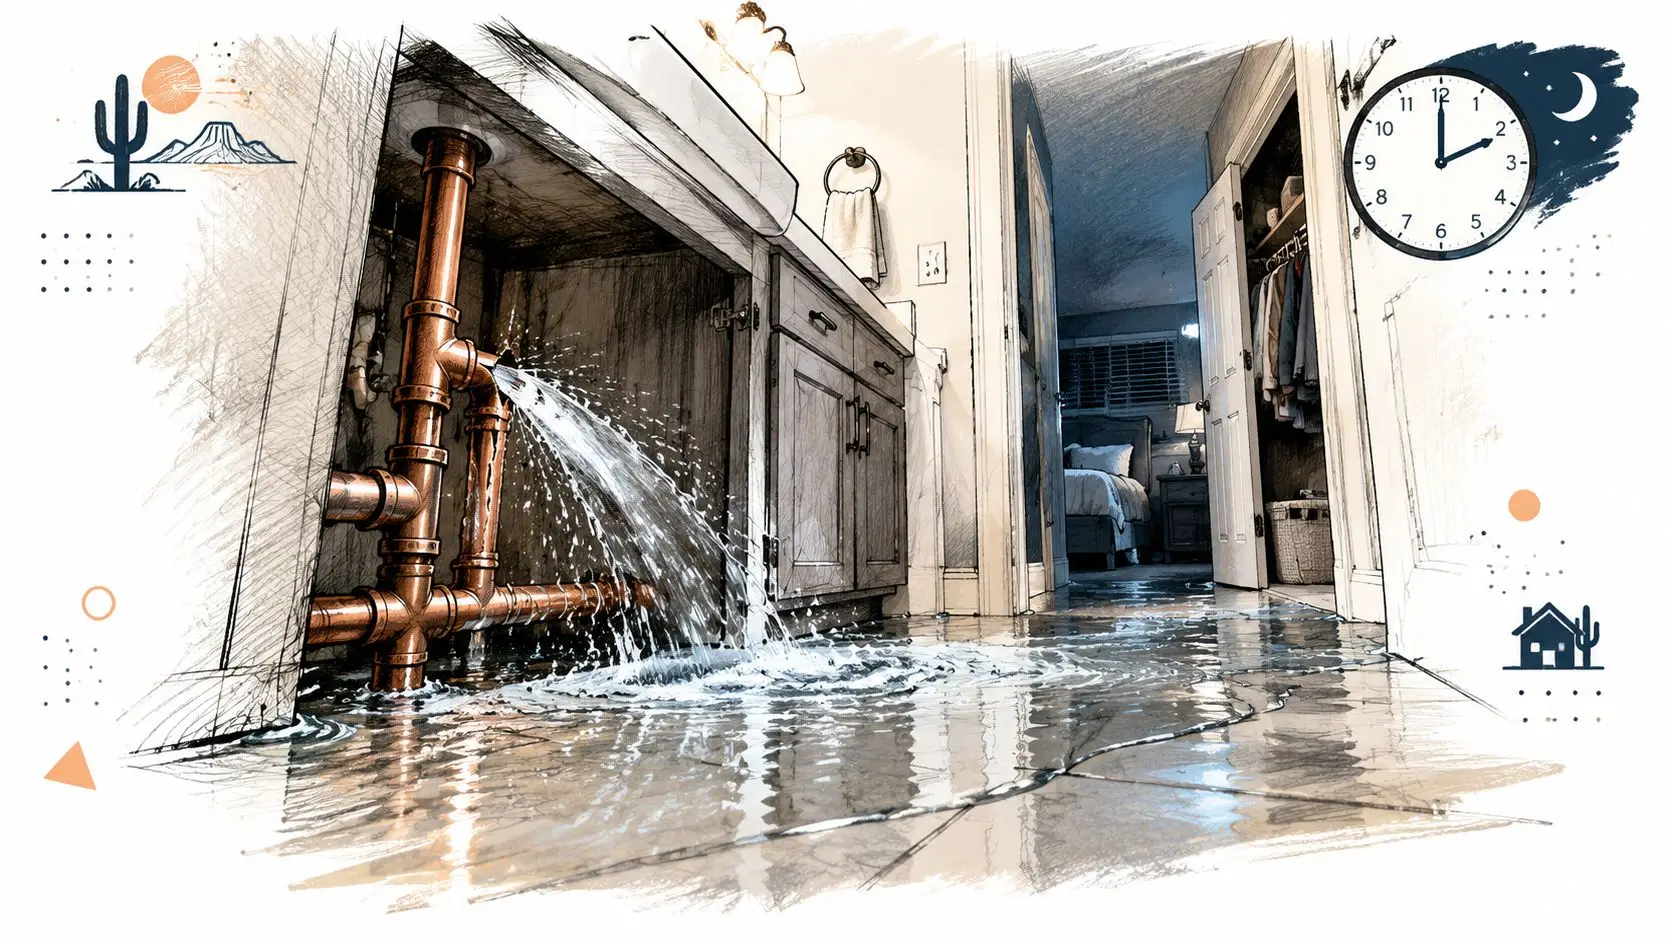
At 2 a.m., a Phoenix homeowner may hear a faint hiss before seeing any water. A supply line behind a bathroom vanity has split, water is crossing the tile, the baseboard is swelling, and carpet in the nearby bedroom feels warm and wet underfoot. By the time a mop makes a difference, water may already be inside the wall and under the flooring.
That's why burst pipe repair in Phoenix is more than replacing a damaged section of plumbing. The pipe needs attention, but the larger loss usually comes from water extraction, hidden moisture, structural drying, and reconstruction. The following playbook focuses on the decisions that protect your home during the first minutes, the standards a professional crew should follow, and the insurance distinction between the failed pipe and the damage it caused.
What a Burst Pipe Actually Looks Like in a Phoenix Home
A burst pipe doesn't always announce itself with a dramatic spray. In one common overnight scenario, the first clues are a sharp hiss behind the vanity, a spreading sheet of water across tile, and a bedroom closet whose carpet has started to darken at the edge. Drywall may swell along the bottom seam. Paint can bubble. Water staining may creep upward even though the visible leak appears low.
Phoenix homes also experience quieter failures. A ranch home in Ahwatukee may develop a slow slab leak when a pinhole forms in a copper line beneath the foundation. Instead of a flood, the homeowner notices an unexplained warm patch on the floor, damp flooring, or a water meter that moves when every fixture is off. Water heaters can fail in garages after years of service, while irrigation poly lines split under intense summer exposure and send water toward foundations or exterior walls.
Freezing remains a real, if less frequent, cause. Central Phoenix has recorded freezing temperatures on 15 occasions since 2010, while the full historical record averages 8 days per year at 32°F or below. That average fell to about 1 day per year during 1991–2020, according to Phoenix freezing-pipe guidance and climate data. Even a brief cold snap can rupture an unprotected hose bib, an exposed exterior line, or PEX in an attic or poorly insulated wall.
Practical rule: Treat the first minutes as damage control, not cleanup. Pressurized water can travel through framing, padding, cabinets, and subflooring before the visible puddle looks severe.
An average burst pipe can release 4 to 8 gallons per minute, or as much as 480 gallons per hour when the flow continues, according to Phoenix water-damage claim data. That volume explains why a small plumbing failure can become a restoration project.
The first decisions matter
Shut off the main supply. In many Phoenix properties, the main valve is in the front curb box, with another valve near the water heater. If the leak is limited to a toilet, sink, or appliance, the local angle stop may control it. If you're unsure, use the main shutoff rather than losing time searching for the exact branch valve.
Protect yourself from electricity. Water along a baseboard can reach a GFCI outlet or bedroom receptacle. If standing water is present, don't touch the electrical panel while standing in it. Move to a dry location, shut off only the affected circuit if you can do so safely, and call an electrician or emergency responder when the panel or wiring may have been exposed.
Contain what you can. Towels, buckets, and a wet vacuum can limit migration after the source is controlled. Move furniture from wet carpet only if you can lift it safely without spreading contamination or injuring yourself. Place foil, blocks, or plastic beneath furniture legs when appropriate, but don't drag heavy pieces across saturated flooring.
Record the condition before demolition. Take wide photographs of every affected room, close-ups of the failed pipe, the water meter reading, and a short video describing when you discovered the leak and what you did. These records help a plumber, restoration estimator, and adjuster understand the sequence. More warning signs are listed in this guide to the signs of a burst pipe.
A sudden wall failure, a slow slab leak, a water-heater rupture, and a winter freeze look different at first. They share the same operational problem. Water moves faster than a homeowner can mop, and hidden moisture determines much of the eventual repair scope.
Safe Temporary Fixes You Can Try Before Help Arrives
Your temporary objective is simple: stop or reduce the flow without creating a second emergency. Shut the local angle stop beneath a sink or toilet when the valve turns normally. If the valve is seized, don't force it with a wrench and risk breaking the fitting inside the wall. Use the main shutoff and arrange professional help.
A small copper pinhole may accept a short-term wrap of self-fusing silicone repair tape. A small split in an accessible line may be contained with a rubber sleeve and hose clamps. A broken hose bib can sometimes be capped with the correct threaded cap, provided the water is fully off and the fitting isn't damaged beyond the connection.
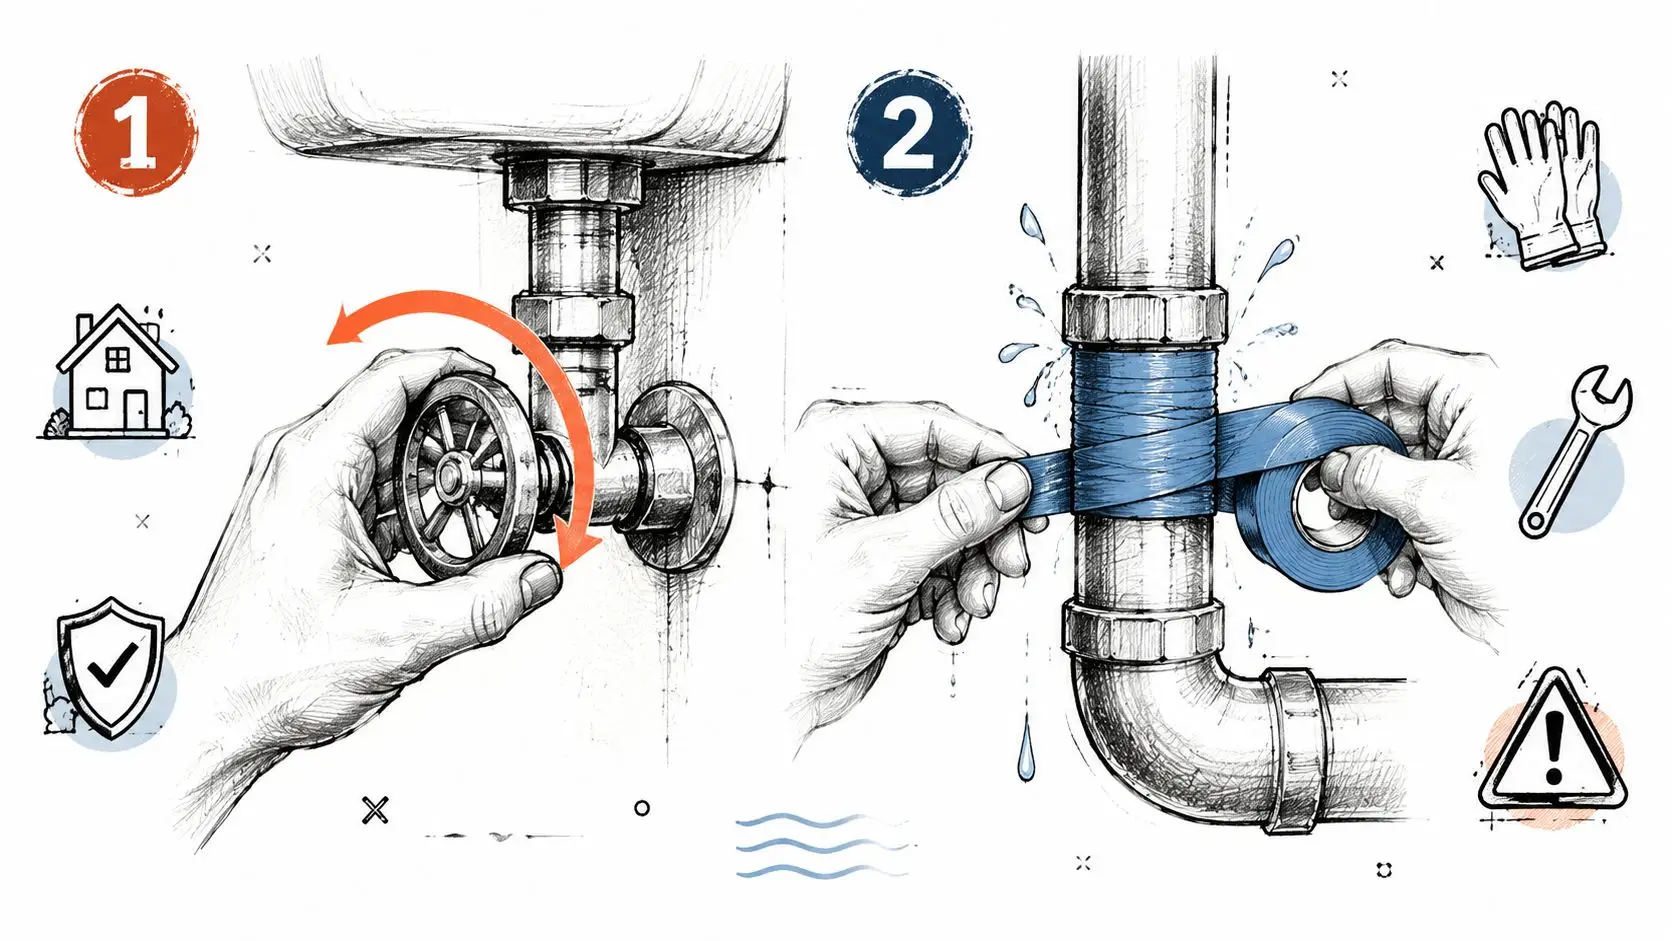
These measures are only temporary. Don't open swollen drywall to search for a leak, sweat a solder joint with a propane torch inside a confined wall cavity, or attempt a repair while the line remains under city pressure. A slab leak is not a DIY project. Phoenix slab-on-grade construction can put supply lines beneath concrete, and an unsuccessful repair may release water again beneath the home.
While waiting, clear furniture and boxes from access paths, move pets to a dry room, and keep children away from standing water. If the failed source is a water heater, tell the responding crew if water may have mixed with combustion residue or other contaminants. You can also review the safest way to locate your emergency water shutoff.
The right goal is not to finish the plumbing repair. It's to stop the flow, avoid injury, preserve evidence, and make the site accessible for a licensed plumber and an IICRC-certified restoration company.
What a Professional Mitigation Job Actually Involves
A professional mitigation job begins with information, not equipment. The crew should inspect the loss, identify the source and affected materials, and create a moisture map using pin meters, non-invasive meters, and, when useful, thermal imaging. A thermal camera can highlight temperature differences, but it doesn't replace meter readings or prove that a cavity is dry.
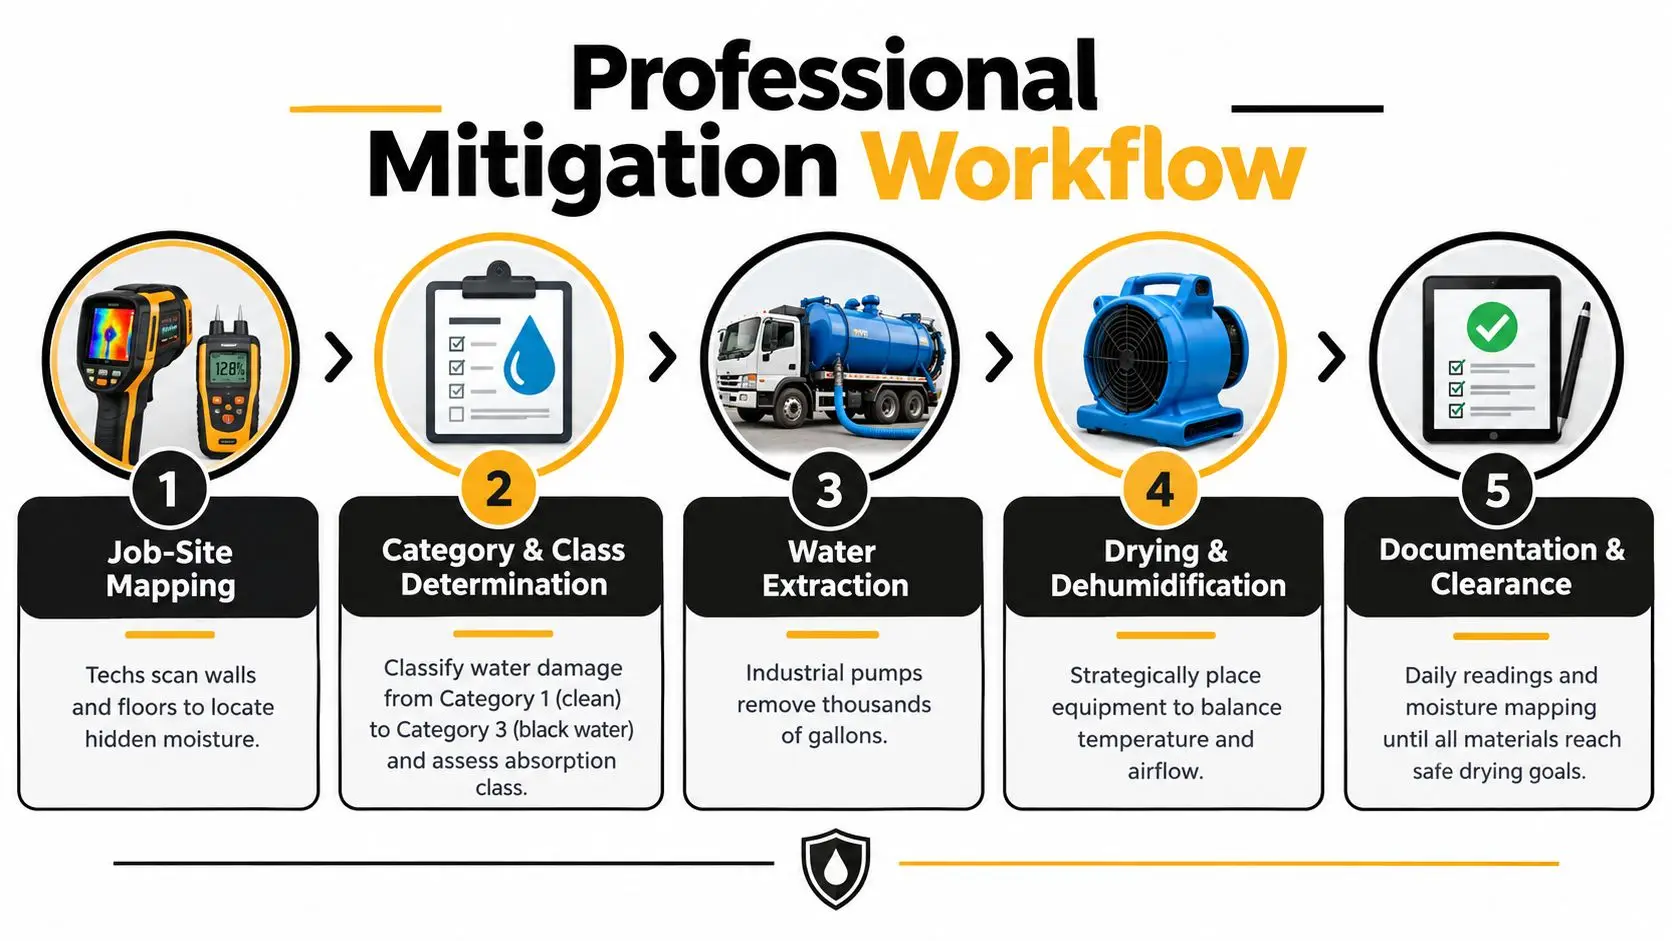
The technician then determines the water category and absorption class. Clean supply water that has remained controlled is different from contaminated water, and a wet floor with limited absorption requires a different response from saturated insulation, ceiling materials, and wall cavities.
Extraction comes before drying
Weighted extractors remove water from carpet and padding. Truck-mounted or portable extraction units handle larger volumes, while controlled demolition may remove unsalvageable drywall, baseboards, insulation, or other materials that block access to wet cavities. Cutting without a moisture map wastes material. Refusing to open a cavity that remains wet can leave the structure at risk.
The crew should position air movers and LGR dehumidifiers based on the wet footprint, airflow, temperature, and humidity. Phoenix's naturally dry conditions can help, but they don't eliminate the need for verification. Moisture can remain inside framing, under cabinets, and beneath flooring even when the room feels comfortable.
Drying needs a documented endpoint
IICRC S500-aligned practice compares affected materials with an unaffected reference material in the same building. The target is generally within 2 to 4 percentage points of that reference, with readings recorded through job logs, as described in this IICRC S500 water-damage workflow. Surface readings alone can miss a wet wall cavity or subfloor, so the crew should revisit those areas and confirm that readings stabilize at the dry standard.
Residential drying commonly targets indoor relative humidity around 40% to 50%. Typical drying can take 2 to 3 days for Class 1 losses and 5 to 7 days or longer for Class 3 losses, depending on the extent of saturation, according to structural drying and dehumidification guidance. A quote that lists only “fans” without extraction, monitoring, equipment placement, and final documentation is incomplete.
For a practical explanation of the service sequence, review water damage mitigation services.
Real Cost Drivers for Burst Pipe Repair in Phoenix
A burst-pipe bill makes more sense when you separate plumbing, mitigation, and reconstruction. The failed pipe may need a localized repair, while the released water creates a second scope involving extraction, drying, material removal, and rebuilding. In Phoenix, rapid water volume can make that second scope larger than the pipe repair itself.
Industry estimates commonly place Phoenix burst-pipe plumbing repairs at roughly $475 to $2,375, with after-hours dispatch adding $150 to $300, according to Arizona claims and restoration guidance. Those figures apply to the plumbing side and do not establish the total property-loss cost. For a fuller breakdown of the factors behind these figures, review this guide to burst pipe repair cost.
| Work Phase | Low Range | High Range | Main Cost Drivers |
|---|---|---|---|
| Plumbing repair | $475 | $2,375 | Access, pipe location, slab work, emergency timing, and whether replacement extends beyond the failed section |
| Mitigation and drying | Not fixed | Not fixed | Water volume, affected area, material absorption, extraction needs, equipment duration, and hidden moisture |
| Reconstruction | Not fixed | Not fixed | Drywall, flooring, cabinets, trim, paint, insulation, finish matching, and access repairs |
The “not fixed” entries are intentional. The available Phoenix pricing range addresses burst-pipe plumbing work, not a universal mitigation or reconstruction charge. A contained one-room loss differs sharply from water that reaches multiple rooms, wall cavities, cabinets, or a slab. Material absorption, access, and the time required to remove and dry affected assemblies can change the scope quickly.
Request separate invoices or clearly separated line items. The plumbing invoice should identify the source repair. The mitigation scope should list extraction, demolition, equipment, monitoring, and drying documentation. Reconstruction should identify the materials and access repairs required after the structure reaches its documented dry goal.
A high total may reflect extensive water-loss work even when the pipe repair is simple. A low quote that omits moisture mapping, monitoring, or required removal can lead to rework. Compare the scope and documentation, not only the final amount.
How Insurance Handles a Phoenix Burst Pipe Claim
A burst pipe claim starts with two separate questions: what failed, and what water damaged the home. After making the property safe and controlling the source, notify your insurer promptly. Photograph and video the rooms, damaged materials, failed pipe, water meter, contents, and visible access points before cleanup changes the scene. Keep receipts for emergency supplies, temporary accommodation, damaged contents, and services.
Most policies distinguish between the failed plumbing component and the resulting water damage. Sudden and accidental water damage is often covered, while the pipe itself may be treated as wear and tear. Damaged drywall, flooring, cabinets, and tear-out needed to reach the leak can receive different treatment under the policy. For a detailed look at coverage rules, see this guide on whether homeowners insurance covers busted pipes, along with this Arizona water-damage claim guide.
Keep the claim file organized
Dwelling coverage generally addresses eligible structural damage, including mitigation and rebuilding, subject to the policy terms and deductible. Personal property coverage concerns affected contents. Loss-of-use coverage may apply when the home is temporarily unlivable, but limits, conditions, and documentation requirements vary by policy.
Submit the plumber's invoice separately from the mitigation invoice. Give the adjuster the moisture map, equipment records, daily readings, photographs, demolition notes, and final drying report. The file should show why materials were removed, how far moisture traveled, and why the crew stopped equipment. This distinction matters because the plumbing repair may be limited while mitigation and reconstruction extend through walls, flooring, cabinets, or other affected assemblies.
Common coverage problems include gradual seepage, neglected maintenance, and sewer backups without the applicable endorsement. Floodwater is treated differently from a sudden interior plumbing failure. A verbal statement that “water damage is covered” does not resolve the failed pipe, access work, contents, or reconstruction questions.
Claim preparation: Report the loss promptly, preserve the damaged components when practical, and ask the adjuster to identify which parts of the scope are accepted, reserved, or excluded.
Carriers and public adjusters increasingly expect digital claim files with photos, invoices, and moisture logs organized in one place. These P&C claims AI examples show how claim-processing tools can handle documented information. A public adjuster may help when the scope is disputed or complex, but understand the fee and role before signing an agreement. Your policy and Arizona law control the outcome.
How a Certified Restoration Team Runs the Job
A capable restoration team follows a sequence that protects the building and the claim file. The first call should capture the loss type, source status, affected rooms, safety hazards, and whether the home is occupied. A 24/7 dispatcher may route the loss to an emergency crew, but no contractor should promise coverage, a specific arrival outcome, or a final price before seeing the conditions.
At arrival, the lead technician should walk the property with you, photograph pre-existing conditions, and note risks such as sagging ceilings, wet insulation, slippery flooring, or standing water near electrical equipment. The team then maps moisture through walls, cabinets, flooring, and other assemblies to define the actual footprint.
What good communication sounds like
You should receive a plain-language explanation of:
- The source status: Whether a plumber has stopped the leak and what remains to be repaired.
- The affected materials: Which items may dry in place, which require removal, and why.
- The equipment plan: Where air movers and dehumidifiers will go and what access they require.
- The monitoring schedule: How readings will be recorded and what dry goal the crew is using.
- The reconstruction boundary: Which work is mitigation and which work begins after drying.
Extraction should occur before equipment is set. Daily moisture and psychrometric readings should be logged against the selected drying goal. If readings don't decline, the technician should adjust airflow, equipment placement, or demolition rather than leaving machines running without explanation.
Restore Heroes is one Phoenix-area option that provides emergency water extraction, structural drying, assessment, and related restoration after a burst pipe has been controlled. Regardless of the company selected, expect final photographs, drying records, and a clear handoff to reconstruction.
Prevention Tips and Quick Answers for Phoenix Homeowners
Phoenix plumbing failures often begin at predictable weak points. Insulate hose bibs and exterior lines on shaded or north-facing walls, where desert cold snaps can affect exposed fittings. Keep the water heater at a consistent setting and drain a gallon annually to help limit sediment buildup. Exercise the main shutoff once a year so you know it turns before an emergency.
Inspect the irrigation manifold for slow leaks that keep soil wet near the slab. Replace washing-machine and toilet supply lines on a regular maintenance schedule, and look for bulging, corrosion, cracking, or dampness rather than waiting for a visible rupture. Water heaters, attic plumbing, exterior lines, and slab penetrations deserve extra attention in local homes.
Phoenix burst-pipe questions
How fast can mold start after water damage? The EPA says wet materials should be dried within 24 to 48 hours to help prevent mold growth, as summarized in this water-damage drying timeline. Carpet and carpet backing also fall within that window, but mold may still have developed even when materials dry within 48 hours, according to the EPA mold remediation guide.
Does homeowners insurance cover a burst pipe? A sudden and accidental water loss may be covered, while the failed pipe, gradual leaks, wear, maintenance, or excluded backup sources may be treated differently. Review the policy and document the event before assuming every part of the repair is included.
Should you call a plumber or a restoration company first? Stop the water if you can do so safely, then notify both when the leak has affected the structure. The plumber controls or repairs the source. The restoration crew extracts water and dries the building.
How long does structural drying take? It depends on the water class, materials, access, and discovery time. One restoration timeline describes drying around days 2 through 4 after a leak is found and shut off within a few hours, while delayed discovery can add 1 to 3 weeks, according to burst-pipe drying and reconstruction guidance.
Can you stay in the house? Sometimes, if utilities are safe, the affected area is contained, and the equipment doesn't create a health or access concern. Leave when electrical hazards, contaminated water, structural instability, severe humidity, or unusable essential rooms make occupancy unsafe.
If a pipe has already failed, focus on the source, safety, documentation, and professional drying rather than trying to make the room look normal. Visit Restore Heroes to discuss emergency water extraction, moisture assessment, structural drying, and the next steps for a Phoenix burst-pipe loss.