
You're a Phoenix homeowner holding a thick mold remediation report after a stressful water event. The contractor says the work is complete, but the document is packed with inspection notes, moisture readings, photographs, laboratory pages, and technical terms. You need to know what it proves, whether the property can be occupied, and which pages an insurer, tenant, buyer, or property manager will trust.
A useful report should answer three practical questions: What was there before the work started? What did the remediation team do? Is there evidence that the problem was resolved? This guide reads the document the way a restoration professional would explain it across a kitchen table, page by page. If you need background on the broader response process, mold damage restoration services provide useful context for how inspection, drying, removal, cleaning, and documentation fit together.
Why a Mold Remediation Report Matters
A mold remediation report isn't just paperwork for the contractor's file. It becomes the shared record for people who weren't present when the damage was discovered or cleaned. An insurance adjuster uses it to understand the loss timeline. A property manager uses it to document tenant-safe completion. A buyer or real estate agent uses it to understand what happened before a sale or occupancy decision.
A strong report performs three jobs at once:
- It records the original condition. The document should identify visible growth, musty odors, damp materials, affected rooms, moisture sources, and photographs taken before work.
- It defines the response. The protocol should show what materials were removed or dried, what containment and PPE were used, and how the moisture source was corrected.
- It verifies the result. The closing pages should connect visual observations, moisture readings, photographs, laboratory information where appropriate, and a clear clearance conclusion.
Read the report for a decision
A homeowner usually asks, “Is my house safe to use?” An adjuster may ask, “Does the documentation connect the damage to the reported loss?” A property manager may focus on whether the source was repaired and whether tenant communication is complete. The same page can answer one question well and leave another unanswered.
Practical rule: A report is defensible when another qualified reader can follow the condition, response, and outcome without relying on a verbal explanation from the contractor.
Don't judge the document by its page count. A long report can still omit the exact room, material, measurement location, or verification date that matters. Start with the summary, then trace each conclusion back to field notes, photographs, readings, sample locations, and corrective-action records.
What a Mold Remediation Report Actually Is
A mold remediation report is a formal before-and-after record of building conditions and corrective actions. It isn't just a laboratory printout, an invoice, or a paragraph saying that the area was cleaned. It should show what investigators found, what the remediation team changed, and how someone verified the final condition.
The distinction matters because the U.S. EPA has long maintained that there are no federal threshold limits for mold or mold spores. A report therefore can't depend on one universal pass/fail number. EPA guidance, identified as EPA 402-K-01-001 and reprinted in September 2008, evaluates remediation through visual inspection and odor removal, and states that remaining mold or moldy odors indicate that remediation hasn't been effective. See the EPA mold remediation guidance_2024.pdf) for that foundational position.
Three terms that prevent confusion
Remediation means the corrective process. It can involve finding and repairing a leak, drying materials, removing unsalvageable building components, cleaning remaining surfaces, controlling dust and spores, and restoring the affected area. The exact work depends on the building conditions and the documented scope.
Clearance is the decision that the remediated area meets the stated completion criteria. In a well-prepared document, the criteria aren't hidden. The report identifies what the inspector looked for, which readings or samples were taken, and whether the final condition passed the stated evaluation.
Post-remediation verification, often called PRV, is the inspection and documentation performed after the cleanup work. It may include visual inspection, moisture measurements, photographs, and air or surface sampling when warranted. A mold remediation inspection can help readers distinguish an initial investigation from this later verification step.
Think of the report as a chain of evidence. Visible growth identifies the condition. Moisture mapping helps explain the cause. The protocol records the response. Clearance observations show whether the response produced the required result.
The Main Parts of a Mold Remediation Report
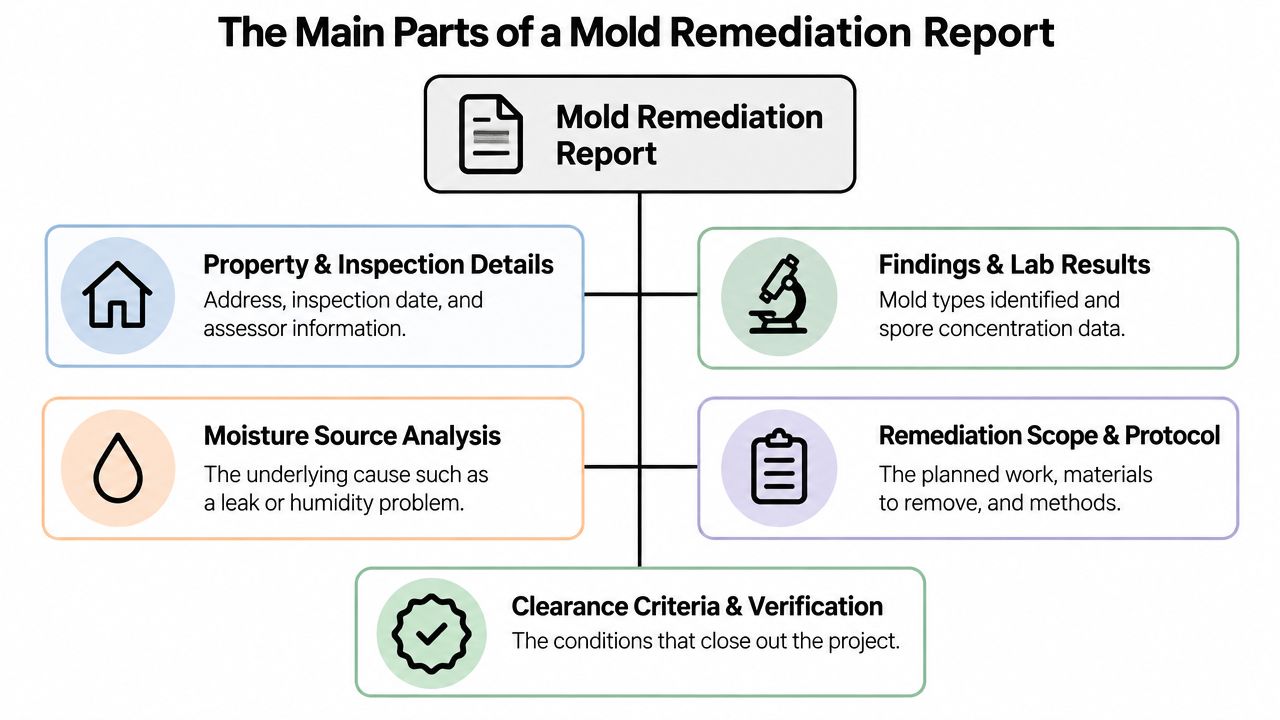
Most complete reports contain several document categories, and each one answers a different reader's question. New Jersey guidance organizes a final inspection report into three core summaries, inspection conditions, mold conditions, and moisture conditions. It also calls for specific locations, estimated affected-area sizes, affected substrates, and size categories that help shape the work plan. The New Jersey mold guideline provides that structure.
Inspection summary
This is the orientation page. It should identify the property, inspection date, assessor, areas inspected, reported complaint, relevant water event, and methods used. An insurer needs the timeline, while an owner needs to know whether the inspector entered the room or assembly being questioned.
Mold conditions summary
This section identifies visible or suspected mold, its exact location, the affected material, and the estimated size of each area. “Bedroom wall” is less useful than a description that identifies the wall, surface, material, and approximate affected zone.
Moisture conditions summary
Moisture findings explain why mold appeared or persisted. Look for the source, affected materials, measurement locations, and whether the report distinguishes active moisture from previous water damage. This is often the section a property manager uses to decide whether a repair remains open.
Remediation protocol
The protocol translates findings into work. It should identify removal, containment, PPE, cleaning methods, waste handling, drying, and the criteria for successful completion. Read it against the final report. If the protocol names a wall cavity but the clearance pages only discuss visible surfaces, ask how the cavity was addressed.
Laboratory results
Lab pages identify the samples collected, their locations and types, analytical findings, and laboratory documentation. They provide useful evidence, but they don't replace the visual and moisture record.
Photographs and clearance statement
Photographs tie observations to places. The final clearance statement gives the reader the conclusion, ideally with the verification date, observations, measurements, sample information when used, and an explicit pass or fail result.
Reading the Inspection Findings and Moisture Documentation
Most readers open the findings pages first. Start with the property map or room list, then compare each location with the moisture readings and photographs. A reading without a location is hard to interpret. A photo without a date or room identifier is difficult to connect to the work.
Follow the moisture story
Ask four questions as you read:
- When did the water damage occur?
- Which materials became wet?
- Which materials were dried, removed, or replaced?
- What prevents water from entering again?
CDC and NIOSH guidance says wetted materials should be dried within 48 hours or removed, and necessary repairs should prevent further water entry. It also points to the NIOSH Dampness and Mold Assessment Tool as a way to monitor whether repairs and remedial actions are effective. The EPA summary of that CDC and NIOSH guidance explains the connection between drying, repair, and follow-up.
A moisture map should tell you more than “moisture detected.” It should show the instrument readings, the surface or material tested, the measurement location, and any comparison with an unaffected area. If you need help understanding the instrument side of the report, moisture meter readings offer a practical reference for interpreting what those entries mean.
Sample field data entries
| Data Point | What It Records | Why It Matters |
|---|---|---|
| Temperature | Ambient temperature at the inspection location | Provides context for the indoor conditions recorded during the visit |
| Relative humidity | Moisture present in the indoor air | Helps evaluate environmental control and potential moisture risk |
| Material moisture reading | Moisture detected in drywall, wood, flooring, or another material | Shows whether a building component remains wet or differs from an unaffected reference |
| Measurement location | Exact room, surface, and material tested | Lets another reader reproduce or evaluate the finding |
| Visual observation | Staining, growth, damage, or drying condition | Connects the number to an observable building condition |
Air-quality questions often arise when a report includes humidity, ventilation, or indoor environmental observations. For a plain-language overview of monitoring considerations, Covenant Aire Solutions air quality advice can provide useful additional context. It shouldn't replace the report's location-specific readings or a qualified interpretation.
Understanding Lab Results and Sample Data
Laboratory pages can look authoritative because they contain sample identifiers, analytical terminology, and tables of results. Read them as one evidence layer, not as the entire decision. A sample tells you what was detected in the collected material or air at a particular location and time. It doesn't, by itself, prove that every room is clear or that the moisture source has been corrected.
Start with sample identity
For each result, confirm:
- Sample type. The report should say whether the sample was an air, surface, or another recognized sample type.
- Exact location. “Hallway” may not be enough. Look for the room, surface, or area that connects the sample to the remediation zone.
- Collection details. The field record should identify when and where the sample was taken and the method used.
- Analytical result. Check what the laboratory reported, including any limitations or qualifications.
- Relationship to the clearance decision. The report should explain how the result was evaluated rather than leaving the reader to guess.
Because no federal mold-spore threshold creates a universal pass or fail, a single airborne count can't close a project on its own. The result must be considered beside visible conditions, odors, moisture readings, worksite observations, photographs, and the stated evaluation criteria described earlier.
What a formal clearance package contains
Independent guidance describes a mold remediation report as a formal clearance package. It should include worksite observations, exact locations and types of measurements and samples, raw field data such as temperature, humidity, and material moisture readings, analytical results, photographs, laboratory reports, and an explicit pass/fail clearance statement. The NORMI recommended licensing regulations document those components.
The practical test is simple. Could an adjuster identify the affected area and response? Could a property manager confirm that the source was repaired? Could an independent reviewer see why the inspector concluded that the space passed? If the laboratory pages are present but the report lacks photographs, field readings, or a final statement, the package is incomplete as a decision document.
For readers comparing initial testing with final verification, mold testing services can help clarify why sampling strategy and interpretation need to match the question being asked.
Interpreting the Remediation Scope and Protocol
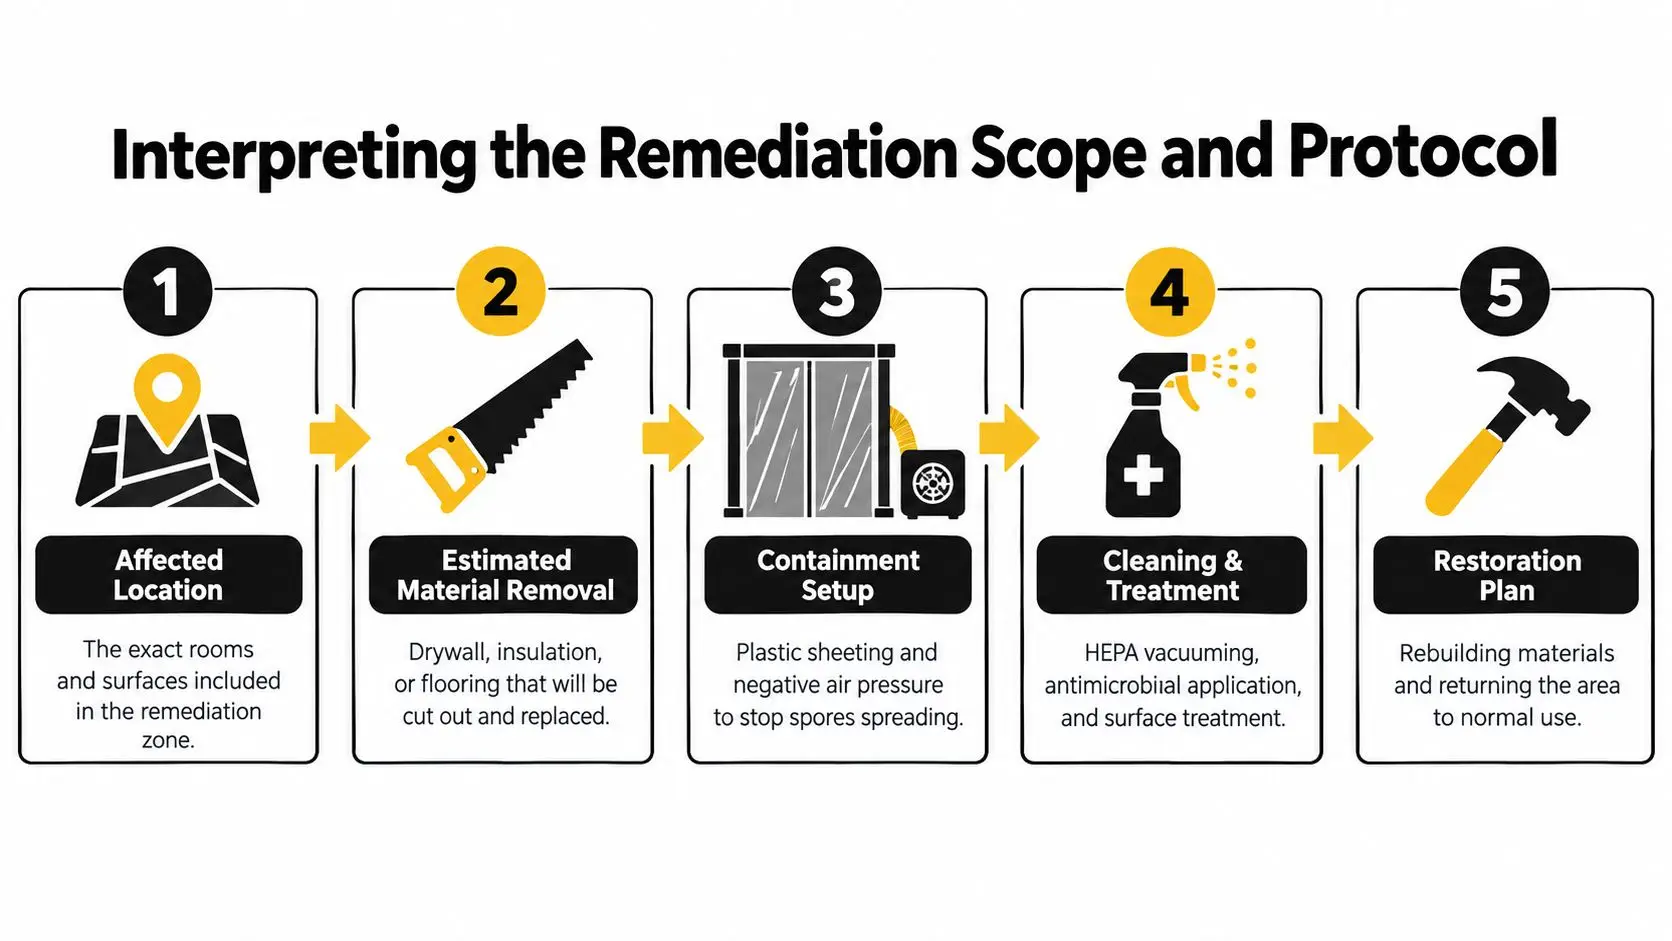
The remediation protocol is the work plan written before or during the cleanup. Read it as a commitment to defined actions, not as a general promise to “treat the mold.” A technically sound protocol identifies the affected location, estimated material removal, PPE level, containment approach or reason containment isn't required, an analytical method, and the criteria used to judge success.
Match the scope to the affected area
Area size can change the planning framework. EPA advises homeowners to consult more detailed schools and commercial-buildings guidance when mold growth covers more than 10 square feet. EPA commercial guidance generally uses limited containment for areas between 10 and 100 square feet. These figures come from EPA cleanup guidance for homes, and the report should explain how its containment decision relates to the observed conditions.
Containment may involve barriers and controlled airflow, but the important reading question is not whether familiar words appear. Ask whether the protocol identifies the rooms and surfaces included, how workers will limit spread, what PPE level applies, and how air movement and debris will be managed.
Check removal and waste handling
The protocol should estimate what will be removed, such as drywall, insulation, flooring, or other porous materials. EPA cleanup guidance says mold-contaminated materials that can't be salvaged should be double-bagged in 6-mil or thicker polyethylene bags. The EPA guidance for schools and commercial buildings gives the handling detail that a report can document.
A complete protocol also names the cleaning or treatment method and explains what happens after removal. Look for drying, HEPA vacuuming where appropriate, surface cleaning, debris transport, and restoration boundaries. If the document says “treated” without identifying the affected material or method, it doesn't give the reader enough information to compare the planned work with the completed work.
Post-remediation verification should occur within a defined time window. In some jurisdictions, that window may be within ten days after completion, as described in District of Columbia requirements for licensed professionals. The report should state the applicable timing rather than leaving the closeout date ambiguous.
How Clearance Criteria and Verification Work
Cleanup and resolution aren't the same event. Cleanup describes actions taken. Resolution requires evidence that the source was fixed, affected materials were addressed, and the environment meets the stated completion criteria.
EPA guidance says remediation isn't finished until the water or moisture source has been completely fixed, visible mold and moldy odors are gone, and a follow-up visit finds no new water damage or mold growth. EPA also recommends indoor relative humidity below 60%, ideally between 30% and 50%, as a post-cleanup environmental-control target. The EPA guide to mold, moisture, and homes explains these conditions.
The clearance sequence
An independent visual inspection should confirm that the remediated area is free of visible growth, dust, debris, and unresolved damage. Moisture measurements should show that affected materials are dry or otherwise meet the stated criteria, with readings tied to exact locations and suitable reference areas.
Air or surface sampling may be warranted when the project scope, building conditions, occupants, or file requirements call for it. Sampling doesn't replace inspection. It adds another evidence layer when the decision-maker needs information that visual inspection and moisture readings can't provide.
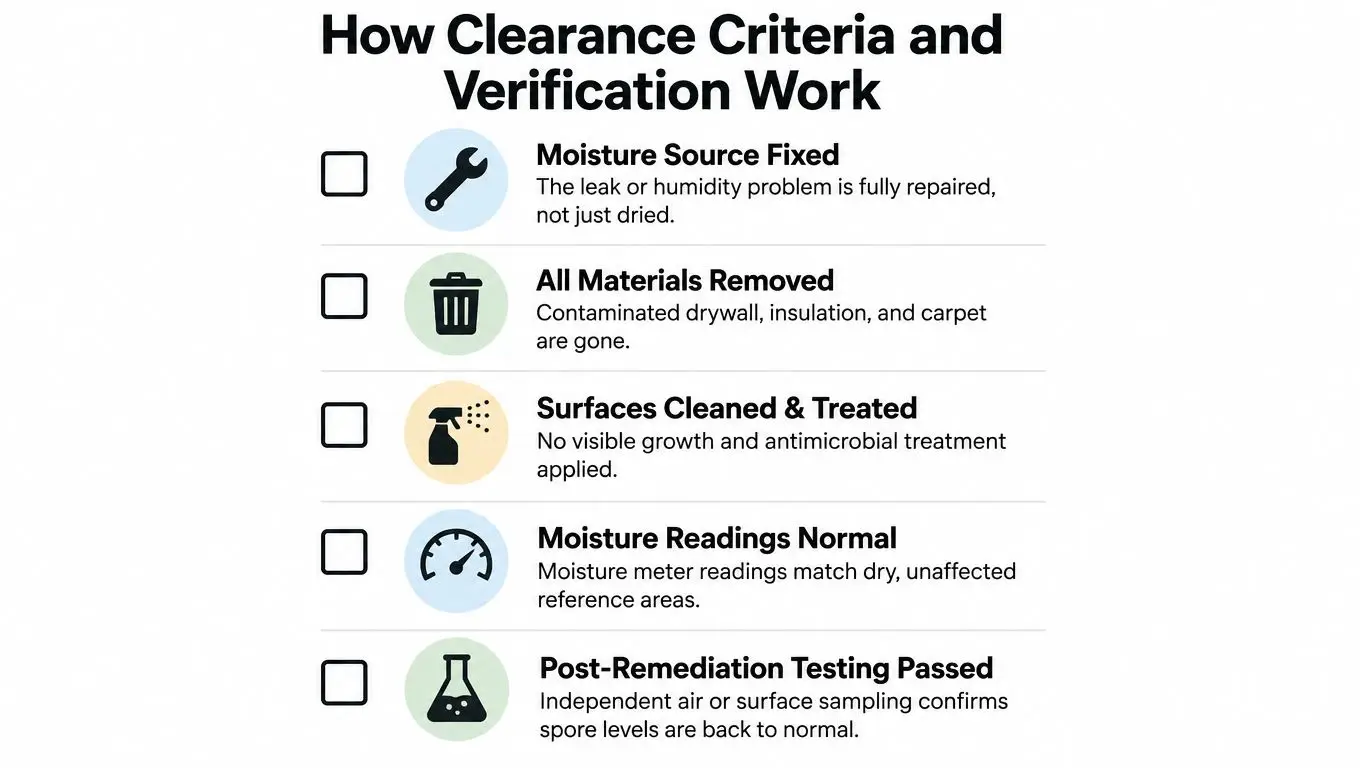
The final page should state the result plainly, identify the verification date, and list exceptions if any remain. A vague sentence such as “area appears acceptable” leaves too much room for disagreement. A clear statement identifies the criteria applied and whether the area passed.
The common failure occurs when a contractor removes visible material but leaves a leak, condensation problem, or humidity issue unresolved. Follow-up then becomes weak or undocumented, and the file says “cleaned” without proving “resolved.” For a closer look at the documentation step, post-remediation verification shows how visual inspection, moisture measurement, and sampling can work together.
What Insurers and Clients Look For in the Report
Different decision-makers read the same document through different questions. An insurer usually follows the loss timeline, source of moisture, affected materials, mitigation actions, and final clearance. The adjuster wants to see how the documented condition connects to the reported event, but coverage decisions depend on the individual policy and provider. A report can't guarantee coverage.
A property manager or landlord focuses on whether the building condition was corrected and whether the tenant file is complete. The manager may need the initial complaint, inspection findings, repair records, photographs, clearance verification, and tenant correspondence in one organized package.
One report, several readers
| Reader | Main concern | Pages that answer it |
|---|---|---|
| Insurance adjuster | What happened, what was damaged, and what work followed | Timeline, moisture source, photographs, scope, invoices or remediation records, clearance |
| Property manager | Can the area be documented as repaired and ready for the next occupancy decision? | Inspection summary, corrective actions, moisture readings, verification, correspondence |
| Real estate agent or buyer | What happened before the sale, and is there evidence of follow-up? | Initial report, affected locations, work records, photographs, final verification |
| Owner or facility manager | Did the response address both mold and the building condition that caused it? | Moisture analysis, protocol, material removal, repairs, environmental readings, closeout |
Documentation gaps can delay decisions even when the physical work appears complete. Records commonly needed by tenants, owners, and insurers include the initial complaint, photographs, inspection report, identified moisture source, corrective actions, remediation records, clearance verification, and tenant correspondence. The mold documentation FAQ highlights this record set.
Keep the original report, laboratory pages, photographs, work authorization, change records, repair receipts, and communication together. If a later reader can't tell which photograph matches which room or which verification applies to which scope, the package loses practical value.
Quick Reference Checklist for Any Mold Remediation Report
Use this list while reviewing the file. Each item should connect to the detailed discussion above.
- Inspection summary: Property, dates, assessor, areas inspected, complaint, and methods.
- Mold conditions: Exact locations, affected substrates, visible findings, and estimated area sizes.
- Moisture conditions: Source, affected materials, measurement locations, drying or removal actions, and repair status.
- Remediation protocol: Scope, estimated removal, PPE, containment or its justification, cleaning method, and waste handling.
- Field data: Temperature, humidity, material moisture readings, and raw location-specific observations.
- Laboratory records: Sample types, exact locations, analytical results, laboratory report, and evaluation criteria.
- Photographs: Before, during, and after images labeled by room or surface.
- Corrective actions: Leak repair, drying, removal, cleaning, treatment, and restoration records.
- Clearance statement: Explicit pass or fail conclusion, verification date, observations, and any sampling used.
- Final conditions: Moisture source fixed, visible mold and odors gone, humidity controlled, and follow-up visit documented.
A report that checks every box gives an insurer, property manager, owner, or buyer a traceable record instead of a cleanup claim without context.
Restore Heroes can help property owners coordinate assessment, moisture control, mold removal, cleaning, odor removal, and documentation for Phoenix-area properties. If you need a practical review of what your report proves and what still needs attention, visit Restore Heroes to discuss the next step.