In the dry climate of Phoenix, it’s easy to assume mold isn't a major concern. However, hidden moisture from a slow plumbing leak, a monsoon storm, or even condensation from your air conditioning system can create the perfect breeding ground for mold inside your walls. The problem is that by the time you see it, the infestation may already be extensive and silently causing damage. A persistent musty smell or a small, discolored water stain might seem minor, but they are often the first warnings of a much larger issue lurking just behind the drywall.
Ignoring these early indicators can lead to more significant structural problems and potential health concerns. This guide is designed to cut through the uncertainty. We will break down the eight most common signs of mold in walls, providing clear, actionable insights to help you identify a potential problem before it escalates. Recognizing these subtle and obvious indicators is the first and most critical step toward protecting your property's integrity and the well-being of those inside.
This listicle will explore everything from the obvious visual cues, like dark spots, to the subtle changes in your home's environment that signal trouble. You will learn to spot issues like peeling paint, warped drywall, and unusual moisture patterns. Our goal is to provide you with the practical knowledge needed to confidently assess your situation and understand when it might be time to consider professional help.
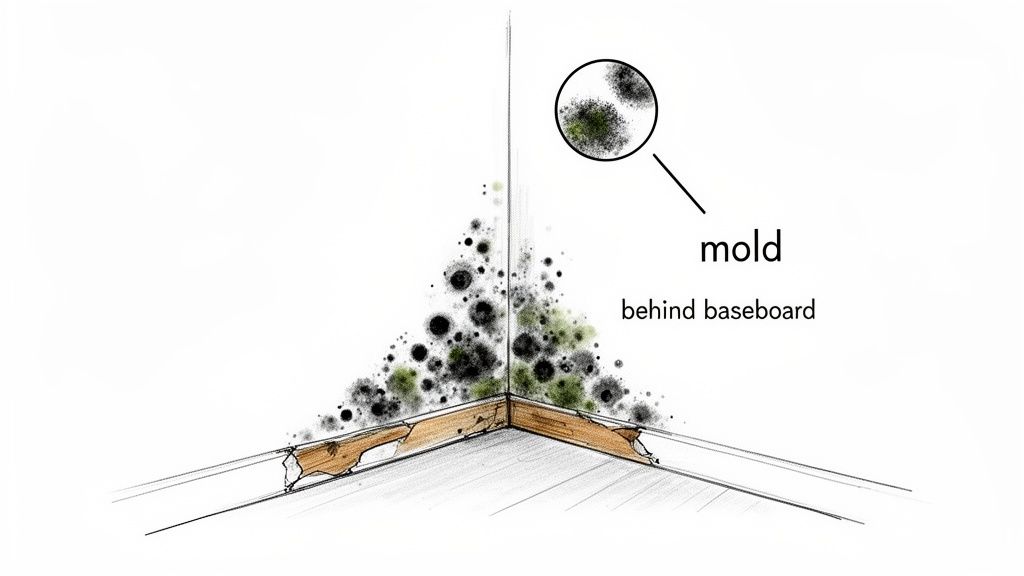
1. Visible Black or Dark Green Spots
The most direct and unmistakable of all the signs of mold in walls is seeing it with your own eyes. Active mold colonies often appear as clusters of black, dark green, or even brown spots on your drywall, baseboards, or wallpaper. These patches might look fuzzy, slimy, or soot-like, and they represent a significant mold problem that has breached the surface of the wall.
This visual evidence is often the final stage of a hidden issue. By the time mold is visible on a wall's exterior, the colony is likely well-established within the wall cavity, feeding on the paper backing of the drywall and any moisture trapped inside. This makes what you see just the "tip of the iceberg."
Common Scenarios for Visible Mold
Visible mold growth is not a random event; it follows a pattern of moisture. In Phoenix-area homes, you are most likely to spot it in specific situations:
- Bathrooms and Kitchens: Areas around tubs, showers, toilets, and sinks are prime locations due to constant humidity and potential plumbing leaks. Look for dark spots forming on the drywall or along the baseboards.
- Basements and Laundry Rooms: After a heavy monsoon storm, water intrusion can dampen basement walls, leading to visible mold patches, often starting near the floor.
- Near Windows and Vents: Condensation on window frames or leaks around HVAC vents can provide the necessary moisture for mold to grow on the surrounding wall surfaces.
Actionable Tips for Inspection
Regularly checking for visible signs is a key part of home maintenance. Here’s how to do it effectively:
- Perform Monthly Checks: Once a month, inspect moisture-prone areas like bathrooms, under sinks, and laundry rooms.
- Use a Flashlight: Shine a bright flashlight along baseboards, in dark corners, and behind furniture or appliances that are rarely moved. Mold thrives in dark, undisturbed places.
- Document Everything: If you find suspicious spots, take clear photos before doing anything else. This documentation is valuable for professional assessment and potential insurance claims.
- Do Not Touch or Clean: Avoid the temptation to scrub or spray the visible mold with bleach. Disturbing the colony can release millions of spores into the air, spreading the problem to other areas of your home.
Discovering visible mold is a clear call to action. It indicates an underlying moisture problem that must be addressed to prevent further structural damage and potential health risks. Contacting a certified professional is the recommended next step to assess the full extent of the growth and determine a safe remediation plan.
2. Musty Odor Detection
One of the most common and telling signs of mold in walls is a persistent, musty smell. This distinct, earthy odor is often the very first clue that a mold problem exists, particularly when the colony is growing hidden within a wall cavity, behind wallpaper, or under flooring. The smell is caused by microbial volatile organic compounds (MVOCs), which are gases produced by mold as part of its metabolic process.
This olfactory signal is a critical early warning. While you may not see any visible evidence, a musty odor strongly indicates that a hidden moisture source is fueling a mold colony somewhere nearby. In the arid Phoenix climate, this smell can become more pronounced after a monsoon storm or if a slow plumbing leak goes unnoticed, as the increase in moisture accelerates mold growth and MVOC production. Trusting your sense of smell can help you identify a problem long before it causes visible structural damage.
Common Scenarios for Musty Odors
A musty smell is a direct result of hidden moisture and fungal growth. For Phoenix-area homeowners and property managers, this odor often points to specific situations:
- Post-Monsoon Dampness: After a heavy summer rain, moisture can penetrate walls, creating the perfect environment for hidden mold that you will smell before you see.
- Hidden Plumbing Leaks: A slow, undetected leak from a pipe inside a wall can saturate drywall and insulation, leading to a concentrated musty smell in a bathroom, kitchen, or laundry room.
- HVAC System Issues: Condensation buildup or a leak in an HVAC unit or ductwork located within walls can cause mold to grow, distributing musty odors throughout the property when the system runs.
- Poorly Ventilated Areas: Closets, basements, or rooms with inadequate airflow can trap humidity, allowing mold to flourish and produce its characteristic smell.
Actionable Tips for Inspection
If you detect a musty odor, it's time to investigate its source. Here are some effective steps to take:
- Trust Your Nose: Don't ignore a musty smell. It is your home's primary alarm system for hidden mold. Never use air fresheners or candles to mask the odor, as this only hides a potentially serious problem.
- Pinpoint the Location: Try to identify where the smell is strongest. Check individual rooms, closets, and cabinets. The concentration of the odor can help guide you or a professional to the source.
- Note Odor Fluctuations: Pay attention to when the smell is most noticeable. Is it stronger after someone showers, when the AC is running, or after it rains? This can provide valuable clues about the moisture source.
- Get a Fresh Perspective: You can become accustomed to the smells in your own home. Ask a friend or visitor if they notice any unusual or musty odors when they walk in.
Detecting a musty odor is a definitive sign that requires further investigation. Because the source is often hidden from view, it’s a strong indicator that professional assessment is needed to locate the underlying moisture issue and determine the extent of the mold growth safely.
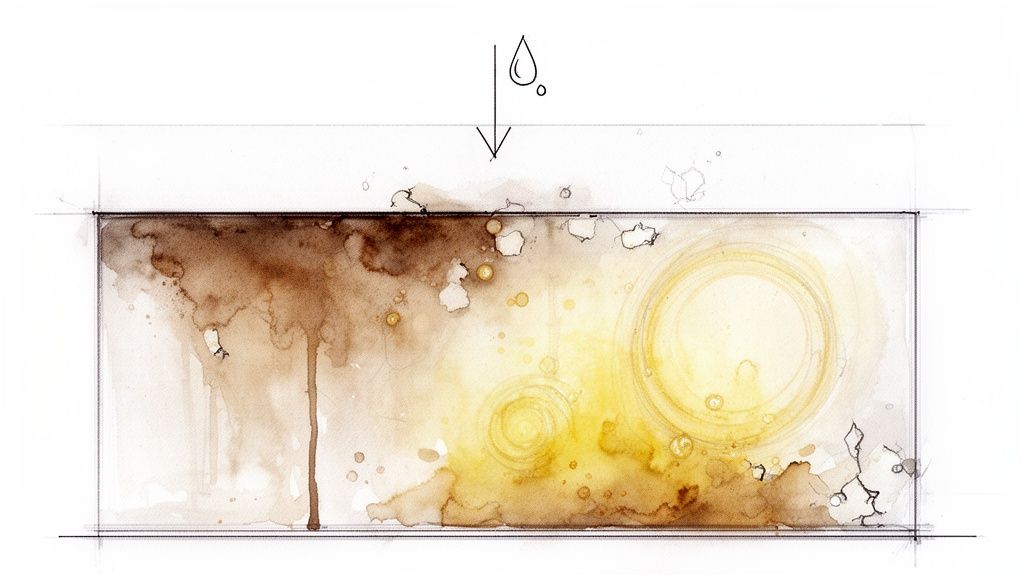
3. Water Stains and Discoloration
Long before visible mold colonies appear, one of the most common early signs of mold in walls is the presence of water stains and discoloration. These unsightly brown, yellow, or tan patches on your drywall or ceiling are clear indicators of moisture intrusion. They signal that water has penetrated the wall structure, creating the perfect damp environment where mold can begin to thrive unseen.
These stains are essentially the footprints left behind by water, showing where past or ongoing leaks have occurred. Ignoring them is a significant risk, as the moisture source that caused the stain is also feeding potential mold growth within the wall cavity. Addressing the stain means addressing the underlying moisture problem before it escalates into a full-blown mold infestation.
Common Scenarios for Water Stains
In the Phoenix area, water stains can appear for several reasons, each pointing to a specific type of moisture problem that can lead to hidden mold.
- Roof Leaks After Monsoon Storms: A classic scenario is a homeowner discovering yellow or brown stains on the ceiling or high on a wall after heavy monsoon rains, indicating a roof leak is allowing water into the attic and wall cavities.
- Plumbing Failures: A discolored patch on a bathroom wall, especially behind a shower or near a toilet, often points to a slow pipe leak or a failing shower pan. This constant dampness is a prime cause of mold growth behind tiles and drywall.
- Window and Door Seal Leaks: Stains appearing around window frames or beneath exterior doors are signs that seals have deteriorated, allowing rainwater to seep into the wall structure during storms.
Actionable Tips for Inspection
Treat every water stain as a serious warning sign that requires immediate investigation. A proactive approach is the best way to prevent mold from taking hold.
- Investigate Immediately: Do not paint over or ignore a water stain. Determine its source. Is it soft to the touch? Is it growing?
- Monitor and Document: Take dated photos of any stains you find. Check them regularly to see if they change in size or color, which indicates an active leak. This documentation is crucial for professionals.
- Confirm with a Moisture Meter: A moisture meter is a valuable tool that can measure the water content in the stained area compared to a dry section of the same wall, confirming if moisture is still present.
- Prioritize the Source: The most important step is to find and fix the source of the water intrusion. Simply cleaning the stain without repairing the leak will only lead to recurring problems and eventual mold growth.
Identifying and acting on water stains is a critical, preventative step. It allows you to stop a moisture issue in its tracks, protecting your property from the more complex and costly damages associated with a widespread mold problem.
4. Wall Bulging or Warping
Beyond discoloration or odor, one of the most serious structural signs of mold in walls is a physical change in the wall’s shape. When drywall, plaster, or other wall materials absorb a significant amount of water over time, they begin to swell and deform. This saturation causes visible bulging, warping, or bowing, indicating a severe and long-term moisture problem and a high probability of extensive hidden mold growth within the wall cavity.
This type of damage is a critical indicator that the structural integrity of the wall material has been compromised. The moisture that causes the warping also creates the perfect environment for a deeply established mold colony to thrive on the paper backing of the drywall and wooden studs. A bulging wall suggests the issue is far beyond a simple surface problem.
Common Scenarios for Wall Bulging
Warping and bulging are caused by persistent moisture intrusion. For homeowners in the Phoenix area, this damage often appears in specific situations:
- Chronic Plumbing Leaks: A slow, undetected leak from a pipe inside a bathroom or kitchen wall can saturate the drywall for months or years, eventually causing it to bow outwards.
- Failed Moisture Barriers: In bathrooms, a failed shower pan or compromised waterproofing behind tile can allow water to seep into the wall structure, leading to bulging on adjacent walls.
- Post-Flooding Damage: After monsoon flooding, basement walls that were not properly dried can warp as the trapped moisture slowly damages the materials from the inside out.
- Appliance Line Failures: A persistent drip from a refrigerator's icemaker line or a dishwasher supply hose can saturate the wall behind the appliance, causing noticeable deformation.
Actionable Tips for Inspection
A bulging wall is an emergency signal that requires immediate attention. If you notice this, proceed with caution:
- Do Not Apply Pressure: Avoid pushing on the bulging area. The water-damaged drywall is weakened and could easily crumble or collapse, potentially releasing a large volume of mold spores.
- Document the Damage: Take clear photos and measure the extent of the bulging. This documentation is crucial for professional assessments and any potential insurance claims process.
- Identify the Source (If Safe): Try to identify the potential source of water, such as a nearby appliance or plumbing fixture, but do not attempt any demolition yourself.
- Prepare for Professional Assessment: Understand that a professional will likely need to remove a section of the drywall to assess the extent of the water damage and mold growth within the wall cavity.
Discovering a warped or bulging wall signifies a serious underlying issue that has been active for a considerable time. It is a clear sign that professional intervention is necessary to address both the moisture source and the resulting mold contamination safely and effectively.
5. Paint Peeling or Bubbling
Paint that is bubbling, cracking, or peeling from a wall surface is a classic visual clue that often points directly to a moisture issue. This is a significant sign of mold in walls because it indicates that water vapor or liquid is trapped behind the paint, breaking its bond with the drywall or plaster beneath. As the moisture accumulates, it pushes the paint outward, creating the tell-tale bubbles and flakes.
In a dry climate like the Phoenix metro area, this sign is particularly alarming. Your home's interior paint should not fail without an external cause. When you see paint peeling on an interior wall, it’s a strong signal that an abnormal moisture source, such as a hidden leak or severe condensation, is present within the wall cavity, creating the perfect environment for mold to thrive unseen.
Common Scenarios for Paint Failure
Paint damage from moisture can appear in specific areas where water is most likely to be a problem. Look for these common situations:
- Bathrooms and Laundry Areas: Walls near showers or exhaust fans may show bubbling paint due to high humidity that has penetrated the wall surface.
- Kitchens: The wall area near a kitchen window can start to peel if condensation is consistently forming and running down behind the paint.
- Ceilings Below Upper Floors: If you notice paint peeling on a first-floor ceiling, it could be the result of a slow leak from a bathroom or plumbing line directly above.
- Exterior-Facing Walls: After a heavy monsoon storm, water intrusion through the roof or window seals can saturate the drywall from within, causing the interior paint to bubble and fail.
Actionable Tips for Inspection
When you notice compromised paint, it's crucial to investigate it as a potential moisture problem rather than just a cosmetic issue.
- Investigate All Paint Failures: Treat any instance of bubbling, peeling, or cracking paint as a moisture symptom until you can definitively prove otherwise.
- Gently Probe the Area: Carefully press on a bubble or peeled section. If the drywall or plaster underneath feels soft, damp, or spongy, it's a strong indicator of prolonged water saturation and probable mold growth.
- Document and Photograph: Before you disturb the area, take clear photos of the damage. This documentation is useful for professionals who will need to assess the source and extent of the problem.
- Anticipate Professional Assessment: Understand that a proper inspection will likely require removing the damaged paint and a section of the drywall to view the wall cavity and confirm the presence of mold. Do not attempt this yourself, as it can release spores.
6. Soft or Spongy Wall Material
Beyond what you can see or smell, one of the most revealing signs of mold in walls is a change in the wall's texture. When drywall is persistently damp, its gypsum core and paper backing absorb water, lose their structural integrity, and become soft. A wall that feels spongy or yields when you press against it is a major red flag for a severe, long-term moisture problem and likely an extensive mold colony thriving within the wall cavity.
This tactile evidence indicates that the moisture has saturated the material to the point of decay. Restoration professionals often use this physical test during an inspection to pinpoint the most damaged areas. What feels soft to the touch is often a sign of a hidden mold issue that has compromised the wall from the inside out, making removal and replacement of the affected section a strong possibility.
Common Scenarios for Soft Walls
A soft or spongy wall is a clear indicator of a persistent water source. In Phoenix-area homes, this structural decay is most often found in these situations:
- Near Showers and Tubs: Bathroom walls, especially those directly adjacent to shower stalls or bathtubs, can soften over time due to failed grout, bad caulking, or slow plumbing leaks inside the wall.
- Under Leaking Windows: Water intrusion from a window with a failed seal can run down the interior of the wall, causing the drywall below the sill to become spongy and weak.
- Basement or Lower-Level Walls: After monsoon flooding or from chronic moisture seepage through the foundation, lower sections of drywall can absorb groundwater, leading to widespread softening.
- Ceilings Under Roof Leaks: A slow, undetected roof leak can saturate the drywall ceiling below, causing it to feel soft and eventually sag before it breaks.
Actionable Tips for Inspection
A tactile check can help you identify severely compromised areas, but it should be done with caution. Here’s how to safely inspect your walls:
- Apply Gentle Pressure: In areas you suspect have moisture issues, gently press against the wall with your palm or fingers. Do not push forcefully, as this could cause further damage or break through the weakened drywall.
- Test Multiple Locations: If you find one soft spot, check the surrounding wall surface in a grid pattern to determine the full extent of the saturation.
- Document the Locations: Mark the soft areas with painter's tape or make a detailed diagram. This information is invaluable when you consult with a professional remediation team.
- Assume Replacement is Needed: Understand that any wall material that has become soft will not dry out and regain its strength. It is compromised and will require complete removal by a professional.
Discovering a soft or spongy wall is a critical sign that goes beyond a simple mold issue; it points to a structural concern that requires immediate professional attention. Contacting a certified restoration specialist is essential to safely assess the scope of the damage and develop a plan for remediation and repair.
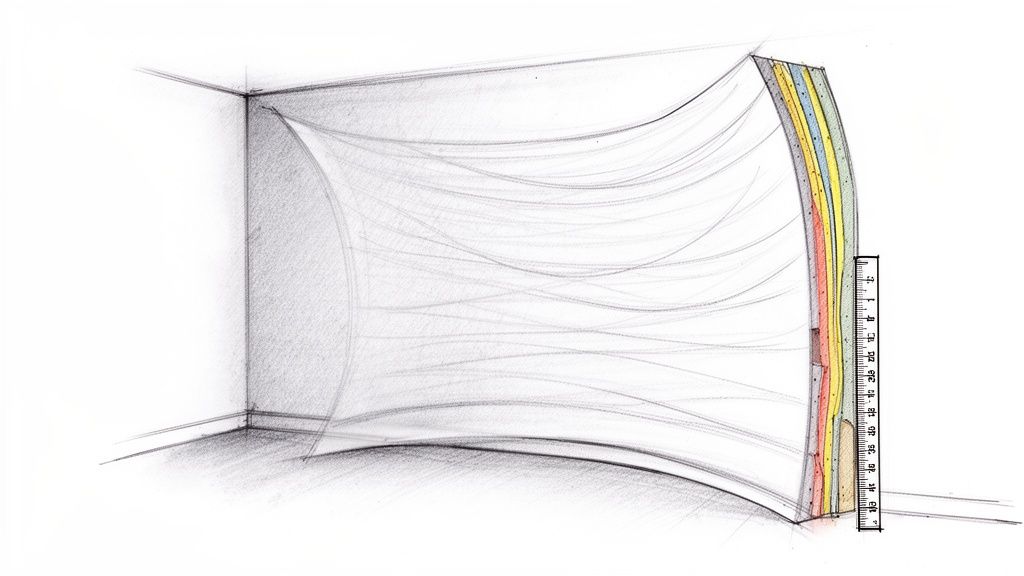
7. Moisture Readings and Elevated Humidity Levels
While your eyes and nose are powerful tools, some of the most definitive signs of mold in walls are completely invisible. Professionals use calibrated moisture meters and humidity sensors to get objective, quantifiable data about the conditions inside your wall cavities. This technology detects elevated moisture long before it leads to visible stains or structural decay, providing an early warning of a potential mold habitat.
In Phoenix's arid climate, consistently high moisture readings within a wall are a significant red flag. They indicate that water is getting in from a leak or being trapped due to poor ventilation, creating the perfect breeding ground for mold. These precise measurements take the guesswork out of an inspection and form the basis of an effective remediation strategy.
Common Scenarios for Elevated Moisture
Elevated moisture isn't random; it's a direct result of water intrusion or retention. For Phoenix-area homes, these scientific readings are most telling in specific situations:
- Post-Leak Assessment: After a plumbing or roof leak, a moisture meter can confirm the extent of water saturation. Readings of 20% or higher in drywall are a clear indicator of a problem that needs immediate drying.
- High-Humidity Zones: In areas like poorly ventilated laundry rooms or bathrooms, a humidity sensor might detect ambient humidity levels consistently above 60%, a condition that promotes surface mold growth on walls over time.
- Confirming Hidden Damage: Following a monsoon storm that caused water intrusion, thermal imaging cameras can identify cold spots in walls, which often correspond to trapped moisture. A moisture meter is then used to confirm and quantify the saturation in those specific areas.
Actionable Tips for Inspection
While professional-grade meters provide the most accurate data, homeowners can use consumer-grade tools and be informed participants in a professional inspection.
- Request Professional Measurement: When hiring a restoration company, ensure they use calibrated moisture meters and thermal imaging as part of their initial assessment. Ask to see the readings.
- Understand Key Thresholds: Generally, a moisture content below 15% in most building materials is considered normal. Anything consistently higher requires investigation. Ambient indoor humidity should ideally be kept between 30% and 50%.
- Document for Verification: Insist that initial moisture readings are documented. These numbers serve as a crucial baseline to compare against post-remediation readings, verifying that the structure has been properly and thoroughly dried.
- Trace the Source: High readings can help professionals trace the water back to its source, whether it's a cracked pipe inside the wall or a leaky window seal, ensuring the root cause is fixed.
Using scientific tools to measure moisture provides undeniable proof of conditions conducive to mold. This data-driven approach is critical for effective diagnosis, creating a targeted remediation plan, and verifying that your home has been returned to a safe, dry state.
8. Efflorescence and Salt Deposits
While not mold itself, the appearance of a white, chalky, or crystalline substance on your walls is a major red flag. This material, known as efflorescence, is formed by mineral and salt deposits left behind after water has seeped through a porous material like concrete, brick, or stucco and then evaporated. These deposits are a direct and clear warning sign that moisture has traveled through your wall structure.
Because mold requires moisture to grow, efflorescence is a powerful early indicator that the conditions are perfect for a mold colony to form within your walls. In Arizona, where hard water is common, these mineral-rich deposits can be particularly prominent and serve as a crucial visual clue to an underlying moisture problem. Seeing this is one of the key signs of mold in walls, even before mold itself becomes visible.
Common Scenarios for Efflorescence
Efflorescence follows the path of water intrusion, making it predictable. In the Phoenix area, you are most likely to find it in these situations:
- Basement and Foundation Walls: After heavy monsoon season rains or due to high groundwater levels, water can seep through concrete foundation walls, leaving behind white, powdery residue as it dries.
- Exterior Stucco or Brick: Poor drainage, sprinkler overspray, or failed waterproofing can cause moisture to penetrate exterior walls, resulting in chalky deposits on the surface.
- Crawl Spaces: The humid, damp environment in a crawl space is a prime location for moisture to wick up through block walls, creating visible crystalline patterns.
Actionable Tips for Inspection
If you spot efflorescence, it’s essential to investigate the source of the moisture immediately. Ignoring it allows the underlying water issue to persist, paving the way for mold and structural damage.
- Document and Monitor: Take photos of the deposits. After cleaning a small test area with a stiff brush, check back in a few weeks. If the efflorescence returns, you have an active and ongoing water leak.
- Trace the Moisture Path: Use the deposits as a map to find the water source. Check for nearby plumbing, exterior drainage issues, or cracks in the foundation that align with the location of the efflorescence.
- Use a Moisture Meter: A moisture meter can confirm the presence of water within the wall material where you see efflorescence. High readings confirm that the wall is still damp.
- Do Not Simply Paint Over It: Painting over efflorescence will not solve the problem. The moisture will eventually cause the new paint to peel and bubble, and the underlying issue will continue to foster mold growth.
The presence of efflorescence is a definitive sign of water intrusion that must be addressed. By identifying and repairing the source of the moisture, you can prevent the development of a much more serious mold problem.
8-Point Comparison: Signs of Mold in Walls
| Indicator | 🔄 Implementation complexity | ⚡ Resource requirements | 📊 Expected outcomes | 💡 Ideal use cases | ⭐ Key advantages |
|---|---|---|---|---|---|
| Visible Black or Dark Green Spots | Low–Moderate: obvious when exposed but often concealed | Minimal for detection (visual); professional remediation required | Confirms active mold colonies; triggers remediation | Visual inspections, insurance documentation, known moisture areas | Clear, photographable evidence that prompts action |
| Musty Odor Detection | Low: easy to notice but subjective and non-specific | Minimal for detection; may require pros and moisture testing to locate source | Indicates hidden mold presence; directs targeted inspection | Enclosed spaces, after humidity spikes, hidden cavity suspicion | Non-invasive early warning for concealed mold |
| Water Stains and Discoloration | Low–Moderate: visually apparent but may hide behind finishes | Visual inspection plus moisture meter and tracing tools | Identifies water intrusion pathways and risk for mold | After leaks, roof/window/plumbing failures, monsoon events | Shows source direction and supports insurance claims |
| Wall Bulging or Warping | High: signifies advanced, structural moisture damage | High: professional remediation, probable drywall replacement, structural assessment | Confirms severe saturation and likely extensive mold; urgent repair needed | Chronic leaks, prolonged water exposure, structural concerns | Unambiguous indicator of serious, immediate problems |
| Paint Peeling or Bubbling | Low–Moderate: visible early sign but can have other causes | Visual check, moisture testing, professional evaluation | Early indicator of moisture migration; may precede visible mold | Bathrooms, kitchens, exterior walls with condensation or intrusion | Detectable from distance; prompts early investigation |
| Soft or Spongy Wall Material | Moderate–High: requires tactile inspection by trained personnel | Hands-on inspection; likely material removal and replacement | Confirms saturation and extent of damage; defines removal zones | Post-flood, near plumbing fixtures, suspected cavity saturation | Tactile confirmation that guides remediation scope |
| Moisture Readings & Elevated Humidity | Moderate: needs equipment and trained interpretation | Moisture meters, RH sensors, thermal imaging, trained technicians | Objective, quantifiable moisture data; detects moisture before mold; verifies drying | Professional assessments, pre/post remediation, insurance documentation | Provides measurable evidence to guide and validate remediation |
| Efflorescence & Salt Deposits | Low: visually obvious indicator of past moisture movement | Visual inspection; combine with moisture testing to assess current risk | Signals historic or ongoing moisture migration; may precede mold | Basements, exterior walls, hard-water environments | Visible marker of moisture pathways—valuable in mineral-rich areas |
Taking the Next Step: When to Call a Certified Mold Professional
Navigating the signs of mold in walls can feel overwhelming, but you've already taken the most important step: becoming informed. Throughout this guide, we've unpacked the tell-tale indicators, from the obvious visible black spots and musty odors to the more subtle clues like peeling paint, warped drywall, and persistent indoor humidity. Each sign is a piece of a larger puzzle, helping you understand the health of your home's structure and the air you breathe.
Recognizing these symptoms is more than just a maintenance task; it's a crucial act of protecting your property's value and your family's well-being. A small, discolored patch or a faint, earthy smell might seem minor, but these are often the first warnings of a hidden moisture problem that needs immediate attention. Ignoring these signals can allow a small issue to escalate into a significant contamination and structural integrity problem, making remediation more complex and costly down the road.
Key Takeaway: The signs of mold are symptoms of an underlying moisture issue. Effective, long-term mold removal is impossible without first identifying and correcting the source of the water.
From Identification to Action: Your Next Steps
You've done the detective work. Now what? Your response should be proportional to the evidence you've found.
- For Minor, Isolated Signs: If you found a very small area of surface mold (less than 10 square feet, per EPA guidelines) on a non-porous surface and have fixed the moisture source, a DIY approach might be an option. However, caution is paramount.
- For Persistent or Widespread Issues: If you're dealing with any of the following, professional intervention is strongly recommended:
- Mold covering a large surface area.
- A strong, persistent musty odor that you can't locate.
- Signs of mold in walls after a significant water event, like a flood or pipe burst.
- Structural issues like bulging, warping, or soft spots in the drywall.
- If household members are experiencing unexplained allergy-like symptoms.
Attempting to remove significant mold without proper training and equipment can be hazardous. Scraping or scrubbing dry mold can release millions of spores into your HVAC system and throughout your home, cross-contaminating other areas. Certified professionals use specialized containment barriers, negative air pressure machines, and personal protective equipment (PPE) to manage the remediation process safely and prevent the problem from spreading.
The Value of a Professional Assessment in Phoenix
In the unique climate of the Phoenix metro area, where monsoon storms can introduce sudden moisture and an otherwise dry climate can hide leaks for months, a professional assessment is invaluable. An IICRC-certified technician does more than just look for visible mold; they use moisture meters, thermal imaging cameras, and extensive training to trace the moisture back to its origin. This comprehensive approach ensures that both the mold and its cause are addressed.
Remember, this information is for educational purposes. A professional onsite inspection is necessary to accurately diagnose the specific conditions of your property, as every situation is unique and outcomes can vary. Choosing a certified, experienced team provides a reliable path to not just removing the mold, but restoring your home to a safe, healthy, and structurally sound condition. Acting decisively on the signs of mold in walls is the best way to protect your investment and ensure peace of mind.
If you've noticed these signs in your Phoenix-area home or business, don't wait for the problem to get worse. The IICRC-certified team at Restore Heroes specializes in safe and thorough mold remediation, from initial inspection to final restoration. Contact us for a professional assessment and let our experts help you restore your property and your peace of mind.