Discovering water damage in your Phoenix home or business can be overwhelming. From a burst pipe in the middle of the night to the aftermath of a monsoon storm, the immediate aftermath is stressful. The path forward involves not just cleanup, but a critical financial process: filing an insurance claim. Success hinges on taking the right steps, in the right order. Missteps can lead to delays, underpayments, or even outright denials, adding financial strain to an already difficult situation.
When water damage strikes, your immediate priority is to stop the source. Homeowners will need to find reliable help quickly, and understanding how an after-hours plumbing service operates can help you get the urgent assistance needed to prevent further flooding. Once the immediate threat is contained, the claims process begins, and how you manage it from the very first phone call can significantly impact your financial recovery.
This guide provides a clear, actionable roadmap. We'll break down 8 crucial water damage insurance claim tips designed to help you navigate the process confidently, protect your property, and work toward a fair outcome. We will cover everything from initial documentation and reporting to managing receipts and working effectively with your insurance adjuster. It's important to remember that this guide provides general tips and does not guarantee any specific service, coverage, or pricing outcomes from your insurance provider. Every policy and situation is unique, but being prepared with the right knowledge is your most powerful tool.
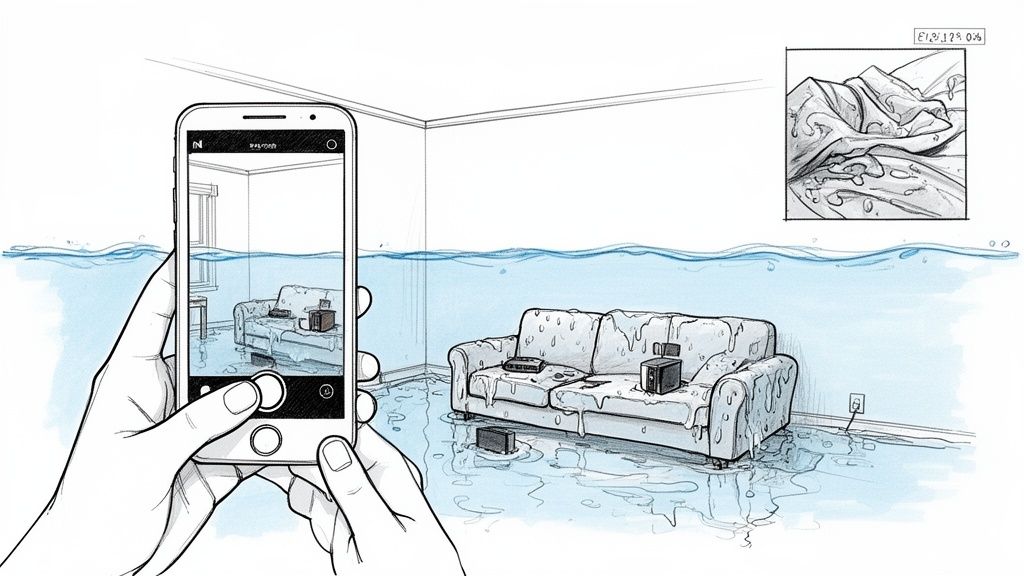
1. Document Everything Immediately with Photos and Videos
Before you move a single piece of furniture or start any cleanup, your first and most critical action is to document the scene. Your smartphone is the most powerful tool you have in the initial moments of a water damage event. Comprehensive visual evidence creates a clear, undeniable record of the damage's extent before any mitigation work begins. This documentation is the foundation of a strong insurance claim and is one of the most effective water damage insurance claim tips you can follow.
Insurance adjusters rely heavily on this initial evidence to understand the full scope of the loss. Without it, they might question the severity of the damage or the necessity of certain repairs, potentially leading to a lower settlement offer. Your photos and videos tell a story that words alone cannot, capturing the immediate aftermath in a way that is hard to dispute.
Actionable Documentation Checklist
To ensure your visual evidence is as effective as possible, follow a structured approach. Don't just take a few wide shots; get detailed and methodical.
- Start with a Video Walkthrough: Begin recording a video as you enter the affected area. Narrate what you see, speaking clearly about the date, time, and the source of the water if you know it (e.g., "It's Tuesday, October 26th, around 3 PM. The supply line under the kitchen sink has burst, and water has flooded the kitchen and living room."). Pan slowly across each room, capturing the full extent of the saturation.
- Capture All Angles: Take still photos from multiple angles in each room. Get wide shots to show the overall scene, then move in for medium shots of specific areas, and finally, take detailed close-ups.
- Photograph the "Water Line": Look for visible water lines on walls, furniture, and cabinetry. These marks clearly show the height the water reached and are crucial for proving the extent of the damage.
- Document Damaged Items: Take individual photos of every single item that was damaged. For electronics and appliances, capture close-ups of the brand, model, and serial number tags. This detail is essential for creating your personal property inventory list later.
- Show the Source: If it's safe to do so, document the source of the water intrusion. Take photos of the burst pipe, leaking appliance, or failed water heater.
Key Insight: Immediately back up all photos and videos to a cloud service like Google Photos, iCloud, or Dropbox. If your phone is lost or damaged during the cleanup process, your primary evidence will be safe and accessible from any device. This simple step protects the most valuable asset in your claim.
2. Report the Claim to Your Insurance Company Promptly
After you have documented the initial scene, your next immediate step is to notify your insurance company. Most policies contain a "prompt notice" clause, which contractually requires you to report a loss as soon as reasonably possible. Delaying this crucial call can jeopardize your claim, potentially giving the insurer grounds to question the damage's origin or even deny coverage altogether.
Initiating the claim process quickly is a critical water damage insurance claim tips because it formally starts the clock and demonstrates you are acting in good faith. It allows the insurance company to assign an adjuster, authorize emergency mitigation services to prevent further damage, and provide guidance on your policy’s next steps. Swift reporting helps ensure that when the adjuster arrives, the evidence is fresh and the timeline of events is clear.
Actionable Notification Checklist
To ensure your initial call is effective and sets a positive tone for the claims process, be prepared. Having key information ready will make the conversation smoother and more productive.
- Have Your Policy Number Ready: Before calling, locate your insurance policy documents (a digital copy is great) and have your policy number handy. This is the first piece of information the representative will ask for.
- Be Clear and Concise: Explain what happened, when you discovered it, and the immediate actions you've taken (like shutting off the water and taking photos). Stick to the known facts.
- Request a Claim Number: This number is the official identifier for your case. Write it down and use it in all future communications with the insurance company.
- Get the Adjuster's Details: Ask for the name and contact information of the claims adjuster assigned to your case. This is your primary point of contact moving forward.
- Confirm Next Steps: Ask about your coverage for temporary mitigation, your policy deductible, and the expected timeline for the adjuster's inspection.
- Follow Up in Writing: After the phone call, send a brief email to the claims department or your assigned adjuster. Summarize the conversation, state your claim number, and reiterate the key details. This creates a valuable paper trail.
Key Insight: Call your insurance carrier before you hire a restoration company. Some insurers have preferred vendors or specific procedures for authorizing emergency work. Notifying them first ensures that any mitigation services you hire are more likely to be covered under your policy, preventing potential out-of-pocket surprises.
3. Mitigate Further Damage While Awaiting the Adjuster
Once you've documented the initial scene, your insurance policy requires you to take reasonable steps to prevent the problem from getting worse. This is known as "mitigation," and it's a critical duty of the policyholder. Failing to mitigate can give the insurance company grounds to deny parts of your claim, arguing that subsequent damage could have been prevented. Acting quickly to control the situation not only protects your property but also demonstrates to your insurer that you are a responsible partner in the claims process.
Taking immediate, sensible actions to stop further harm is a non-negotiable part of a successful claim. This doesn't mean you need to perform professional-level repairs, but you must address the immediate threat. These actions show you are actively working to minimize the total loss, which is a key component adjusters look for when evaluating water damage insurance claim tips and best practices.
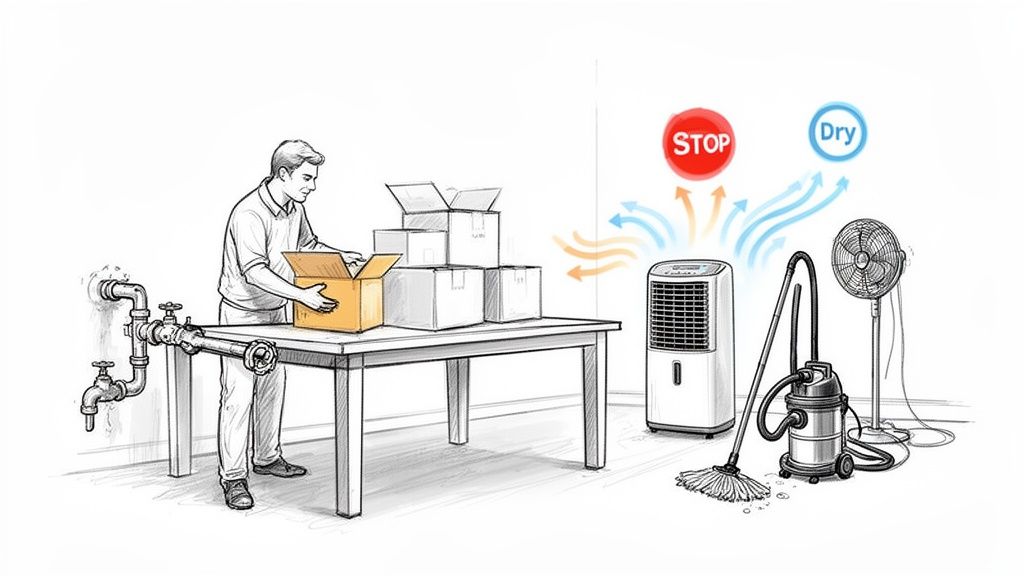
Actionable Mitigation Checklist
Follow these steps to safely and effectively mitigate damage. Remember to photograph your actions before, during, and after to prove you took these necessary steps.
- Stop the Water Source: If you know where the water is coming from and it is safe, stop it. This is often as simple as turning off the water supply valve to a specific appliance or, if necessary, shutting off the main water valve to the entire property.
- Address Electrical Hazards: Unplug or turn off the power to any electronics or appliances in the affected area to prevent electrical shock or short circuits. If standing water is near outlets or the breaker box, do not enter the area and call an electrician.
- Remove Standing Water: If the water level is low and free of contaminants, use a wet/dry vacuum, mops, and buckets to remove as much standing water as possible. This reduces absorption into flooring, subflooring, and wall cavities.
- Move Valuables: Relocate furniture, electronics, documents, and other personal belongings to a completely dry and unaffected area of your property. Placing items on wood blocks or plastic sheeting can also help.
- Promote Air Circulation: Open windows and doors (if weather permits) to encourage airflow. Set up fans and residential dehumidifiers to help begin the drying process and reduce ambient humidity.
- Manage Saturated Items: If possible, pull up saturated area rugs and carpet padding. These materials act like sponges and can trap moisture against the subfloor, leading to mold and structural decay.
Key Insight: Keep detailed records and receipts for any mitigation-related expenses, such as renting a dehumidifier or purchasing a wet/dry vacuum. These costs may be reimbursable under your policy as part of the effort to minimize the overall damage. Documenting these proactive measures is a powerful way to support your claim.
4. Create a Detailed Inventory of Damaged Items and Personal Property
While your photos and videos provide visual proof, a detailed written inventory is the second half of the documentation puzzle. This comprehensive list, often called a "proof of loss," is where you quantify your damages in a format the insurance company can process. A meticulously organized inventory prevents you from forgetting smaller items and demonstrates to the adjuster that you are thorough, which can help streamline your contents claim.
This list is your official request for reimbursement for everything that was damaged or destroyed. Without a detailed inventory, you risk receiving a settlement that doesn't accurately reflect the full value of your lost belongings. This step is one of the most crucial water damage insurance claim tips for ensuring you are compensated fairly for what you've lost, from major appliances to the books on your shelf.

Actionable Inventory Checklist
Creating this list can feel overwhelming, especially after a stressful event. Break it down room by room using a spreadsheet to stay organized and ensure you don’t miss anything.
- Go Room-by-Room: Systematically move through each affected space. Create a separate tab or section in your spreadsheet for the kitchen, living room, bedroom, etc.
- List Every Single Item: Document everything that was touched by water. Be specific: instead of "sofa," write "Crate & Barrel Axis II 3-Seat Sofa, gray."
- Detail Each Item: For each entry, create columns for:
- Description: Brand, model, and serial number.
- Age: How old was the item?
- Original Cost: What did you pay for it?
- Replacement Cost: What would it cost to buy new today? Research prices online.
- Condition: Describe the extent of the damage (e.g., "fully submerged," "warped wood base").
- Gather Proof of Value: For high-value items like electronics or furniture, find and attach copies of receipts, credit card statements, or original owner's manuals. This documentation strengthens your valuation.
Key Insight: Don't dispose of any damaged items until your insurance adjuster has seen them or explicitly gives you permission to do so. Prematurely throwing things away can give the insurer a reason to deny that portion of your claim, as they were unable to verify the loss themselves.
5. Keep All Receipts, Invoices, and Documentation of Restoration Work
Once the initial mitigation work begins, your focus must shift to meticulous record-keeping. Every dollar you spend on recovery, from hiring professional restoration services to buying replacement materials, must be documented. This financial paper trail is just as critical as your initial photos and videos, serving as the concrete proof of your "actual cash value" (ACV) or "replacement cost value" (RCV) losses. It transforms your claim from an estimate into a verifiable expense report.
Insurance adjusters are required to substantiate the figures in a claim settlement. Detailed invoices, receipts, and contractor estimates provide the justification they need to approve payments. Without this documentation, expenses may be deemed speculative or unnecessary, leading to disputes and a potentially reduced payout. Maintaining an organized file of all financial records is a non-negotiable step in any list of essential water damage insurance claim tips.
Actionable Financial Documentation Checklist
A disorganized box of receipts can create confusion and delays. Instead, use a structured system to track every expense related to the water damage incident from day one.
- Request Itemized Invoices: Do not accept a simple one-line bill. Insist that all contractors, including mitigation companies like Restore Heroes, provide detailed, itemized invoices. These should break down costs for labor (hours and rates), specific materials used, and each piece of equipment rented (e.g., "3 industrial dehumidifiers @ $75/day for 5 days").
- Organize by Category: Create a physical or digital folder system. Have separate folders for "Emergency Mitigation," "Structural Repairs," "Flooring Replacement," "Personal Property," and "Additional Living Expenses" (like hotel stays or laundry services if you're displaced).
- Track All Communication: Keep a log of every conversation with your insurance company, adjuster, and contractors. Note the date, time, person you spoke with, and a summary of the discussion. Save all related emails and letters in your file.
- Document Contractor Credentials: Keep copies of your contractor's license, insurance certificate, and any relevant certifications (such as IICRC certification for water restoration). This demonstrates you hired qualified professionals, which is often a policy requirement.
- Keep Proof of Payment: Match every invoice with corresponding proof of payment, such as a credit card statement, canceled check, or bank transfer confirmation.
Key Insight: Never pay a contractor in full upfront, and be wary of any who demand large cash payments. A professional restoration company will typically work directly with your insurance provider on billing. Paying by credit card or check creates an indisputable financial record that protects you and strengthens your claim.
6. Understand Your Insurance Policy Coverage Limits and Deductibles
Before you even file your claim, you must become a student of your own insurance policy. Many homeowners assume their policy covers any and all water damage, but the reality is often far more complex. Understanding your specific coverage limits, deductibles, and exclusions is a crucial water damage insurance claim tip that prevents major financial surprises and empowers you to set realistic expectations for your claim.
Your policy is a contract that outlines exactly what your insurer will and will not pay for. Knowing these details upfront allows you to navigate the claims process strategically. For example, understanding that a sudden pipe burst is covered but gradual seepage from a leaky faucet is not can completely change how the damage is assessed and reported. This knowledge is your roadmap to a successful claim.
Actionable Policy Review Checklist
To avoid being caught off guard, locate your policy documents (or access them online) and identify these key figures and clauses. A few minutes of review can save you thousands of dollars and immense frustration.
- Identify Your Deductible: This is the amount you must pay out-of-pocket before your insurance coverage begins. A $2,500 deductible on a $4,000 claim means you receive $1,500 from the insurer.
- Check Your Coverage Limits: Note the maximum amounts your policy will pay for different categories. Pay close attention to the limits for Dwelling (the structure of your home), Personal Property (your belongings), and Additional Living Expenses (ALE) (costs if you must temporarily relocate).
- Understand Named Perils vs. Open Perils: Know if your policy covers only specifically listed events ("named perils") or covers all events except those specifically excluded ("open perils"). This distinction is critical for water damage claims.
- Locate Exclusions: Carefully read the exclusions section. Most standard policies exclude damage from "flooding" (rising surface water), sewer backups, and gradual leaks caused by poor maintenance. You may need separate endorsements or policies for this type of coverage.
- Differentiate Water Damage Types: Policies often distinguish between different water sources. A burst pipe ("sudden and accidental discharge") is typically covered, while water seeping through the foundation may not be.
Key Insight: Create a one-page summary sheet of your policy's key information: your policy number, agent's contact info, deductible amounts, and major coverage limits. Keep this summary with your emergency documents so you have all critical information at your fingertips when a disaster strikes.
7. Cooperate Fully with Insurance Adjusters and Provide Access
After you’ve reported your claim, the insurance company will assign an adjuster to assess the damage. Your full cooperation during this phase is not just helpful; it's essential for a smooth and fair claims process. The adjuster’s primary role is to investigate the loss, determine the cause, and estimate the cost of repairs covered by your policy. Obstructing this process, whether intentionally or not, can lead to significant delays, misunderstandings, and even claim denial.
Providing complete access and being transparent demonstrates good faith and helps the adjuster build a comprehensive report. This is a crucial step in the list of water damage insurance claim tips because it directly impacts the accuracy of your settlement. By facilitating their inspection and answering questions honestly, you empower them to validate the full extent of your loss, which is necessary for a fair payout determination.
Actionable Checklist for Working with Your Adjuster
To ensure the adjuster’s visit is productive and your claim stays on track, treat the inspection as a collaborative effort. Your preparation can make a significant difference in the outcome.
- Respond Promptly: When the adjuster contacts you, return their call or email as soon as possible to schedule the inspection. Quick responses set a positive and professional tone.
- Prepare Your Documentation: Have all your photos, videos, receipts for initial expenses, and your personal property inventory list ready for their review. Being organized shows you are serious and prepared.
- Provide Unrestricted Access: Make sure the adjuster can easily and safely access all affected areas. If parts of your property are blocked or locked, clear the way before they arrive.
- Be Present and Answer Questions: Be available during the inspection to answer questions about the timeline of events, the source of the water, and the items that were damaged.
- Consider a Professional Presence: It can be beneficial to have your restoration contractor (like a representative from Restore Heroes) present during the inspection. They can answer technical questions and point out damage the adjuster might otherwise overlook, which may lead to a more thorough assessment.
- Document the Visit: After the inspection, send a follow-up email to the adjuster summarizing your conversation, including any next steps and timelines they provided. This creates a written record of the meeting.
Key Insight: Never guess or speculate when answering an adjuster's questions. If you don't know the answer, say so. Providing inaccurate information, even by mistake, can complicate your claim. Stick to the facts you have documented and know to be true.
8. Know When to Challenge Claim Denials and Seek Professional Appeal Assistance
Receiving a claim denial or a settlement offer that seems too low can feel like a final verdict, but it often isn't. You have the right to challenge the insurance company's decision. Understanding the appeals process and knowing when to seek professional help is a crucial step in ensuring you receive fair compensation for your water damage loss. This is one of the most empowering water damage insurance claim tips, as it reminds you that you can advocate for your own best interests.
An insurer's initial decision is based on their adjuster's assessment, but this assessment may overlook critical details, misinterpret your policy, or undervalue the cost of restoration. Challenging a denial requires a methodical, evidence-based approach to demonstrate why their initial conclusion was incorrect. Successfully appealing a decision can mean the difference between paying for repairs out-of-pocket and having your restoration funded by your policy.
Actionable Appeal Checklist
If your claim is denied or underpaid, don't panic. Instead, take systematic steps to build your case for an appeal.
- Request a Written Explanation: The first step is to formally request a detailed explanation of the denial in writing. The letter should cite the specific policy language the insurer is using to justify their decision. This document is the foundation of your appeal.
- Review Your Policy Again: With the denial letter in hand, carefully review the cited sections of your insurance policy. Sometimes, the language can be complex or subject to interpretation. Understanding common reasons why your insurance company might refuse to pay a claim, and knowing what steps you can take, is paramount for a successful appeal.
- Gather Counter-Evidence: Compile all your documentation, including photos, videos, the mitigation company's report, and independent repair estimates. If the denial concerns the cause of loss (e.g., claiming it was a flood instead of a burst pipe), a report from a certified restoration professional can provide crucial evidence.
- Submit a Formal Appeal: Draft a formal appeal letter that clearly states why you believe the decision is incorrect. Reference your policy language and attach all your supporting evidence to counter their reasoning. Keep your tone professional and fact-based.
- Consider a Public Adjuster: For large or complex claims, hiring a public adjuster can be a strategic move. These professionals work for you, not the insurance company, to manage your claim, negotiate on your behalf, and fight for a fair settlement.
Key Insight: Never accept a denial at face value without understanding the specific reasons behind it. Always ask for the decision in writing and know that you have the right to appeal. By staying organized and presenting a fact-based argument, many homeowners are successful in having initial decisions overturned or settlement offers significantly increased.
8-Point Water Damage Claim Tips Comparison
| Item | Complexity 🔄 | Resources ⚡ | Expected Outcome 📊 ⭐ | Ideal Use Cases 💡 | Key Advantages ⭐ |
|---|---|---|---|---|---|
| Document Everything Immediately with Photos and Videos | Medium 🔄 (time‑sensitive, immediate action) | Low ⚡ (smartphone, cloud storage; large file sizes) | High 📊 — clear visual proof speeds adjuster decisions ⭐⭐⭐ | Immediately after discovery, before cleanup | Objective, irrefutable evidence; supports mold/secondary claims |
| Report the Claim to Your Insurance Company Promptly | Low 🔄 (procedural; stressful but simple) | Low ⚡ (policy docs, phone/email) | High 📊 — activates coverage and official record ⭐⭐⭐ | Within 24–72 hours of discovery | Prevents denial; starts formal claims workflow |
| Mitigate Further Damage While Awaiting the Adjuster | Medium-High 🔄 (rapid decisions; technical steps) | Medium-High ⚡ (equipment, possible pro costs) | High 📊 — reduces damage and mold risk ⭐⭐⭐ | Immediate mitigation to limit spread and secondary loss | Lowers total claim cost; shows duty‑to‑mitigate compliance |
| Create a Detailed Inventory of Damaged Items and Personal Property | High 🔄 (time‑intensive, meticulous) | Medium ⚡ (time, receipts, research) | High 📊 — ensures full contents recovery ⭐⭐⭐ | Contents‑heavy losses; high‑value items | Prevents omissions; supports valuation and negotiations |
| Keep All Receipts, Invoices, and Documentation of Restoration Work | Medium 🔄 (organizational effort) | Low-Medium ⚡ (paper/digital filing) | High 📊 — substantiates actual expenses ⭐⭐⭐ | When contractors are hired or costs incurred | Concrete proof of costs; reduces disputes over charges |
| Understand Your Insurance Policy Coverage Limits and Deductibles | Medium-High 🔄 (complex policy review) | Low ⚡ (time, agent consultation) | Medium-High 📊 — sets realistic expectations ⭐⭐ | Before loss; policy renewal or purchase decisions | Avoids surprises; informs claim strategy and coverage gaps |
| Cooperate Fully with Insurance Adjusters and Provide Access | Low-Medium 🔄 (coordination, scheduling) | Low ⚡ (time, documentation) | High 📊 — faster, more accurate assessments ⭐⭐⭐ | During adjuster inspections and assessments | Speeds processing; demonstrates good faith and transparency |
| Know When to Challenge Claim Denials and Seek Professional Appeal Assistance | High 🔄 (procedural/legal complexity) | Medium-High ⚡ (time, possible fees for public adjuster) | Medium 📊 — potential recovery but uncertain ⭐⭐ | Denials, underpayments, or large disputed claims | Recovers legitimate coverage; professional leverage in appeals |
| Keep All Receipts, Invoices, and Documentation of Restoration Work | Medium 🔄 (organizational effort) | Low-Medium ⚡ (paper/digital filing) | High 📊 — substantiates actual expenses ⭐⭐⭐ | When contractors are hired or costs incurred | Concrete proof of costs; reduces disputes over charges |
Your Partner in Phoenix Water damage Recovery
Navigating the aftermath of a water damage event can feel overwhelming, but the journey from crisis to recovery is manageable with the right strategy. This guide has provided a comprehensive roadmap of actionable water damage insurance claim tips, designed to empower you at every step. From the critical first moments of documenting the scene to the final negotiations with your adjuster, your actions directly influence the outcome of your claim.
Remember, the core principles of a successful claim are simple but powerful: act quickly, document meticulously, and communicate clearly. These aren't just suggestions; they are the pillars that support a strong, well-substantiated claim. By taking immediate photos and videos, reporting the loss promptly, and starting mitigation efforts, you demonstrate proactive ownership and protect both your property and your rights under your policy.
Key Takeaways for a Smoother Claims Process
Let's distill the most critical advice into a final checklist. Mastering these points can make the difference between a frustrating, drawn-out process and a fair, efficient resolution:
- Documentation is Your Strongest Ally: Your claim is only as strong as the evidence supporting it. Detailed photo logs, video walkthroughs with narration, and an exhaustive inventory of damaged items are non-negotiable. Don't just list a "sofa"; describe it as a "three-seat, gray microfiber sofa, purchased in 2021," and include the receipt if possible.
- Mitigation is Not a Suggestion, It's a Duty: Your insurance policy requires you to take reasonable steps to prevent further damage. This means calling a professional restoration company to extract standing water and set up drying equipment. This action shows your insurer you are a responsible partner in the recovery process.
- Understand Your Policy Before You Need It: Knowing your coverage limits, exclusions, and deductible is crucial. Does your policy cover gradual leaks or only sudden bursts? Is there a sub-limit for mold remediation? Reviewing these details helps you set realistic expectations and communicate more effectively with your adjuster.
- Professional Partnership Streamlines Everything: You are an expert in your life and work, not necessarily in water damage restoration or insurance negotiations. Partnering with an IICRC-certified restoration company like Restore Heroes brings that expertise to your side. We use industry-standard software that insurers recognize and provide the detailed documentation they require, which can help streamline the approval process.
Crucial Insight: The relationship between you, your restoration contractor, and your insurance adjuster is a triangle of communication. When your contractor can speak the same technical language as the adjuster and provide data-backed reports, it removes ambiguity and often accelerates the claim.
Your Next Steps to Take Control
Filing a water damage insurance claim is a marathon, not a sprint. Your patience, organization, and persistence are essential. Keep every receipt, log every phone call, and never be afraid to ask your adjuster for clarification. If you encounter a roadblock or a denial, remember that you have the right to challenge the decision and seek a second opinion.
Ultimately, the goal is not just to file a claim but to restore your home or business to its pre-loss condition. The tips outlined in this article are your toolkit for achieving that goal. By applying them, you transform from a passive victim of circumstance into an active, informed advocate for your own recovery. This proactive stance helps prepare you to secure a fair and just settlement, allowing you to rebuild and move forward with confidence. For those in the Phoenix area, this process doesn't have to be a solitary one.
When facing a water-related disaster in Phoenix, Mesa, or Scottsdale, let Restore Heroes be your first call. Our team specializes in providing the immediate mitigation and professional documentation your insurance provider needs, which can help simplify your water damage insurance claim from start to finish. Contact us for a free, no-obligation onsite inspection and let us help restore your property and your peace of mind: Restore Heroes.