You step out of a hot shower, the mirror clears, and you notice it. A dark speckled patch above the tile line. Maybe it was smaller last week. Maybe you scrubbed it once already and it came back.
That’s a common way mold on drywall in bathroom areas gets discovered in Phoenix homes. It doesn’t always start with a dramatic leak. Often it starts with trapped steam, weak airflow, hairline grout failure, or condensation collecting on a cool wall while the AC runs hard.
That Dark Spot on the Wall Why Bathroom Mold is Common in Phoenix
In Phoenix, homeowners often assume mold is mostly a coastal or basement problem. Then monsoon season hits, indoor humidity climbs, and the bathroom that seemed fine in spring starts showing stains on the ceiling corner or soft paint above the shower.
Bathrooms already deal with daily moisture. Drywall makes that more complicated because it isn’t just a hard wall finish. It has a gypsum core and paper facing that can hold moisture long enough for growth to take hold. In a Phoenix house, that moisture can come from shower steam, a slow plumbing leak, or AC-related condensation on a cooler wall surface.
A multi-state study on mold in U.S. bathrooms found mold growing on 50% of bathroom walls above showers and 49% of shower grouts, which tells you how normal this problem is even when people know bathrooms are risky. If you’re dealing with a small patch today, that doesn’t mean you’ve done anything unusual or negligent. It means your bathroom has the same basic ingredients mold needs. Moisture, an organic surface, and not enough drying time.
Bathrooms in Phoenix don’t stay mold-free because the air outside is dry. They stay mold-free when indoor moisture gets removed fast.
One reason this catches people off guard is that Phoenix homes swing between very dry outdoor conditions and very damp indoor bathroom conditions. Add monsoon humidity and strong air conditioning, and you can create wet spots on drywall without a major plumbing failure. If the room doesn’t dry well, mold starts where the moisture lingers.
If you’ve had a leak, overflow, or repeated bathroom humidity issue, it helps to understand the broader relationship between water intrusion and fungal growth. This overview of water and mold mitigation gives useful context on how quickly a moisture problem can turn into a mold problem.
Confirming Your Suspicions How to Identify Mold on Drywall
Not every dark mark is mold. In bathrooms, I see homeowners confuse mold with dirt, old paint bleed-through, or simple mildew staining. The right first move is observation, not panic.
What mold on drywall usually looks like
Mold on drywall in bathroom areas can appear in several colors and textures. It may look:
- Speckled and flat on painted ceilings or upper wall corners
- Fuzzy or cottony where it has started rooting into paper-faced drywall
- Slimy or blotchy in areas with repeated wetting
- Green, blue, yellow, brown, white, or black depending on the species and moisture pattern
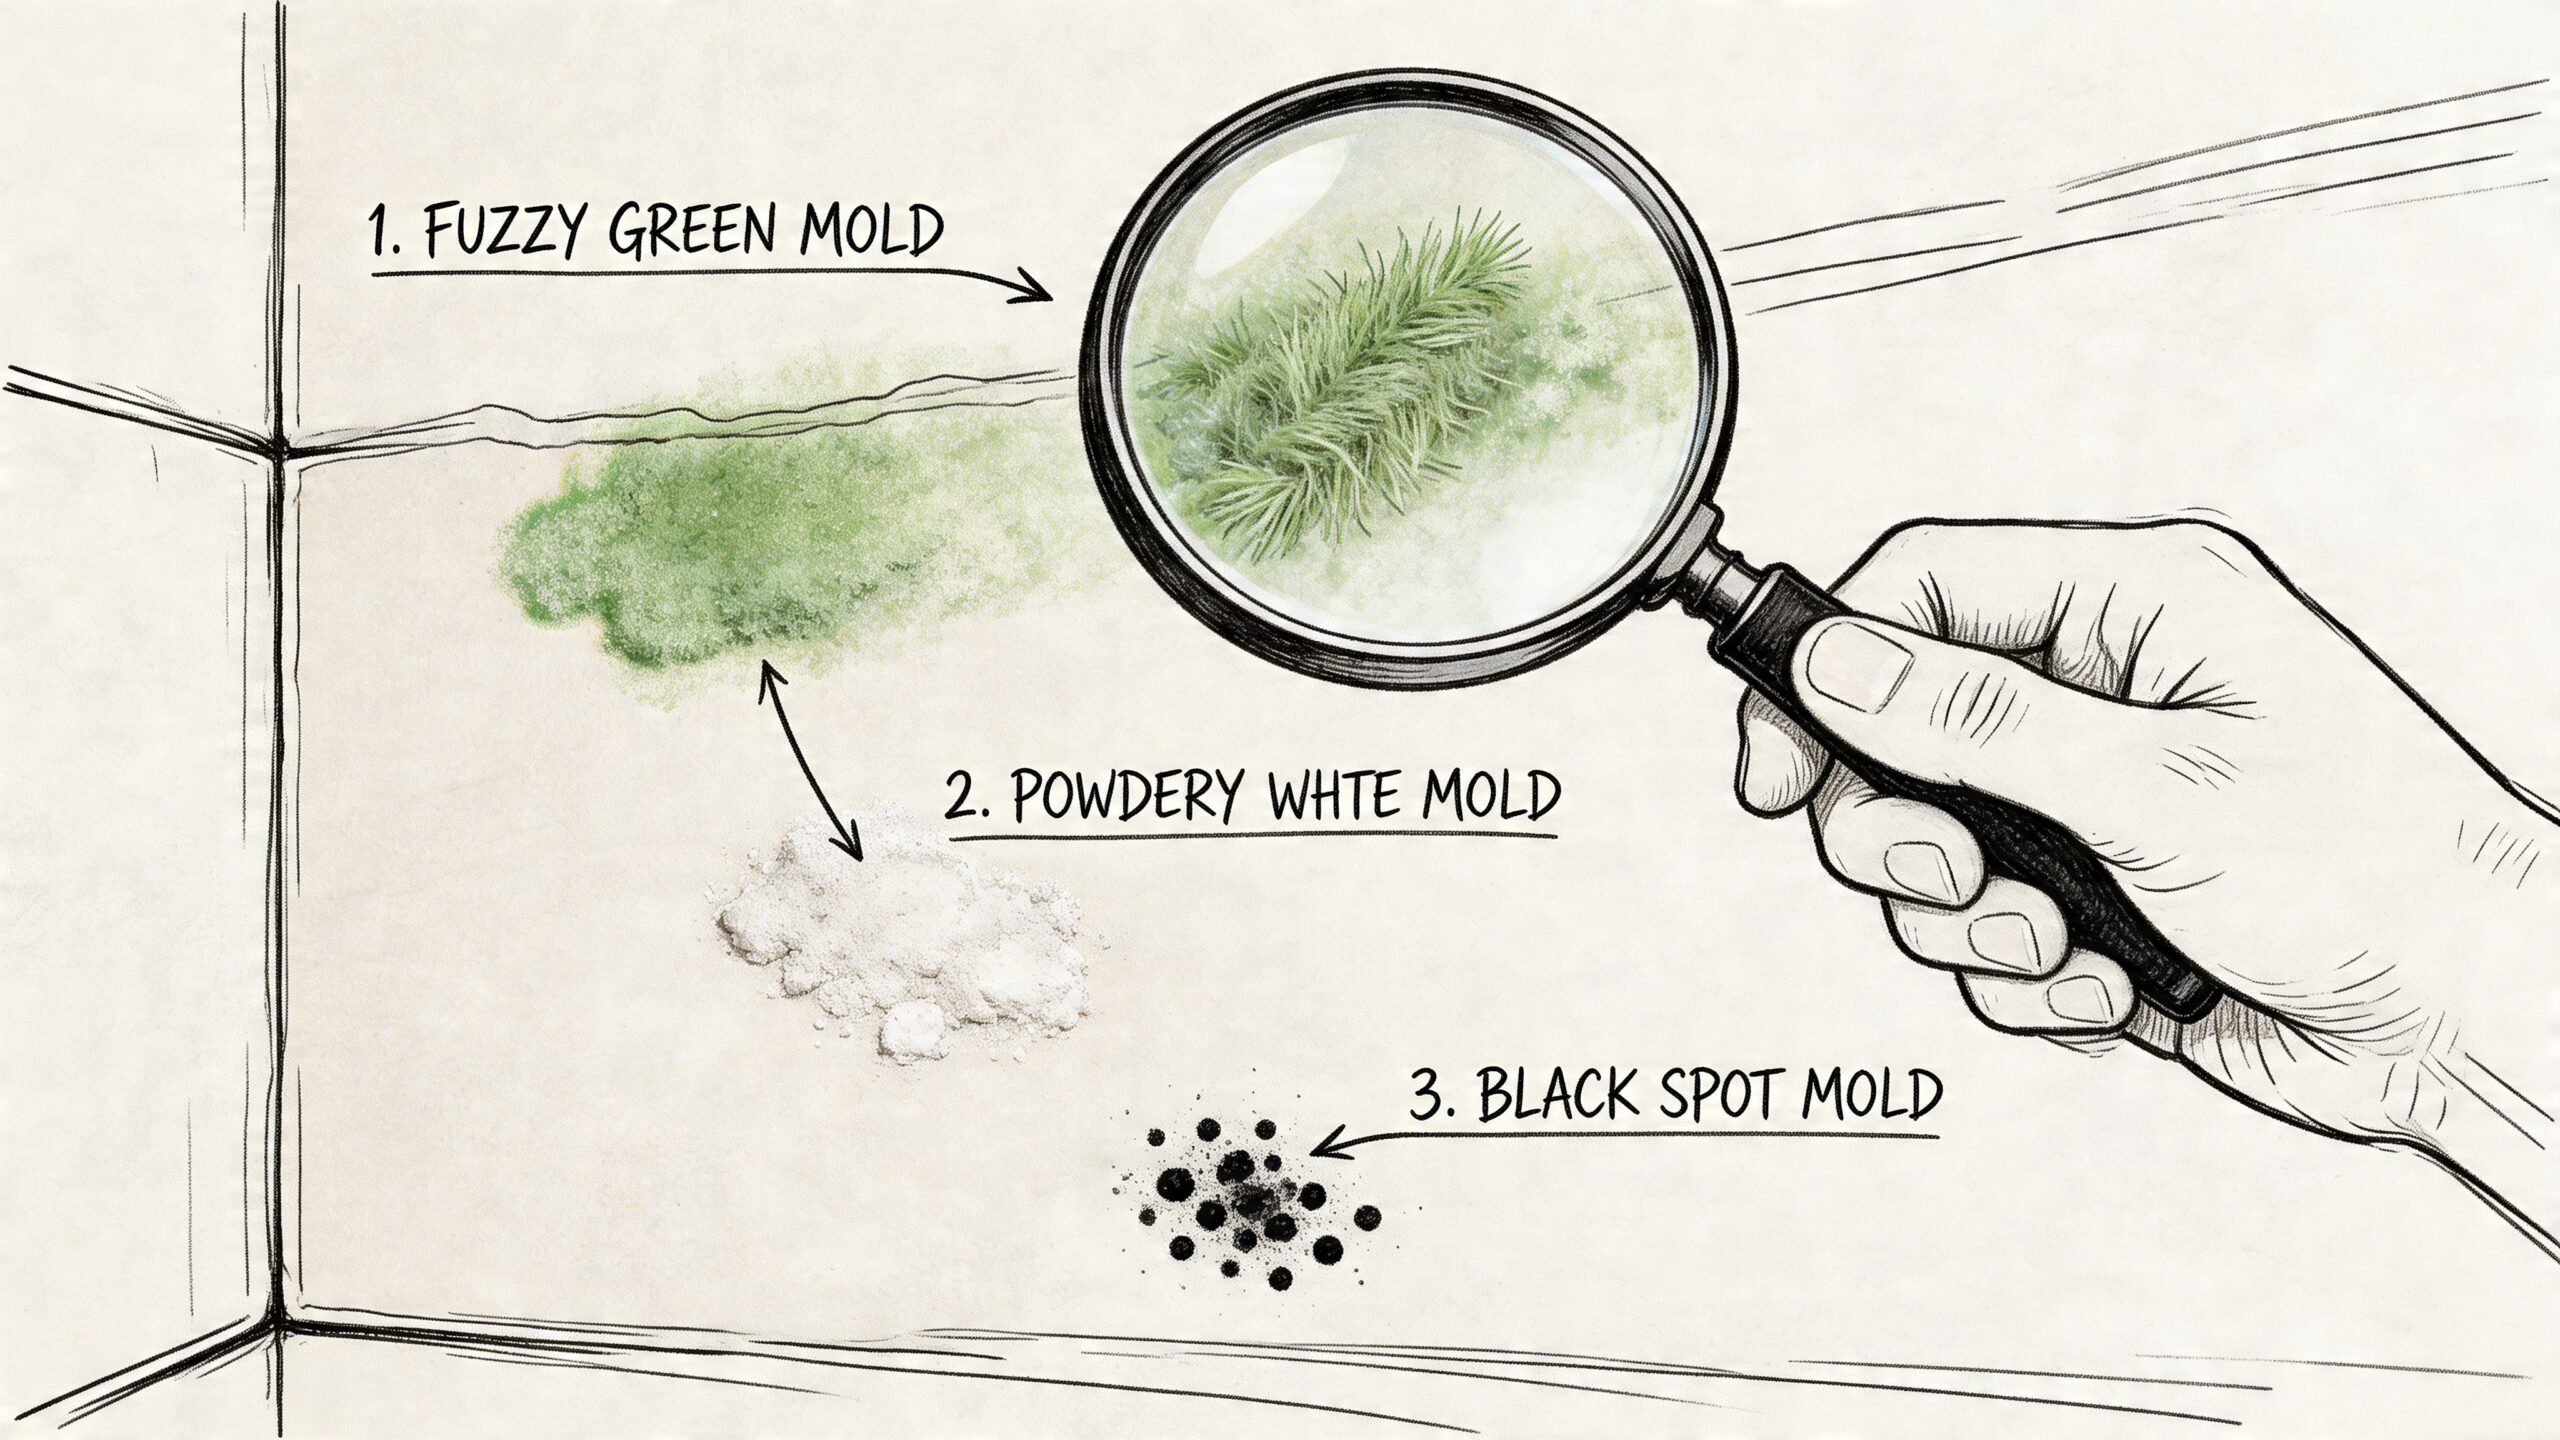
The color alone doesn’t tell you how serious it is. “Black mold” gets all the attention, but many bathroom growths aren’t Stachybotrys. A bathroom mold statistics review found the most common toxic mold group on bathroom drywall was Penicillium/Aspergillus at 59%, while Stachybotrys was detected in about 16.7% of cases. For a homeowner, the practical takeaway is simple. Any persistent growth on drywall deserves attention, even if it isn’t jet black.
Use sight, smell, and touch carefully
A bathroom mold problem often announces itself before you see a large patch.
Look for these signs:
- Persistent musty odor: If the bathroom smells stale even after cleaning, moisture may be feeding hidden growth.
- Paint changes: Bubbling, peeling, or hairline cracking above the shower often points to trapped moisture.
- Softness: Drywall that feels spongy, swollen, or crumbly has moved beyond a simple cosmetic issue.
- Recurring staining: If a spot comes back after wiping, you may be seeing growth from inside the material, not just on the surface.
If you suspect hidden growth, this guide on how to check for mold inside your walls is a useful companion because it helps you think past what’s visible on the paint surface.
Mildew versus mold matters
Many DIY decisions concerning mold often go awry. Surface mildew or light surface growth on a sealed, painted area may clean off. Penetrating mold doesn’t. Once fungal growth roots into the drywall paper and gypsum, wiping the surface won’t solve the problem.
A reliable field clue is texture and shape. If the area is fuzzy, slimy, irregular, or discolored beneath the paint film, treat it as a deeper material issue. If it looks like a light residue sitting on intact painted drywall, it may be surface-level.
Field check: If the stain wipes away cleanly and the wall stays dry and solid, you may be dealing with a surface issue. If the wall is soft, stained through, or the spot returns, assume the drywall itself is involved.
For more examples of visual patterns homeowners miss, this page on what mold looks like on drywall can help you compare what you’re seeing.
DIY Cleanup or Call a Pro Making the Right Decision
Most homeowners don’t need a lecture here. They need a decision. Can I clean this safely, or am I about to make the problem worse?
The answer depends on two things more than anything else. First, is the growth only on the surface of a sealed wall. Second, is the affected area small and clearly limited. If either answer is no, the job changes fast.
The distinction that actually matters
A lot of online advice skips the key split between surface mold and penetrating mold. That’s the split I care about in the field because it tells me whether cleaning is realistic or whether removal is the safer path.
A remediation-focused explainer on drywall mold notes that misidentifying surface mold versus penetrating mold leads to 30-50% of unnecessary remediation costs or failed DIY attempts. That tracks with what homeowners experience. They clean a visible patch, repaint it, and then call for help when the stain reappears or the wall softens.
When DIY can make sense
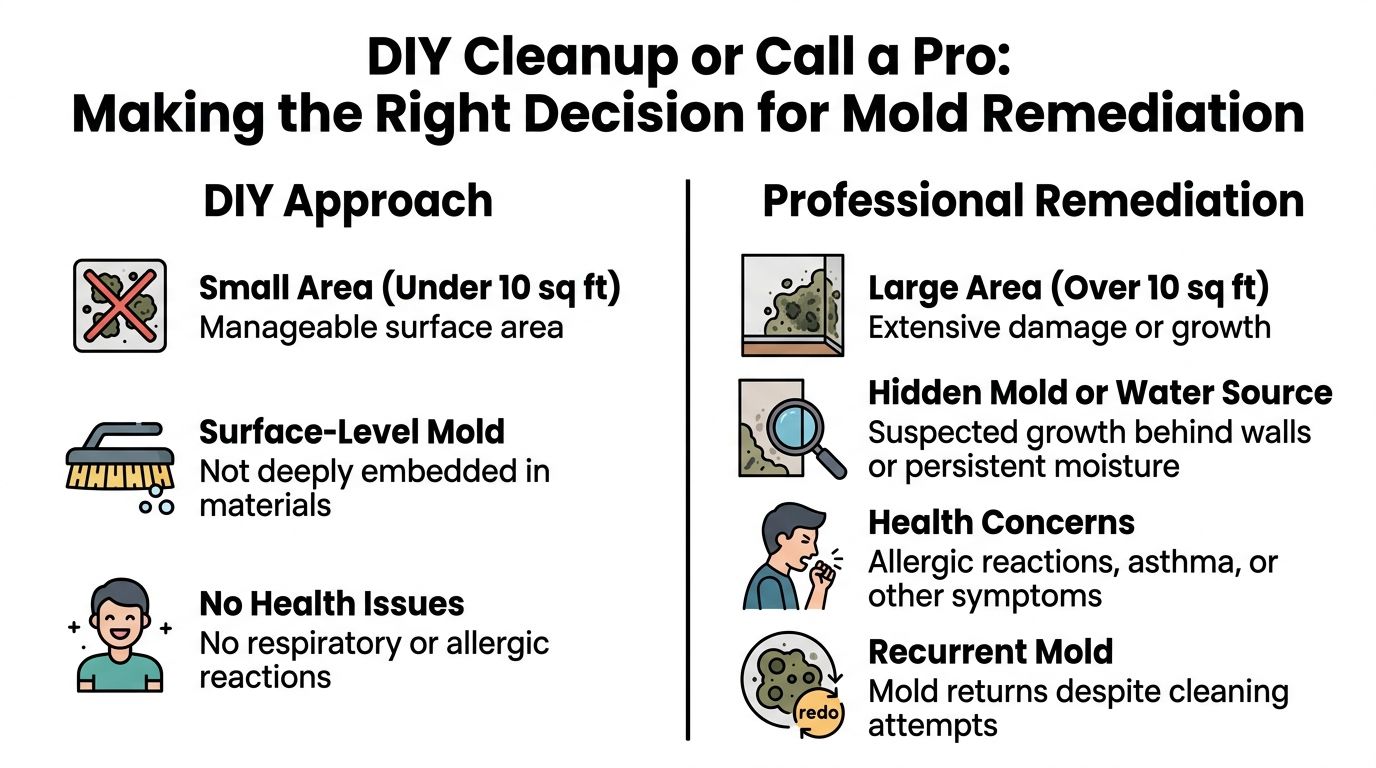
A homeowner may be able to handle the job when all of the following are true:
- Small area: The affected area is under 10 square feet
- Sealed surface: The drywall is painted or primed and the growth appears to sit on top of the finish
- Dry, solid wall: No swelling, no softness, no crumbling paper face
- No hidden moisture signs: No active leak, no recurring stain, no musty smell outside the immediate spot
- No health sensitivity: Nobody in the home is reacting strongly to the area
For that kind of light, surface issue, careful cleaning and drying can be reasonable.
When a pro is the safer call
Call for professional help if you notice any of these:
- Area over 10 square feet
- Fuzzy, slimy, or embedded growth
- Drywall feels soft or damaged
- Mold keeps returning
- You suspect growth behind the wall
- There’s a leak source you haven’t fixed
- Someone in the home has asthma, allergies, or respiratory concerns
If you’re already at the point of comparing providers, this page on mold removal companies near me gives a practical starting point for what to look for.
DIY versus professional remediation
| Factor | DIY Approach (Under 10 sq. ft.) | Professional Service (Over 10 sq. ft. or Hidden Mold) |
|---|---|---|
| Type of problem | Surface growth on painted drywall | Penetrating, hidden, or recurring growth |
| Main goal | Clean and dry the finish surface | Remove contaminated material and control spread |
| Risk level | Lower if the wall is intact and dry | Higher because spores and hidden damage are more likely |
| Tools needed | PPE, cleaner, wiping tools, drying setup | Containment, HEPA air filtration, moisture detection, removal tools |
| Chance of missing hidden damage | Moderate to high | Lower because the wall cavity can be evaluated properly |
| Best fit | Small, isolated, clearly visible issue | Soft drywall, repeat growth, leak-related damage |
If you’re debating whether the drywall is contaminated inside, don’t judge by stain color alone. Judge by material condition, moisture history, and whether the growth keeps coming back.
What doesn’t work well is the middle-ground approach. Homeowners often spray a stronger chemical on a wall that really needs removal. That can bleach the stain, but it doesn’t remove rooted growth from porous drywall. It also doesn’t fix the leak, weak fan, or condensation pattern that caused the problem.
Your Step-By-Step Guide to Safe Mold-Damaged Drywall Removal
If you’ve confirmed the issue is small and localized, and you’re dealing with a minor area appropriate for careful homeowner work, the job has to be done cleanly. Sloppy removal spreads spores into the room and leaves contaminated material in the wall.
A professional drywall mold remediation process calls for containment with negative pressure and HEPA-filtered air scrubbers that capture 99.97% of particles at 0.3 microns and larger, and it recommends cutting out damaged drywall 12 to 24 inches beyond visible staining. That’s the standard because visible staining rarely marks the full edge of contamination.
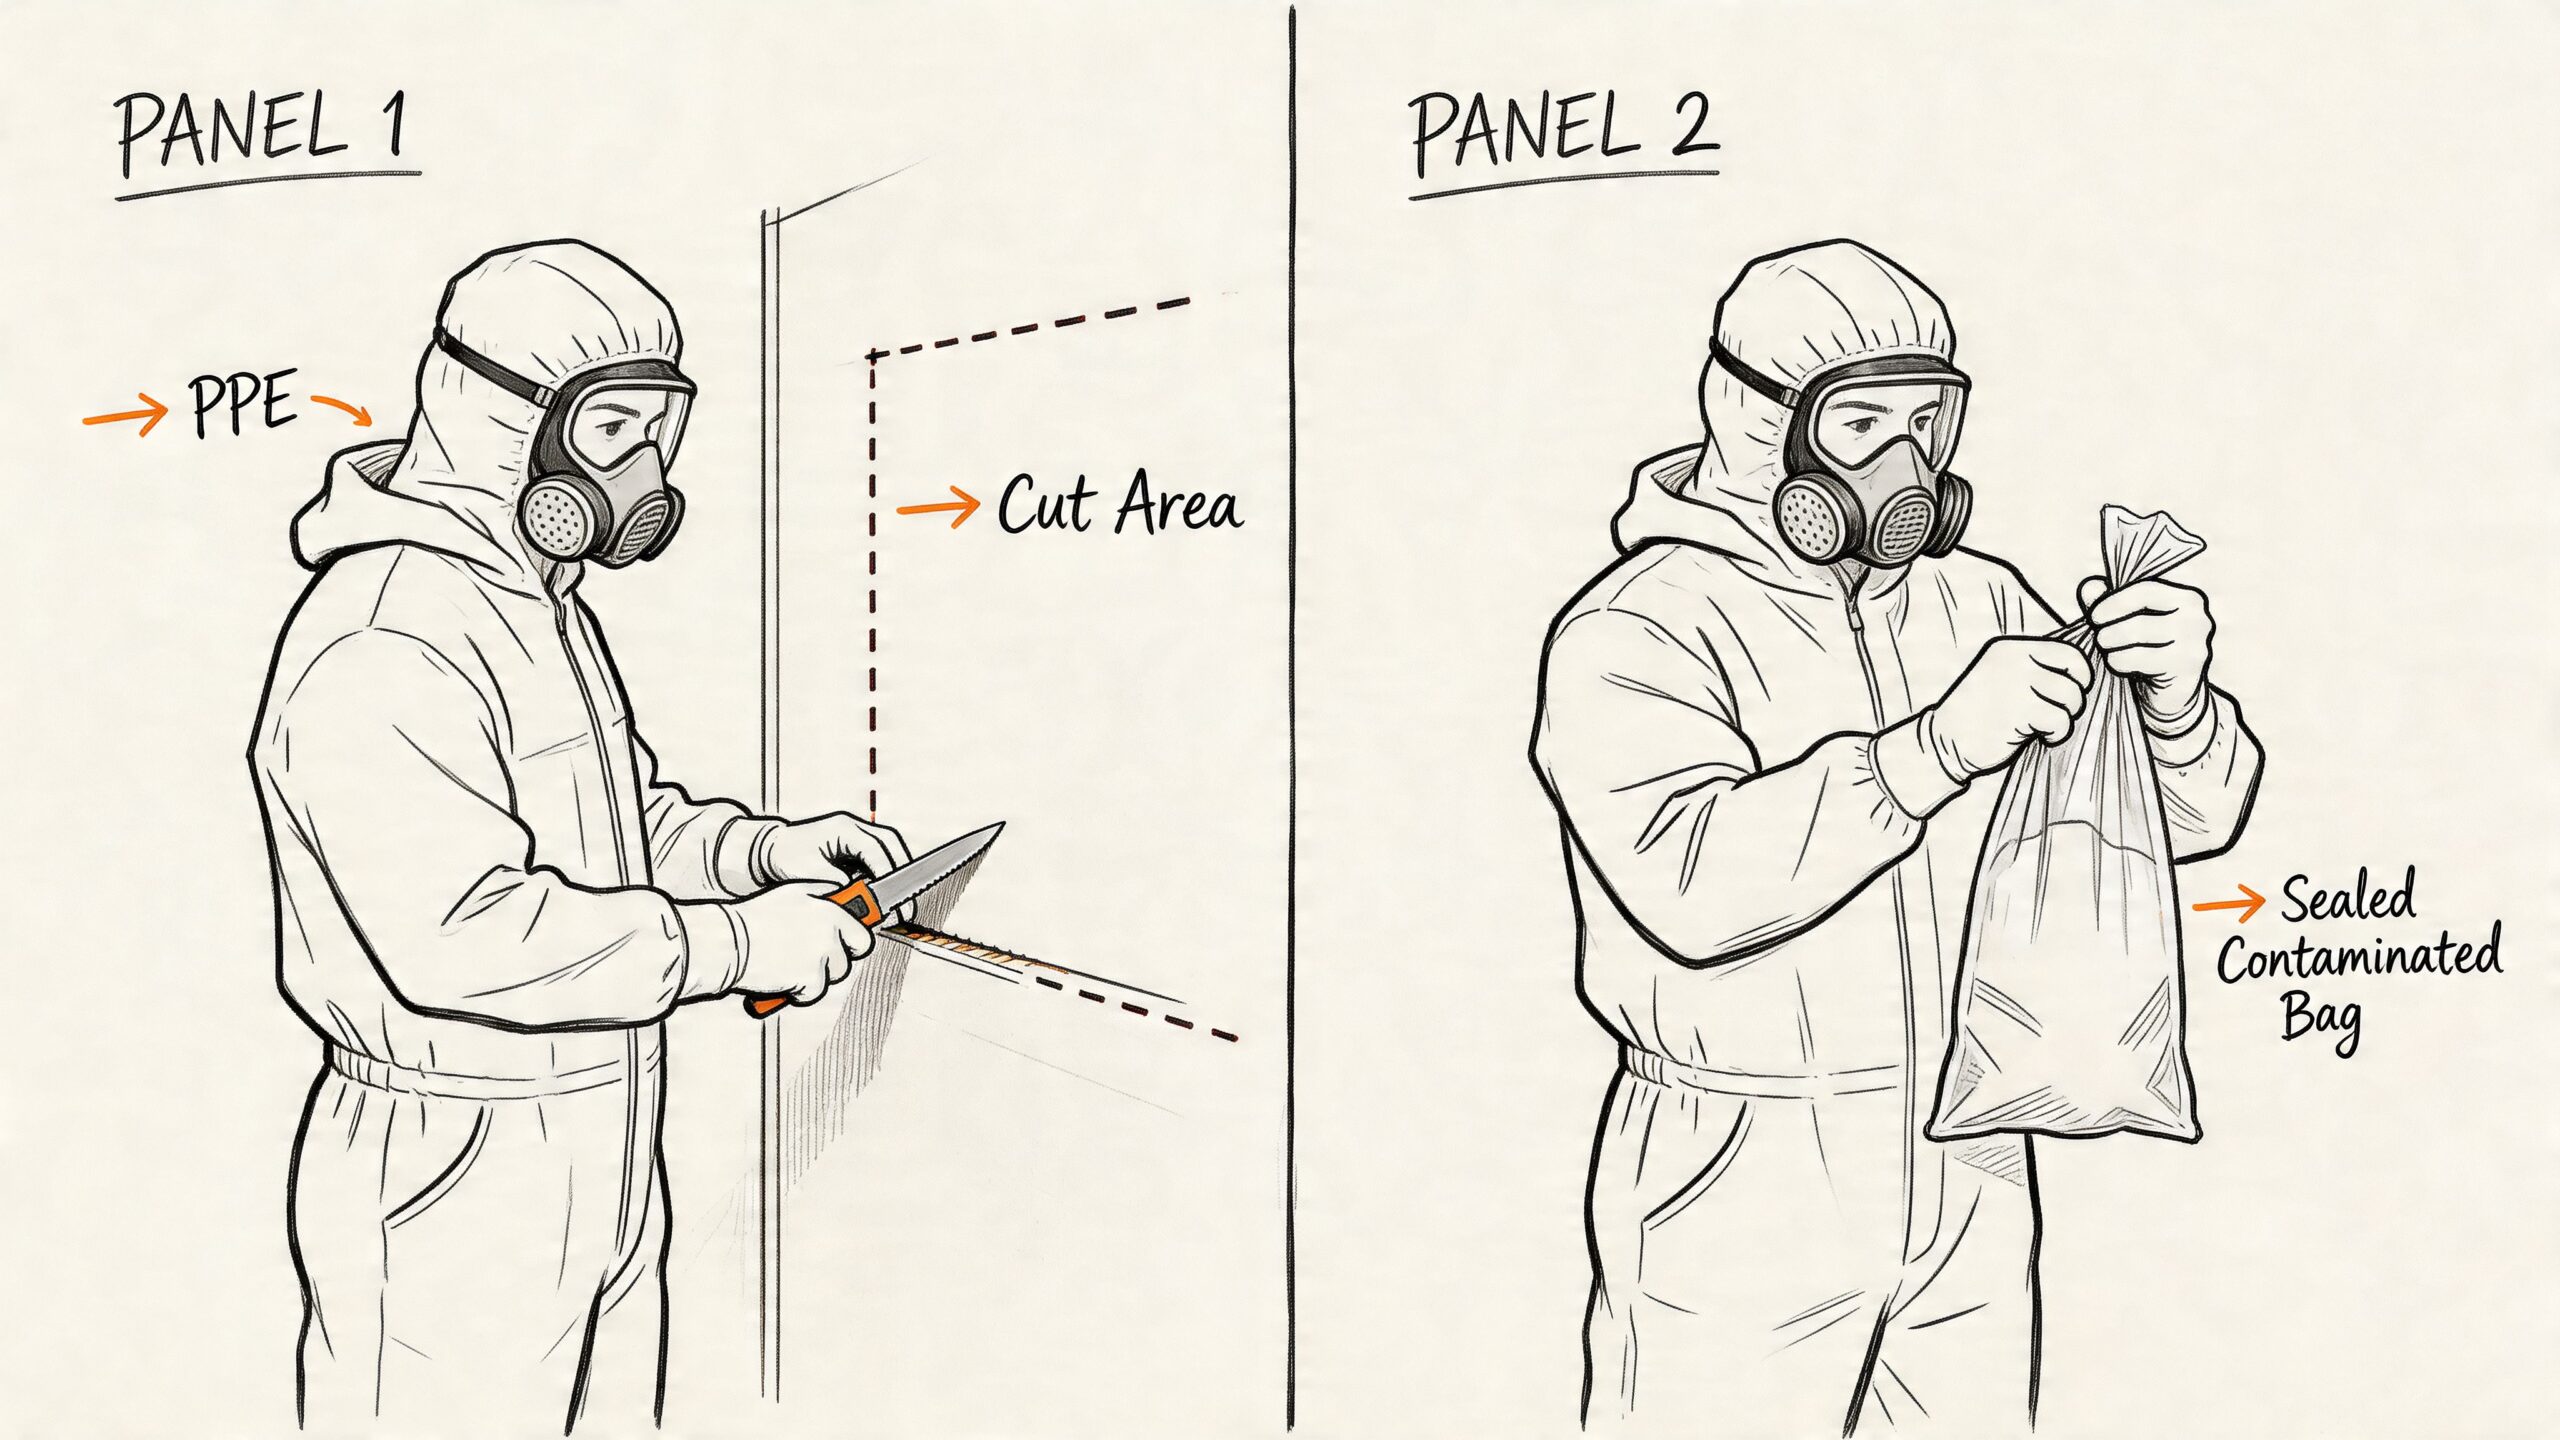
Step 1 Get your safety gear and tools ready
For a small bathroom drywall removal, gather:
- PPE: N95 respirator, gloves, goggles, and disposable coveralls if possible
- Containment materials: 6-mil plastic sheeting and tape
- Cutting tools: Utility knife, stud finder, marker, drop cloths
- Cleanup tools: HEPA vacuum if available, heavy-duty trash bags
- Treatment and drying: Appropriate cleaner or biocide labeled for the use, box fan or air mover, moisture meter if you have access to one
Avoid power saws for this kind of work. They aerosolize dust and make contamination harder to control.
Step 2 Contain the work zone
This is the step DIYers skip most often. It matters.
Seal the bathroom doorway or the immediate work area with plastic sheeting. Remove towels, rugs, and loose toiletries. If the room connects to the HVAC system, don’t let dust move freely through the house during removal.
Practical rule: The cleanup isn’t successful if you remove mold from one wall and spread spores through the rest of the home.
For significant contamination, pros create negative pressure. A homeowner handling a small issue may not have that setup, but the principle still applies. Keep the work area isolated, and don’t create unnecessary air turbulence.
Step 3 Mark beyond the visible damage
Use a stud finder to locate framing. Then mark a removal area that extends 12 to 24 inches beyond the visible staining, following the professional guidance above. Mold growth inside drywall doesn’t stop neatly at the edge of a dark mark.
Score the drywall with a utility knife. Work deliberately. Keep the piece as intact as possible during removal.
Step 4 Remove the drywall carefully
Pull the section away gently and keep the contaminated side facing inward or upward as you move it. Set it directly onto a drop cloth and bag it promptly.
Don’t drag broken drywall chunks through the bathroom. Don’t pile them in the hallway. That only spreads debris and spores.
If the cavity reveals wet insulation, decayed framing, or much broader contamination than expected, stop there. That’s the point where this becomes a larger remediation project, not a simple wall patch.
Step 5 Clean the cavity and framing
Once the damaged drywall is out, clean loose contamination with a HEPA vacuum if available. Then treat the exposed framing or cavity surfaces with an appropriate labeled product and let it dwell as directed.
You’re not trying to soak the cavity. You’re trying to remove residue and address remaining contamination without adding more moisture. After treatment, dry the cavity thoroughly with moving air.
Here’s a quick visual walkthrough of the removal mindset and safe handling sequence:
Step 6 Verify dryness before closing the wall
Many repeat problems begin when homeowners patch the wall before the cavity has dried.
The wall cavity should be dry to the touch, and ideally verified with a moisture meter before new drywall goes in. If the wood framing still feels cool, damp, or smells musty, you’re closing up a problem instead of solving it.
Step 7 Know when to stop and escalate
A small removal job can turn into a larger problem the moment you open the wall.
Stop and call a professional if you find:
- Growth extending beyond the opening
- Wet insulation or soaked framing
- Mold around plumbing penetrations
- Strong odor from the cavity
- Widespread contamination above the cut line
If your concern is specifically dark staining and you want more detail on safe handling, this guide on how do I remove black mold from drywall adds more context.
Rebuilding Your Wall After Mold Remediation
Once the cavity is clean and fully dry, rebuilding the wall is straightforward. The goal isn’t just to make it look finished. The goal is to rebuild it with materials and finishes that handle bathroom conditions better.
Choose the right replacement material
For bathrooms, use moisture-resistant drywall, often called greenboard, in appropriate locations. In splash-prone areas, many contractors prefer cement-based backer materials instead of standard drywall. The exact choice depends on where the patch sits and how much direct moisture that surface sees.
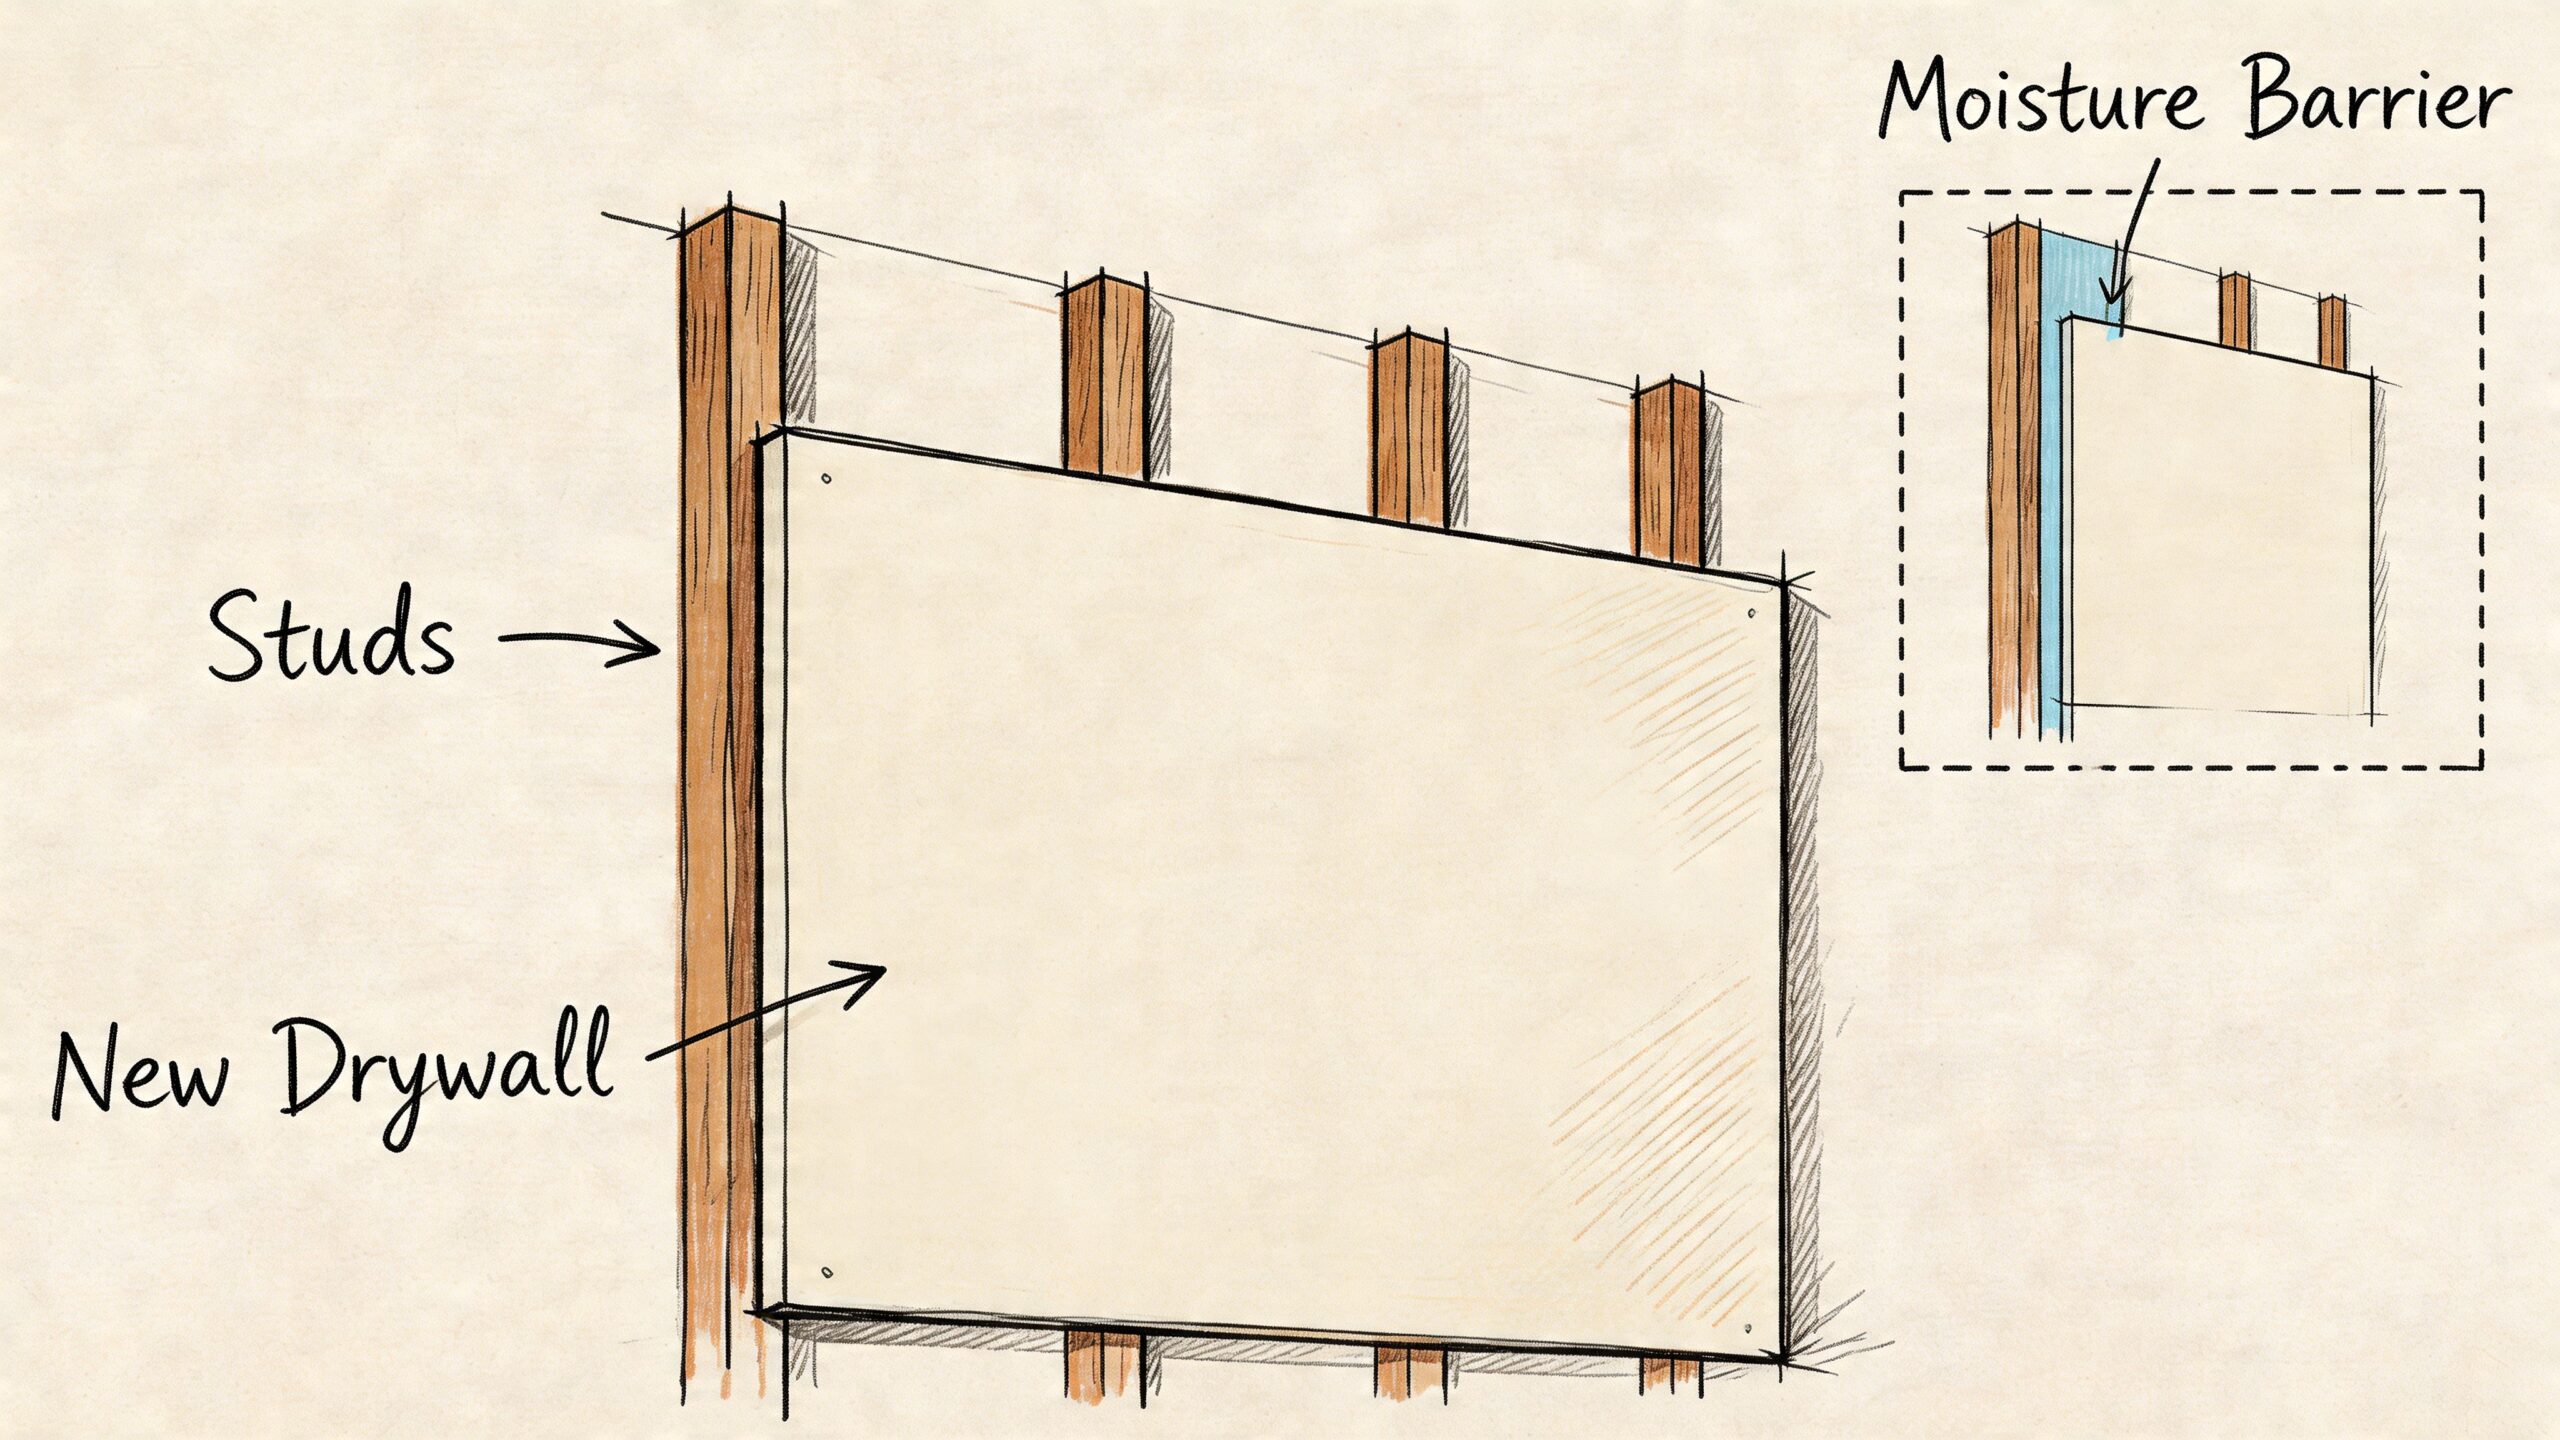
Cut the new panel to fit the opening cleanly. Fasten it securely to framing. A loose patch often shows up later as cracking at the seams.
Finish the patch correctly
Follow a normal drywall finishing sequence:
- Tape the seams with appropriate joint tape.
- Apply joint compound in thin coats rather than one heavy coat.
- Let each coat dry fully before sanding and recoating.
- Sand lightly so you don’t rough up adjacent painted surfaces more than necessary.
If the wall had previous moisture staining nearby, don’t rush to final paint. Surface prep matters in bathrooms because every weak point in the finish becomes another place for steam to linger.
Prime and paint for a bathroom environment
Use a quality mold-inhibiting primer before painting. Then apply a bathroom-appropriate finish coat that stands up better to moisture and routine cleaning.
Rebuilding is the part homeowners want to get to fastest, but the quality of the dry-out and prep work determines whether the patch stays sound.
If the area you repaired sits above a shower or near a recurring condensation line, look beyond the wall itself. A good patch won’t compensate for a bad fan, cracked grout, or an uncorrected leak source.
Keeping Mold Away for Good Phoenix-Specific Prevention Tips
The best mold cleanup is the one you never have to repeat. In Phoenix, prevention isn’t just about “keeping things dry” in a general sense. You have to manage quick bursts of bathroom humidity, seasonal monsoon moisture, and condensation caused by aggressive cooling indoors.
A hidden bathroom wall mold guide notes that mold risk becomes imminent when drywall moisture content exceeds 17%, and it recommends maintaining indoor humidity below 50% while running the bathroom exhaust fan for 30 minutes after showers. In a Phoenix bathroom, that advice matters because shower humidity can spike fast, even when outdoor air is dry.
Control steam before it becomes wall moisture
If your bathroom fan is loud, weak, or rarely used, fix that habit first. A fan only helps if it moves moist air out of the room.
Use this routine:
- Run the fan during the shower
- Keep it running for 30 minutes after
- Leave the bathroom door open afterward if privacy allows
- Wipe condensation off painted walls, mirrors, and windows
- Squeegee shower surfaces so the room dries faster
If you already notice condensation on glass or trim in other parts of the home, this article on black mold on window sills is a useful reminder that the same moisture habits affecting bathroom drywall often show up elsewhere first.
Watch the Phoenix-specific trouble spots
In this market, I’d pay close attention to these conditions:
- Monsoon season humidity: Bathrooms take longer to dry when the outdoor air is already carrying more moisture.
- AC condensation patterns: Cold air inside can create damp wall zones where warm bathroom air hits cooler surfaces.
- Weakly vented fans: Some fans make noise but don’t move enough air because the duct is blocked, too long, or poorly routed.
- Minor grout and caulk failures: These look cosmetic until water gets behind tile or trim and reaches drywall paper.
Keep an eye on moisture before you see stains
You don’t need to wait for visible growth. A simple routine inspection catches most bathroom moisture issues earlier.
Check these regularly:
- Ceiling corners above the shower
- Wall areas outside the tub or shower surround
- Baseboards near toilet supply lines and vanities
- Caulk joints and grout lines
- Paint for bubbling or soft spots
A bathroom moisture problem is easier to fix when it’s still a ventilation or minor repair issue. Once it becomes mold on drywall in bathroom cavities, the repair gets more invasive.
The homes that avoid repeat mold problems usually aren’t cleaned more aggressively. They dry faster every single day.
For a practical maintenance reference, this mold inspection checklist can help you build a quick bathroom walk-through into your routine.
Frequently Asked Questions About Bathroom Mold
Can I just paint over the mold?
No. Paint can hide staining, but it won’t remove active growth inside drywall. If the mold is rooted into the material or the wall is still damp, the problem keeps developing behind the new finish.
Is bleach the best cleaner for bathroom drywall mold?
Not usually on drywall. Drywall is porous, so stain removal and true contamination control are different things. Bleach may change the appearance of a spot without addressing what has penetrated the paper facing or the source moisture issue.
Are health effects always severe?
Not always, but bathroom mold should still be taken seriously. Some people notice little more than odor or irritation. Others react more strongly, especially those with asthma, allergies, or other respiratory sensitivity.
Will homeowners insurance cover it?
That depends on the policy language and the cause of loss. Insurance may treat sudden water damage differently from long-term moisture problems or maintenance-related issues. The smart move is to document what you found, take photos, and ask your carrier how they classify the source.
If I cleaned it and it came back, what does that mean?
It usually means one of three things. The growth was deeper than it looked, the wall never fully dried, or the moisture source is still active. Repeat growth is a strong sign that wiping and repainting weren’t enough.
If you’ve found mold on drywall in bathroom areas and you’re not sure whether it’s a surface cleanup or a wall removal job, Restore Heroes serves the Phoenix metro with IICRC-certified restoration support for mold and water-related damage. A professional assessment can help you determine whether the issue is cosmetic, hidden behind the wall, or tied to an ongoing moisture source that needs to be corrected before repairs are made.