You notice it when the house is quiet. A faint drip near the hallway light. A new brown mark over the guest room. Maybe a musty smell that wasn't there last week. In Phoenix, that kind of surprise can follow a hard monsoon storm, wind-driven rain, or a roof detail that's been letting in small amounts of water for a while.
The first job is to slow down and get organized. A ceiling stain doesn't always mean the hole is directly above it, and a roof leak can move through insulation, framing, and drywall before it finally shows itself indoors. That's why good roof leak detection starts with calm observation, not guesswork.
That Sinking Feeling After Spotting a Water Stain
A lot of homeowners have the same first reaction. They stare at the ceiling, then at the floor, then at their phone, wondering whether this is a small annoyance or the start of a much bigger mess. Both reactions are understandable.

What matters next is speed and method. Leaks rarely stay in one place. Water soaks insulation, stains drywall, loosens texture, and can feed mold growth in hidden cavities. The repair stakes are also larger than many people expect. Roof repair costs in the U.S. surpass $12 billion annually, according to LAIIER's flat roof leak overview.
Start with control, not panic
If the stain is active, move furniture, place a bucket or pan under the drip, and protect flooring with towels or plastic. If water is near a light fixture, ceiling fan, or outlet, stop there and get qualified help. Electricity changes the risk level immediately.
For homeowners sorting out the next steps after interior damage appears, this short guide on what to do after property damage is useful because it helps you think about documentation before cleanup wipes away evidence.
Water on the ceiling is a symptom. The actual entry point may be several feet away.
A small spot can still matter. If you've noticed small brown spots on the ceiling, don't assume they're old and harmless. In dry climates, minor signs sometimes get ignored until the next storm makes the problem obvious.
What to do in the first hour
- Contain active dripping: Use a bucket, pan, or towels to keep water from spreading.
- Take photos right away: Get the stain, the drip path, nearby fixtures, and any damaged belongings.
- Watch for changes: Is the stain expanding, bubbling, or sagging?
- Resist random patching: Caulk on the wrong spot can hide clues without stopping the leak.
That first hour sets the tone for everything that follows. Homeowners usually feel better once they stop reacting to the stain and start investigating the source.
Reading the Warning Signs Inside Your Home
Indoor clues often tell you more than the obvious ceiling spot. Water follows framing, drywall seams, wiring paths, and gravity. By the time you see a stain, it may have traveled.
Interior leak signs and what they mean
| Symptom | Likely Indication |
|---|---|
| Brown or yellow ceiling stain | Ongoing or past moisture intrusion above drywall |
| Bubbling paint near wall or ceiling corners | Water trapped behind painted surfaces |
| Peeling texture or soft drywall | Repeated wetting and drying |
| Musty odor in one area | Hidden damp materials, often insulation or drywall backing |
| Dark streaks running down from the ceiling line | Water tracking along framing or surface irregularities |
| Rust on nearby metal fasteners or vents | Moisture exposure over time |
| Stain near a bathroom exhaust, skylight, or vent pipe | Problem around a roof penetration or condensation issue |
Clues that deserve a closer look
Walk room to room with the lights on and your phone camera ready. Don't just inspect the center of the stain. Check the edges of the ceiling, upper wall corners, and the tops of window trim.
Look for:
- Paint failure near corners: This often means water is entering above and spreading before it appears.
- A faint musty smell: If one room smells different from the rest of the house, hidden moisture may be sitting behind the finished surface.
- Texture changes: Swelling, sagging, or a surface that feels softer than the surrounding area points to prolonged wetting.
- Patterns after weather: If the mark appears after rain but not after showers or appliance use, the roof becomes a stronger suspect.
If you want a second checklist to compare against your own observations, 7 Summits Roofing's guide to leaky roofs is a helpful companion read.
Practical rule: Follow the evidence outward. The worst-looking stain isn't always the start of the problem.
How water can fool you
A leak above one room can show up in another. Water may enter near a vent flashing, run along the underside of the roof deck, soak insulation, then finally appear at a drywall joint where it has an easy exit.
That's why homeowners get misled when they only focus on the center of a ceiling stain. A better approach is to map the area. Note which side of the room is affected, what's above it, and whether the problem lines up with a roof penetration, valley, chimney, or parapet.
If the signs are subtle, reviewing common signs of water damage on a ceiling can help you separate an active leak from old cosmetic staining.
Your Attic Inspection Detective Work
If your home has attic access, this is often where roof leak detection becomes much clearer. You're no longer guessing from the living room. You're looking for the path water took before it reached the ceiling.
Industry studies have found over 50% of newly constructed buildings had water-intrusion issues in the building envelope, according to IIBEC guidance on electronic leak detection. That matters because not every leak announces itself quickly. Hidden moisture can exist well before you see a stain downstairs.
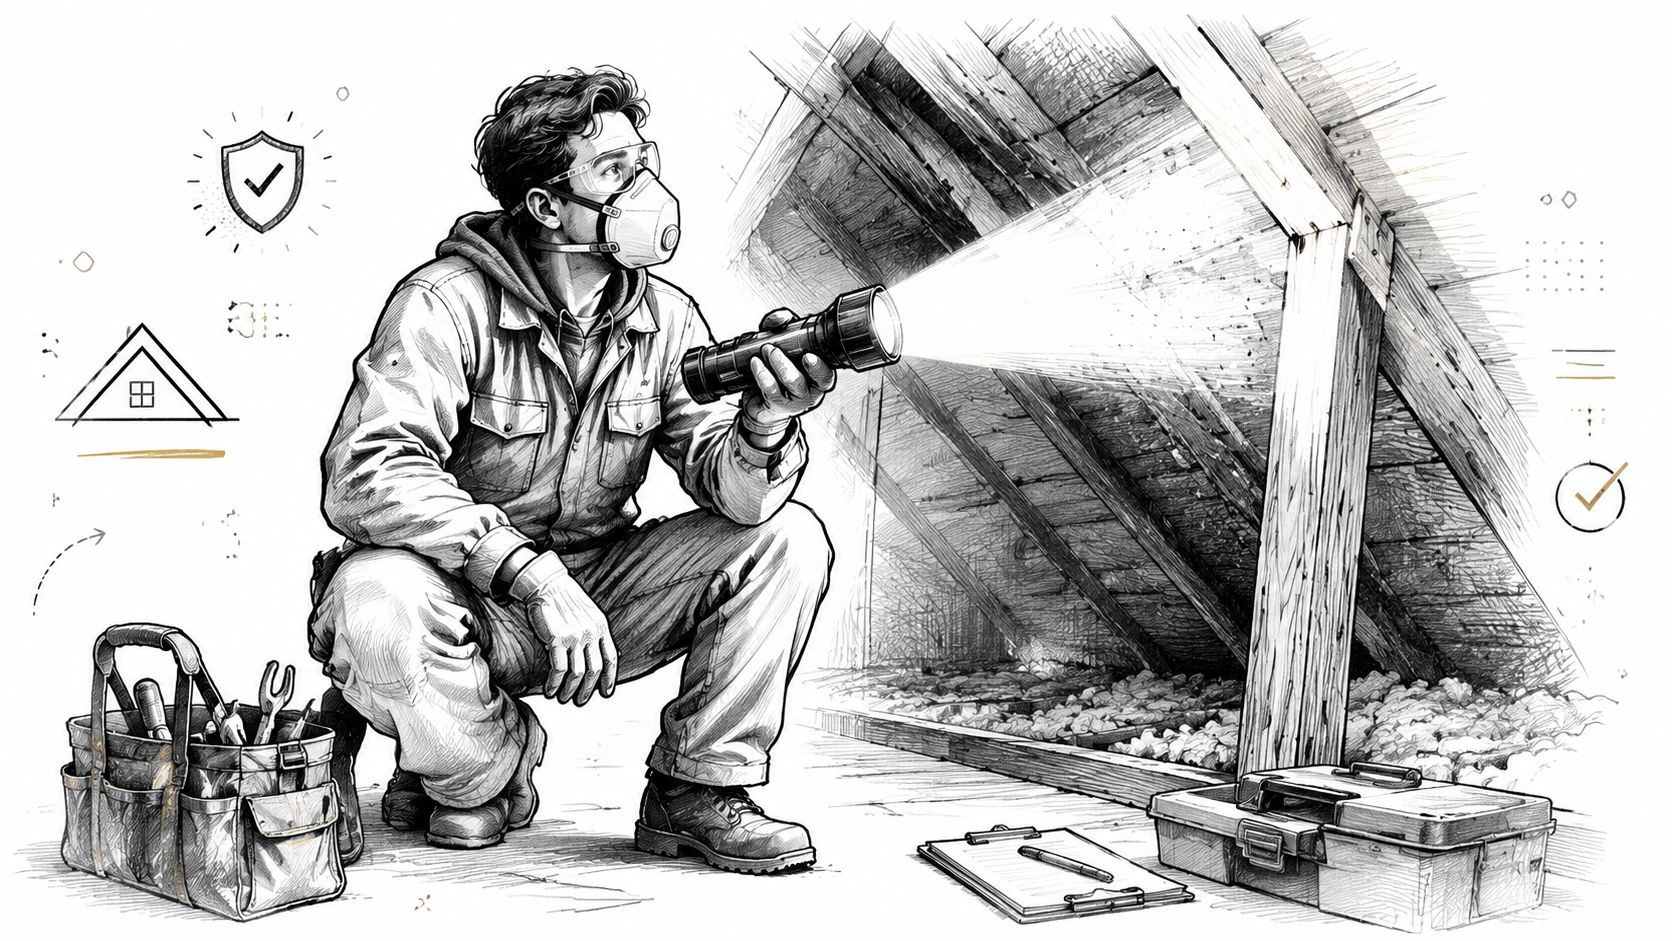
Safety first in a Phoenix attic
Attics in the Phoenix area can be brutal. Heat builds fast, insulation hides hazards, and footing is limited.
Before you go up, use this checklist:
- Wear the right gear: Gloves, long sleeves, eye protection, and a dust mask or respirator.
- Bring a strong flashlight: Your phone light isn't enough for spotting sheen, staining, and nail rust.
- Step only on framing: Put your weight on joists or truss members, never on the drywall ceiling.
- Don't go alone if the attic is tight or hot: Have someone nearby who knows you're up there.
What to look for above the ceiling
Once you're in place, slow down and scan. Start above the room where the stain appeared, then work uphill from there. Water often enters higher on the roof than where you first see damage.
Check for:
- Compressed or dark insulation: Wet insulation loses its fluff and can look matted or dirty.
- Stains on the roof sheathing: Look for darkened wood, rings, or black spotting.
- Rusty roofing nails: Rust on nail tips can point to condensation or repeated moisture exposure.
- Daylight where it shouldn't be: Small openings around penetrations or flashing details may be visible.
- Tracks on framing: Rafters or trusses can guide water sideways.
One area homeowners often miss is metal detailing at roof transitions. If your leak seems tied to a metal roof edge or termination, seeing examples of metal roof end cap solutions can help you understand where water can sneak in when an edge detail is incomplete or aging.
For homes where the source still isn't obvious, a thermal imaging inspection can help identify temperature differences that suggest hidden moisture, especially when visual clues are limited.
A quick visual can help you know what you're trying to spot in cramped areas:
In attics, the visible drip is often the end of the trail, not the beginning.
Using a Water Test to Pinpoint the Leak Source
If the attic clues narrow the area but don't confirm the exact entry point, a controlled water test is the next logical step. This is the closest a homeowner can get to a practical field test without specialized equipment.
It needs two people. One person stays outside with the hose. The other stays inside, ideally in the attic, watching for new moisture.
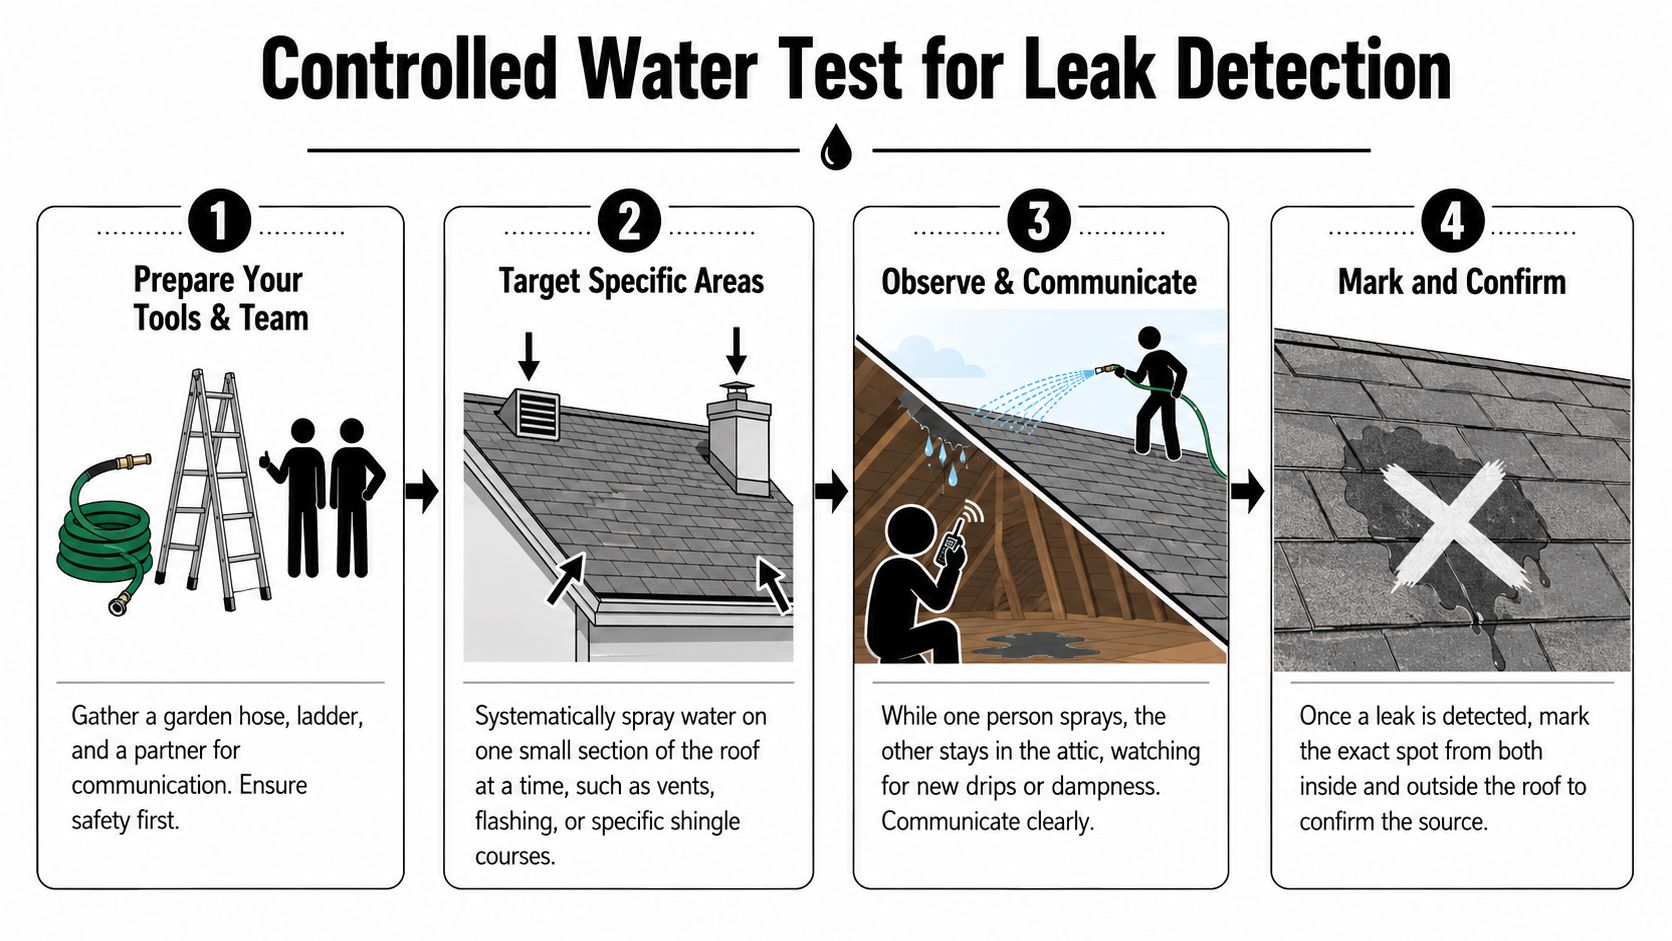
How to run the test without confusing the results
A water test only works when you isolate variables. Professionals do the same thing with non-destructive methods. WATERPROOF! Magazine's roofing guidance describes a methodical process for narrowing the search area before intrusive work, including grid-based scanning when mapping roof moisture.
Use that same mindset at home:
- Start low on the roof: Test the lowest likely suspect area first.
- Soak one small section at a time: Don't spray the whole slope.
- Wait and watch: Give water time to travel.
- Move upward only if needed: If nothing shows, test the next area above.
The order that usually makes sense
Most homeowners get false results because they start too high or spray too widely. That floods multiple details at once and makes the leak source hard to identify.
A better sequence is:
- First check penetrations: Plumbing vents, attic vents, furnace flues, skylights, and chimney flashing.
- Then test transitions: Valleys, wall intersections, roof-to-patio tie-ins, and edge details.
- After that, check field areas: Shingle courses, tile underlayment zones, or suspect membrane seams on low-slope sections.
Ground rules for accuracy and safety
- Use a steady flow, not a pressure blast: You're simulating rain, not forcing water under materials.
- Keep communication open: A phone call or speakerphone works well between the attic and roof.
- Mark the spot when you find it: Chalk outside, painter's tape inside, or both.
- Stop if footing is poor: Wet roofs become dangerous fast, especially tile roofs common in Arizona.
If you're trying to tell whether the dampness you found is fresh or old, this guide to moisture meter readings helps explain how professionals interpret hidden moisture in building materials.
Documenting Damage and When to Call a Professional
At some point, roof leak detection shifts from diagnosis to proof. That's especially important if the leak affected drywall, insulation, flooring, or personal property and you may need to deal with insurance.
What to document before anything changes
Take wide photos first, then close-ups. Get the full room, the ceiling stain, any bubbling paint, attic findings, and the suspected roof area if it can be photographed safely from the ground. Short video clips help too, especially if you can capture active dripping or show the path of water.
Write down:
- When you first noticed it
- What the weather was doing
- Whether the stain is growing
- Any actions you took to protect the area
Good documentation does two jobs. It helps a contractor diagnose the problem, and it preserves a record before cleanup or repairs change the scene.
Clear signs to stop and bring in help
Some situations are no longer good DIY candidates.
Call a professional if:
- The ceiling is sagging: Wet drywall can fail without much warning.
- Water is near electrical components: Lights, fans, outlets, and switches raise the hazard level.
- The leak is spreading fast: Rapid changes usually mean a larger opening or more trapped water.
- You can't move safely in the attic or on the roof: That alone is enough reason to stop.
- The source still isn't clear after basic testing: Repeated guesswork often causes extra damage.
There's another reason to bring in qualified help. Verifying the repair can be as important as finding the leak. StrucuraView's discussion of post-repair electronic leak detection explains why professional post-repair testing can create defensible records that insurers often require when closing a claim.
If the leak has already affected interior materials, one option in the Phoenix area is Restore Heroes' water damage restoration contractor services, which include moisture detection and drying work after the source issue is addressed.
Frequently Asked Questions About Roof Leaks
Can a small roof leak dry up and go away on its own
No. The stain may stop changing during dry weather, but the opening that let water in usually remains. The next storm often makes it worse.
How do I tell a roof leak from a plumbing leak
Look for patterns. If the problem appears after rain, the roof is more likely. If it happens when a shower runs, a toilet is used, or an HVAC line backs up, plumbing or condensation becomes more likely.
Is it safe to walk on my roof
Often, no. Tile roofs can crack. Shingle roofs get slick. Low-slope roofs can hide weak spots and debris. If you're unsure about footing, stay off the roof.
Why is the ceiling stain not directly under the leak
Water travels. It can run along framing, under underlayment, across the roof deck, or down a penetration before it reaches the ceiling surface.
Should I patch the spot with caulk if I think I found it
Only if you're using it as a very temporary measure and you understand the roof detail. Random caulking often masks the source and makes proper repair harder.
If you're dealing with a ceiling stain, attic moisture, or a leak that still doesn't make sense, Restore Heroes can inspect the damage, help identify hidden moisture, and guide the next step without adding more guesswork to an already stressful situation.