
You're standing outside your home with your phone in your hand, wondering whether you can grab clothes, find the cat's carrier, or start wiping the black film off the kitchen cabinets. The flames are out, but nobody has clearly explained what happens next. Your first job isn't cleaning. It's establishing whether anyone can enter safely, then building a plan that separates emergency access from permission to live there again.
For Phoenix-area homeowners, fire clean up should start with safety clearance and end with documented verification, not a room that merely looks better. During the first 48 hours, resist the urge to prove you're making progress by scrubbing or hauling debris. Make the right calls, protect the property, and preserve evidence before cleanup begins.
What to Do in the First Hours After a Fire
Ask the fire department what access is permitted before you approach the doorway. Permission to retrieve an essential item isn't the same as permission to clean, restore power, or sleep inside. Have officials identify restricted areas and explain what additional inspections they recommend.
Federal emergency-response guidance warns that smoldering debris can remain for weeks, reigniting when disturbance introduces oxygen, and reports that 25% of U.S. fire-related deaths involve smoldering fires, according to its post-fire debris safety guidance. Don't poke through burned piles to check whether they're cold.
Make the safety calls in the right order
- Fire department: Confirm that active fire hazards have been addressed and ask about damaged chemical containers, propane cylinders, and inaccessible rooms.
- Utility provider: Request instructions and inspection for damaged gas or electrical systems. Don't approach a compromised panel or operate switches if you suspect a gas leak.
- Structural inspector or engineer: Arrange an assessment when roofs, ceilings, stairs, or load-bearing components appear damaged. Don't test a questionable floor by walking across it.
- Insurer and restoration contractor: Report the loss from a safe location and arrange assessment and emergency stabilization.
Set an exclusion zone around damaged areas. Keep children, pets, visitors, and anyone collecting belongings outside it. Leave doors to contaminated rooms closed and don't run a potentially contaminated HVAC system.
The timeline below is a planning aid, not permission to enter before officials clear access.
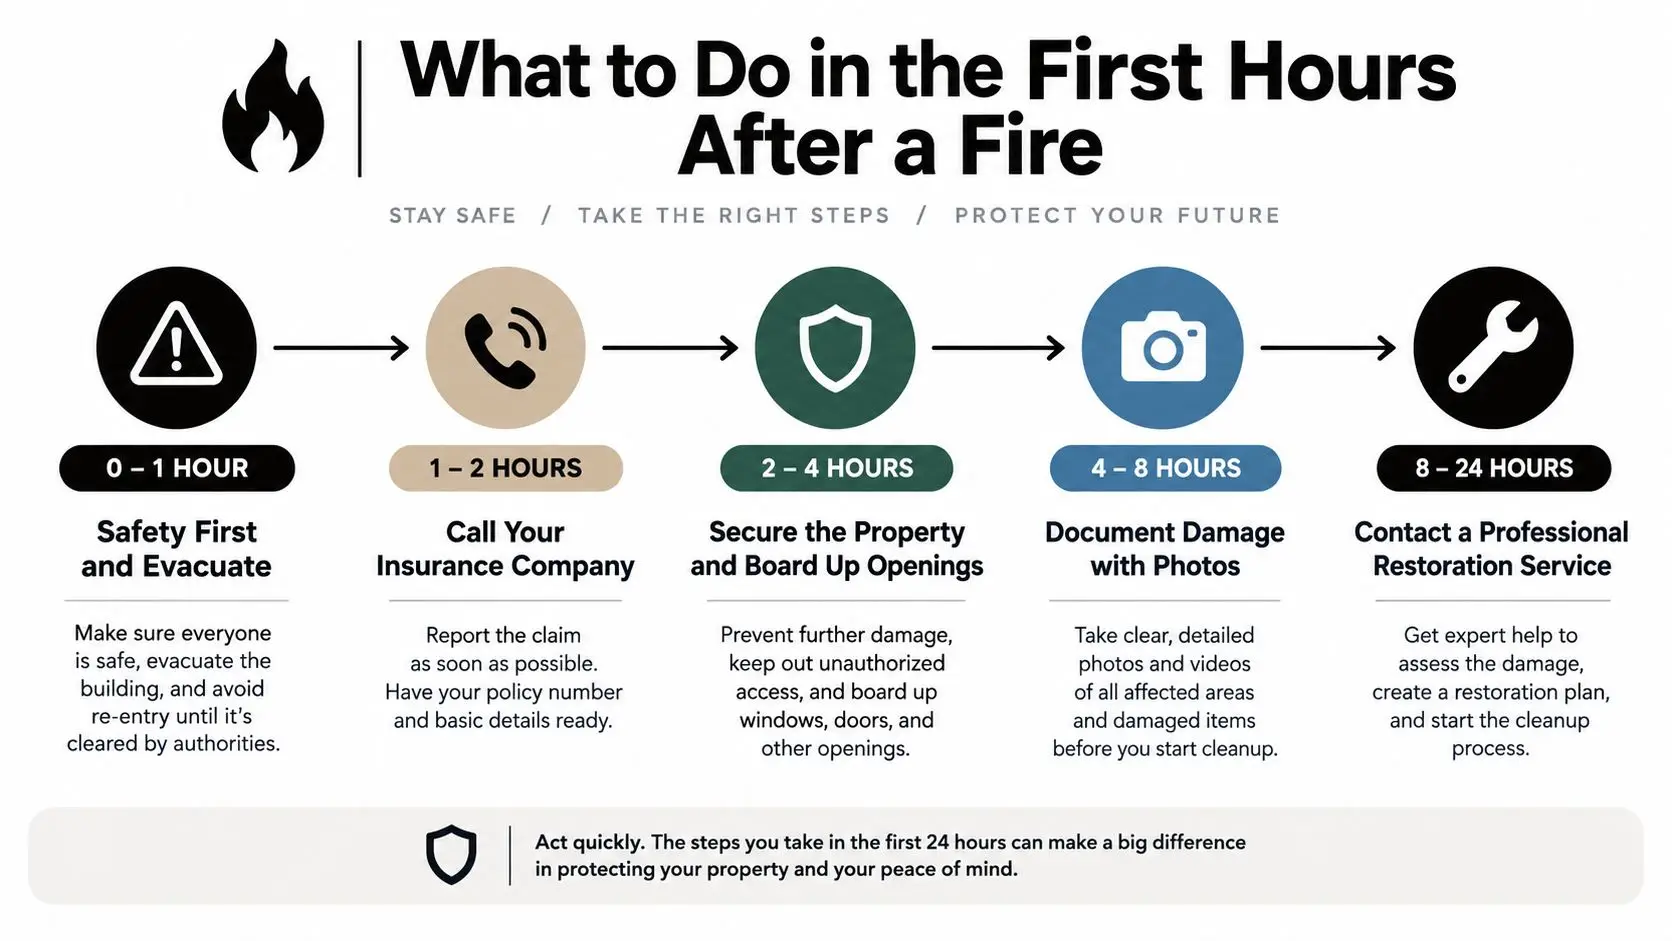
Secure openings without entering unsafe areas
Ask a qualified crew to board damaged windows and doors, protect exposed openings, and establish a clean access route. Discuss temporary vent protection with the restoration team rather than blocking equipment or required ventilation yourself. Review the proposed scope of emergency board-up services before authorizing work.
Access rule: Nobody should cross the exclusion boundary just because the flames are gone.
If you smell gas, see renewed smoke, or find an unidentified leaking container, leave and contact emergency responders. Don't attempt your own investigation.
Safety Gear and Contamination Control
Treat the work area as a contaminated zone, not a messy room. Your equipment and exit routine should keep residue off your body and out of clean spaces.
For ash particles, CDC and EPA guidance recommends a tight-fitting respirator marked NIOSH and either N95 or P100. It also advises children, pregnant people, older adults, and people with respiratory or cardiovascular conditions to avoid ash cleanup where possible, as explained in the CDC's post-wildfire safety recommendations.
Check your protection before entry
- Respirator: Check the markings, inspect straps, and follow the manufacturer's seal-check instructions. A cloth or surgical mask isn't a substitute.
- Eyes and hands: Wear safety glasses or goggles and nitrile gloves. Replace torn or heavily contaminated gloves.
- Clothing and footwear: Use long sleeves, long pants, and enclosed shoes, or disposable hooded coveralls and boot covers appropriate to the work.
- Higher-risk work: Leave invasive cleanup to trained workers with task-specific protection. A hard hat doesn't make a damaged structure safe.
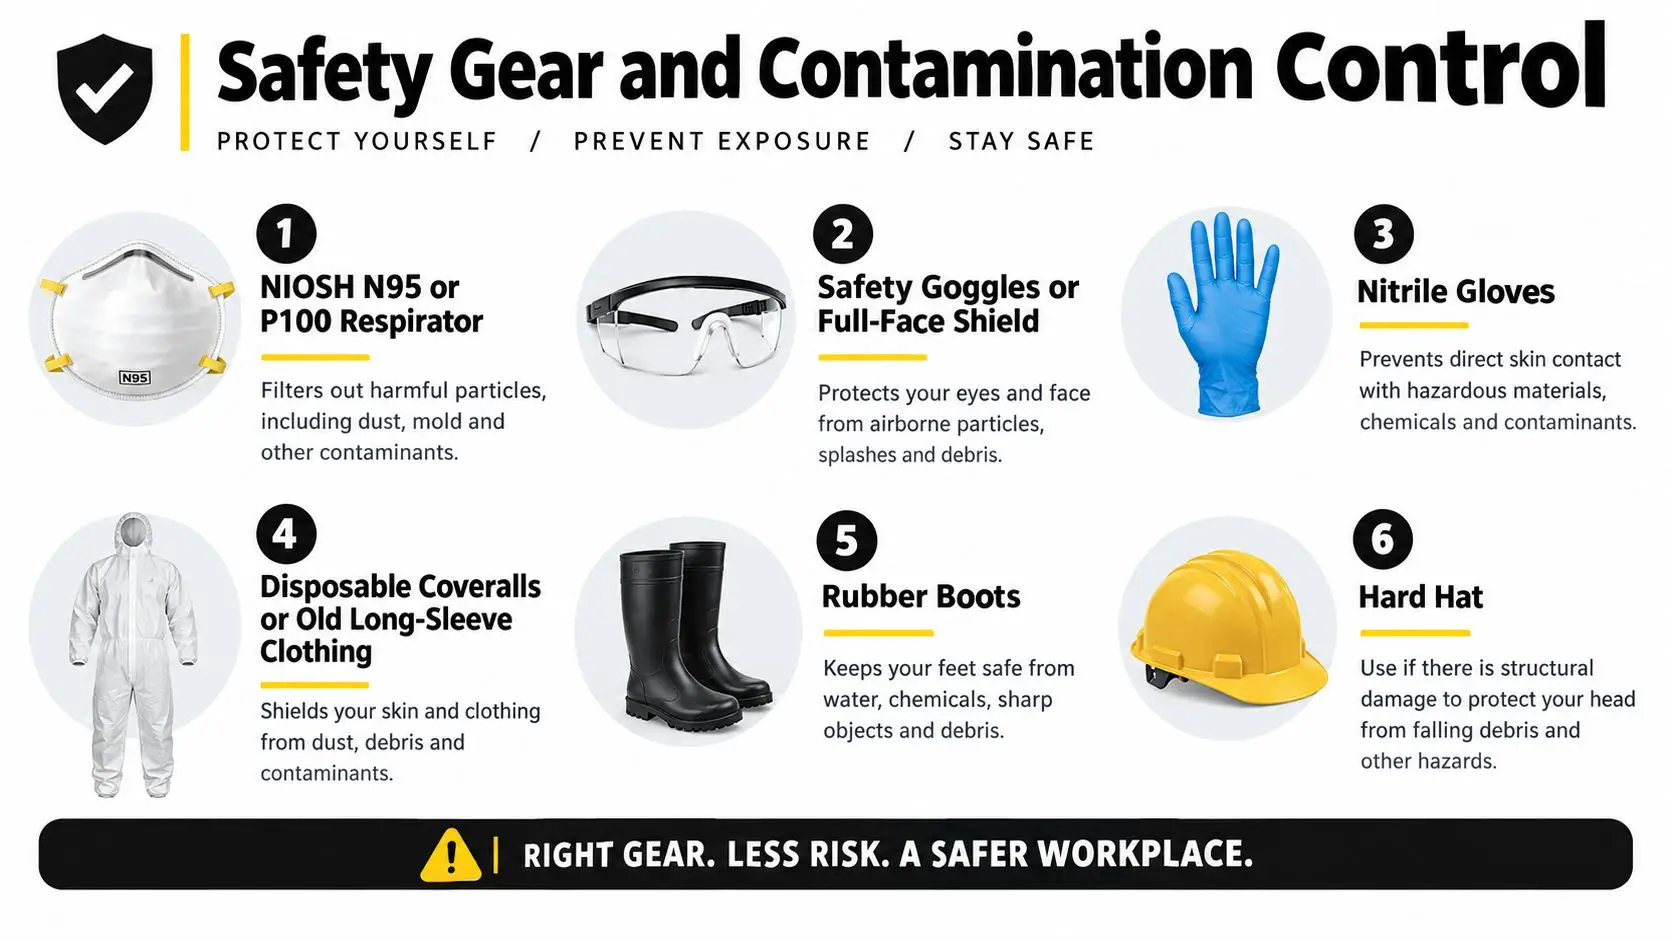
Keep a written pre-entry checklist with your equipment. Record the permitted work area, required protection, respirator check, and exit procedure. If any item is unresolved, postpone the task.
As a conservative recommendation, don't assign cleanup to someone with reduced immunity. People with asthma, COPD, heart disease, diabetes, chronic kidney disease, or pregnancy need extra caution under CDC occupational cleanup guidance.
Control what leaves the room
Create a transition area at the boundary with clean bags, replacement clothing, and a place to remove dirty footwear. Don't carry contaminated gloves, tools, or clothing into your vehicle or an unaffected room. Change clothes and wash exposed skin before leaving.
For residue removal, plan around HEPA equipment and controlled surface cleaning, not a broom or ordinary shop vacuum. A focused explanation of soot from fire can help you describe the contamination to a contractor without treating every black deposit as ordinary dust.
Documenting Fire and Smoke Damage for Your Claim
Once safe access is established, document before anyone changes the scene. Your file should let an adjuster and contractor understand both the visible damage and the areas that still need investigation.
U.S. fire departments responded to an estimated annual average of 328,590 home structure fires during 2019–2023, with $8.9 billion in annual direct property damage, according to NFPA's home structure fire statistics. For your claim, the useful evidence is property-specific: what was damaged, where it was located, and what work is proposed.
Build a room-by-room loss file
Take wide photographs from safe positions, then close-ups of soot patterns, damaged finishes, contents, and accessible structural components. Photograph model and serial labels when you can reach them without moving hazardous items. Capture meter or panel displays only from a cleared, safe position, never by opening equipment.
- Inventory: Record each item's description, location, condition, and available purchase documentation.
- Event timeline: Note when you discovered the fire, when responders attended, and when access restrictions or emergency work were communicated.
- Expense records: Save accommodation, transport, emergency protection, and other relevant receipts for the insurer's review.
- Communication folder: Keep photographs, estimates, emails, texts, and signed authorizations together.
Preserve evidence without preserving hazards
Don't throw away contents because they look ruined. Ask the adjuster how they want disposal documented and whether inspection is needed first. If emergency removal is necessary, prioritize safety and request written instructions or an exception, retaining photographs and disposal records.
Documentation habit: Record what was removed, why removal couldn't wait, who authorized it, and where it went.
Ask for a fire damage assessment that separates cleaning, removal, repair, and further inspection. Keep the contractor's repair estimate distinct from your contents replacement inventory. Ask the insurer separately whether any required code upgrades fall within your policy rather than assuming they're included.
DIY Cleanup Versus Calling a Restoration Professional
Choose DIY work by the hazard and material, not by the size of the stain. A small, accessible deposit on a compatible hard surface may be manageable after clearance. Soot across multiple rooms, contamination in ductwork, or damaged building materials calls for a restoration assessment.
My recommendation is to reserve homeowner cleanup for limited, noninvasive tasks after the hazards have been evaluated. Hire appropriately licensed, insured, IICRC-certified restoration professionals for the broader loss, and confirm whether specialist hazardous-material contractors are needed.
DIY Cleanup vs Professional Restoration at a Glance
| Situation | DIY-Suitable Tasks | Call a Restoration Professional |
|---|---|---|
| Limited residue on cleared, intact hard surfaces | Photograph damage and perform a small approved cleaning test | If residue spreads, the finish changes, or the extent is uncertain |
| Heavy soot or multiple affected rooms | Inventory belongings from permitted areas | Containment, systematic cleaning, and contents triage |
| Soot at registers or inside ductwork | Report observations and leave equipment untouched | HVAC assessment and contamination control |
| Suppression-water damage or warped materials | Document visible conditions without opening assemblies | Extraction, drying assessment, and material evaluation |
| Suspected asbestos, lead, or chemical ash | Keep people away and report the concern | Specialist assessment and appropriate disposal controls |
| Persistent odor after cleaning | Record affected locations | Source investigation and a revised remediation plan |
Ask what the equipment is meant to accomplish
A professional proposal should explain the purpose of HEPA air scrubbers, contents-cleaning equipment, structural drying, and any environmental testing. Don't accept a list of machines as a substitute for a scope of work.
If a contractor proposes thermal fogging, hydroxyl treatment, or ozone deodorization, ask why that method fits the loss, what access restrictions apply, and how results will be checked. Don't attempt those treatments yourself or accept deodorization as evidence that contamination has been removed.
For general hiring discipline, Maid in America's tips for vetting house cleaners can help organize your questions. Fire restoration still requires additional scrutiny of remediation qualifications and hazardous-material procedures.
Stop DIY work if you encounter suspected sewage contamination, swelling materials, or previously hidden residue. Opening a wall to see what's behind it isn't a harmless inspection.
A Practical Cleanup Workflow That Actually Works
Remove contamination before treating odor. Spraying fragrance or immediately washing soot-covered walls doesn't establish that the affected material has been cleaned.
EPA recommends HEPA-type vacuuming, avoiding dry sweeping and leaf blowers, and lightly misting ash on suitable hard surfaces before damp collection or wet mopping. It warns that ordinary household and shop vacuums can release collected particles back into the air in its ash-cleanup recommendations.
Follow the material-specific sequence
- Remove loose residue first: Use appropriate HEPA equipment without aggressively scrubbing deposits into the surface.
- Dry-clean compatible soot deposits: Use soot or chemical sponges on suitable walls, ceilings, and delicate finishes. Test an inconspicuous area first.
- Wet-clean compatible hard surfaces: Use manufacturer-approved chemistry after loose soot removal. Change cleaning solution and rinse water frequently.
- Work systematically: Move from cleaner, higher areas toward dirtier, lower areas, including cabinetry, frames, furniture, and flooring.
These practices follow the Restoration Industry Association's fire-restoration protection guidance. Lightly misting ash on a hard floor is different from soaking soot into painted drywall. Match the method to the residue and material.
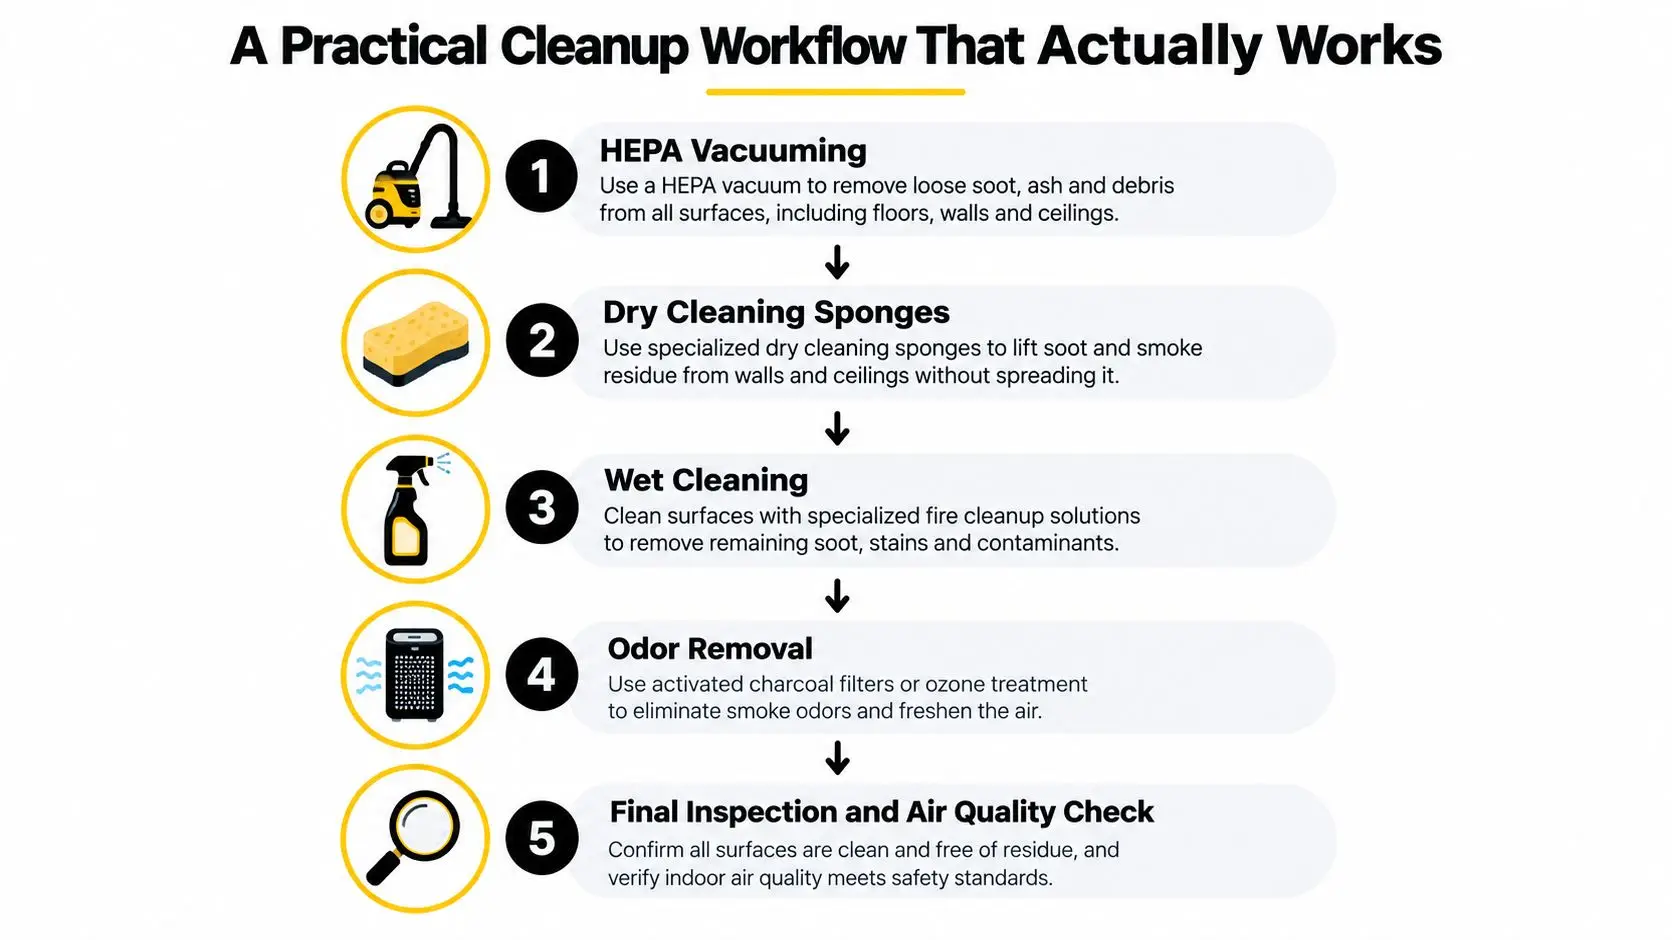
Treat the illustration's deodorization stage as contractor-directed work, not a recommendation to operate an ozone generator yourself. For wall-specific preparation and testing, review how to clean soot from walls.
Evaluate contents and air-handling separately
Carpet, upholstery, mattresses, drapes, pillows, and pet beds need item-by-item decisions. EPA's protect-yourself-from-ash factsheet addresses HEPA cleaning of soft goods and recommends contacting local hazardous-waste authorities when asbestos is suspected.
Have potentially contaminated HVAC equipment inspected before restart. Use portable air cleaners as part of the cleanup plan, and ventilate only when outdoor conditions permit, consistent with EPA indoor-air guidance.
A clean-looking room and a room ready for occupancy are different conclusions.
Record returning odor, new visible deposits, or symptoms during permitted visits. Leave if you develop breathing difficulty or significant irritation, and seek medical advice as needed. Ask the team to investigate rather than repeatedly applying deodorization.
Working with Your Insurance Company After a Fire
Keep the first insurance conversation factual. Report what you know, identify access restrictions, and describe immediate needs. Don't speculate about the cause, declare everything a total loss, or promise a repair cost before assessments are complete.
Use this opening script in your own words:
First-call script: I'm reporting a fire at my property. Access is restricted, and I need instructions for emergency protection, temporary accommodation, documentation, and an adjuster inspection. Please confirm the claim number and required next steps in writing.
Ask coverage questions before assuming payment
Ask whether Additional Living Expense coverage applies and what documentation, limits, or approvals the insurer requires. Request information about any available advance for immediate expenses, but don't treat an advance as approved until you receive confirmation.
For contents and building payments, ask the insurer to explain actual cash value and replacement cost using your policy language. Have them identify any depreciation deduction, conditions for recovering withheld amounts, and relevant deadlines. Request the same written explanation for code-upgrade coverage and emergency mitigation.
- Authorization: What work may proceed before the adjuster visits?
- Accommodation: Which expenses are eligible, and what approval is needed?
- Scope: How should hidden damage or additional remediation be submitted?
- Payments: What information is missing before the next payment decision?
A practical overview of fire damage insurance claims can help you prepare, but the insurer must explain how your specific policy applies.
Walk the loss with the right people
Arrange for the restoration project manager to attend the adjuster's inspection when feasible. Bring the inventory, photographs, emergency-work records, and itemized estimates. Identify areas that haven't been opened or tested so the initial scope doesn't become the final scope.
If the claim stalls, ask for the unresolved issue, required evidence, and expected next action in writing. Request supervisor review when explanations remain unclear; consider qualified independent claims or legal advice when the dispute warrants it.
Don't sign a broad release or final settlement while significant scope questions remain unresolved. Ask what the document closes, whether supplements remain possible, and who can explain its consequences before you sign.
A Two-Week Fire Cleanup Checklist
Use this schedule to organize decisions, not to set a move-in deadline. Inspection findings, hazardous materials, damaged assemblies, and testing can change the sequence. Don't compress work because you've reached the end of the calendar.
Put safety gates ahead of dates
- Day 1: Confirm access restrictions, arrange utility checks, contact the insurer, and establish temporary accommodation if needed.
- Day 2: Complete the accessible loss record and authorize appropriate property protection.
- Days 3–4: Review hazard assessments, containment, PPE, and the proposed salvage and disposal decisions. Begin approved residue removal only after those prerequisites are satisfied.
- Days 5–7: Continue material-specific cleaning and drying work. Reconcile newly discovered damage with the contractor and adjuster.
- Days 8–10: Review source removal, contents results, and the air-cleaning plan before accepting deodorization work as complete.
- Days 11–14: Gather inspection records, resolve outstanding scope items, and make the occupancy decision using evidence rather than appearance.
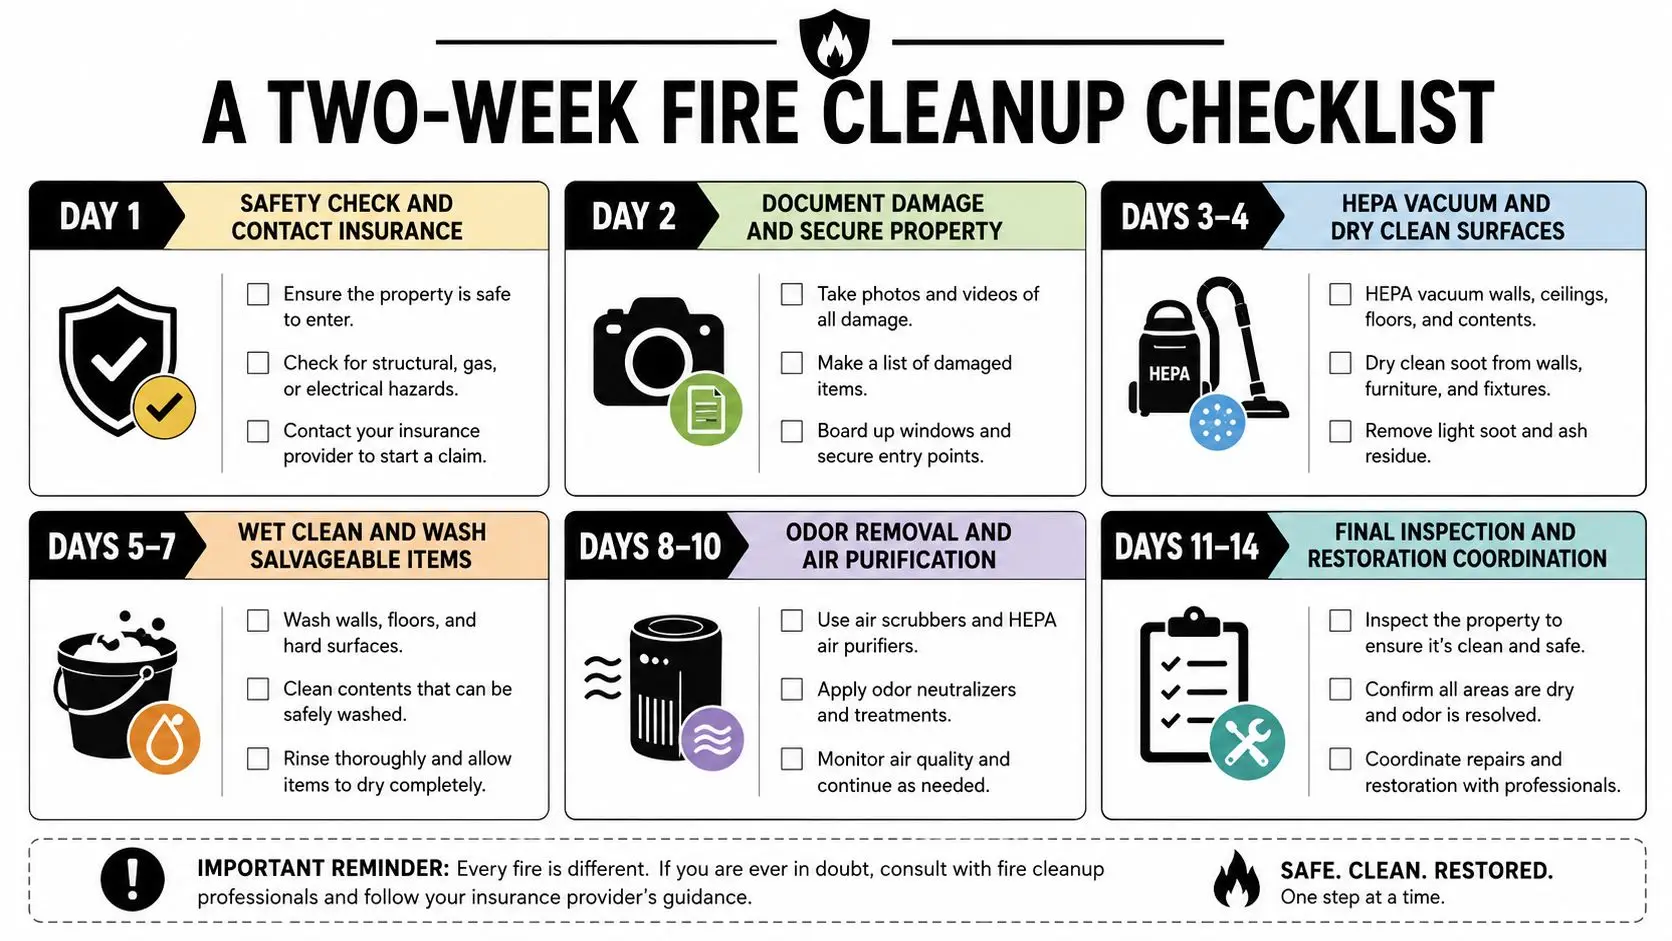
Require a defensible occupancy decision
For wildfire-smoke damage, FEMA says cleanup may reduce without eliminating all contaminants, recommends environmental testing afterward, and suggests continued air purification until testing supports long-term occupancy in its residential smoke-damage remediation guide. Ask a qualified environmental professional which affected rooms, adjoining spaces, and HVAC-served areas need evaluation, and what criteria will support clearance.
Keep emergency-entry permission, structural and utility findings, remediation records, and environmental results together. Insurance sign-off addresses the claim; ask separately what evidence supports sleeping or working inside, particularly for vulnerable occupants.
For ordinary maintenance after remediation, Gmaids' fragrance-free cleaning guide is a useful planning resource. Don't use routine housekeeping or a pleasant scent as a substitute for post-fire verification.
Before signing a restoration contract, ask about certifications, insurance, itemized scope, schedule dependencies, payment milestones, and any written warranty or guarantee terms. Get exclusions and change-order procedures in writing. You're hiring a defined recovery process, not buying a promise that every uncertainty will disappear.
Restore Heroes offers Phoenix-area fire, soot, and smoke cleanup, along with post-fire water extraction, structural drying, contents cleaning, and odor removal. Visit the team to discuss an assessment and a documented restoration scope before you authorize cleanup or plan your return home.