If you want to keep mold out of your closet, you need to think like mold. It’s all about taking away the three things it loves most: moisture, still air, and darkness. Get a handle on those, and you’ve won most of the battle. It really boils down to keeping the humidity below 50%, making sure the air is moving, and never putting away anything that’s even slightly damp.
Understanding Why Mold Grows in Closets
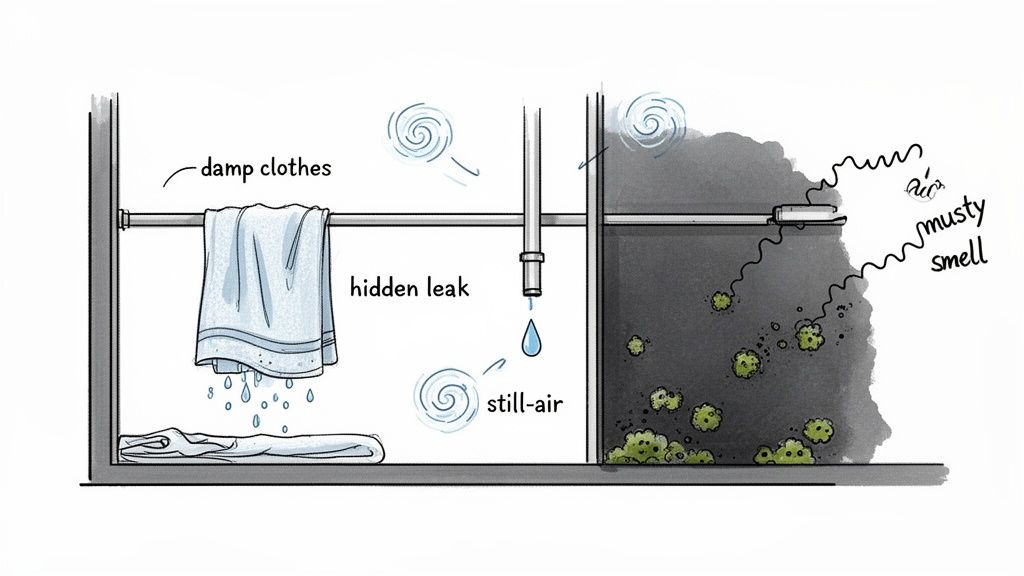
Before we jump into prevention, let's get to the root of the problem. Why are closets such a magnet for mold? Simply put, they can be the perfect breeding ground. They check all the boxes: they’re dark, the air is stagnant, and it's surprisingly easy for moisture to get trapped inside.
Most of the time, the moisture source isn’t a big, obvious flood. It’s usually a much sneakier, slow-moving problem that you don’t notice until that musty smell hits you.
The Recipe for a Mold Problem
Think about it—your closet is almost always dark and closed off. This lack of ventilation can create a still, stale environment where airborne mold spores, which are often present, can land and settle in. Once they find even a tiny bit of moisture, they can start to grow.
Here are some of the most common culprits:
- High Ambient Humidity: In many regions, seasonal weather can make the air incredibly humid. That moisture gets into your house and can get trapped in small, enclosed spaces like closets.
- Slightly Damp Items: This is a big one. Tossing a towel that isn't 100% dry into the hamper or hanging up a jacket that’s still damp from a rainstorm introduces just enough moisture to kickstart a mold colony.
- Hidden Leaks: Closet mold can sometimes be traced back to a slow, hidden leak from a pipe in an adjacent bathroom wall. Condensation from a nearby AC vent can also slowly soak into drywall without you ever knowing.
My Two Cents: Mold doesn't need a catastrophe to take hold. It thrives on small, consistent sources of dampness, which is why closets are prime real estate. If you open your closet and get a whiff of that musty, earthy smell, trust your nose. That's often your first and most reliable sign of a moisture issue.
How to Spot the Early Warning Signs
Long before you see any fuzzy black spots, your nose might tell you something is wrong. That distinct, musty odor—like damp soil or old, wet books—is the tell-tale sign that the conditions are ripe for mold, even if it’s still hiding. If you want a better idea of what you might be looking for on your walls, we have a guide on what mold on drywall looks like.
Keep an eye out for other subtle clues, too. Do you see any bubbling or peeling paint on the closet walls or ceiling? That’s a potential giveaway that moisture is getting trapped behind the surface. Catching these signs early is key to stopping a small moisture problem before it turns into a larger, more expensive remediation project.
Taking Control of Closet Humidity
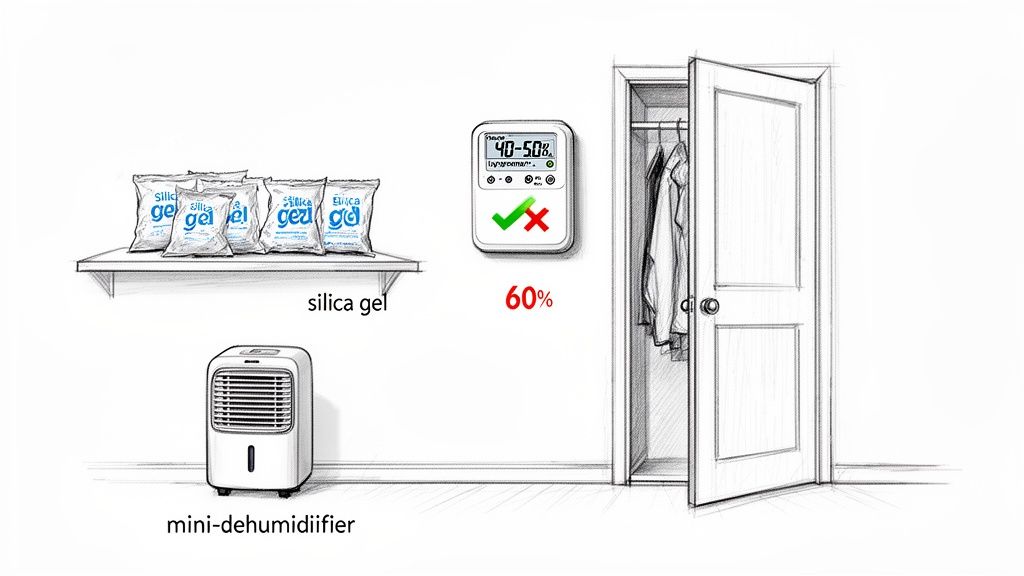
Once you've tried to figure out where the dampness is coming from, it's time to take control of your closet's environment. This is, without a doubt, one of the most important parts of preventing mold. Your mission is to try to keep the relative humidity consistently below 50%. Below that level, it's harder for most types of mold to get a foothold.
Luckily, you have a few tools at your disposal, from simple moisture absorbers to small, powerful machines. What you choose may depend on your closet's size, how bad the humidity is, and your budget.
Choosing Your Weapon: Dehumidifiers vs. Desiccants
For a small coat closet or a dresser drawer, you can often get by with passive moisture absorbers. Think of those little silica gel packets you find in a new pair of shoes—you can buy much larger, renewable versions that are useful for closets. These products, along with calcium chloride crystals, quietly pull moisture right out of the air. When the silica gel packs are saturated, you can "recharge" them in the oven and use them again.
If you have a bigger walk-in closet or a space that’s always fighting dampness, you might want to consider a mini dehumidifier. These electric appliances are workhorses, actively pulling moisture from the air and trapping it in a small tank you just have to empty every so often. They’re fantastic for maintaining a precise humidity level.
Pro Tip: Consider placing your dehumidifier or moisture absorber where the air moves the least. That’s usually on the floor in a back corner, right where stagnant, humid air tends to gather.
Below is a quick comparison of some common methods to help you decide what might be right for your space.
Comparing Closet Dehumidification Methods
This table breaks down some common solutions for controlling closet humidity, outlining their general costs and ideal applications.
| Method | Best For | Upfront Cost | Ongoing Maintenance |
|---|---|---|---|
| Renewable Silica Gel Packs | Small to medium closets, drawers, and sealed containers. | Low ($15 – $30) | "Recharge" packs in the oven or microwave every 2-4 weeks. |
| Calcium Chloride Crystals | Hanging in closets with decent airflow or placed in small containers. | Very Low ($10 – $20 for a multi-pack) | Replace disposable containers or refill crystals every 30-60 days. |
| Mini Dehumidifier | Large walk-in closets, closets with persistent dampness, or high-humidity climates. | Moderate ($40 – $80) | Empty the water collection tank every few days; clean the filter monthly. |
Ultimately, any of these methods can be a huge step up from doing nothing. The key is to match the solution to the scale of your problem.
Simple Habits That Make a Huge Difference
You don't always need to buy something to fight mold. Some of the most effective strategies are free—they just require tweaking a few daily habits.
- Only Store Bone-Dry Items. This one is non-negotiable. Never put clothes or towels away if they feel even slightly damp. A single damp shirt can spike the humidity in a closed space and kickstart a mold problem in as little as 24 to 48 hours.
- Let Your Closet Breathe. You’d be surprised how much this helps. Just leaving the closet door open a crack allows the dry, conditioned air from your home to circulate inside. This simple act helps prevent moist air from getting trapped and becoming stagnant.
- Give Your Belongings Some Space. A crammed closet is a mold-friendly closet. Avoid packing clothes, shoes, and boxes tightly together. Leaving even a small gap between your items—and between your items and the walls—is crucial for airflow.
These practices aren't just for closets; they're fundamental to moisture control everywhere. Many of the same ideas are used to help prevent mold in basements, another area notorious for poor airflow and high humidity. For even more great ideas, check out these effective cabinet humidity control tips that also apply perfectly to keeping closets dry and mold-free.
How to Improve Airflow and Closet Ventilation
Once you've got a handle on humidity, your next big mission is to get some fresh air circulating. Mold absolutely loves still, stagnant air because it allows moisture to just sit on surfaces. When you get the air moving, you’re actively creating an environment where it's much harder for mold spores to land and start growing.
This fight often begins with a good old-fashioned declutter. A closet crammed full of clothes, boxes, and shoes is a closet with zero airflow. Every single item packed in there is just another roadblock stopping air from doing its job.
Rethink Your Closet Organization for Airflow
First things first, create some space. Try to leave at least a few inches of open air between your belongings and the closet walls. That small gap can act as a vital channel for air to move through, preventing moisture from getting trapped against the drywall.
The way you store things also makes a huge difference.
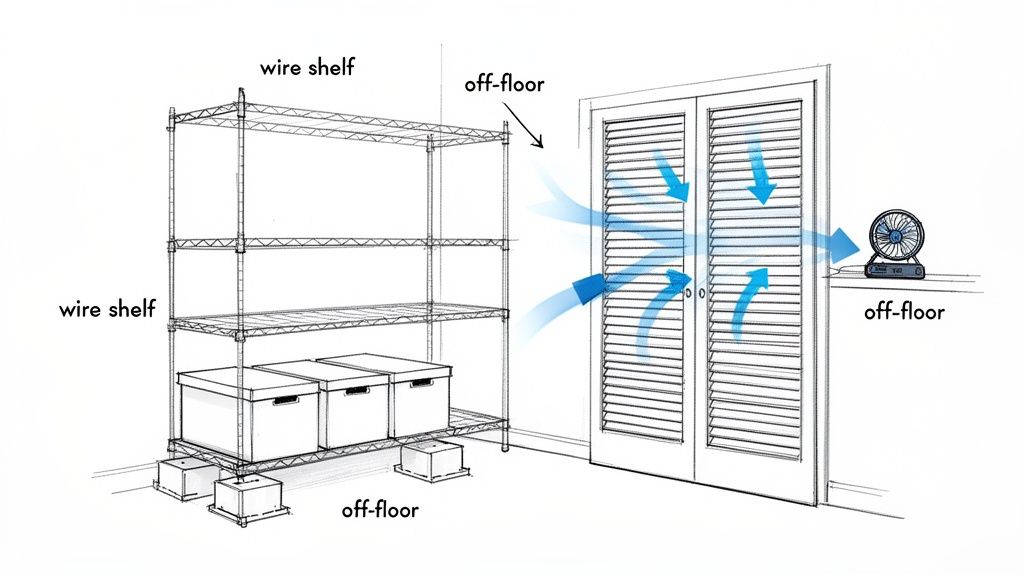
- Swap Solid Shelves for Wire: Those solid wood or MDF shelves are like a ceiling for the air below them, completely stopping it from moving vertically. Wire shelving is a game-changer, letting air flow freely around everything you have stored.
- Get Boxes Off the Floor: Stacking cardboard boxes or plastic bins directly on the carpet or floor creates a perfect dead zone for damp, musty air. Use some simple risers or low shelving to lift everything up, even just by a few inches.
- Avoid Overstuffing: Don’t jam your clothes so tightly on the rack that you can’t see between them. Give your garments some breathing room so air can circulate, which is especially critical for natural fibers like cotton and leather that tend to absorb moisture.
A packed closet is a happy home for mold. By strategically organizing for airflow, you’re not just tidying up—you’re actively disrupting the stagnant, damp environment that mold depends on.
Simple Upgrades for Stubbornly Stuffy Closets
Sometimes, even after you've organized perfectly, a closet just won't get enough natural airflow. This is a common headache in older homes or in closets that are far from any AC vents. If you're dealing with a persistently stuffy closet, a couple of small upgrades can force the air to exchange.
One of the easiest and most effective fixes is to swap your solid closet door for a louvered or slatted door. Those angled slats allow air to constantly pass through even when the door is shut, giving you passive ventilation around the clock.
For closets that need a bigger push, a small, battery-operated fan can be surprisingly effective. You don't need to create a wind tunnel—just a gentle, consistent breeze is enough. Stick it on a shelf or on the floor and let it run for a few hours a day to keep the air from sitting still. It's a fantastic way to prevent mold in a closet without kicking off a major project.
Thinking bigger, improving the air circulation in the entire room will also help your closet. If you want to get the air moving throughout the space, you might find some good inspiration from these creative ceiling fan placement ideas to maximize airflow. When the air in the room is fresher and drier, the air going into your closet will be, too.
Using Smart Storage Habits and Materials
Even with good airflow and humidity control, the stuff you keep in your closet can be a secret invitation for mold. Mold has to eat, and unfortunately, many of our favorite belongings—from cotton sweaters to leather shoes—can be the perfect meal.
The good news is you can make your closet a much less appealing buffet for mold spores. It all comes down to what you store and how you store it.
Choose Mold-Resistant Materials
Mold seems to have a preference for organic materials that are easy for it to break down.
- Natural Fibers (Mold Favorites): Think cotton, wool, leather, and even wood hangers. These materials can be fantastic at absorbing moisture from the air, providing both the food and water mold needs to take hold.
- Synthetic Fibers (More Resistant): On the other hand, materials like polyester, nylon, and acrylic are far less attractive. They're essentially plastics, offering little to no nutritional value for mold.
Now, this doesn't suggest you throw out your favorite wool coat. Just be mindful. Give those more vulnerable items, like leather jackets and cotton t-shirts, a little extra breathing room. Don't pack them in tightly.
Avoid Moisture-Trapping Storage
Two of the biggest mistakes people can make are using cardboard boxes and sealed plastic garment bags for storage. They seem harmless, but they can create a perfect micro-environment for mold.
Cardboard is like a sponge; it can suck up any ambient humidity and hold it right against your clothes or shoes. Those thin plastic bags from the dry cleaner can be even worse. They trap moisture inside, turning the bag into a tiny greenhouse. If an item is even slightly damp when you put it in there, you could be asking for trouble. When that moisture gets trapped against a wall, you'll want to understand what happens when drywall gets wet.
Pro Tip: Avoid storing anything long-term in a dry-cleaning bag. They are generally only for getting your clothes home from the shop. They can trap not only moisture but also the dry-cleaning chemicals, which can damage fabrics over time.
So, what should you use? Look for solutions that breathe. Open-weave baskets are fantastic because air can circulate freely. If you need a closed container, opt for breathable fabric bins instead of airtight plastic tubs.
Make the Seasonal Refresh a Habit
One of the simplest and most effective things you can do is a "closet refresh" twice a year. When you're swapping out your winter and summer clothes, you have the perfect opportunity to help stop mold before it starts.
It doesn’t have to be a huge chore. Just follow these simple steps:
- Pull everything out. Get right to the back of the closet and empty the shelves and floor. This is where problems often hide.
- Inspect your belongings. Take a close look at the items that have been sitting for a while. Give them a quick sniff—a musty smell is a potential red flag.
- Wipe all surfaces down. A quick wipe of the shelves and walls removes dust, which is another food source for mold.
- Reorganize strategically. As you put everything back, rotate your items. Don't shove the same things into the back corner again.
This routine does more than just keep you organized. It's a proactive inspection that helps you spot the early warning signs of a moisture problem long before it gets out of hand.
Safely Cleaning Minor Mold Spots Yourself
Finding a patch of mold in your closet is always a bit alarming. The good news is that if you've caught it early and the spot is small—less than a few square feet—you may be able to handle it yourself. The trick is to do it safely so you don't spread spores all over your house.
Before you even think about scrubbing, your first job is to protect yourself. Seriously, don't skip this.
Gear Up for Safety First
Disturbing mold can release spores into the air, and you do not want to be breathing them in. Before you start, get your Personal Protective Equipment (PPE) together.
Here’s a potential safety checklist:
- An N-95 Respirator Mask: A simple dust mask won't cut it. An N-95 is designed to filter out microscopic mold spores.
- Safety Goggles: Protect your eyes from stray spores and cleaning splashes.
- Long Rubber Gloves: Make sure they go over your wrists to keep mold and cleaners off your skin.
- Old Clothes: Wear a long-sleeved shirt and pants you don't care about. You can either wash them in hot water right after or just toss them.
Think of PPE as your personal armor. Wiping or scrubbing at mold without it can send a cloud of spores right into your face, turning a tiny problem into a potential health issue.
Choosing the Right Cleaning Solution
Now, let's talk about what to use. Many people’s first instinct is to reach for bleach, but that’s often not the best choice, especially on porous things like drywall or wood. Bleach might kill the surface mold, but its water base can soak into the material, potentially feeding the roots and setting you up for a comeback.
Instead, try one of these other options:
- Soap and Water: For hard, non-porous surfaces like plastic shelving or metal rods, good old-fashioned detergent and water are often all you need to scrub the mold away.
- White Vinegar: This is a go-to for more porous surfaces. Put some undiluted white vinegar in a spray bottle. The acidity may kill many common household molds and help keep them from growing back.
The Cleanup and Drying Process
Alright, you've got your gear on and your cleaner is ready. Let's get to it.
Start by lightly spraying the moldy area. You want to dampen it, not soak it. Let the solution sit for about 10-15 minutes to give it time to work.
Next, use a stiff brush or a disposable rag to scrub the surface mold off. Once you've scrubbed it away, wipe the area clean with a fresh damp cloth. If you're dealing with mold on drywall, it's a bit of a special case; our guide on how to remove black mold from drywall walks you through the specific steps for that.
Drying is the most important part of this whole process. Point a fan directly at the cleaned spot and leave it running for at least 24 hours. The area needs to be bone dry. Any moisture left behind is an open invitation for the mold to return.
Finally, clean up your cleanup. Put all your used rags, brushes, and disposable clothes into a heavy-duty plastic bag, seal it tightly, and throw it in your outside trash can. This helps keep the contained spores from finding a new place to thrive.
When You Should Call a Professional for Mold
There’s a certain satisfaction in tackling a small mold spot on your own, I get it. But knowing when to step back and call for backup is one of the most important things you can do for your home and your health. DIY fixes are fine for a tiny, isolated patch of surface mold, but some situations are just too big, too hidden, or too risky to handle without bringing in an expert.
It's crucial to recognize the signs that a small problem may have turned into a major one. The line between a quick cleanup and a job for the pros is actually pretty clear once you know what to look for.
The Problem Is Bigger Than You Think
The most obvious sign is simple: size. If you’re looking at a patch of mold that’s bigger than 10 square feet—think a 3-foot by 3-foot section—it’s time to consider picking up the phone. Stop right there.
An outbreak that large is a potential sign of a significant, ongoing moisture problem that a bottle of cleaner just won't fix. Professionals are equipped with the proper containment gear and industrial-strength equipment to tackle a job of that scale safely, without spreading spores all over your house.
You Smell Mold but Can’t See It
This is a classic scenario, and frankly, it's one of the most concerning. You open your closet and get hit with that unmistakable musty, earthy smell, but you can’t find a single visible trace of mold.
This is a huge red flag. It may mean mold is growing somewhere out of sight.
- Behind the drywall.
- Underneath carpeting and the pad.
- Tucked away above ceiling panels.
If you start tearing things apart to find it, you risk releasing a massive cloud of spores into your home's air. Professionals use tools like moisture meters and thermal imaging cameras to help pinpoint hidden mold colonies without needless destruction.
This simple decision tree can help guide your choice between a DIY approach and calling for backup.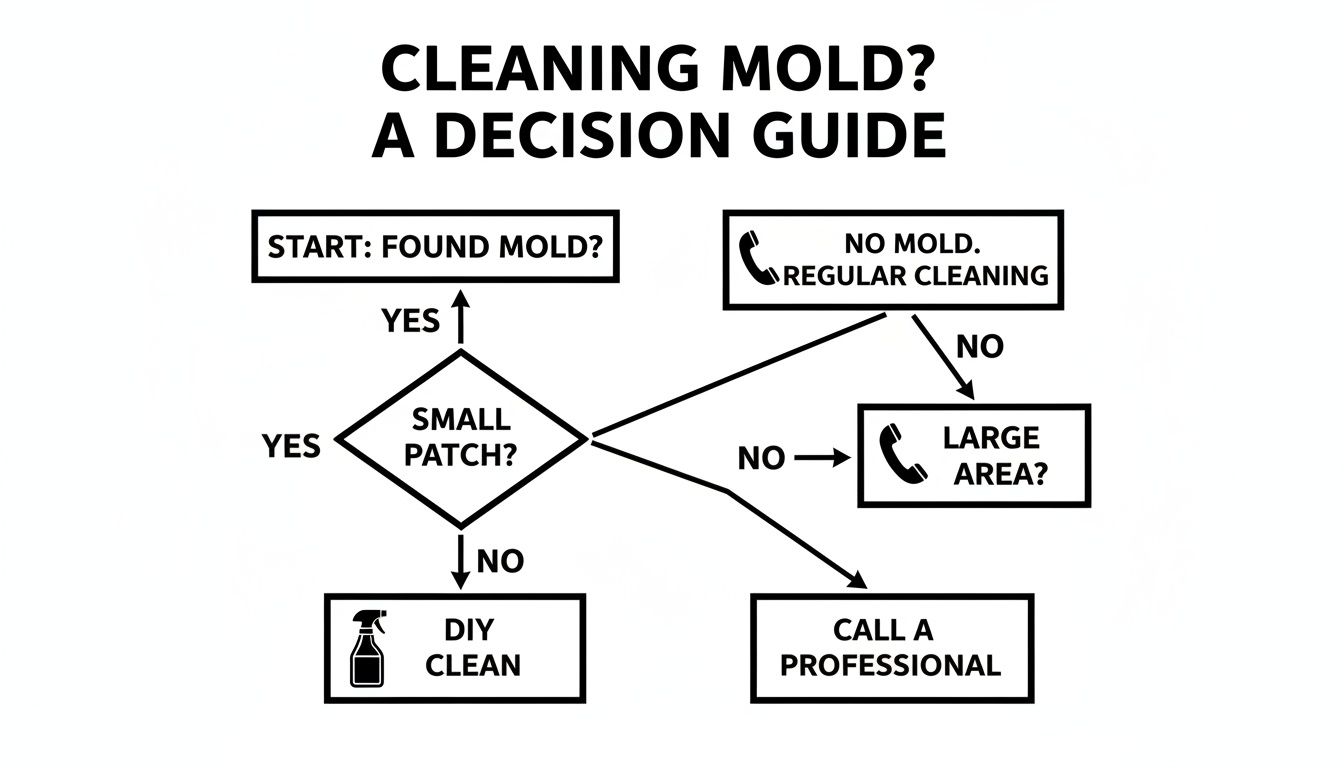
The takeaway is straightforward: while small, visible mold patches are often manageable, large or hidden issues may require expert intervention.
The Mold Keeps Coming Back
So you cleaned the spot. You were sure you dried it out completely. But a few weeks later, there it is again. Stubborn, recurring mold may mean one thing: you never fixed the source of the moisture. You’ve been treating the symptom, but the underlying issue might still be active.
A professional remediation company doesn’t just clean what you can see; they are trained to play detective. They work to trace the problem back to its origin—be it a slow plumbing leak, a crack in the foundation, or poor ventilation—and address it.
If any of this sounds familiar, calling for professional help may be the smartest and safest decision you can make. To get a better idea of what pros do, you can learn about our mold damage restoration services and see how we handle these complex jobs from start to finish.