Discovering mold on your basement walls means it's time for a three-part plan: figure out how bad it is, stop the water feeding it, and then decide if you can clean it yourself or if you need to call in the pros.
For a small spot—less than 10 square feet—you can probably handle the cleanup once you've solved the moisture issue. Anything bigger than that really needs professional help to make sure it's gone for good and done safely.
Your First Steps After Finding Basement Mold
Finding mold in your Phoenix basement is unsettling, but don't panic. The worst thing you can do is start scrubbing at it while it's dry, which just launches a cloud of spores into the air. Your first job is to calmly figure out what you're dealing with and cut off the mold's life support: water.
This isn't just a surface stain; it's a big red flag for a moisture problem. Here in Arizona, that could mean anything from a tiny, slow leak behind a wall to condensation building up during our humid monsoon season. Molds like Stachybotrys (the infamous "black mold") absolutely love these dark, damp spots.
Assess the Scope of the Problem
Before you even think about cleaning, you need to get a handle on the size of the mold patch. Grab a tape measure and see what you're up against. The guideline we use in the industry, which comes from the Environmental Protection Agency (EPA), is pretty straightforward:
- Under 10 square feet: Think of a patch roughly 3 feet by 3 feet. If your problem is this small, a properly equipped and careful homeowner can often tackle it.
- Over 10 square feet: If the mold covers a larger area, if you suspect it's inside the walls, or if it's anywhere near your HVAC system, stop right there. It's time to call a professional. Big jobs require containment zones and specialized gear to prevent making the problem worse.
This decision tree can help you see which path makes the most sense for your situation.
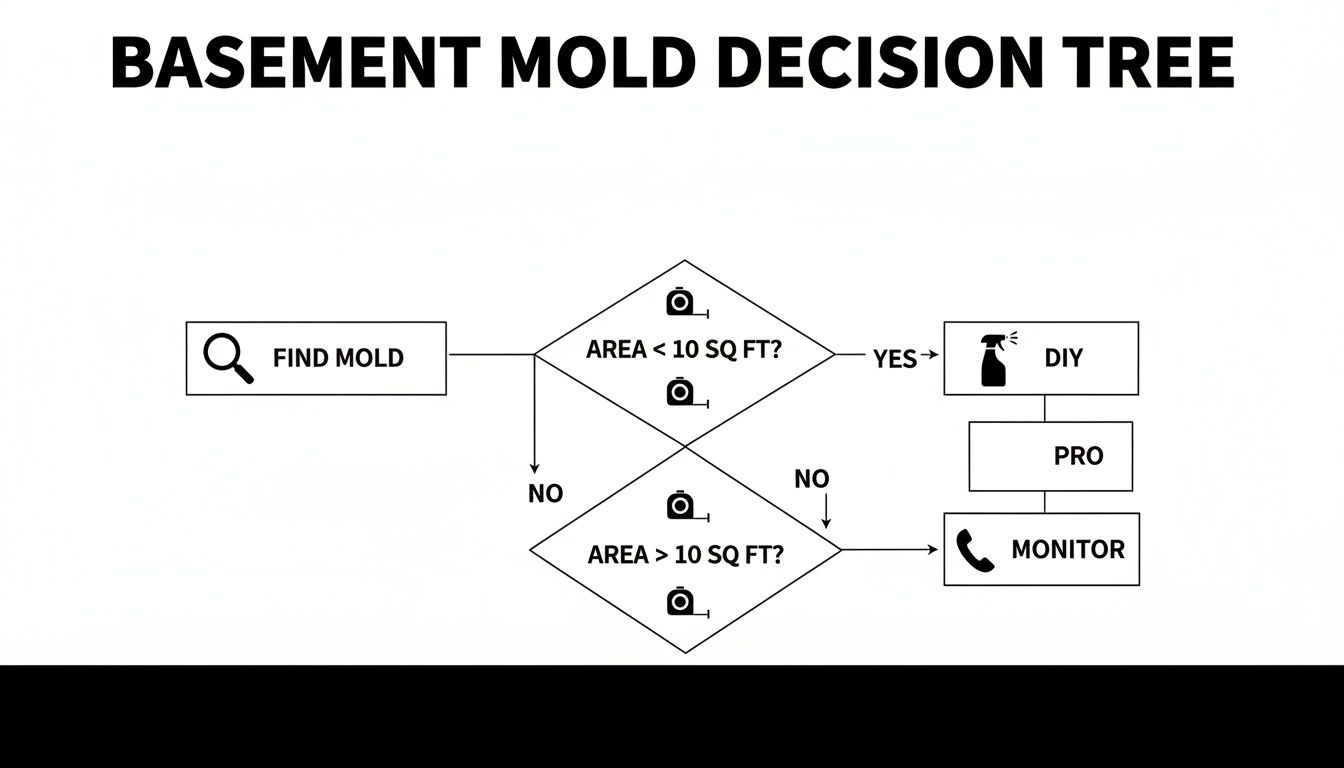
Ultimately, the size of the visible mold is your first and most important clue for what to do next.
DIY vs Professional Mold Remediation at a Glance
Deciding whether to tackle mold yourself or call a pro can be tricky. This table breaks down the key differences to help you make an informed choice based on the 10 square foot rule of thumb.
| Factor | DIY Approach (Under 10 sq ft) | Professional Remediation (Over 10 sq ft) |
|---|---|---|
| Safety Gear | Requires N95 mask, gloves, and eye protection. | Uses full-face respirators, hazmat suits, and negative air machines. |
| Containment | Basic containment using plastic sheeting and tape. | Creates a fully sealed, negative-pressure containment zone. |
| Effectiveness | Good for surface mold on non-porous materials. | Can handle deep, hidden mold in drywall, wood, and HVAC systems. |
| Cost | Low initial cost (cost of cleaning supplies and PPE). | Higher upfront cost but aims for complete removal and helps prevent recurrence. |
| Risk | Higher risk of spreading spores or missing hidden mold if not done correctly. | Low risk due to industry-standard protocols and equipment. |
| Time | Can take a few hours to a full weekend. | Typically a multi-day process involving containment, removal, and testing. |
While a small, contained mold issue can be a manageable weekend project, anything more significant carries risks that just aren't worth it. When in doubt, getting a professional assessment is always the safest bet.
Identify and Stop the Moisture Source
You can clean mold a dozen times, but it will keep coming back until you fix the leak. This is the most critical step of all. Put on your detective hat and search for the source—look for dripping pipes, water stains coming from the ceiling above, or even small cracks in the foundation.
The real goal isn't just to clean the mold you see. It's to make your basement an environment where mold can't grow back. That means cutting off its water supply for good.
Sometimes the culprit is sneaky, like high humidity causing condensation to form on cool concrete walls. If you’ve had any kind of water event, from a burst pipe to a small flood, making sure the area is bone-dry is non-negotiable. We cover this process in detail in our guide on how to dry out a flooded basement. You absolutely have to find and fix the root cause before you start any cleanup.
This is a massive issue for homeowners everywhere. The global mold remediation market was valued at USD 1,234.6 million in 2023 and is only expected to grow. North America makes up over 39% of that market, with residential properties accounting for nearly 59% of all jobs, driven by everything from aging pipes to simple household humidity.
Gearing Up and Sealing It Off: Safety Comes First
Before you touch a single speck of mold, let’s talk about safety. This is the single most important part of the entire process. The moment you start scrubbing or disturbing mold, it releases millions of tiny spores into the air. They’re invisible, and they can make you sick and spread the problem to other parts of your home.
Trying to tackle mold without the right gear is a rookie mistake with serious consequences. Those airborne spores can cause respiratory problems, skin irritation, and more. This isn't about being overly cautious; it's about doing the job right so you don't create a bigger problem for your health or your house.
Your Mold Battle Armor: The PPE Checklist
Think of this as your uniform for going into battle. Every piece has a specific job, and skipping one could put you at risk. Here’s what you absolutely need:
- N95 or P100 Respirator: Forget that flimsy paper dust mask. You need a real respirator that’s rated to filter out microscopic mold spores. An N95 is the bare minimum, but a P100 provides even better protection.
- Non-Vented Goggles: Spores can get into your body through your eyes just as easily as your lungs. You need fully sealed, non-vented goggles to keep them out and protect you from any chemical splashes.
- Disposable Gloves: Get yourself some long, heavy-duty disposable gloves—nitrile or rubber work great. Make sure they’re long enough to pull over the cuffs of your sleeves.
- Disposable Coveralls: You don’t want to track mold spores all over your house on your clothes. A full-body disposable suit with a hood is the best way to keep yourself and your clothes from getting contaminated.
This gear is your personal barrier. It keeps the nasty stuff on the other side while you work.
Contain the Mess Before You Start
Just as crucial as protecting yourself is protecting the rest of your home. You have to completely isolate the basement from all other living areas. If you don't, you’re basically guaranteeing that you’ll spread the mold problem from a contained area into a full-blown, house-wide nightmare.
Containment isn't just a good idea—it's the heart of any responsible mold cleanup. Without it, you're actively spreading the very contamination you're trying to eliminate.
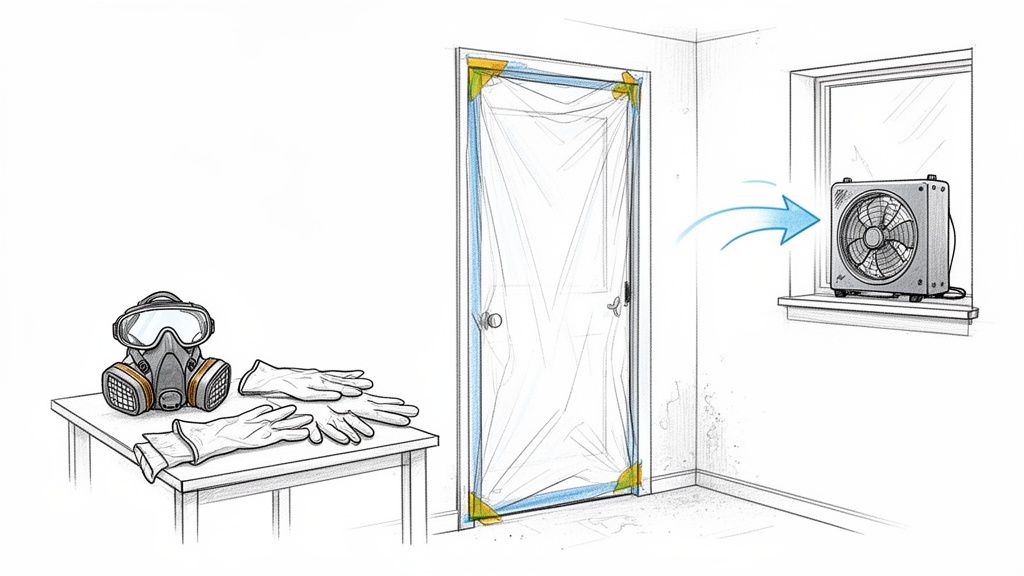
Setting up a containment zone is easier than it sounds. All you need is some heavy-duty (6-mil) plastic sheeting and some good painter’s tape. Use it to seal off any doorways or openings that lead out of the basement. Don’t forget to cover up any HVAC vents or cold air returns in the area, too. The last thing you want is your furnace or AC unit sucking up spores and blowing them into every room.
It puts things in perspective when you realize that an estimated 45 million buildings in the U.S. have unhealthy mold levels. Basements are ground zero for a lot of these problems. In fact, OSHA often considers significant basement mold a Level III or IV project, which means the pros would bring in full containment, negative air machines, and all the right PPE. Suddenly, taking these steps yourself seems pretty smart, doesn't it? You can even read the full research on mold remediation market trends to see just how big this issue is.
Set Up Negative Air Pressure
For an extra layer of protection, you can use a trick the pros use: creating "negative air pressure." It sounds complicated, but it's not. The goal is simple: make sure the air in the basement flows out of the house, not into it.
Here's how. Securely place a box fan in a basement window, aiming it so it blows air outside. Now, go to another part of your house, far away from the basement, and crack open a window just a little bit. This creates a gentle, consistent airflow that pulls fresh air into your home while pushing the contaminated air from the basement straight outside.
This one technique is a game-changer for a DIY job. It actively keeps your home’s air clean while you work. For bigger jobs, it’s worth understanding all the tools and techniques professionals use. You can learn more by checking out our overview of expert mold removal services.
How to Clean Mold Depends on Your Basement Walls
Not all basement walls are created equal, and your approach to mold treatment needs to reflect that. You can't just grab any cleaner and start scrubbing. Using the wrong method for your specific wall type won't just fail to work—it can actually make the problem much, much worse.
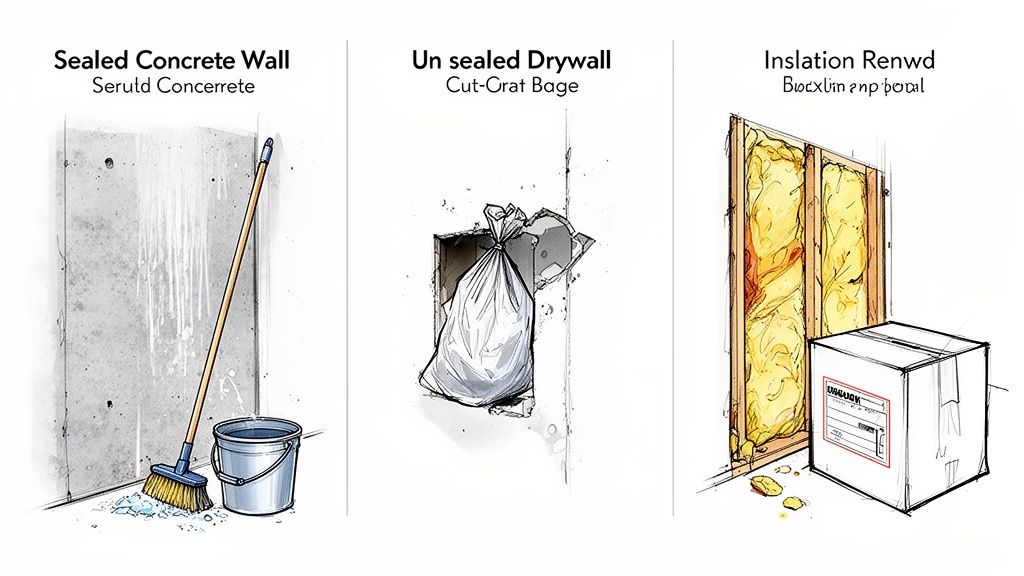
The entire game plan comes down to one simple question: is the surface porous or non-porous?
That distinction is everything. A non-porous surface, like sealed concrete, doesn’t let moisture soak in. Mold just sits on top, which makes it far easier to clean off. Porous materials like drywall and wood, on the other hand, are like a sponge. They allow mold’s root-like structures to dig deep inside where surface scrubbing can't possibly reach.
Treating Mold on Non-Porous Surfaces
If you’re looking at mold on painted or sealed concrete, cinder blocks, or even metal surfaces, you’re in a much better position. These materials don’t give the mold a place to hide, so a thorough surface cleaning is usually all it takes to get the job done.
A simple but effective method is usually best:
- Mix up a cleaning solution with warm water and a good non-ammonia detergent. Honestly, simple dish soap often works perfectly.
- Get scrubbing. Dip a stiff-bristle brush into your solution and really put some elbow grease into it. You need to physically dislodge and remove the mold growth from the surface.
- Rinse and repeat. After you've scrubbed everything, use a clean, damp rag to wipe the wall down and get rid of any leftover residue. You might have to hit stubborn spots a second time.
- Dry it completely. This is the most important step, hands down. Use fans and a dehumidifier to get the wall bone-dry. Any moisture you leave behind is just an open invitation for the mold to come right back.
You might be tempted to reach for bleach, but it's often the wrong tool for this job. While bleach can kill surface mold, its high water content can actually feed the mold’s deeper roots on porous surfaces. It’s for this exact reason that the EPA generally advises against using bleach for routine mold cleanup.
Handling Porous Materials Like Drywall and Wood
When you’re dealing with porous surfaces like unsealed drywall, insulation, or unfinished wood, the professional advice is blunt: removal and replacement is often the only reliable solution. Mold on these materials is like an iceberg—what you see on the surface is just a tiny fraction of the problem.
The mold’s hyphae (its "roots") burrow deep into the material itself. No amount of surface scrubbing will ever get them all out.
If you find mold on your drywall, your first thought shouldn't be "How do I clean this?" It should be "How do I safely remove this?" Trying to save mold-infested porous materials is a losing battle that almost always leads to regrowth.
Here's the reality: drywall, which accounts for a 35.7% market share of mold treatments, is incredibly absorbent. After a flood or leak, mold colonies can explode on it in as little as 48-72 hours, trashing your home's air quality. This is a huge driver behind the steady growth of the U.S. mold remediation market.
Industry best practices, which are followed by about 80% of professionals, involve techniques like building containment zones with 6-mil plastic and running HEPA air scrubbers that capture 99.97% of spores. These are steps that go far beyond simple scrubbing.
The Safe Removal Process
If you have a small, contained area of moldy drywall (under 10 sq ft) and you’ve already stopped the moisture source, you might be able to handle the removal yourself. But before you start, remember that moisture management is everything. You need to understand the full picture of how wet drywall contributes to mold growth to prevent this from happening again.
Here’s how to tackle it safely:
- Mist the Area: Lightly spray the moldy section with water. This keeps spores from going airborne the moment you cut into the wall.
- Cut Beyond the Mold: Grab a utility knife and cut out a section of drywall that extends at least 12 inches beyond the visible mold on all sides. This helps ensure you remove any unseen growth that's already spreading.
- Bag and Seal Immediately: Place the contaminated drywall directly into a heavy-duty contractor bag. Seal the bag tightly with tape while you are still inside the contained work area.
- Inspect the Cavity: Shine a flashlight inside the wall cavity. Look for any signs of mold on the wood studs or insulation. If you see more mold in there, that’s a clear sign the problem is bigger than you thought. It’s time to call a professional.
This careful, methodical approach is the only way to properly treat mold on basement walls made of porous materials. It's not about cleaning; it's about complete and safe removal.
How to Properly Dry and Dehumidify Your Basement
Once you’ve scrubbed away the last of that ugly mold, it’s tempting to pack up your gear and call it a day. But hold on—that’s one of the biggest mistakes you can make. The cleaning process itself introduces more moisture, and the air is still damp, which is basically an open invitation for mold to return.
Getting the area bone-dry isn't just a final step; it's your first line of defense against a comeback. Any lingering moisture is like a welcome mat for new mold spores, which can take root and start growing in as little as 24 to 48 hours.
Right now, the goal is to transform your basement from a damp, vulnerable space into an environment where mold simply can’t survive. This takes more than just cracking a window and hoping for the best.
Creating an Aggressive Drying Environment
To really knock out mold for good, you have to get aggressive with your drying. That means actively pulling moisture out of the walls, floors, and the air itself. Just opening a window won't cut it, especially here in Phoenix when monsoon season humidity spikes unexpectedly.
You need to create some serious airflow to get the job done right. Here’s what a pro-level setup looks like:
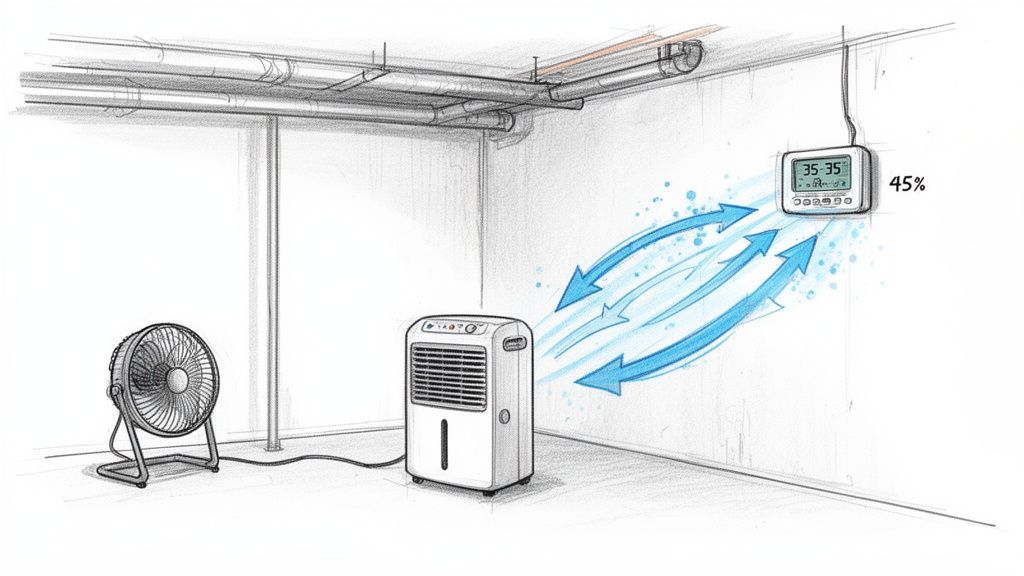
- Industrial Fans and Air Movers: Forget that little box fan from the garage. You need high-velocity fans, the kind restoration pros use. You can rent them. Point them directly at the damp walls to speed up evaporation.
- Cross-Ventilation: Think of creating a wind tunnel. Set up some fans to blast air across the wet surfaces, and position others to push all that damp air out a window or door.
This one-two punch forces moisture out of the materials and then physically shoves it out of the room. It ensures that dampness doesn't just hang in the air, waiting to settle back onto your clean walls.
Mastering Humidity with a Dehumidifier
Fans are great for surfaces, but a dehumidifier is your secret weapon for the air. Basements are just naturally prone to dampness, and a good dehumidifier is a non-negotiable tool for keeping mold at bay.
Living in the Phoenix desert, you might not think much about humidity. But basements are a different story. Cool concrete walls are magnets for condensation when warmer, moist air finds its way down there. And that condensation is all the water mold needs to thrive.
A dehumidifier isn't just for a one-time cleanup; it should be a permanent part of your basement. Keeping humidity in check is the single most effective thing you can do to prevent mold from ever coming back.
The magic number for relative humidity is between 30% and 50%. Any higher, and you're rolling out the red carpet for mold. You can track this with a cheap little gadget called a hygrometer. Stick one on a shelf in the basement and check it regularly to make sure your dehumidifier is keeping things in that sweet spot.
Your Long-Term Humidity Control Plan
After the initial cleanup and drying, the job shifts to long-term maintenance. You can't just set it and forget it. A dry, healthy basement requires a consistent strategy.
Here are the key things to focus on:
- Get the Right Dehumidifier: Size matters. Pick a unit rated for your basement's square footage. Modern ones often have a built-in hygrometer and will turn on and off automatically, saving energy.
- Set Up Continuous Draining: Constantly emptying a heavy water bucket is a pain. Look for a model that lets you attach a hose for continuous drainage into a floor drain or sump pump.
- Keep the Air Moving: Even after things are dry, running a fan on low from time to time helps prevent stagnant, damp air from collecting in corners.
- Monitor and Tweak: Glance at your hygrometer once a week. If you see the humidity levels creeping up, adjust the dehumidifier or start looking for a new moisture source.
This kind of proactive thinking is what really separates a temporary fix from a permanent solution. For a deeper dive, check out our complete guide on advanced basement drying techniques. This final, thorough drying phase is what makes all that scrubbing and cleaning worthwhile.
Long-Term Strategies for Mold Prevention
Now that you’ve gotten through the tough part—the cleanup—the real work of keeping mold away for good begins. Getting rid of the mold you can see is a great first step, but it’s a temporary fix if you don't tackle the root cause. This is where you switch from playing defense to playing offense, making your basement an environment where mold simply can’t thrive.
This isn’t about a single magic bullet. It’s about creating a layered defense system. By fixing moisture issues both inside and outside your home, you can lock down your basement and turn a one-time problem into a permanent solution.
Reinforce Your Foundation From the Inside
Your basement walls are the front line against moisture from the ground. Even after cleaning and drying, they can have weak spots that let water sneak back in.
A really common culprit is tiny cracks in the concrete. Hydrostatic pressure from groundwater can push moisture right through these hairline fractures. Sealing them is non-negotiable.
- Hydraulic Cement: I'm a big fan of this stuff. You can use it to patch cracks in concrete walls and floors, and it actually expands as it cures. This creates a powerful, watertight seal that can stop even an active leak in its tracks.
- Waterproof Sealant: Once any repairs are done, think about rolling on a high-quality waterproof coating. These products act like a thick membrane, blocking moisture from seeping through the naturally porous concrete.
It’s like waterproofing your basement from the inside out. You’re adding a solid layer of protection exactly where moisture tries to get in.
Take the Fight Outside Your Home
Here’s a secret many people miss: basement moisture problems often don’t start in the basement. They start outside, with rainwater pooling up against the foundation. Getting a handle on that water is one of the most effective things you can do.
Bad landscape grading is a huge offender. If the ground around your home slopes towards the foundation, you’re basically inviting every rainstorm right into your basement.
The ground around your foundation should slope away from the house at a grade of at least 5%. That means it needs to drop about six inches over the first ten feet. It’s amazing how many chronic dampness issues this one simple fix can solve.
Clogged gutters are another major source of trouble. When they overflow, all that water cascades down and saturates the soil right next to your foundation, putting a ton of pressure on your walls.
A little regular maintenance goes a long way:
- Clean your gutters at least twice a year, especially after our Phoenix monsoon storms.
- Make sure your downspouts extend at least five to ten feet away from the house, directing water to a spot where it can drain away harmlessly.
These outdoor fixes stop water before it even has a chance to become an indoor problem.
Add a Final Layer of Defense
With your interior and exterior fixes in place, there’s one last step you can take. This final layer helps manage any lingering humidity and makes the wall surface itself hostile to new mold growth.
Applying a specialized paint can make a world of difference. You’ve got a couple of great options.
- Mold-Resistant Paint: This type of paint has antimicrobial agents mixed right in, which actively stops mold and mildew from growing on the surface. It’s the perfect topcoat for a finished basement.
- Waterproofing Paint: This is a much thicker, almost cement-like product that bonds directly with the masonry to create a true waterproof barrier. It’s an excellent choice for unfinished concrete or cinder block walls.
Choosing the right finish doesn't just make your basement look better; it adds a crucial layer of long-term security. These proactive steps are the foundation of smart homeownership. To dig deeper, check out our other articles on various mold prevention topics. Taking these strategies to heart will give you lasting peace of mind and protect your home’s value.
Knowing When to Call in a Mold Remediation Pro
It’s tempting to think you can handle a little spot of basement mold with some bleach and elbow grease. And sometimes, you can. But the real trick is knowing when a small DIY project is actually the tip of a very big, very dangerous iceberg.
Crossing that line isn't just about the job being bigger than you thought. It can put your family’s health on the line and risk spreading the problem to every corner of your house. Calling in a certified professional isn't giving up; it's making the smart call to protect your home and everyone in it.
Red Flags That Scream "Get an Expert"
Some mold situations are automatic non-starters for a DIY approach. If you see any of these, your next move should be to call a certified mold remediation specialist, period.
Here are the big ones:
- The mold patch is bigger than 10 square feet. This isn't some arbitrary number; it's the industry standard. An area larger than a small doormat (about 3 ft by 3 ft) points to a serious moisture issue that needs professional containment and equipment to fix without making things worse.
- It keeps coming back. You scrubbed it, you treated it, and a few weeks later, it’s back. This is a classic sign that you only cleaned the surface. The mold's "roots" are still there, and more importantly, so is the moisture source that’s feeding it.
- You suspect it’s in your HVAC system. This is a five-alarm fire. Mold in your vents means spores are being blown into every single room of your home every time the AC or heat kicks on. This turns a localized problem into a full-blown, house-wide contamination event.
- You can smell it more than you can see it. That strong, musty, earthy odor that won't go away is a huge clue. It often means there's a large, hidden colony growing behind your drywall, under the carpet, or deep inside your insulation.
If you're dealing with any of these, you're past the point of a simple cleanup. It’s time for a professional investigation.
Health and Safety Come First
The decision to call a pro isn't just about the size of the mold—it's about who lives in your house. Mold exposure can trigger everything from allergy-like symptoms to serious respiratory distress.
If anyone in your household has asthma, severe allergies, a compromised immune system, or any chronic lung condition, there is no "safe" amount of mold for you to clean yourself. Your only move should be to call a professional.
Professionals don’t just scrub mold away. They set up proper containment zones with plastic sheeting and use powerful air filtration devices (air scrubbers) to make sure spores don’t get scattered through your home during the cleanup. This is crucial for protecting vulnerable family members.
They Have the Right Tools for the Job
A huge part of what you’re paying for is the gear. Certified remediation companies have specialized equipment that goes far beyond anything you can buy at a home improvement store.
This isn’t just about having bigger fans. Pros use tools like:
- HEPA Air Scrubbers: These machines are the real deal, trapping microscopic mold spores from the air so you aren't just breathing them in.
- Thermal Imaging Cameras: This is how they find the hidden enemy. These cameras can see temperature differences behind walls, pinpointing moisture from a hidden pipe leak without having to smash things open.
- Professional Moisture Meters: They don't just feel if a surface is dry. These meters measure the moisture content deep inside materials like wall studs and concrete, ensuring everything is bone-dry before they rebuild.
Using this kind of tech is the difference between thinking you got it all and knowing you did. It's how you eradicate the problem at its source for good.
When you're facing a mold problem that's clearly out of your league, you need a team you can trust. Restore Heroes is IICRC-certified and available to help Phoenix homeowners. We can provide onsite inspections to assess your situation and work with all insurance carriers. Don't let mold compromise your home's safety—get professional help by visiting https://www.restoreheroesaz.com.