
You notice a brown ceiling stain after a Phoenix monsoon, or you catch a musty smell when the air conditioner starts. Maybe the baseboard feels soft, the carpet is damp near an exterior wall, or water has appeared beneath a cabinet with no obvious explanation. The visible mark is stressful, but it isn't the whole problem. Mold damage mitigation starts with finding and stopping moisture, then proving that the structure is dry before anyone cleans, paints, or rebuilds.
Why Mold Damage Mitigation Starts Before You See Mold
Mold isn't the original failure. Moisture is. A roof penetration, plumbing drip, HVAC condensation line, slab leak, or stucco crack can wet building materials long before a colony appears on the surface. Drywall paper, wood, insulation, carpet padding, and flooring assemblies can hold moisture where a homeowner can't see it.
The EPA advises drying wet areas within 24 to 48 hours to help prevent mold growth, and recommends keeping indoor humidity below 60%, ideally between 30% and 50%. See the EPA mold and moisture guidance for the underlying benchmarks. The practical lesson is simple: a stain deserves investigation even when it doesn't yet look like mold.
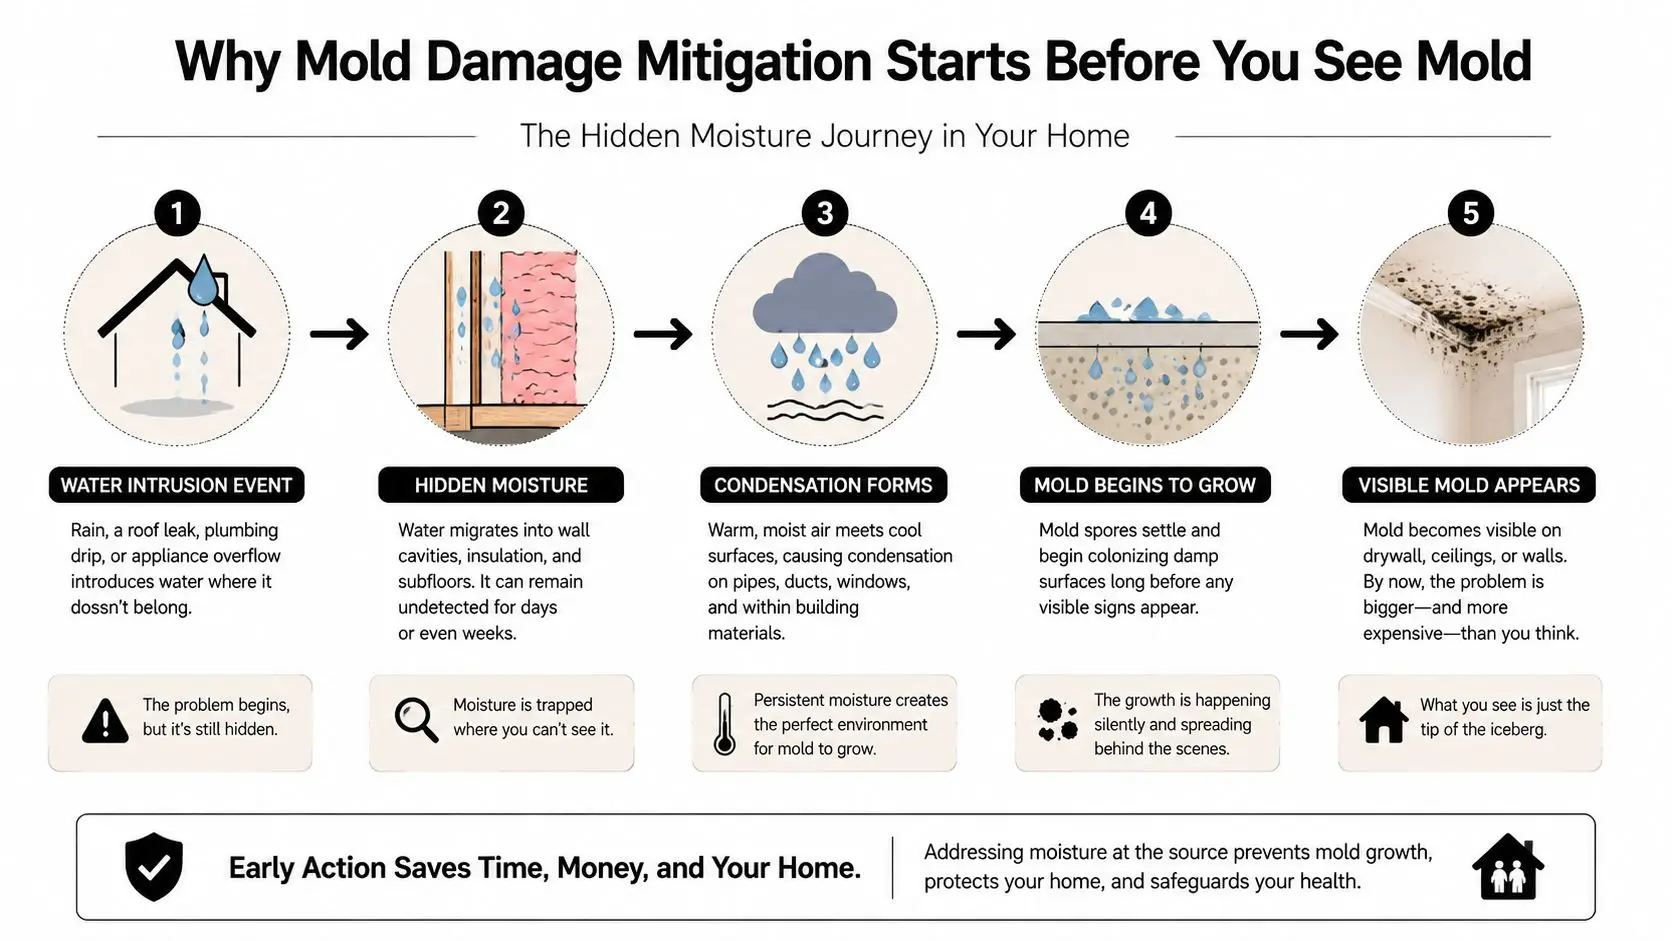
Find the source before buying cleaner
Start by asking where the water came from and whether it can return. Check:
- Plumbing: Supply lines, drain connections, water heaters, washing machines, and refrigerator lines can leak into cabinets and wall cavities.
- Roof and exterior envelope: Monsoon rain can enter around flashing, roof penetrations, stucco cracks, windows, and soffits.
- HVAC systems: Condensation can collect around drip pans, duct boots, insulation, and poorly draining lines.
- Slabs and flooring: A hidden supply-line leak below tile or near baseboards can keep materials damp without leaving a large surface puddle.
A musty odor, bubbling paint, or swollen baseboard may indicate a larger hidden reservoir. Scrubbing the visible patch without correcting the source only removes evidence temporarily. Practical background on stopping water intrusion is available in EZ Plumbing's water restoration tips, but any active leak involving electricity, sewage, or concealed piping deserves professional assessment.
Practical rule: Treat every visible mold spot as a moisture investigation, not a cleaning assignment.
Document the affected rooms, note odors and stains, and arrange an inspection that includes wall edges, cabinetry, flooring transitions, and HVAC-adjacent areas. A focused mold inspection checklist can help you avoid overlooking the places where moisture commonly remains. The finish line is not a brighter wall. It's a controlled source and materials that have returned to a verified dry condition.
First 24 Hours of Emergency Action
The first day is about damage limitation and safety, not completing remediation. Stop the water if you can do so safely. Close a supply valve, shut down an appliance, or arrange emergency roof protection. If water is near outlets, appliances, electrical panels, or low-voltage equipment, keep people away and have the affected circuit evaluated before using it.
Take photographs and video before moving contents or removing finishes. Capture the source, standing water, stained surfaces, furniture, flooring, and any visible damage. Record the time you discovered the problem and keep receipts for emergency purchases. This record helps you explain what happened without exaggerating the loss.
What a homeowner can handle
For a small, clean-water event in a well-ventilated area, a homeowner may be able to remove loose, unsalvageable baseboards, extract surface water with a wet vacuum, and run a consumer dehumidifier. Keep air movement controlled. A box fan pointed across a wet surface can help, but blowing directly at visible mold may spread contamination beyond the original area.
Use polyethylene sheeting to separate the affected room from occupied areas when practical. Don't seal a wet cavity permanently, and don't create negative pressure or disturb contaminated materials if you don't understand the airflow path. Sewage, floodwater, extensive growth, and occupants with respiratory vulnerability change the risk assessment.
| Task | Safe for Homeowner | Requires Professional |
|---|---|---|
| Shut off an accessible clean-water source | Yes, if safe | If the source is concealed, pressurized, or hazardous |
| Photograph and record damage | Yes | No |
| Wet-vacuum a small clean-water spill | Yes, with electrical safety | Larger losses or contaminated water |
| Run a dehumidifier in an isolated area | Yes, while monitoring conditions | Structural drying requiring equipment placement and readings |
| Remove loose damaged trim | Sometimes, with PPE | Extensive demolition or hidden cavities |
| HEPA vacuuming across a large contaminated zone | No | Yes |
| Antimicrobial application | Usually not | Yes, when specified by the scope |
| Sewage-backup cleanup | No | Yes |
| Demolition around HVAC contamination | No | Yes |
If the event is beyond a contained room, arrange an emergency water mitigation assessment quickly. Large losses require containment, extraction, air filtration, and moisture mapping rather than improvised fan placement. Don't mix cleaning chemicals, enter unsafe areas, or remove drywall around suspected sewage contamination.
The Drying and Moisture Removal Workflow
Drying works best as a sequence, not as guesswork. First stop the source. Then remove bulk water, reduce moisture in the air, direct airflow through affected assemblies, and verify the result with readings. Skipping one step can leave a wall or subfloor wet even when the room feels comfortable.
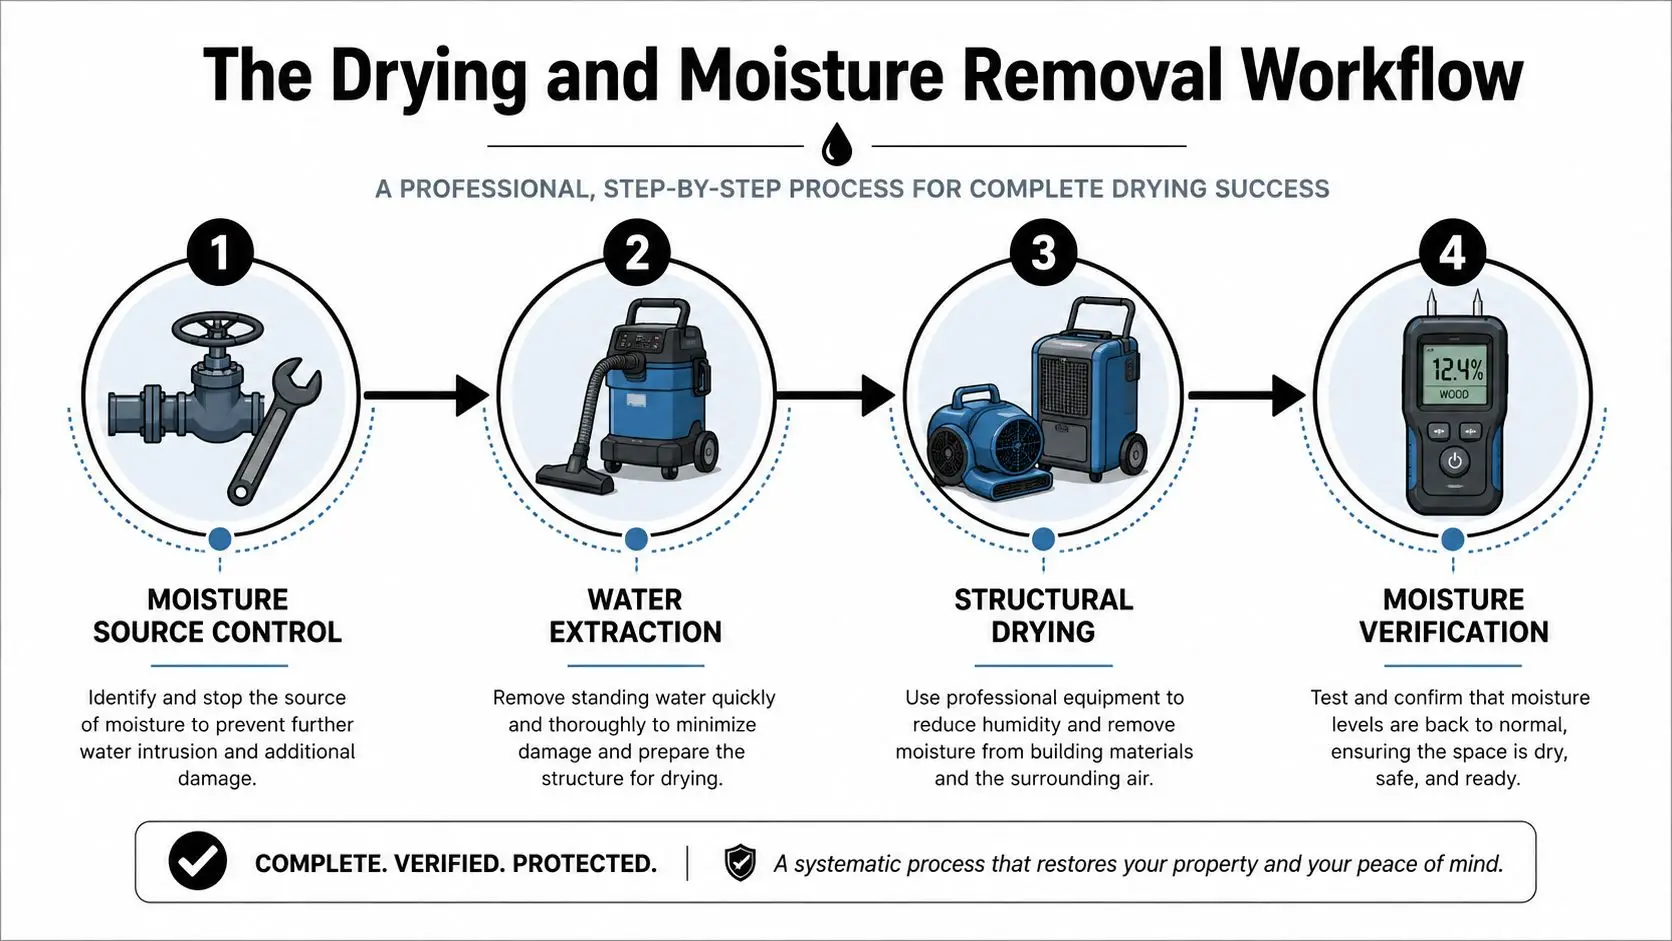
Extraction comes before aggressive airflow
Technicians use weighted carpet extractors, portable extraction units, or truck-mounted systems according to the loss. Extraction removes liquid water that fans can't address. After that, air movers create evaporation at wet surfaces while commercial dehumidifiers remove the moisture released into the air.
More fans aren't automatically better. Dehumidification capacity matters because moving humid air around doesn't make water disappear. In a Phoenix summer, a conditioned room may feel dry while a wall cavity, insulation pocket, or ceiling assembly remains wet. Equipment placement should account for the building layout, air exchange, material type, and the path moisture must travel to leave the structure.
The EPA's guidance for schools and commercial buildings emphasizes identifying the source, assessing materials, containing the work, cleaning and drying salvageable items, discarding unsalvageable porous materials, and checking for moisture return. Its commercial mold remediation process also highlights HVAC-related moisture controls, including clean drip pans and insulated, sealed ducts where needed.
Monitor the structure, not just the thermostat
A drying plan should include daily moisture mapping. Pin meters help assess wood and other materials where a probe can be inserted. Pinless meters help scan broader areas and locate changes that deserve closer inspection. Readings should be logged by room, material, elevation, and date.
Compare affected materials with an unaffected area of the same construction. A single reading doesn't prove a wall is dry, especially where drywall, framing, insulation, cabinets, and subfloor have different drying behavior. Keep equipment logs, moisture maps, photographs, source-control notes, and the final verification record for the insurer, owner, or clearance professional.
The CDC says homes and contents should be dried as quickly as possible, within 24 to 48 hours if possible, and wet flood-damaged materials that can't be fully cleaned and dried in that period should be removed. The CDC mold cleanup guidance supports treating this period as an emergency response window.
A visual demonstration of airflow and drying equipment can be useful before you decide what your property needs:
Use equipment only when you can monitor the result. If readings stop improving, investigate trapped moisture, closed cavities, wet insulation, condensation, or an unresolved source rather than adding another fan. Guidance from water damage drying fans can help explain basic airflow choices, but structural drying is a measurement-driven task.
Safe Removal and Cleaning Practices by Material Type
Cleanup is a decision tree. The right action depends on whether the material is hard, semi-porous, or porous, and whether it remains structurally sound after drying.
Hard, non-porous surfaces such as tile, glass, metal, and sealed concrete are the most realistic candidates for careful homeowner cleaning. Remove loose contamination with appropriate HEPA filtration, then clean with detergent or a suitable EPA-registered fungicidal product according to its label. Never combine chemical products, and provide ventilation without sending contaminated air through the rest of the home.
Semi-porous materials require judgment. Wood framing, subfloor, and concrete block may be cleanable when the material has dried, remains sound, and contamination is limited to the surface. A dark mark isn't proof that the material must be removed, but a soft, swollen, delaminated, or persistently odorous component shouldn't stay in place just because its exterior looks better.
Porous materials usually decide the scope
Drywall, carpet, carpet padding, insulation, ceiling tiles, and paper-faced products can retain contamination below the visible surface. If they have visible growth or a persistent odor after drying, removal is generally more reliable than repeated scrubbing. FEMA advises discarding mold-contaminated materials that can't be properly cleaned and dried within 24 to 48 hours in its flood damage cleanup guidance.
| Material Type | Examples | Recommended Action |
|---|---|---|
| Hard, non-porous | Tile, glass, metal, sealed concrete | HEPA vacuum where appropriate, then clean and dry |
| Semi-porous | Wood framing, subfloor, concrete block | Dry fully, assess integrity, clean surface contamination when suitable |
| Porous and absorbent | Drywall, carpet padding, insulation, ceiling tile | Remove when visibly contaminated, persistently odorous, or not dryable |
| Paper-faced products | Paper-backed drywall and insulation | Treat as porous, with removal often preferable |
| Sealed wood or finished surfaces | Painted trim, finished cabinetry | Clean cautiously after source control and drying |
Wear gloves, eye protection, and at least an N95 respirator for limited work. A P100 respirator may be appropriate for higher-risk tasks, but fit and respiratory health matter. Don't undertake cleanup around sewage, extensive contamination, HVAC systems, or vulnerable occupants without a professional plan.
Contain debris before it travels. The EPA commercial guidance identifies 6-mil-or-thicker polyethylene for double-bagging contaminated materials that can't be salvaged. Seal bags inside the containment area, wipe the exterior if needed, and move them through a planned route. For carpet-specific decisions, guidance on getting mold out of carpet can help clarify why padding and backing often change the answer.
Post-Remediation Verification and Re-Occupancy Thresholds
A room can look clean and still be unready. Paint hides stains, odor can fade after ventilation, and cabinetry can conceal trapped moisture. Visual clearance is not the same as dry, clean, source-controlled clearance.
Begin with moisture readings. For wood framing and subfloor, a common field target is below 15% moisture content, but the reading must be compared with an unaffected area of the same structure and interpreted in context. Material type, meter calibration, construction, and local conditions all matter. A number without a comparison point can create false confidence.
What a proper closeout should show
The final file should include:
- Source control: The roof, plumbing, HVAC, slab, or exterior pathway has been corrected or isolated.
- Moisture verification: A dated map shows affected materials were checked and reached the selected dry standard.
- Cleaning record: Removed materials, cleaned surfaces, containment, filtration, and waste handling are documented.
- Odor assessment: The affected area is free of persistent musty odor under normal operating conditions.
- Rebuild readiness: No wet insulation, swollen substrate, concealed debris, or unresolved cavity concern remains.
For larger or disputed projects, an independent industrial hygienist can provide a separate evaluation. A clearance inspection may include visual review, moisture measurements, and, when appropriate, air or surface sampling. Sampling isn't a substitute for fixing the source or removing unsalvageable material. It should answer a defined question, not provide a decorative report.
Don't repaint or rebuild simply because the surface is dry to the touch. Ask to see moisture logs, photographs of opened areas, equipment records, and the written scope. Occupants should return only when the area is dry, clean, odor-free, and protected from renewed moisture. If any one of those conditions is missing, pause the finish work and investigate.
Preventing Recurrence in Phoenix-Area Homes
Phoenix homes face a sharp contrast between dry outdoor conditions and intense seasonal moisture events. A structure can stay comfortable for months, then develop hidden wetting during a monsoon, an HVAC condensation failure, or a slow plumbing leak beneath tile.
Monsoon intrusion
Wind-driven rain can enter through roof penetrations, soffit vents, flashing failures, and stucco cracks. The leak may show as a ceiling ring, but the wetter material may be attic insulation, roof decking, or the top of a wall. Inspect penetrations and flashing before storm season, and check attic spaces after major rain.
Dry wet attic materials promptly, using safe ventilation and dehumidification strategies. Don't rely on the desert climate alone to dry an enclosed assembly. If insulation or electrical components are wet, keep the inspection professional.
HVAC condensation
Summer HVAC systems can create moisture around drip pans, drain lines, duct boots, and poorly insulated connections. Condensation may enter a ceiling cavity without producing a dramatic indoor spill. Check that the drain path is open, the pan is clean, duct boots are insulated, and a pan switch is installed where appropriate.
Slab leaks and exterior irrigation
A supply-line leak under tile or near a baseboard can feed a concealed area for months. Irrigation overspray against stucco or the foundation can also keep lower wall assemblies damp. Watch for recurring baseboard swelling, flooring changes, paint bubbling, unexplained odors, or a meter reading that differs from adjacent areas.
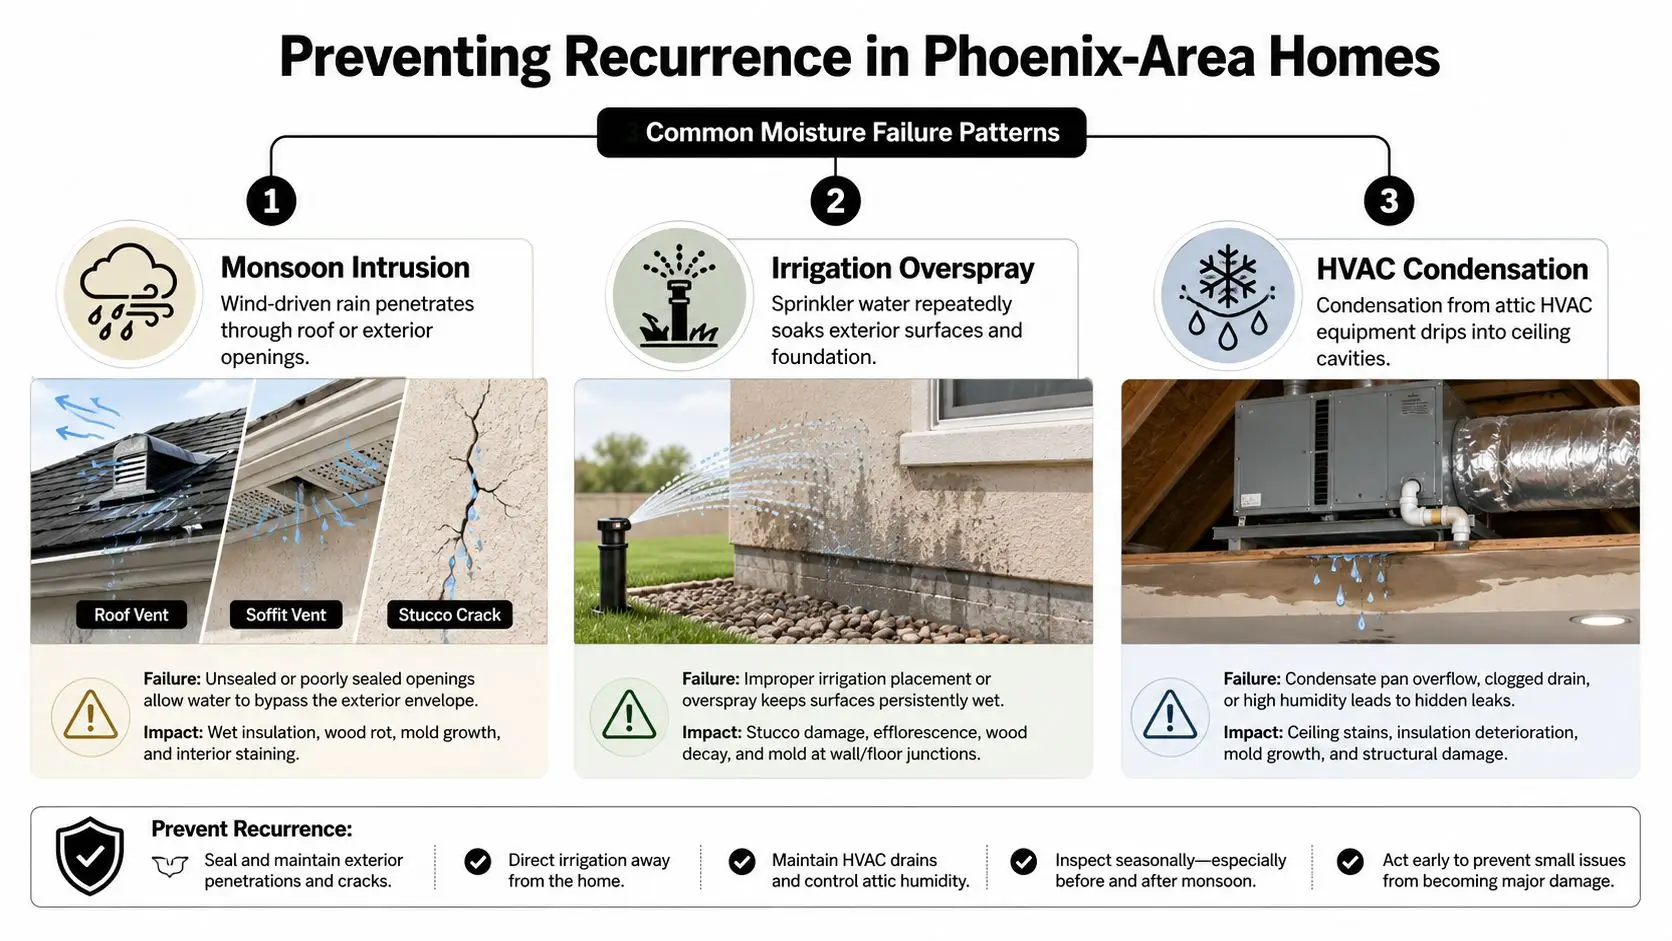
Build inspections into routine maintenance rather than waiting for visible growth. After storms, inspect the attic and ceilings. During heavy cooling, check HVAC drain areas. Around foundations, adjust sprinklers and look for dampness that doesn't match normal irrigation. Recurrence prevention is a habit of finding water early, not a one-time application of antimicrobial product.
Insurance Coordination and When to Call a Professional
Professional mold remediation is a risk-management decision, not automatically an upsell. A small, isolated clean-water event may be manageable with careful drying and documentation. A larger or concealed loss can become more disruptive when an owner delays source control, disturbs contaminated materials, or rebuilds before verification.
Call an IICRC-certified restoration professional promptly when visible growth covers more than 10 square feet, HVAC involvement is suspected, sewage or floodwater is present, an occupant is immunocompromised, or drying has failed after 48 hours. These thresholds don't replace an inspection, but they signal that containment, specialized equipment, or independent verification may be needed.
Document before the scope changes
Keep a chronological file with:
- Photos and video: Capture the source, affected materials, contents, and conditions before disturbance.
- Moisture readings: Record locations, material types, dates, and comparisons with unaffected areas.
- Source evidence: Photograph failed supply lines, roof openings, HVAC components, or plumbing access points.
- Written estimates: Save scopes, invoices, equipment logs, disposal records, and change orders.
- Communication: Notify the insurer promptly and describe observable facts without guessing about cause or coverage.
Policies differ. Gradual leaks, maintenance issues, neglect exclusions, and mold-specific limits can affect the claim. Water damage and mold remediation may also be handled under different policy language. Homeowners should read their policy and ask the carrier how the cause, timing, and resulting damage will be evaluated. For broader flood-policy context, Duncan & Associates Insurance flood help is a useful educational resource, although it isn't a substitute for your policy documents or carrier's determination.
A qualified Phoenix-area contractor should provide moisture mapping, source identification, a containment plan, a material-by-material scope, and written documentation. Ask who will perform the work, how readings will be recorded, what happens if moisture returns, whether HVAC or concealed cavities are included, and which tasks are excluded. The homeowners insurance and mold coverage guide can help you prepare questions before speaking with an adjuster.
Compare the expense of professional assessment with the risk of leaving wet materials, contaminating clean rooms, losing contents, or rebuilding over an unresolved source. Paying for targeted expertise may protect indoor air quality, property condition, and future resale options, but no contractor can promise coverage, pricing, or a particular outcome before the loss is inspected and the policy is reviewed.
Restore Heroes provides Phoenix-area mold inspection, moisture detection, containment, contaminated-material removal, cleaning, sanitation, odor control, structural drying, and restoration for residential and commercial properties. If you have a current leak, unexplained odor, or failed drying attempt, visit Restore Heroes to request an assessment and discuss the next safe step.