Water usually doesn’t announce itself in a dramatic way. In Phoenix, it often starts with a ceiling stain after a monsoon storm, a water heater leak in the garage, an AC drain problem, or damp flooring you notice only because it feels slightly different under your feet.
That’s when most homeowners ask the same question. What is water remediation, exactly? Is it cleanup, drying, repairs, mold prevention, or all of the above?
The short answer is that water remediation is the professional process of removing water, drying the structure, cleaning contamination, and preventing the damage from getting worse. This process mirrors emergency medical care for a house. First, you stop the immediate threat. Then you stabilize the affected areas. Then you clean, dry, and restore what can safely be saved.
That matters because water problems aren’t rare or isolated. Flood damage has affected 99% of U.S. counties between 1996 and 2019, and total annual economic impacts have been estimated at $180-496 billion by the Joint Economic Committee, as summarized in these water damage statistics for homeowners. Even in a dry climate, homes still deal with leaks, pipe failures, roof intrusion, appliance overflows, and hard-water issues like common window water spots in Phoenix, which remind homeowners how quickly water can leave lasting evidence behind.
What Water Remediation Means for Your Phoenix Home
For a Phoenix homeowner, water remediation means more than mopping up a mess. It means protecting drywall, flooring, framing, insulation, and indoor air quality before trapped moisture turns a manageable problem into a much bigger one.
A lot of people hear “remediation” and assume it just means cleanup. In practice, it’s the phase where trained technicians remove the water, track hidden moisture, dry materials to a proper standard, and clean affected surfaces based on the type of water involved. If repairs are needed later, those come after the structure is stabilized.
Water damage is often a race between drying the building and letting moisture stay hidden long enough to create secondary problems.
Phoenix adds its own twist. Monsoon winds can drive rain into places that usually stay dry. Roof leaks can travel far from the visible stain. A slab leak or appliance leak can subtly affect baseboards and flooring before you see standing water.
Homeowners also tend to underestimate how broad the problem is. Many think of flooding as a coastal issue, but the earlier claim data shows water-related damage reaches almost everywhere. That’s why understanding what is water remediation isn’t just useful after a disaster. It’s part of basic homeownership.
The Three Categories of Water Damage and Why They Matter
The source of the water changes the whole job. A small kitchen leak and a small sewage backup can leave the same amount of wet flooring, but they do not carry the same health risk, cleanup rules, or likely cost.
That is why professionals classify water by category before they decide what can be dried, what must be removed, and how protective the cleanup needs to be. For a Phoenix homeowner, those labels are not technical jargon for its own sake. They help explain why one loss may dry in place while another requires demolition, protective gear, and much tighter containment.
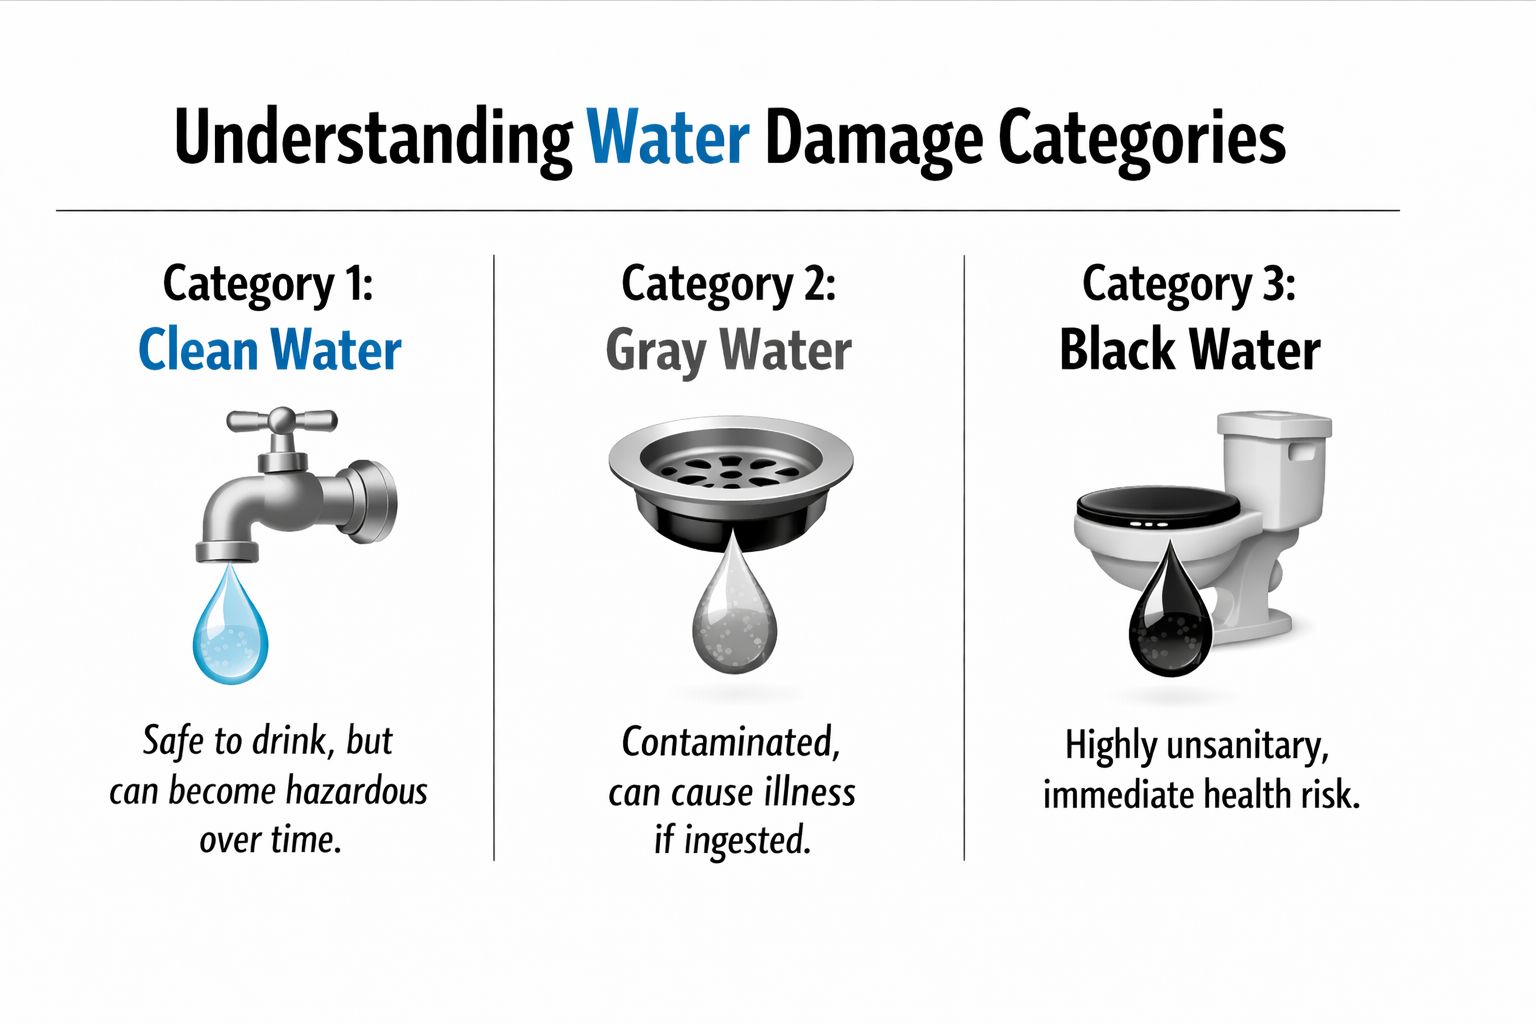
Category 1 clean water
Category 1 starts from a sanitary source. Common examples include a broken supply line, an overflowing sink fed by clean water, or a fresh water heater leak.
Homeowners often hear "clean water" and assume the cleanup is simple. Sometimes it is. But that label describes the starting point, not a guarantee about what the water is after it spreads through drywall, dust, insulation, or flooring materials. If the leak sits long enough or passes through contaminated areas, the category can change.
In practical terms, Category 1 losses usually give a restoration team the most flexibility. More materials may be salvageable, the cleaning steps are less intensive, and the job often costs less than a contaminated-water loss. It can still become expensive if moisture reaches cabinets, subfloors, or wall cavities before anyone notices.
Category 2 gray water
Category 2 water contains a meaningful level of contamination. Sources often include washing machine overflows, dishwasher discharge, or water that has already moved through parts of the home and picked up contaminants.
This is a common source of confusion. The water may look harmless. It may even be clear. What matters is exposure risk, not appearance.
A good way to think about it is a medical triage decision. A scrape and an infected wound may both look minor at first glance, but they do not get the same treatment. Category 2 usually requires more careful handling, more detailed cleaning, and a stricter decision about which porous materials can stay. That often affects both timeline and cost because crews cannot treat the area like a basic drying job.
Category 3 black water
Category 3 is the highest-risk category. It includes sewage backups and other grossly unsanitary water that can carry harmful contaminants.
For a homeowner, this category has the clearest practical meaning. People, pets, and porous materials in the affected area may all be at risk. Cleanup usually involves PPE, controlled removal of damaged materials, disinfection, and disposal procedures that go well beyond standard extraction and drying. If you are dealing with sewage or heavily contaminated intrusion, this guide to Category 3 water damage cleanup explains why the response is much more involved.
One more point matters here. Water categories and drying classes are different things. Category tells you how contaminated the water is. Class describes how much water was absorbed and how hard the structure will be to dry. Homeowners often hear both terms during an inspection, and mixing them up can make an estimate sound inconsistent when it is not. A loss can have a smaller affected area but still require intense sanitation because of the category. It can also be clean water spread across many materials, which raises drying time without creating the same contamination risk.
A simple rule helps. Judge water by source and exposure, not by how it looks on the floor. That is often the difference between a straightforward drying project and a job that requires removal, containment, and a longer path back to normal.
The Water Remediation Process Step by Step
The easiest way to understand the process is to compare it to emergency care.
A doctor doesn’t start with cosmetic treatment. First comes triage. Then stabilization. Then treatment. Then recovery. Water remediation follows the same logic inside a house.
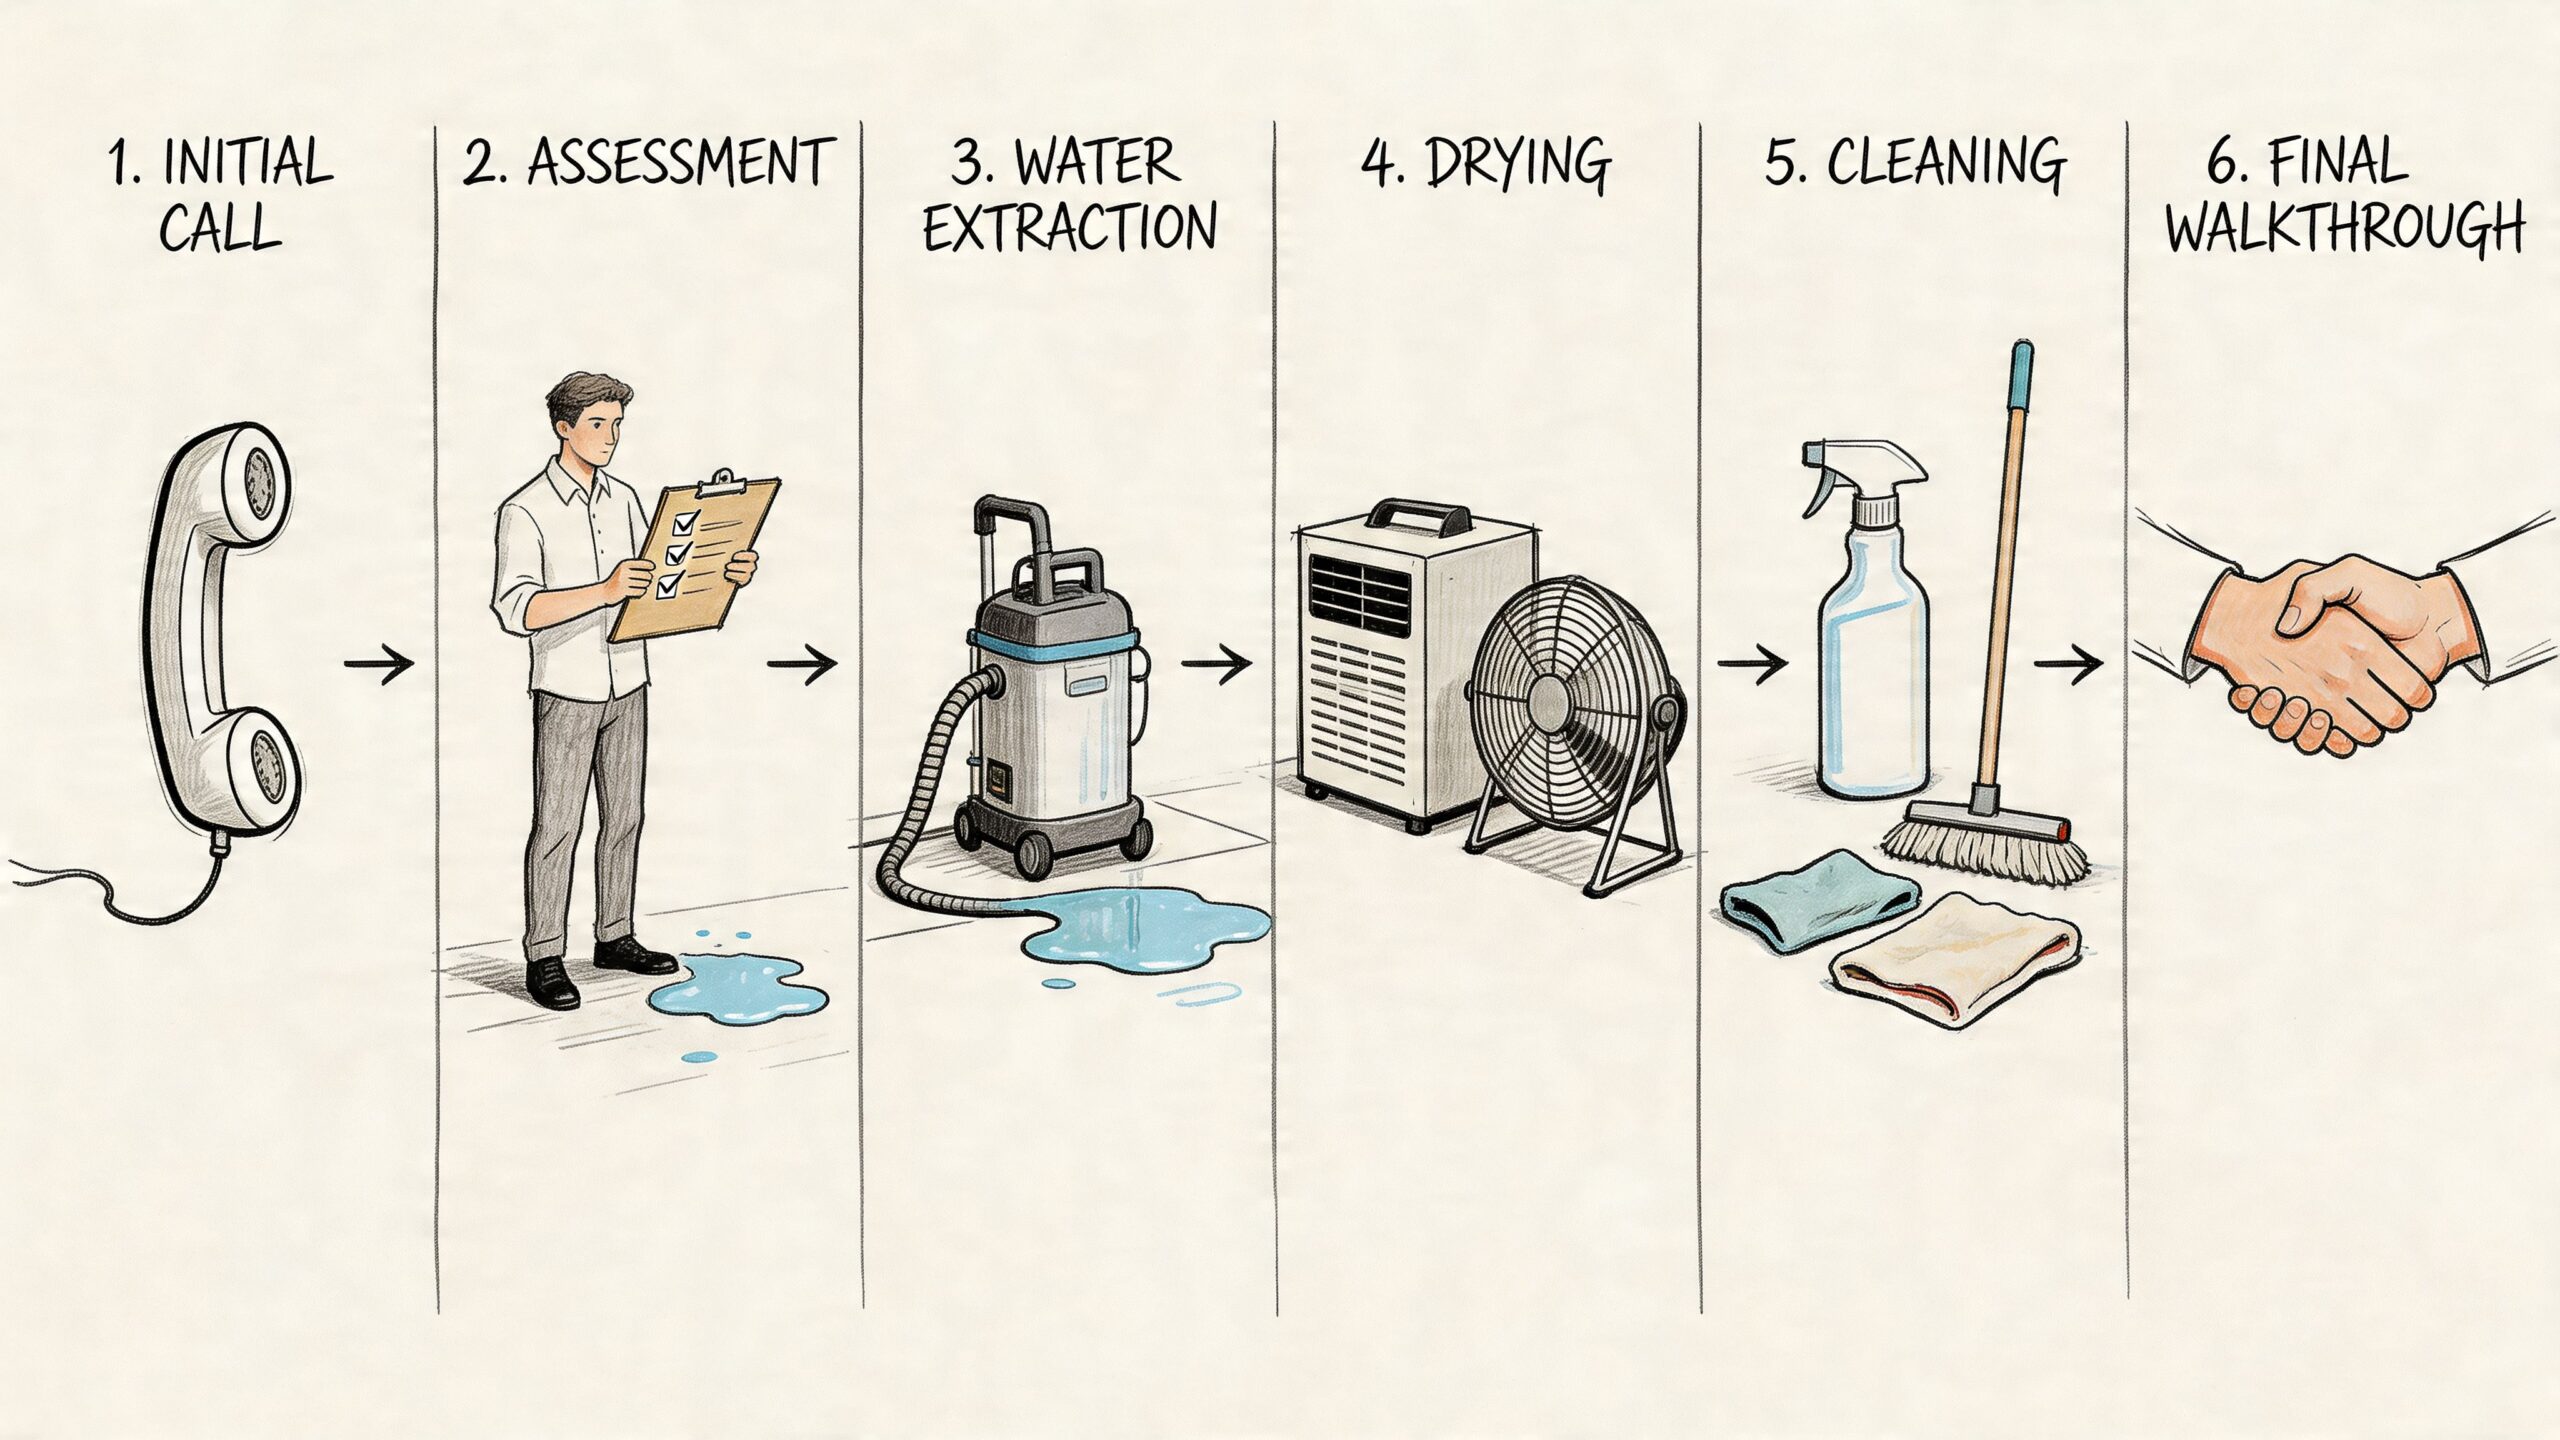
Step 1 inspection and assessment
Technicians begin by identifying the water source, the category of water, and how far the damage has spread. That includes checking areas that don’t look wet yet, such as baseboards, wall cavities, subflooring, insulation, and adjacent rooms.
This first step shapes everything that follows. A garage water heater leak may stay relatively contained. A roof leak during a storm may travel through attic insulation and show up far away from the entry point.
Professionals use tools like moisture meters, thermal imaging cameras, and psychrometers because visible staining tells only part of the story.
Step 2 mitigation stops further damage
People often get confused about this concept. Mitigation means stopping the loss from getting worse. It may include shutting off the water source, extracting standing water, moving contents out of harm’s way, and removing materials that can’t be safely dried or cleaned.
Mitigation is the “stop the bleeding” phase. It’s urgent and practical.
Confusion between mitigation, remediation, and restoration is common, and that confusion can delay action. A background explanation of that problem appears in this discussion of remediation, mitigation, and restoration. For homeowners who want a broader look at who handles each phase, this page on what a restoration company does helps connect the roles.
Step 3 drying and dehumidification
After extraction, the building still may hold a lot of hidden moisture. This is the part homeowners often underestimate because surfaces can feel dry before the structure is completely dry.
Technicians place air movers and dehumidifiers strategically to pull moisture out of materials and out of the air. They don’t just “set fans.” They monitor conditions and adjust equipment as readings change.
A typical setup may involve directing air movement across wet surfaces while dehumidifiers collect moisture from the indoor environment. If drywall, wood framing, or subfloors remain above dry standards, the job isn’t done.
If the structure only feels dry on the surface, that’s not enough. Drying has to be measured, not guessed.
Step 4 remediation means cleaning and sanitizing
This is the point where water remediation most directly happens. The goal is to remove contamination and make affected areas sanitary and safe for the next phase.
Depending on the water category, technicians may clean salvageable materials, remove unsalvageable porous items, treat surfaces, and address odors. Category 1 losses may need light cleaning. Gray or black water incidents require more controlled sanitation work.
This phase also reduces the chance that moisture plus contamination turns into a lingering odor or microbial issue later.
Step 5 restoration returns the space to use
Restoration is the repair and rebuild stage. That may mean replacing drywall, reinstalling baseboards, laying new flooring, repainting, or rebuilding sections that had to be removed during mitigation and remediation.
Not every water loss needs major reconstruction. Some stop at drying and cleaning. Others involve a larger repair scope.
For Phoenix homeowners, one local option is Restore Heroes, which handles emergency water extraction, structural drying, contaminated water cleanup, and related restoration work in the metro area.
Here’s the clean distinction homeowners can remember:
| Term | Plain-English meaning | Main goal |
|---|---|---|
| Mitigation | Stop the damage from spreading | Stabilize the property |
| Remediation | Remove contamination and dry the structure properly | Make the space safe and clean |
| Restoration | Repair and rebuild affected materials | Return the property to normal use |
How Long Does Water Remediation Take
The honest answer is that it depends on two things. How much water got in, and what that water got into.
Spilling a glass of water on tile is one kind of problem. A bathtub overflow soaking carpet, baseboards, drywall, and wood framing is another. Both are “water damage,” but they don’t dry on the same schedule.
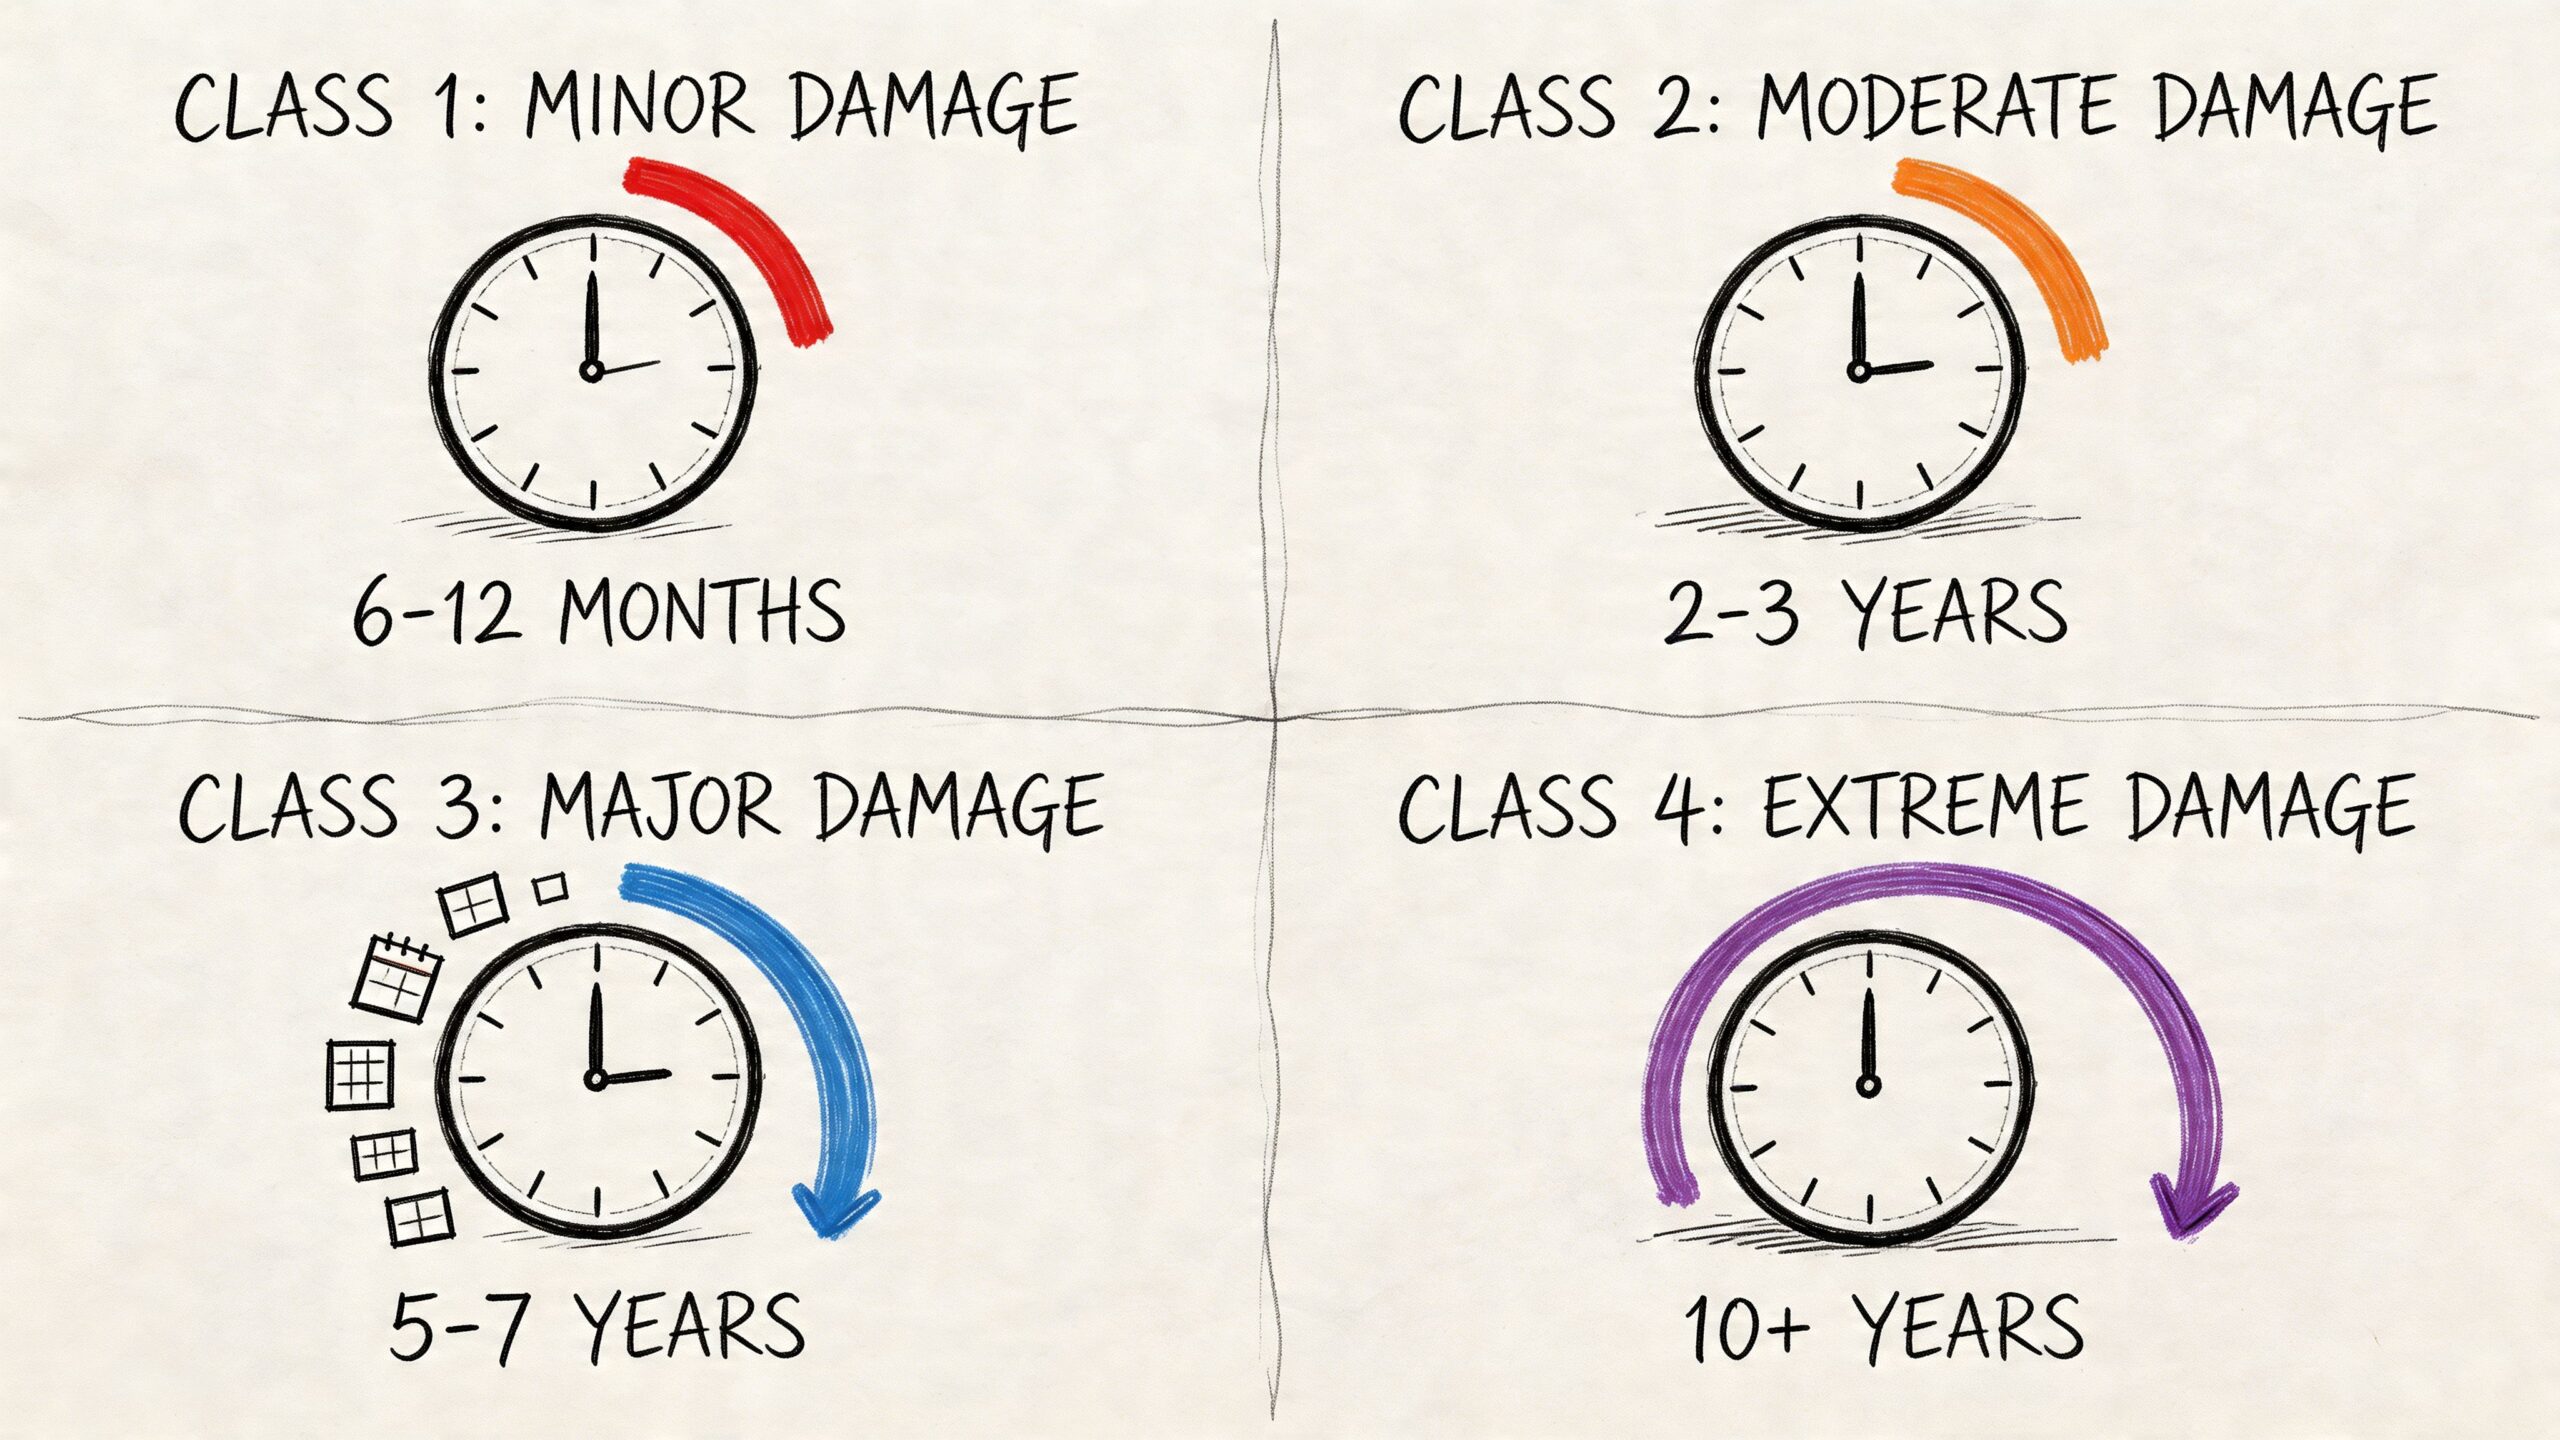
What the damage class tells you
The class of water damage refers to the amount of water and how far it has been absorbed into materials. A smaller incident affecting a limited area of low-porosity material is simpler to dry than water that has saturated carpet pad, drywall, insulation, and wood.
That’s why a hallway leak can sometimes dry relatively quickly, while a hidden leak under flooring can take much longer. Porous materials hold moisture below the surface, and that trapped moisture doesn’t leave on its own just because the room feels less damp.
What a moderate drying timeline looks like
For moderate Class 2 damage, professional drying with commercial-grade air movers and dehumidifiers typically takes 4-7 days to reach dry standards, including less than 15% moisture content in wood, according to QED Environmental’s water remediation overview.
That same source notes that inadequate drying can stretch the timeline to 2 weeks or more and raise mold risk by 300%. That’s a strong reminder that the goal isn’t speed alone. The goal is verified drying.
Why professional drying is different from household drying
Homeowners understandably ask, “Can’t I just run fans?” Household fans can help with surface evaporation, but they don’t create a complete drying plan.
Professional crews track moisture with instruments and adjust equipment placement as the structure changes. They may use:
- Air movers to increase evaporation across wet surfaces
- Dehumidifiers to remove moisture from the air so materials can keep drying
- Moisture meters to check wood, drywall, and other materials
- Thermal imaging to spot hidden wet areas behind finishes
That’s why “it looks dry” and “it is dry” are two different things.
Drying is a science problem, not a waiting game.
If you want a practical timeline overview tied to common job types, this guide on how long water damage restoration takes gives useful context for what can shorten or extend the process.
Understanding Water Remediation Costs and Insurance
At this stage, Phoenix homeowners usually ask two questions at once: “How bad is this?” and “How much is this going to cost me?” Those questions are connected.
Water remediation pricing works a lot like medical triage. The first step is figuring out the severity of the problem, not jumping straight to a final bill. The same IICRC factors used to classify the loss, especially water category, damage class, and which materials are wet, also shape the cost, timeline, and health concern level. A clean supply-line leak in one room is a very different job from contaminated water that reached carpet, drywall, and cabinets.
What actually changes the price
The biggest cost drivers are usually the size of the affected area, the type of water involved, how long the materials stayed wet, and how much has to be removed versus dried in place.
Here is the practical version:
- Category 1 water usually costs less to address because cleaning and disposal needs are lower if the response is fast.
- Category 2 or 3 water often costs more because crews need more protective steps, more detailed cleaning, and more material removal.
- Higher damage classes usually mean more evaporation is happening, which often means more equipment, more monitoring, and more labor.
- Porous materials like carpet pad, insulation, and drywall often increase the bill because they absorb water instead of just getting wet on the surface.
That is why two homes with “water damage” can receive very different estimates. The label sounds the same. The scope of work is not.
Materials can change a simple job into a larger one
Tile over slab and a wet guest bathroom can be fairly straightforward if moisture has not spread beyond the visible area. A similar leak in a kitchen can become more expensive quickly if water moved under cabinets, into toe kicks, behind drywall, or beneath flooring layers.
Hidden moisture is often the budget surprise.
A sprinkler leak outside can also contribute to indoor moisture problems near exterior walls or foundations. Poor drainage and faulty irrigation systems sometimes keep feeding the problem long after the first wet spot appears indoors.
How insurance fits into the process
Insurance usually focuses first on cause, not just damage. In plain terms, carriers often treat a sudden accidental event differently from a slow leak, deferred maintenance issue, or long-term seepage.
That distinction matters because homeowners often see only the wet drywall. Adjusters and remediation teams are also asking questions like:
- Did the loss start suddenly, or has it been happening for weeks?
- Is the source clearly identified?
- What category of water was involved?
- What parts of the home were affected?
- What documentation supports the claim?
A good remediation file helps answer those questions. Crews typically document moisture readings, photos, affected materials, equipment used, and drying progress. That paperwork supports both the restoration plan and the insurance conversation.
If you want a more detailed breakdown of what changes pricing from one job to another, this guide to water damage repair cost factors explains the common variables in plain language.
One point that helps reduce stress
Insurance may pay for part of the loss. It does not decide what your house needs to become dry and safe.
The remediation standard still comes first. Then the billing and coverage questions get matched to that documented scope. For homeowners, that is often the clearest way to make sense of a confusing situation. The category and class are not just technical labels. They help explain why the job costs what it costs, how long it may take, and how serious the health and material risks are.
Warning Signs You Need Professional Water Remediation
Some water problems shout. Others whisper.
A burst pipe gives you standing water and obvious panic. A slow leak behind a bathroom wall may only show up as paint that looks slightly swollen or a smell you can’t quite place. In Phoenix, dry air can make people assume minor signs will resolve on their own. They usually don’t.
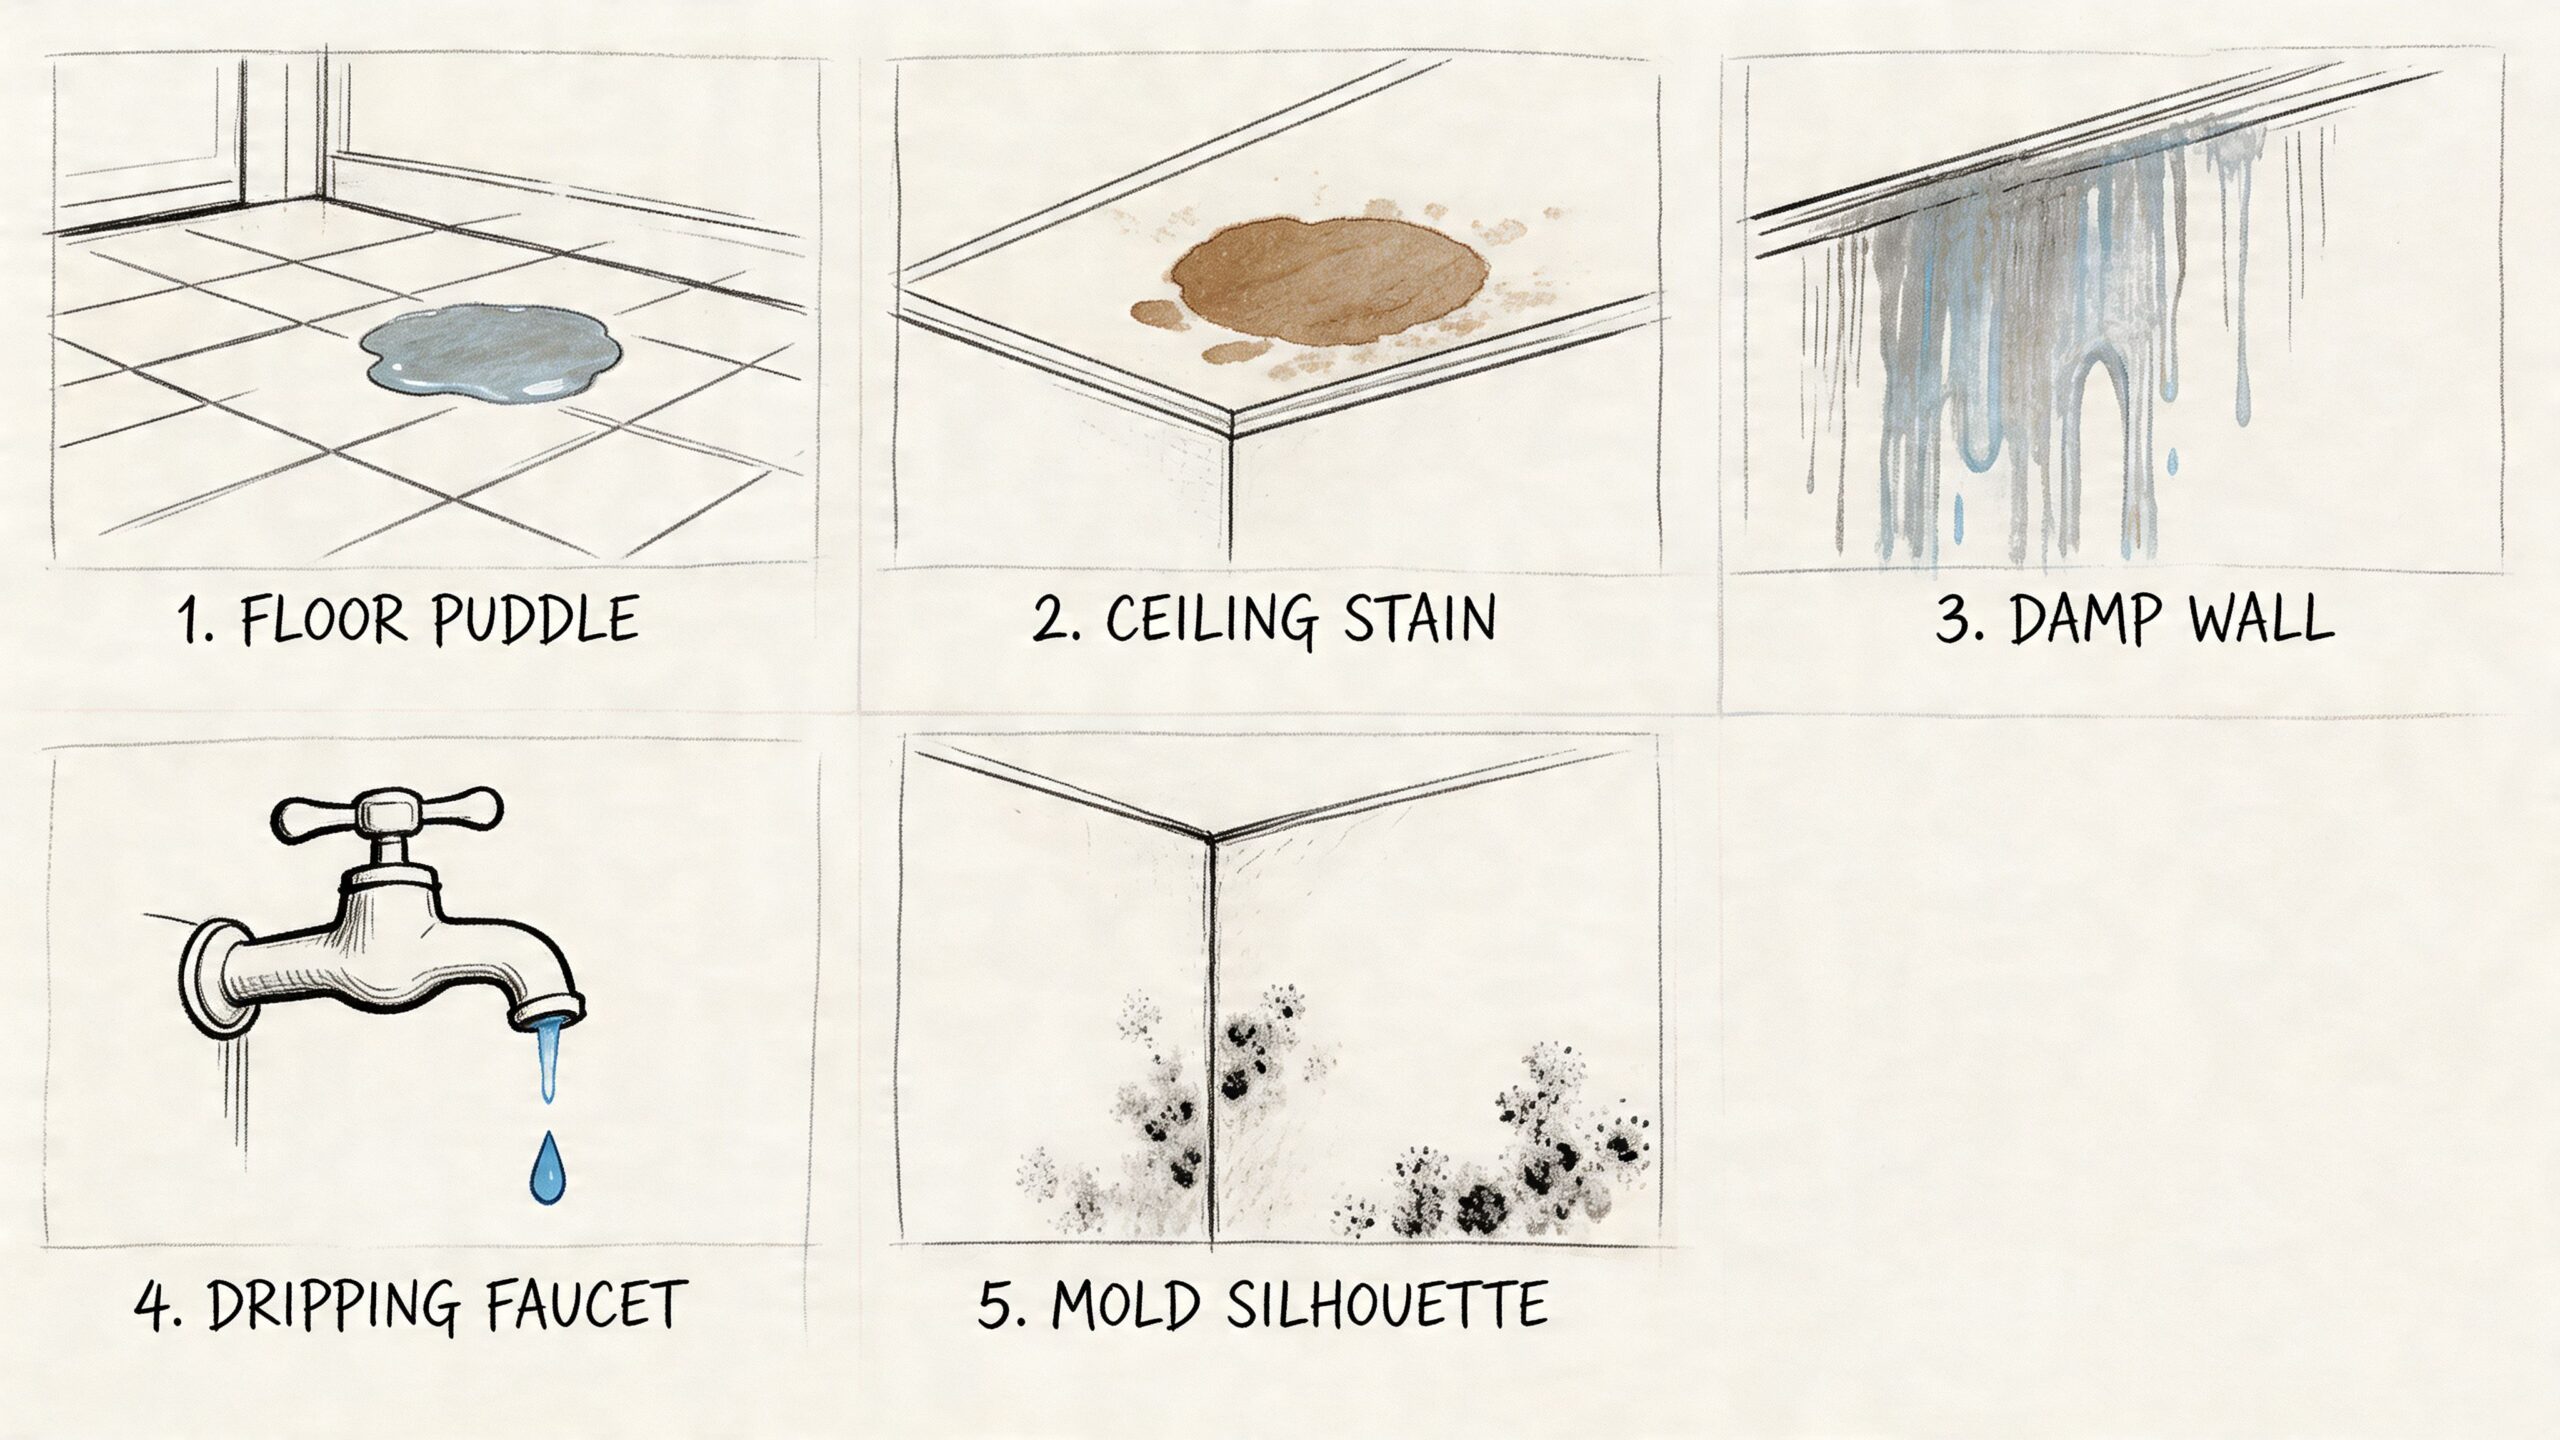
The obvious clues
These signs usually mean you need help quickly:
- Standing water under sinks, around appliances, or on floors
- Ceiling stains after storms or plumbing issues
- Wet carpet or padding that stays damp
- Dripping or active leaks from supply lines, roofs, or fixtures
- Sewage odors or backups that suggest contaminated water
If you see staining overhead, this resource on signs of water damage in a ceiling can help you tell the difference between cosmetic marks and signs of an active moisture problem.
The subtle clues Phoenix homeowners miss
These are the detective-level signs that often point to hidden moisture:
- Musty smell with no obvious source
- Bubbling paint or peeling texture
- Baseboards that swell or separate from the wall
- Flooring that cups, lifts, or feels soft
- A sudden spike in the water bill
- Repeated damp spots near exterior walls or windows
Outdoor water can contribute too. If overspray or grading issues are pushing water toward the house, it helps to understand how faulty irrigation systems and sprinkler components can create moisture problems around foundations, walls, and window lines.
A small stain can be the visible end of a much larger moisture path.
This short video gives a helpful visual sense of what water damage can look like in real homes and why early action matters.
When not to wait
Call for a professional assessment if any sign keeps returning, if the smell is getting stronger, or if the water involved may be contaminated.
Don’t rely on touch alone. Drywall can feel normal on the painted side while insulation behind it stays wet. Flooring can look fine while the subfloor underneath remains affected. That’s why professional testing matters when the clues don’t fully match what you can see.
Your Next Steps for Water Damage in Phoenix
When water gets into a home, the biggest risk usually isn’t just the puddle you can see. It’s the moisture that keeps moving into drywall, wood, insulation, cabinets, and air space after the obvious mess is gone.
That’s why the right response is fast, methodical, and based on measurement. First stop the source if you can do so safely. Then protect people and pets from affected areas, especially if the water may be contaminated. After that, get the property assessed before hidden moisture has more time to spread.
For Phoenix homeowners, this matters after monsoon leaks, appliance failures, supply line breaks, slab leaks, and sewage backups alike. A professional team should be able to identify the water category, measure the true spread, set a drying plan, document the damage clearly, and explain where remediation ends and repairs begin.
Certification matters here. IICRC-certified work means the process is tied to recognized standards for water extraction, structural drying, contamination control, and documentation. It doesn’t remove the stress of the situation, but it does make the path forward clearer.
If you’re dealing with active water damage in the Phoenix area, getting an onsite inspection is often the simplest next step. It gives you a real scope, not a guess, and helps you decide what needs immediate action.
If you need help after a leak, flood, or sewage backup, Restore Heroes provides water extraction, structural drying, contaminated water cleanup, and insurance coordination for Phoenix-area properties. An onsite inspection can help you understand the scope of damage and what the next practical steps look like.