You notice a higher water bill, a faint stain on drywall, or a soft hiss under the kitchen sink at night. In Phoenix, those early signs are easy to miss until the problem spreads. Hard water scale builds slowly inside fixtures and valves. Monsoon humidity and runoff can turn a minor plumbing leak into drywall damage, cabinet swelling, or microbial growth.
Leaks also waste a surprising amount of water. The EPA's WaterSense leak guidance explains how common household leaks add up and why catching them early matters. A good plumbing inspection checklist gives homeowners a practical way to spot trouble before it becomes an insurance claim or a restoration job.
Local conditions change what deserves extra attention. In the Phoenix area, I look harder at mineral buildup, older galvanized and polybutylene piping in certain neighborhoods, slab leak warning signs, and drainage risks during summer storms. That local lens also affects the action plan. Some items are reasonable for a homeowner to check, like testing shutoff valves or looking for corrosion under sinks. Others call for fast help, especially if you see active leakage, wall staining, flooring damage, or any of the warning signs of a burst pipe.
If you also maintain a mountain property, this guide on preparing your Big Bear plumbing for spring is a useful seasonal companion.
1. Water Supply Lines and Connection Points
A lot of expensive water damage starts with a drip no one notices. Under a bathroom sink. Behind a refrigerator. At a water heater fitting with a little mineral crust around the threads. In Phoenix, hard water makes those warning signs easier to miss because scale can make a slow leak look old and harmless.
I start at the meter side of the house, then follow every visible cold and hot water branch I can access. The goal is simple. Find active leaks, early corrosion, weak connection points, and pipe materials that tend to fail at transitions. Older Phoenix-area homes often have a patchwork system because remodels were done in stages. It is common to see copper, galvanized steel, CPVC, braided appliance connectors, and older plastic supply lines all in the same property. Every change in material is a place to look harder.
What to inspect first
Residential water pressure should stay in the normal operating range. The International Association of Certified Home Inspectors notes that home water pressure is ideally between 40 and 80 psi. High pressure shortens the life of supply lines, valves, and appliance connections. Low pressure can point to scale buildup, a partially closed valve, a hidden leak, or a utility-side issue.
Start with the parts a homeowner can see and touch safely:
- Main shutoff valve: Confirm you can locate it quickly. Turn it gently only if it has been exercised before and does not feel stuck.
- Visible supply piping: Check for rust, green staining on copper, white hard-water deposits, damp spots, and corrosion at threaded joints.
- Branch connection points: Inspect stops at sinks and toilets, dishwasher supply fittings, refrigerator tubing, and water heater flex lines.
- Material transitions: Look closely where copper connects to galvanized, older plastic, or newer braided connectors. These joints fail more often than straight runs.
- Repair clues: Stained cabinet bottoms, patched drywall, new trim in one small area, or bubbled paint can point to an older leak that was fixed only on the surface.
One practical rule matters here. Mineral crust is not cosmetic in Phoenix. White buildup or green corrosion around a fitting usually means water has been escaping, even if the connection looks dry during a quick check.
Some of this is a reasonable DIY inspection. Homeowners can look under sinks, check around exposed valves, and note pressure changes at fixtures. Call a plumber or restoration pro if you find active dripping, soft drywall, cabinet swelling, floor damage, or any of these warning signs of a burst pipe. If a line is hidden in a wall or under a slab, waiting usually makes the repair and cleanup more expensive.
2. Drain, Waste, and Vent System Integrity
Supply lines bring water in. The DWV system has to move it back out cleanly and safely. When it doesn't, the clues are usually slow drains, gurgling sounds, odors, or backups that seem random until they aren't.
This is a common blind spot in Phoenix homes because many owners focus on leaks they can see. Drain problems often stay hidden below floors, inside walls, or out in the yard at the sewer connection. In older properties, especially those with aging drain materials, a sink that drains slowly may be the first sign of a much larger line issue.
Signs the DWV system isn't breathing correctly
The vent side matters as much as the drain side. A blocked vent can make a perfectly intact drain line act clogged because the system can't balance air pressure.
- Slow drainage in multiple fixtures: One slow sink is local. Several slow fixtures suggest a broader line issue.
- Gurgling after flushing or draining: That often points to venting trouble or a developing blockage.
- Sewer odor indoors: Dry traps can cause it, but so can vent defects or drain leaks.
- Hidden cleanouts: If cleanout ports are buried by landscaping, tile, or concrete, future service gets harder and more expensive.
I'm especially cautious with homes from the 1950s through the 1970s that may have older clay drain lines. Root intrusion and partial collapse are common patterns in many markets with mature landscaping. On multistory homes, a blocked lower-level line can show up first as an upper bath backup, which confuses owners because the problem appears far from the actual failure point.
If the house is older or has a backup history, ask for a sewer camera inspection. It's one of the few ways to stop guessing.
3. Water Heater Condition and Installation
A Phoenix water heater often fails subtly at first. You may not see a dramatic leak. What shows up instead is mineral crust at fittings, a rust trail down the jacket, or a small stain in the pan that keeps coming back.
Hard water is hard on these systems. Tank heaters collect sediment faster, which can shorten burner life and reduce efficiency. Tankless units avoid a storage tank, but scale still builds inside the heat exchanger if descaling gets skipped. In older Phoenix homes, I also pay attention to where the heater is installed. A garage location changes the risk profile. An interior closet raises the stakes if a slow leak goes unnoticed. If the home sits in a flood-prone area or has had monsoon water intrusion before, the condition of the base, pan, and surrounding materials matters even more.
The unit itself usually gives you enough clues to decide whether you are looking at routine maintenance or a call for service. Check the shell, the piping above it, and the area below it.
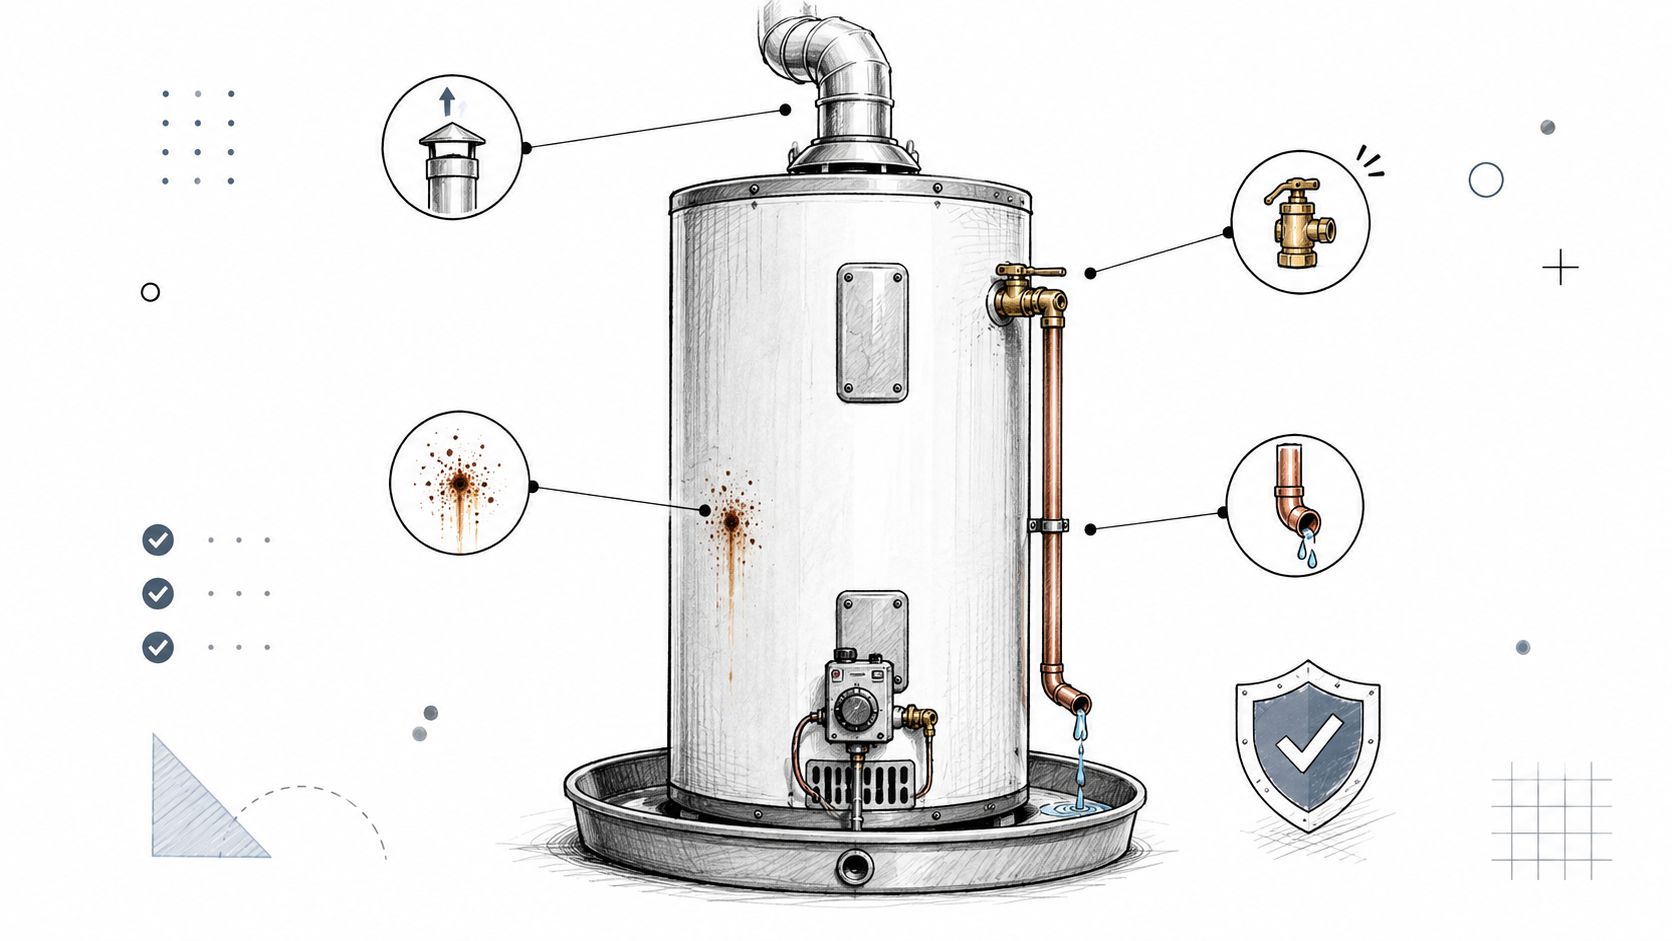
Safety points homeowners should actually check
Residential water heater work is installed and inspected under code, and pressure testing is part of the code-based process. For an owner doing a visual check, the practical goal is simpler. Confirm the heater is installed safely, draining where it should, and not showing signs that failure is close.
- T&P valve discharge line: It should be present, properly routed, and end where discharge can be seen without injuring someone or soaking hidden building materials.
- Corrosion at the top connections: Green staining, white crust, or rust at nipples and flex lines often points to ongoing leakage or hard water buildup.
- Drain pan and drain path: In interior closets or finished areas, a missing pan or blocked drain creates a much bigger cleanup if the tank lets go.
- Gas venting: On gas units, loose joints, poor slope, or rusted vent sections need prompt attention because combustion gases must vent correctly.
- Combustion air and clearance: Storage piled around a gas heater is a common garage problem and an avoidable safety issue.
- Age and service history: An older unit with visible scale, rumbling, or inconsistent hot water deserves closer evaluation even if it is not leaking today.
Some checks are reasonable DIY work. Look for staining, listen for popping or rumbling, confirm the pan is dry, and note the manufacture date on the label. If you know the unit has not been flushed in years, ask a plumber before opening the drain on an older tank. Heavy sediment can clog the valve or turn a minor maintenance job into a leak.
Call a licensed plumber or certified restoration professional if you find active leakage, water damage around the platform or wall, improper venting, scorch marks, or a T&P discharge problem. If monsoon flooding has reached the burner compartment, gas controls, or surrounding drywall, treat that as more than a plumbing repair. It may also require drying, material removal, and moisture checks before the area is closed back up.
4. Fixture Supply and Shutdown Valves
If a toilet supply line splits at 9 p.m., the difference between a small cleanup and a major water loss often comes down to one thing. Can you shut off that fixture immediately?
A good plumbing inspection checklist always includes fixture stops under sinks, behind toilets, at washing machines, and at appliance feeds. These valves don't get much attention until they're needed, and that's exactly why they fail. In older Phoenix homes, I often find seized gate-style valves under vanities that haven't moved in years. When someone finally tries to close them, the stem sticks or the valve starts leaking around the packing nut.
What works better over time
Ball valves generally hold up better than old gate-style valves in day-to-day service. More important than valve style, though, is access. A perfectly good shutoff hidden behind shelving, jammed against a vanity drawer, or blocked by a washing machine isn't much help in an emergency.
- Turn each valve gently: It should move without force.
- Check for drips after testing: Some valves leak only after they're disturbed.
- Confirm every fixture has one: Missing stops create bigger shutdowns than necessary.
- Note blocked access: Storage items and built-in cabinets often create a bad setup.
I tell homeowners to label problem valves in their notes even if they're not replacing them yet. That way, when a plumber comes out, you already know which locations need attention first.
A fixture shutoff that won't turn is a repair issue today, not just an inconvenience for later.
5. Toilet Tank and Bowl Assessment
A hall bath toilet can waste water for months in Phoenix without drawing much attention. The room stays dry, the bowl still clears, and the only clue may be a faint refill sound after everyone walks away. I see this often in guest baths and vacant homes, where a slow leak keeps running long after the last flush.
Toilets deserve a close look because they fail in two different ways. One wastes water inside the tank and bowl. The other sends water out at the base, where it can stain grout, loosen flooring, and damage the subfloor before anyone notices. The EPA's WaterSense toilet leak guidance is a good reference for the simple checks homeowners can do themselves.

Start with the tank, then check the floor
A dye test catches many silent leaks. Add a few drops of food coloring to the tank, wait about 30 minutes, and do not flush during that time. If color shows up in the bowl, the flapper or flush valve is letting water pass.
In Phoenix, hard water often leaves scale on flappers, fill valves, and flush valve seats. That buildup can keep parts from sealing cleanly, even when the toilet still seems to work fine. Older homes may also have builder-grade toilets or aging supply tubes that are due for closer review.
- Listen after the tank fills: A toilet that refills on its own usually has a slow internal leak.
- Check around the base: Yellowing caulk, dark grout lines, soft flooring, or a musty smell can point to seepage at the wax ring or flange.
- Gently test for movement: A toilet should sit firm. Any rocking can break the wax seal over time.
- Inspect the tank and bowl surface: Hairline cracks, rusty bolts, and mineral buildup around fittings deserve attention.
- Look at the supply connection: Corrosion, green staining, or a stiff old shutoff can turn a small repair into a larger one.
Some fixes are reasonable DIY jobs. Replacing a flapper, adjusting the chain, or installing a new fill valve is usually straightforward if the shutoff works and the toilet has no crack or floor damage. Call a plumber or restoration professional if the toilet rocks, leaks at the base, has damaged flooring, or has overflowed onto finished materials. If that has already happened, keep this guide on what to do after a toilet overflow handy.
6. Sink, Bathtub, and Shower Drain and Overflow Systems
Bathrooms and kitchens don't need dramatic leaks to cause damage. A shower with failed caulk, a tub overflow that doesn't seal, or a sink drain that drips only during heavy use can stain cabinets, wick into drywall, and feed mold in hidden cavities.
Phoenix homes add one extra wrinkle. Hard water scale often narrows flow at showerheads and builds up in traps and drain assemblies. That doesn't always create an immediate clog, but it can slow drainage enough that people start compensating with harsher cleaners instead of addressing the actual cause.
Where small clues matter most
Fill a sink basin and let it drain. Run a tub at strong flow. Watch how fast the water leaves and listen while it does. The system should clear cleanly without backing up, bubbling, or pulling strange sounds from nearby fixtures.
I also look beyond the fixture itself. A shower might appear fine inside the enclosure while the wall on the opposite side shows faint paint blistering. On two-story homes, the ceiling below a tub or shower often reveals the truth first.
- Tub and shower edges: Cracked or missing caulk lets water slip past the finish layer.
- Overflow cover and seal: If the tub fills high, this fitting has to hold.
- Under-sink cabinet floors: Swollen particleboard is one of the best signs of repeat minor leaks.
- Ceilings below wet areas: Stains, sagging texture, or patchwork deserve follow-up.
What doesn't work is relying on appearance alone. A shiny remodeled shower can still have a failing waterproofing system behind the tile.
7. Washing Machine Supply Lines and Connection
Laundry rooms cause some of the worst surprise water losses because hoses are under pressure, the machine vibrates, and many homeowners rarely look behind it. A supply hose can appear acceptable from the front and be one cycle away from failure at the back.
This is one place where I'm very direct. Old black rubber hoses are a weak point, especially if they're original to the house or have no documented replacement history. Braided steel supply lines are usually the better choice for durability, and routing matters just as much as material. A hose crushed against the wall by the machine won't last the way it should.
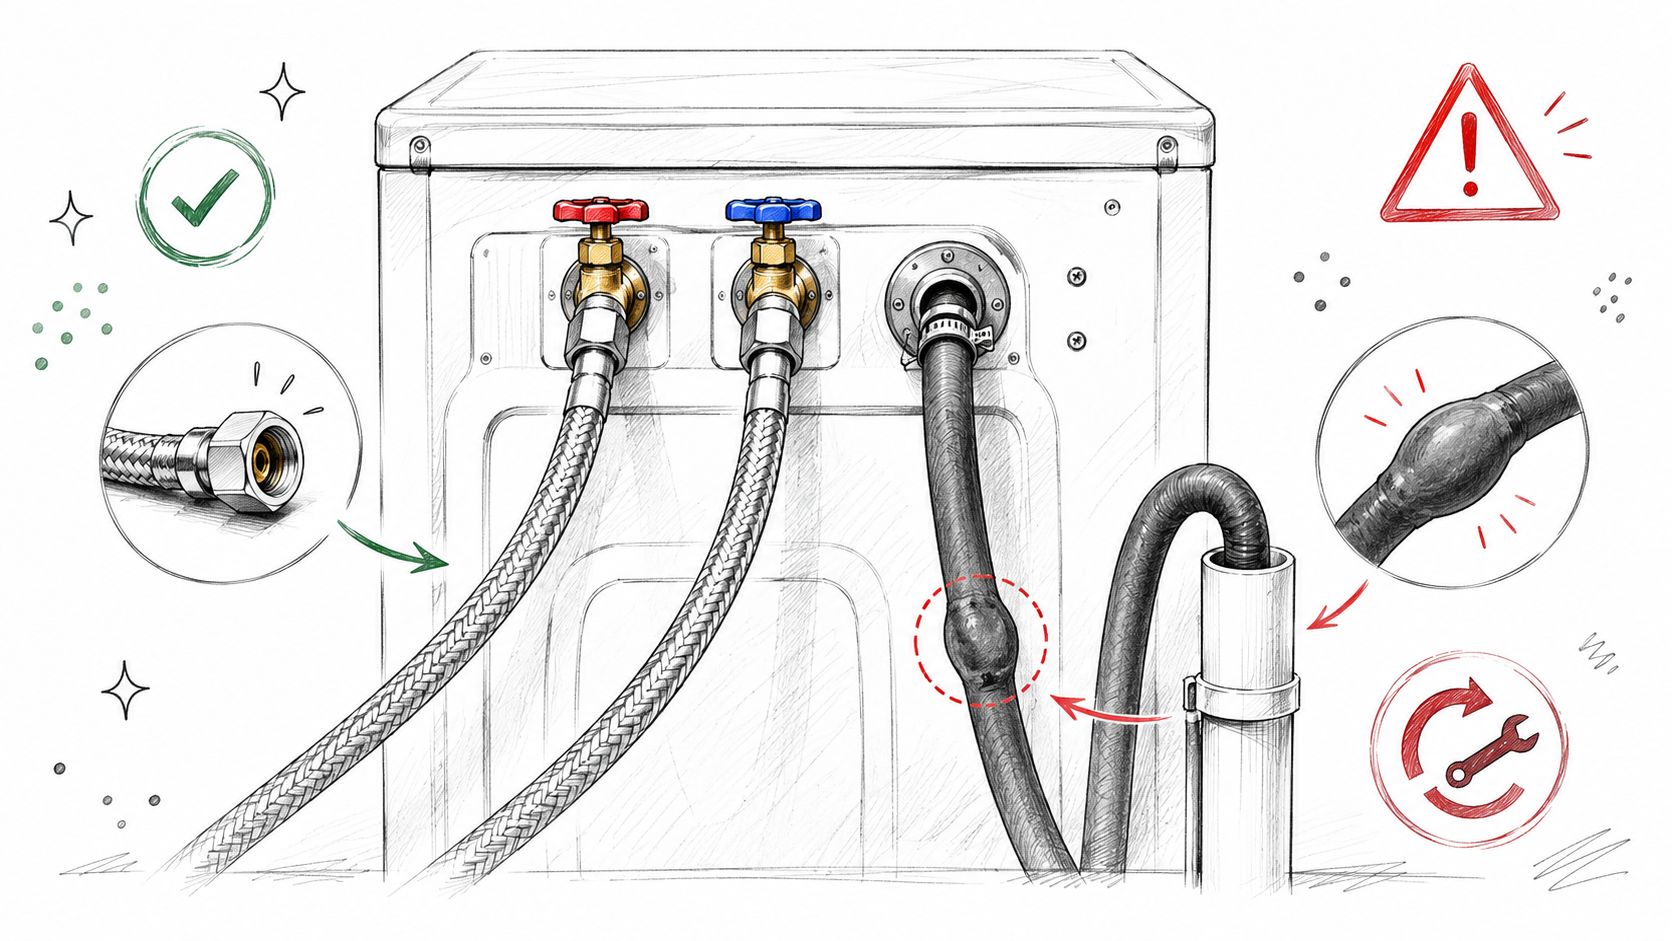
What I want to see behind the machine
The drain side is easy to ignore. It shouldn't just be shoved loosely where water can spill into the wall cavity or onto the slab.
- Supply hoses: Look for bulges, cracking, rust at fittings, or mismatched replacements.
- Shutoff valves: Both hot and cold should be reachable and operable.
- Drain hose routing: It should be secured and directed into a proper standpipe, not left on the floor.
- Wall and floor condition: Staining, lifted flooring, or musty odor nearby often points to earlier leakage.
If the machine sits in a tight closet, schedule enough time to pull it forward and inspect properly. Too many “inspections” skip that step, and that's where the useful information is.
Don't grade laundry hookups from the doorway. Move the machine if you can do it safely, or have someone do it during the inspection.
8. Appliance Water Supply Connections
A slow leak at the dishwasher or refrigerator line can sit for months before anyone notices. In Phoenix homes, I see this under sink bases, behind fridge alcoves, and along cabinets on exterior walls where summer heat can harden cheap plastic tubing sooner than homeowners expect.
These connections deserve their own check because the warning signs are small at first. A little mineral crust at a compression fitting. A dark stain at the back corner of the cabinet. A toe-kick panel that starts to swell after monsoon humidity or a minor leak adds moisture to an already warm cavity.
What to check around dishwashers and refrigerator lines
Dishwashers often show problems at the shutoff, supply fitting, drain connection, or the cabinet floor next to the unit. Refrigerator ice maker and filtered water lines fail in different ways. The line may be kinked, rubbing against the back of the appliance, or made from older brittle plastic that should have been replaced years ago.
- Look for a dedicated shutoff valve: You want a valve that turns freely and is not buried behind stored items or fixed panels.
- Check the tubing material and routing: Copper and newer braided or approved polymer lines tend to hold up better than old plastic tubing, especially in hot appliance cavities.
- Inspect for hard water residue: In the Phoenix area, white or greenish buildup around fittings often shows a very slow leak long before you see standing water.
- Open the sink base or nearby cabinet: Stains, warped shelving, or a soft cabinet floor usually tell the story of an older leak.
- Watch the drain and air gap setup on the dishwasher: Poor routing can lead to backup, odors, or repeated moisture under the sink.
If an appliance can be pulled out safely, do it. A quick look from the front misses the connections that fail.
Homeowners can usually handle a basic visual check, test the shutoff, and replace an accessible refrigerator filter line if the manufacturer allows it. Call a plumber or a certified drying and cleanup team if you find active leaking, damaged cabinetry, microbial growth, or moisture that has spread into walls or flooring. If wastewater is involved, sewage backup cleanup services are the safer next call.
If you are budgeting for older plumbing systems in general, it also helps to find out about septic tank costs, especially if the property has multiple deferred maintenance items. For a leak source that is still unclear, professional leak detection services can help separate a supply-line leak from condensation, roof entry, or appliance overflow.
9. Sewer Line and Septic System Condition
A Phoenix home can drain fine at the kitchen sink and still have a sewer problem underground. I see this most often in older neighborhoods where clay tile, cast iron, or early ABS piping is still in service. Add mature tree roots, shifting soil, and hard water scale, and a line can be partly blocked long before it backs up inside the house.
Before the visual check, it helps to know what a sewer inspection can reveal:
A good inspection starts outside. Find the cleanout, confirm it is accessible, and check the area around it for staining or past overflow. Then walk the line path if you can estimate it from the house to the street or septic tank. Strong odor, soggy soil, depressed ground, or one strip of greener growth often points to leakage below grade.
If the property has a septic system, ask for pumping and service records, the tank location, and any repair history. That matters more in the Phoenix area than many buyers expect. Monsoon runoff and poor site drainage can overload a marginal septic system, especially if the yard drains toward the tank or leach field.
What to check
- Cleanout access: A buried or sealed-over cleanout makes future diagnosis slower and more expensive.
- Backup history: Repeated snaking usually means roots, a belly in the line, scale, or damaged pipe are still there.
- Yard conditions: Odors, wet patches, or insect activity near the line route deserve follow-up.
- Indoor clues: Gurgling at distant fixtures, slow drains in more than one area, or sewage smell near a shower or floor drain can point to a main line issue.
- Pipe age and material: Older clay and cast iron lines need closer scrutiny than newer PVC.
- Camera inspection: The International Association of Certified Home Inspectors explains when a sewer scope is a smart next step, especially for older homes and properties with recurring drain complaints.
For Phoenix owners, the practical trade-off is simple. A camera inspection costs more upfront than a basic drain clearing, but it can show whether you are dealing with roots, a cracked section, heavy buildup, or a sag in the pipe. That is the difference between a targeted repair and paying for the same clog to come back. If the home has a history of slab leaks, soil movement, or older buried piping, it also makes sense to review pipe burst prevention steps for aging plumbing systems.
Homeowners can handle the visual part, ask for records, and note patterns like slow drainage in multiple fixtures. Stop there if you see sewage, standing wastewater, strong odor at the cleanout, or signs the yard is surfacing effluent. That is when a plumber and a certified cleanup crew should take over. If sewage has already surfaced indoors or outside, move straight to sewage backup cleanup services. If you're comparing ownership costs on septic properties, it also helps to find out about septic tank costs.
10. Water Pressure and System Balance Assessment
A Phoenix home can look fine at first glance and still have a pressure problem hiding in plain sight. You notice it when someone starts the washer and the shower turns weak, or when a faucet spits and bangs after the irrigation line cycles. That kind of imbalance often points to a restriction, scale buildup from hard water, an aging pressure reducing valve, or piping that was never sized well for the house.
For residential systems, pressure usually needs to stay in a normal operating range without big swings. The U.S. Environmental Protection Agency explains that homes may use a pressure reducing valve when incoming municipal pressure is too high, and that stable pressure helps protect fixtures and appliances from wear (EPA WaterSense guidance on pressure reducing valves).
How to check pressure the way an inspector does
One reading at a hose bib helps, but it does not answer the full question. The actual test is whether the system stays steady under demand in different parts of the house.
- Static pressure: Check pressure with no water running.
- Dynamic pressure: Open two or more fixtures and watch for a sharp drop.
- Hot and cold comparison: Weak hot-side flow can point to water heater scale, a clogged flex line, or a failing valve.
- System balance: Run a shower, sink, and another fixture in sequence. Look for pulsing, temperature swings, or one fixture stealing flow from another.
- PRV behavior: If the home has a pressure reducing valve, pressure downstream should stay controlled and reasonably consistent.
This matters more in the Phoenix area than many owners expect. Hard water scale can narrow supply lines and fixture cartridges over time, so the pressure at one faucet may seem strong while the whole system still performs poorly under load. Monsoon season adds another layer. Sudden municipal demand changes, outdoor irrigation use, and older shutoff hardware can expose weak spots fast.
Homeowners can do the basic screening with a simple gauge and a careful multi-fixture test. Stop and call a plumber if pressure is very high, if pipes hammer when valves close, or if pressure rises and falls without any clear pattern. Those conditions can shorten the life of supply lines, water heaters, and appliance valves. If you want to reduce the chance of a split line or fitting failure, review these pipe burst prevention steps for aging plumbing systems. If unstable pressure has already led to active leaking, water damage, or wet walls, bring in a certified restoration professional after the plumbing repair is underway.
10-Point Plumbing Inspection Comparison
| Checkpoint | Implementation Complexity 🔄 | Resource Requirements ⚡ | Expected Outcomes ⭐📊 | Ideal Use Cases 💡 | Key Advantages ⭐ |
|---|---|---|---|---|---|
| Water Supply Lines and Connection Points | 🔄 Medium, visual + pressure testing; hidden runs limit scope | ⚡ Medium, pressure gauge, leak detector, basic tools | ⭐📊 Detect active/incipient leaks; assess material and pressure; reduce burst-pipe risk | 💡 Older Phoenix homes, burst-pipe assessments, pre-listing inspections | ⭐ Early leak detection; verifies main shutoff; guides mitigation |
| Drain, Waste, and Vent (DWV) System Integrity | 🔄 High, slope/vent checks; often requires video inspection | ⚡ High, camera scope, access, possible excavation | ⭐📊 Locate clogs, blockages, vent failures; prevent sewage backups and odor issues | 💡 Properties >30 years, recurring backups, multi-story drainage problems | ⭐ Identifies buried failures; prevents backups; directs repairs |
| Water Heater Condition and Installation | 🔄 Medium, visual, safety checks; interior requires draining | ⚡ Medium, combustion/CO tools for gas, T&P test, basic plumbing tools | ⭐📊 Identify end-of-life units, venting/CO risks, T&P and leak vulnerabilities | 💡 Aging units, suspected leaks, safety/pre-purchase inspections | ⭐ Ensures safety; prevents tank failure; improves efficiency |
| Fixture Supply and Shutdown Valves | 🔄 Low, visual and gentle operability checks | ⚡ Low, hand tools, basic access | ⭐📊 Verify local isolation capability; find missing or seized valves | 💡 Older homes, renovation prep, emergency-readiness planning | ⭐ Enables targeted shutoff; reduces need to close main supply |
| Toilet Tank and Bowl Assessment | 🔄 Medium, visual, dye test; flange/wax ring needs removal | ⚡ Low, dye, basic tools; plumber for invasive checks | ⭐📊 Detect silent leaks, seal failures, and subfloor risk | 💡 High water bills, visible stains, older toilet installations | ⭐ Prevents hidden water damage and wasted water; detects seal failures |
| Sink, Bathtub, and Shower Drain and Overflow Systems | 🔄 Medium, drain tests; shower pan checks may require specialized inspection | ⚡ Medium, flow tests, possible camera, moisture detection | ⭐📊 Find slow drains, failed overflows, pan leaks and mold risks | 💡 Bathrooms/kitchens with slow drains, remodels, moisture complaints | ⭐ Prevents mold/structural damage; confirms overflow and pan integrity |
| Washing Machine Supply Lines and Connection | 🔄 Low, visual and operational checks; hoses inspected under/behind machine | ⚡ Low, visual inspection, recommend braided hoses | ⭐📊 Identify hose deterioration, improper routing, burst risk | 💡 Laundry rooms with old rubber hoses, heavy use households | ⭐ Prevents catastrophic hose failure; recommends durable upgrades |
| Appliance Water Supply Connections (Dishwasher, Refrigerator, Ice Maker) | 🔄 Medium, often hidden; may require pulling appliance | ⚡ Medium, appliance access, basic tools | ⭐📊 Detect hidden leaks in cabinetry, missing shut-offs, loose fittings | 💡 Kitchens with older appliances, cabinet water damage, appliance replacement | ⭐ Protects cabinetry; enables isolated repairs; reduces unseen damage |
| Sewer Line and Septic System Condition | 🔄 High, underground system evaluation; video and possible pumping | ⚡ High, sewer camera, pumping, excavation specialists | ⭐📊 Locate breaks, root intrusion, backups; assess biohazard and repair scope | 💡 Properties >40 years, recurring backups, private septic systems | ⭐ Identifies contamination hazards early; pinpoints repairs to avoid guesswork |
| Water Pressure and System Balance Assessment | 🔄 Medium, static and dynamic pressure testing at multiple points | ⚡ Low, pressure gauges, fixture operation | ⭐📊 Reveal high/low pressure, imbalances, need for PRV or supply repairs | 💡 Homes with pressure complaints, frequent fixture wear, suspected leaks | ⭐ Protects fixtures; detects hidden leaks; informs mitigation strategy |
From Inspection to Action Your Next Steps
A Phoenix homeowner notices a warm spot on the floor in June, then a higher water bill the next month. Another finds white crust on shutoff valves, then cabinet swelling after monsoon humidity hits. Those are the moments when an inspection turns into a decision.
Use your notes to sort problems into two buckets. First, items you can handle safely with basic tools and a close eye on the area afterward. Second, items that need a licensed plumber or, if water has already spread, a certified restoration crew. The line between those buckets matters because waiting too long can turn a simple repair into damaged drywall, base cabinets, flooring, or microbial growth.
DIY follow-up usually makes sense when the issue is small, visible, and isolated. A dripping faucet cartridge, an old toilet flapper, a loose supply connection you can tighten carefully, or failed caulk at a tub edge often falls into that category. In Phoenix homes, mineral buildup from hard water can also cause slow fixture performance or crusted aerators, and that is often a manageable first fix. Shut off the local valve first, confirm the surrounding materials are dry, make the repair, then check again later that day and the next morning.
Call a plumber when the problem points to a hidden failure or a system issue. Recurring stains, sewer odor, repeated slow drains in more than one fixture, soft flooring near a toilet, unexplained pressure swings, corrosion on exposed piping, and signs of a slab leak all belong in that group. In older Phoenix-area homes, galvanized piping, aging angle stops, and water heater sediment problems can hide behind walls or show up as weak flow and repeated leaks. Monsoon season adds another layer. If exterior drainage is poor, stormwater can expose weak points around cleanouts, low entries, and underground piping.
Set priorities by risk, not annoyance. A single drip under a sink is one level. A damp cabinet floor is higher. Soft drywall, standing water, sewage odor, or water that has reached adjacent rooms needs same-day action.
When active water is present, act fast. Shut off the nearest valve or the main water supply. Move rugs, boxes, and stored items out of the area. Take clear photos and write down when you first saw the problem, what fixtures were running, and whether the stain or leak changed size.
If the issue is a burst pipe, sewage backup, flood intrusion after a storm, or water damage that has already spread beyond the plumbing repair itself, bring in a restoration professional. If your plumbing inspection turns up active leaking, hidden moisture, sewage contamination, or water damage that's already spreading, Restore Heroes is the team to call in the Phoenix metro area. They handle emergency mitigation, water extraction, structural drying, and cleanup for homes and commercial properties, which is exactly what you need when the problem has moved beyond a simple repair.
Good inspections prevent bad guesses. Mark what you can monitor, schedule what needs a plumber, and treat any sign of spreading moisture as a time-sensitive problem. In Phoenix, hard water, slab construction, and monsoon conditions make that extra step worth taking.