A drip inside the wall or a faint stain under a vanity usually gets written off as a small leak. Then the cabinet swells, the drywall softens, and a plumbing repair turns into a drying and reconstruction job.
That is how pipe failures catch people in Phoenix.
Cold snaps are part of the risk, but they are not the whole risk. In homes across the Valley, I see burst pipes and failed fittings tied to high water pressure, aging copper, corrosion, poor previous repairs, and supply lines exposed to attic heat or garage temperature swings. A pipe does not need a hard freeze to fail. It only needs enough stress, enough time, and one weak spot.
Good prevention starts with recognizing early warning signs and fixing the conditions that shorten pipe life. If you are not sure what those warning signs look like, these common signs of a burst pipe are a practical place to start.
The goal is simple. Catch problems before water gets into drywall, flooring, cabinets, and insulation.
The Unseen Threat Lurking in Your Walls
A lot of pipe failures begin subtly. There's no dramatic split in the middle of the night. Instead, a homeowner sees paint bubbling near a baseboard, hears a soft hiss after the shower shuts off, or opens a cabinet and finds damp wood that shouldn't be damp.
By the time water shows itself, it has usually been traveling for a while.
That's why I don't like the usual advice that treats pipe burst prevention as a simple winter checklist. Frozen pipes matter, but hidden plumbing failures happen year-round. The line inside the wall doesn't care whether the damage started from a cold snap, high pressure, corrosion, or a weak connection that finally gave out.
One of the most useful habits is learning what early failure looks like. If you're not sure what to watch for, these signs of a burst pipe give you a practical starting point. The earlier you catch a problem, the more likely it stays a plumbing repair instead of a full restoration job.
Practical rule: If water appears where it shouldn't, assume the problem is already larger than the visible spot.
Phoenix homeowners have a unique blind spot here. Because we don't live through long, brutal winters, it's easy to assume our plumbing is mostly safe unless a rare freeze warning hits. That's not how real systems fail. Heat, mineral-heavy water, aging pipe, bad support, and pressure stress all work on plumbing every day.
The good news is that homeowners can reduce risk in a very real way. You don't need to tear open walls or become a plumber. You need to know where your vulnerable lines are, what warning signs matter, and when a small symptom is telling you something bigger.
Conducting Your Home Plumbing Risk Assessment
Before you buy sensors or wrap insulation around everything in sight, walk the house like an inspector would. Pipe burst prevention starts with finding the weak spots you already have.
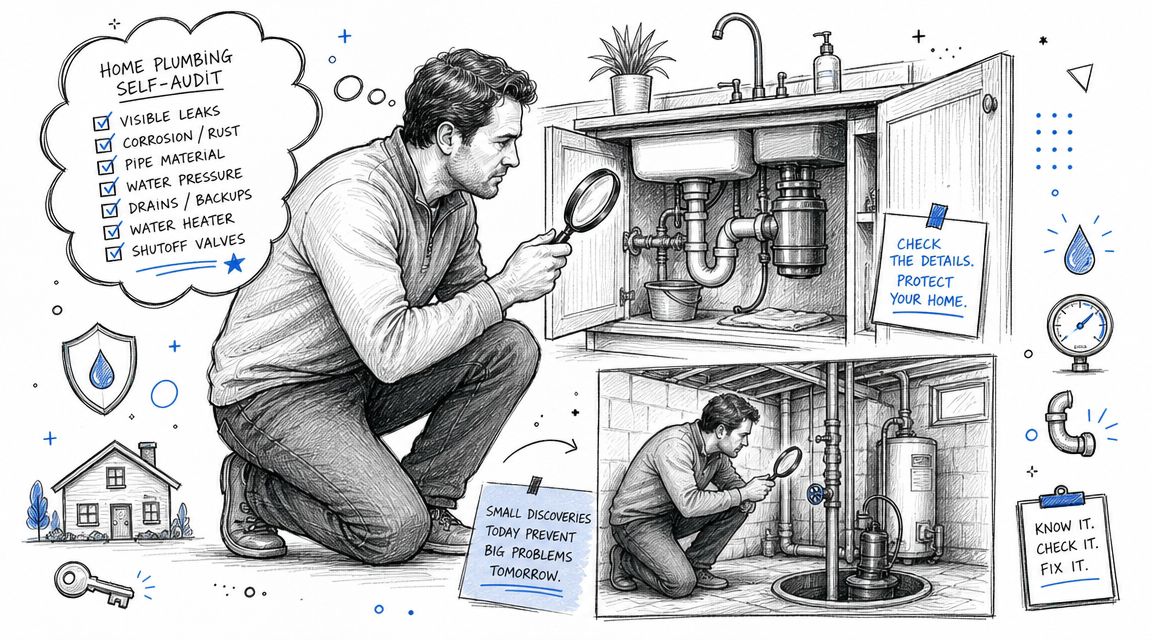
Start with location
Most vulnerable plumbing isn't in the middle of a conditioned room. It's in places that run hotter, colder, dustier, or more neglected than the rest of the house.
Check these areas first:
- Under sinks and behind vanities: Look for staining, swollen cabinet bottoms, rust on shutoff valves, and supply lines that look kinked or stressed.
- Garage walls and utility areas: In Phoenix, garages often put plumbing through wider temperature swings than interior rooms.
- Attics and exterior walls: Rare freezes hit these spaces harder, especially where insulation is thin or air leaks are present.
- Around the water heater and laundry hookups: These are common leak points because valves, hoses, and fittings get used and bumped.
- Outdoor hose bibs and irrigation connections: Sun exposure and occasional cold snaps both matter here.
If you're already tracking moisture risks around the house, a good mold inspection checklist can help you connect plumbing leaks with hidden secondary damage.
Check material and condition
Not all pipe materials age the same way. Copper can develop pinhole leaks and visible corrosion. Older galvanized pipe can restrict flow and deteriorate internally. PEX usually handles movement better, but fittings and connections still deserve attention. PVC or other plastic components exposed outdoors can degrade under intense sun and heat over time.
You don't need to identify every pipe perfectly. You do need to notice change.
Look for:
- Green or blue staining: Often a clue that copper has been leaking or corroding.
- Orange or brown rust marks: Common around metal fittings, connectors, and older valves.
- White crust or mineral buildup: A sign water has been evaporating from a small leak.
- Condensation that doesn't make sense: Especially on cold lines in warm areas, since persistent moisture can hide a bigger issue.
- Sagging or poorly supported pipe runs: Weight and movement put stress on joints.
A pipe doesn't have to look terrible to fail. A small stain around a fitting is often more important than a long section of pipe that simply looks old.
Finish with a simple risk map
Make a short list, not a mental note. Write down where the shutoff valve is, which areas have exposed lines, which fittings look questionable, and which spaces would be hard to notice quickly if a leak started.
That list becomes your maintenance plan. It also helps if you ever need a plumber or restoration team to respond fast.
Mastering Seasonal Pipe Protection
A Phoenix cold snap usually catches people at the wrong time. You go to bed with a normal forecast, then wake up to a stiff hose outside, a garage line under stress, or a drip at a shutoff that was already aging. In this climate, seasonal protection means preparing for short freezes and for the long stretch of heat, sun, and dry air that wear plumbing down the rest of the year.
A home-maintenance guide on burst-pipe prevention recommends insulating exposed lines, sealing air leaks, letting faucets drip during extreme cold, and adding leak detection for earlier warning (Stanley Steemer on prevention and early warning systems).

What to do before a cold snap
Keep the plan simple and specific. Focus on the pipes exposed to outside air, the fittings in unheated spaces, and the fixtures on exterior walls.
- Insulate exposed pipe: Add foam insulation to runs in garages, attics, and other areas that lose heat fast.
- Disconnect garden hoses: A hose left on the bib can hold water where it should not stay during a freeze.
- Shut off and drain exterior bibs if your plumbing allows it: Older homes benefit the most from this step.
- Open sink cabinet doors on exterior walls: That helps warmer indoor air reach the plumbing.
- Keep indoor heat consistent: Avoid letting the house get too cold overnight, especially if you'll be away.
- Let a faucet drip only for lines that are at significant risk: It can reduce freeze pressure during a real cold event, but it does not replace insulation or basic prep.
If you want another practical rundown focused on cold-weather basics, these winter pipe prevention tips are worth reviewing before temperatures drop.
Closed utility areas can create a different problem. Moisture lingers, air gets stale, and small leaks stay hidden longer. In some homes, venting a closet or improving airflow around water lines helps reduce condensation near nearby plumbing and valves.
What seasonal protection means in Phoenix
Phoenix plumbing ages under UV exposure, attic heat, dust, and long periods of neglect. That changes the work that matters.
| Season or condition | Best move | Common mistake |
|---|---|---|
| Cold warning | Protect exposed lines and keep indoor temperatures stable | Assuming a desert home cannot have a freeze-related pipe break |
| Summer heat | Inspect outdoor plastic parts, insulation covers, and hose bibs | Leaving cracked insulation and sun-damaged fittings in place |
| Vacation or snowbird absence | Set a shutoff plan, confirm leak alerts, and arrange check-ins | Leaving the house empty for weeks with no monitoring |
This short video covers a few of the core winter habits homeowners should know before a freeze:
The larger lesson is simple. Do the winter basics when a freeze is coming, but do not treat January as the only danger window. In Phoenix, good seasonal pipe protection also means replacing sun-baked insulation, checking exposed exterior components, and keeping vacant homes from sitting unchecked until a small leak becomes a restoration job.
Beyond Freezing Year-Round Pipe Burst Risks
The biggest mistake homeowners make is assuming pipe bursts are mostly a winter problem. They aren't.
One plumbing source puts it plainly: the highest-risk pipe failures often involve non-freezing causes such as corrosion, water hammer, and pressure spikes, while most prevention advice still stays stuck on winter tips (Halpin Plumbing on year-round burst-pipe threats).
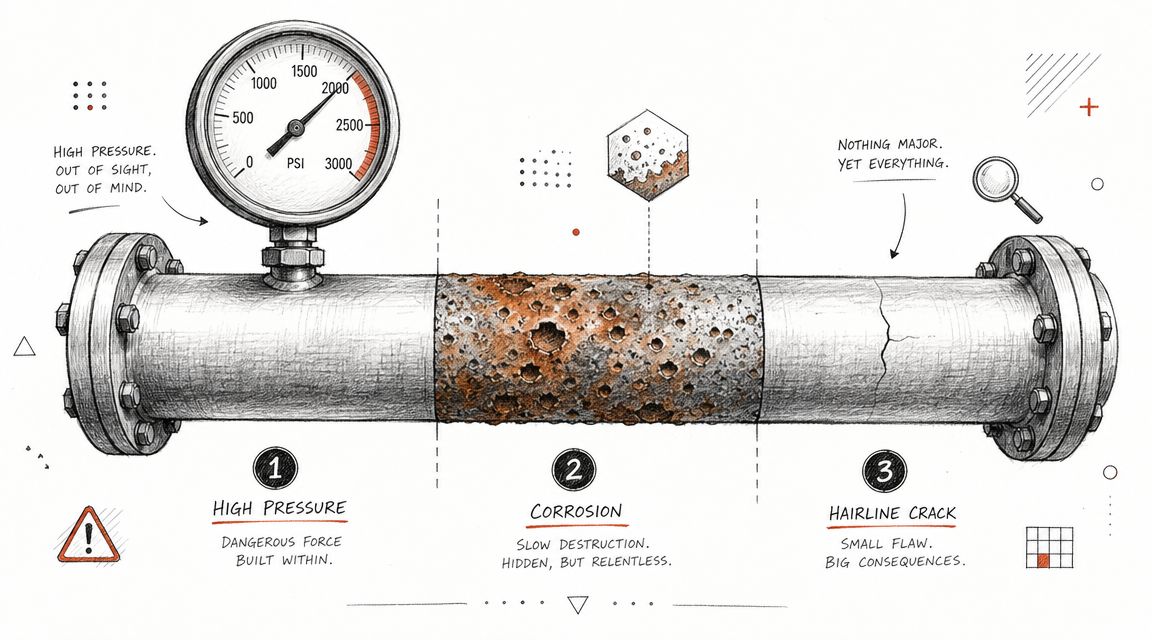
High pressure quietly shortens pipe life
Pressure problems don't always announce themselves. Sometimes you notice faucets that hit hard when opened, toilets that refill aggressively, or appliance hoses that seem to wear out faster than they should. Other times, the first sign is a failed angle stop, split supply line, or leak at a weak joint.
A simple pressure gauge from a hardware store can help you understand whether your house is running unusually hard. The exact reading and corrective action should be discussed with a plumber, but the broader point is simple: if your system is constantly under stress, insulation won't solve that.
Watch for clues such as:
- Banging or snapping when valves close
- Frequent leaks at fittings rather than in straight pipe
- Appliance hose wear
- Fixtures that feel overly forceful
Corrosion doesn't care about the weather
Corrosion is one of the most underappreciated causes of pipe failure. Homeowners often notice the cosmetic signs first, but by then the interior condition may already be worse than the outside suggests.
Look for these warning signs:
- Discolored staining near joints
- Recurring pinhole leaks
- Metallic-looking residue
- Water discoloration that keeps returning
- Old shutoff valves that look crusted or fragile
In Phoenix, mineral-heavy water and heat exposure can make small weaknesses harder to ignore over time. Corrosion may be local to a fitting, or it may point to broader aging in the system.
If a leak is forming under the slab or a pressurized line is weakening where you can't see it, the insurance side gets complicated quickly. This overview of slab leak insurance coverage can help homeowners understand why early diagnosis matters before damage spreads.
If the same area leaks twice, stop treating it like bad luck. Repeated failure usually means an underlying condition hasn't been corrected.
Water hammer is more destructive than people think
That loud thunk after the washing machine valve closes isn't just an annoying sound. It's a pressure shock moving through the plumbing. Over time, repeated hammering can fatigue fittings, loosen connections, and stress older pipe runs.
Water hammer often shows up when:
- A fast-closing valve shuts down flow suddenly.
- Pipe support is poor and the line moves.
- Pressure is already running high.
- An aging system has little margin left at the joints.
The wrong response is ignoring it because nothing is leaking yet. The right response is to have the cause identified. Sometimes the solution is better support. Sometimes it's pressure regulation. Sometimes it's replacing sections that have already taken too much abuse.
Pipe burst prevention works better when you stop thinking only about temperature and start thinking about stress. Freezing is one kind of stress. Pressure, corrosion, movement, and age are the others.
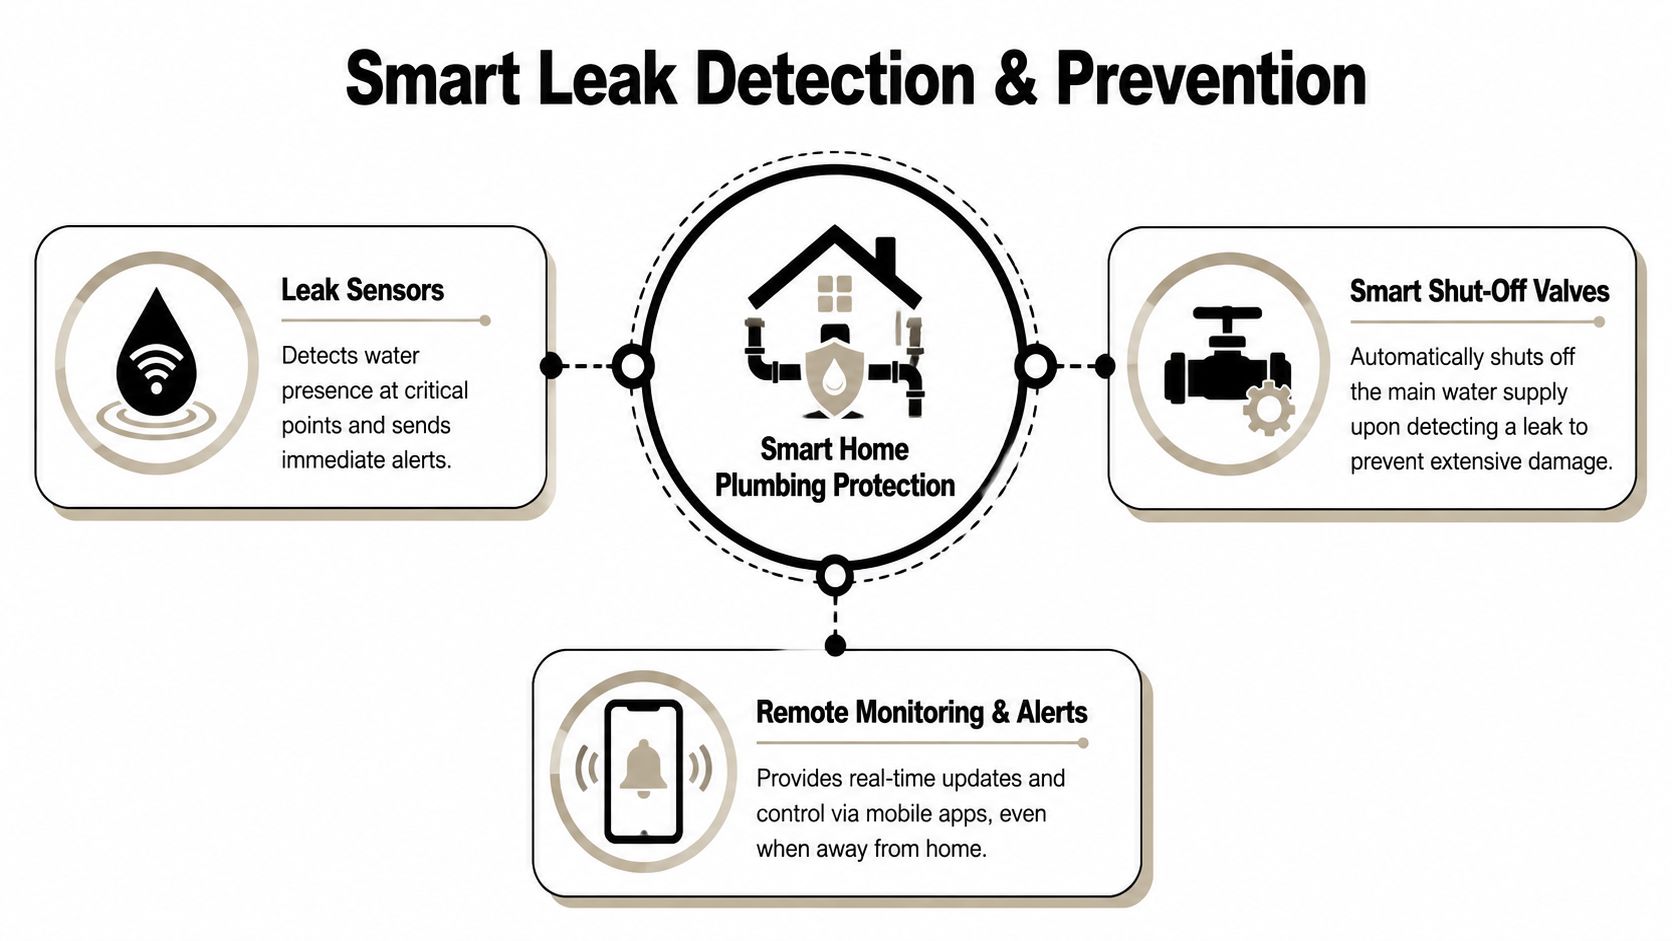
Using Smart Technology for Leak Detection
A pipe can leak for hours in a Phoenix home without making much noise. By the time water shows up on drywall, baseboards, or around a fixture, the cleanup is already bigger than it needed to be.
That is why smart leak detection earns its place in a prevention plan. It shortens the time between failure and response. For year-round risks like worn supply lines, failing water heater connections, slab-side leaks, and pressure-related failures, that time difference matters.
What each device actually does
These tools are not interchangeable. The right setup depends on how your house is plumbed, how often it sits empty, and whether you want alerts only or automatic shutoff.
- Standalone water alarms: Good for basic coverage under sinks, near water heaters, behind refrigerators, and at washing machines. They make noise when water reaches the sensor.
- Smart leak sensors: Best when you want phone alerts and remote awareness, especially during travel or at rental properties.
- Flow-monitoring systems: Useful for catching leaks you cannot see, including continuous flow from a stuck toilet fill valve or a slow line failure inside a wall.
- Smart shutoff valves: Better for homeowners who want the system to stop water automatically when abnormal flow or a confirmed leak is detected.
If you're comparing product types and setup options, Clouddle's ultimate water sensor guide is a useful primer for understanding how the main categories differ in real homes.
Where technology helps most
In Phoenix, I usually see the best return from smart detection in houses with older shutoff valves, second-story plumbing, laundry rooms that stay closed up, and part-time occupancy. Heat ages rubber hoses and gaskets. High water pressure turns a small weakness into a bigger leak. A sensor will not prevent that wear, but it can keep a manageable repair from turning into cabinet loss, drywall removal, or flooring replacement.
A practical layout usually puts sensors at:
- Water heater pans and the floor beside the unit
- Under kitchen and bathroom sinks
- Behind refrigerators with ice maker lines
- At washing machine supply valves and drain pans
- Near the main shutoff, manifold, or pressure regulator area
Placement matters more than quantity. One well-placed sensor at a water heater or washing machine is often more useful than three in low-risk spots.
Hidden leaks deserve special attention. A sensor can alert you to trouble before you notice stains, warped trim, or something more dangerous like a water leak from a ceiling light.
What smart devices will not do
Smart monitoring does one job well. It tells you faster that water is where it should not be.
It will not fix corrosion. It will not correct high static pressure. It will not stop water hammer on its own. And it will not make an old angle stop, brittle supply hose, or failing water heater connection any more reliable. Homeowners get the best results when they pair detection with regular inspection, pressure control, and timely replacement of weak parts.
If a leak gets past the prevention stage, Restore Heroes handles emergency water extraction, drying, and restoration after burst-pipe losses in the Phoenix area. That is the response side of the plan, and smart detection helps by reducing how long the water has to spread.
Your Complete Pipe Burst Prevention Checklist
A good checklist should be usable. Not theoretical. Not overloaded. Just clear enough that you can walk the property and act on it.
One risk-control source notes that unoccupied or intermittently occupied buildings face a higher risk of extensive damage because leaks can go undiscovered, and that they need layered monitoring, automated alerts, and response protocols rather than passive winterization alone (Paul Davis on protecting vacant and intermittent-use properties).
Home Pipe Protection Checklist
| Frequency | Task | Notes for Phoenix Residents & Property Managers |
|---|---|---|
| Monthly | Inspect exposed pipes, valves, and supply lines | Pay extra attention to garages, laundry rooms, and outdoor-adjacent walls |
| Monthly | Check under sinks and around toilets for dampness or staining | Small leaks often show up here first |
| Monthly | Listen for banging, hissing, or repeated pressure noises | These sounds can point to water hammer or valve issues |
| Seasonally | Disconnect hoses and inspect hose bibs | Important before rare freeze events and after long summer exposure |
| Seasonally | Check pipe insulation in exposed areas | Replace sun-damaged or crumbling insulation |
| Seasonally | Seal obvious drafts near plumbing penetrations | Exterior wall and garage entries deserve attention |
| Before travel | Confirm who can access the home if an alert comes in | Fast response matters more than perfect hardware |
| Before travel | Review shutoff plan and sensor battery status | Don't leave this until the day you depart |
| Annually | Have plumbing pressure evaluated and problem areas reviewed | Useful if you've had recurring leaks, noise, or aging materials |
| Annually | Review whether older hoses, valves, or sections of pipe should be replaced | Preventive replacement is often cheaper than cleanup |
Special checklist for vacant and part-time properties
If the home sits empty for part of the year, prevention needs a different standard.
- Set a minimum indoor temperature: Don't let the home swing wildly during winter cold snaps.
- Use remote alerts: Leak and temperature monitoring matter more when no one is onsite.
- Decide in advance about water shutoff: Some owners shut off the main line during long absences, depending on the property's systems and occupancy plan.
- Assign a responder: A neighbor, property manager, or maintenance contact should know how to enter and what to do.
- Document the shutoff location: That saves time when every minute counts.
For owners who manage rentals or seasonal homes, prevention and response planning are closely linked. If a leak does get out of control, a clear water damage mitigation process helps limit how much moisture stays in walls, flooring, and contents.
The checklist most people skip
The most overlooked item isn't insulation. It's response readiness.
Write down:
- Where the main water shutoff is.
- Which plumber you would call.
- Who can access the house if you're away.
- Where your leak sensors are installed.
- Which areas of the house have the oldest plumbing.
That list turns a bad surprise into a controlled event.
Knowing When to Call a Restoration Professional
You shut off the water, wipe up what you can see, and the room looks under control. Then the baseboard swells, the paint starts to bubble, or a musty smell shows up two days later. That is the point where a pipe problem stops being a simple cleanup and turns into a drying and damage-mapping job.
Pipe burst prevention includes knowing when the failure has already spread beyond the pipe itself. In Phoenix, I see that after winter cold snaps, but also after slab leaks, pinhole leaks from aging copper, failed supply lines, and homes with water pressure that has been running too high for too long. The trigger changes. The hidden damage pattern usually does not.
Red flags that deserve expert eyes
Bring in a professional if you notice any of the following:
- Low water pressure that keeps affecting the same area
- Discolored water that returns after running the tap
- Corrosion showing up at several fittings or valves
- Banging pipes after fixtures or appliances shut off
- A leak that returns after a recent repair
- Soft drywall, warped trim, or a musty odor near plumbing walls
- Water staining or wet materials away from the suspected source
Those signs point to a bigger issue than a loose connection. The problem may be pressure-related, tied to pipe age, or already affecting materials behind the finish surfaces.
What a restoration professional checks
A stain on the wall tells you where water showed up. It does not tell you where it traveled.
Water can move inside insulation, under flooring, along framing, and into cabinet bases before it becomes visible. By the time a homeowner sees bubbling paint or lifted flooring, the wet area is often larger than expected. A restoration crew checks the full path of migration, not just the obvious damage.
That inspection usually focuses on:
- How far moisture spread through walls, ceilings, or floors
- Which materials can dry in place and which should be removed
- Whether active drying equipment is needed
- Where hidden moisture is likely to stay trapped
- Whether the event has created conditions for microbial growth
If water reached ceiling cavities, underlayment, insulation, or electrical areas, get a qualified set of eyes on it. A local water damage restoration contractor can evaluate the wet materials, map the affected areas, and set up drying after the plumbing source is fixed.
The job is done when the structure is dry, not when the drip stops.
The right time to bring in help
Call sooner if the leak ran while no one was home, if the home is a part-time property, or if the source involved a supply line under constant pressure. Those are the jobs that turn into warped floors, cabinet damage, and moisture trapped in wall cavities.
You also want help when the same area has had repeated plumbing trouble. Recurrent leaks are often a sign of a larger condition such as pipe wear, poor pressure control, or corrosion in the system, especially in older Phoenix homes.
Restore Heroes serves Phoenix-area property owners dealing with water damage after pipe failures, appliance leaks, and other sudden losses. If you've shut off the water but you're still dealing with soaked drywall, wet flooring, or hidden moisture concerns, Restore Heroes is one local option for assessment, mitigation, structural drying, and restoration support.