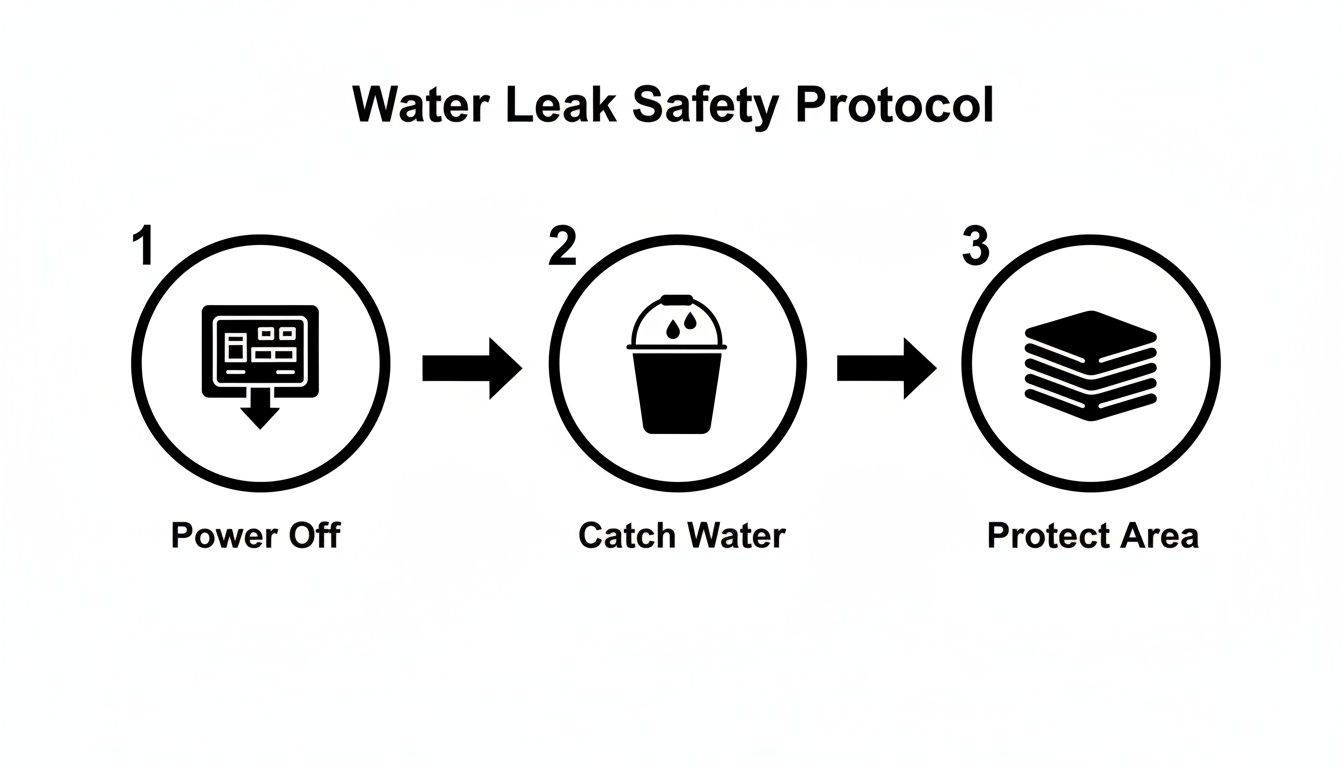
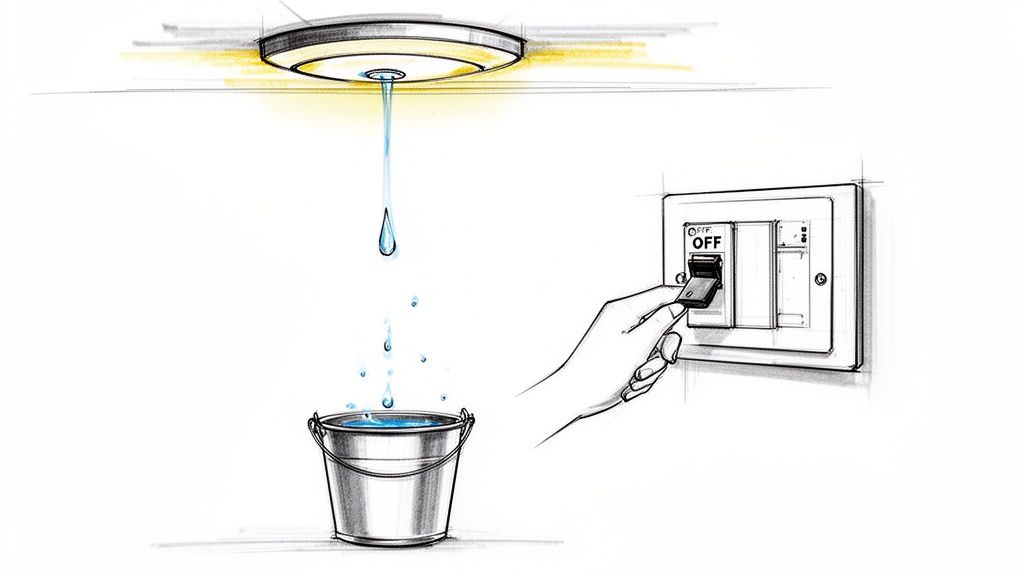
It’s a homeowner’s nightmare: looking up to see water dripping from a ceiling light. This isn't just a leak; it's a serious emergency that mixes water damage with a very real electrical hazard. Your first move, before anything else, is to kill the power to that area. Safety first. Only then should you worry about containing the water.
Your First Moves When Water Leaks From a Ceiling Light
That moment you spot water coming through a light fixture is jarring. It’s a definite sign that something, somewhere, has gone wrong. How you react in the next 15 minutes is crucial for keeping everyone safe and limiting the damage. Forget trying to figure out where the water is coming from—that can wait. Right now, it's all about securing the scene.
Let’s turn that initial panic into a clear, methodical plan. By focusing on safety first, you can keep a bad situation from spiraling into a truly dangerous one.
Prioritize Electrical Safety Above All Else
When you see a water leak from a ceiling light, your mind should immediately jump to the electrical risk. Water is a fantastic conductor, and when it meets the live wiring inside your light fixture, you've got the perfect recipe for electrical shock or a fire-starting short circuit.
Whatever you do, don't touch the light switch or the fixture itself. The only safe move is to head straight for your home’s main electrical panel.
- Find the right breaker. Look for the circuit that powers the room with the leak. If your panel isn't clearly labeled (a common issue!), play it safe and shut off the main breaker to kill power to the whole house.
- Double-check that the power is off. After flipping the breaker, try turning on a different light or plugging something into an outlet in the same room. You need to be 100% certain the power is dead before you do anything else.
Taking this one step is the single most important thing you can do to protect yourself and your family.
Here’s a quick-reference checklist to guide you through those first critical minutes.
Emergency Safety Checklist: The First 15 Minutes
| Action Item | Why It's Critical | Pro Tip |
|---|---|---|
| Kill the Power | Prevents electrocution and electrical fires—the most immediate dangers. | If breakers aren't labeled, shut off the main. It's better to be in the dark than in danger. |
| Contain the Drip | Stops water from spreading and causing more damage to floors and belongings. | Use a large plastic bin instead of a bucket—it has a wider catch area and is less likely to splash. |
| Move Valuables | Protects furniture, electronics, and personal items from irreversible water damage. | Start with items directly underneath the leak and work your way out. Move things to a completely dry room. |
| Document Everything | Provides crucial evidence for your insurance claim later. | Use your phone to take videos and photos of the leak and the initial damage after the power is off. |
Following these steps methodically will help you manage the immediate crisis and set the stage for a smoother recovery.
Manage the Water and Protect Your Property
Once you've neutralized the electrical hazard, your focus can shift to damage control. The goal here is simple: stop the water from spreading and ruining your floors, furniture, and anything else in its path.
Get a bucket or, even better, a large plastic storage bin and place it directly under the drip. If it’s more of a steady stream, you might need a few containers you can swap out. For a wider drip pattern, lay down old towels, blankets, or plastic tarps to soak up the moisture and shield the floor.
By the time you see water dripping from a light, it has already saturated the drywall, insulation, and potentially the wooden joists in your ceiling. The visible drip is just the final exit point for a much larger, hidden problem.
Get any furniture, rugs, and electronics out of the area as quickly as possible. The faster you clear the space, the less you'll have to worry about secondary damage. For homeowners thrown into a crisis like this, knowing when to call for help is key. After you've handled these immediate safety steps, getting professional advice on emergency flood cleanup can give you a clear plan for what comes next.
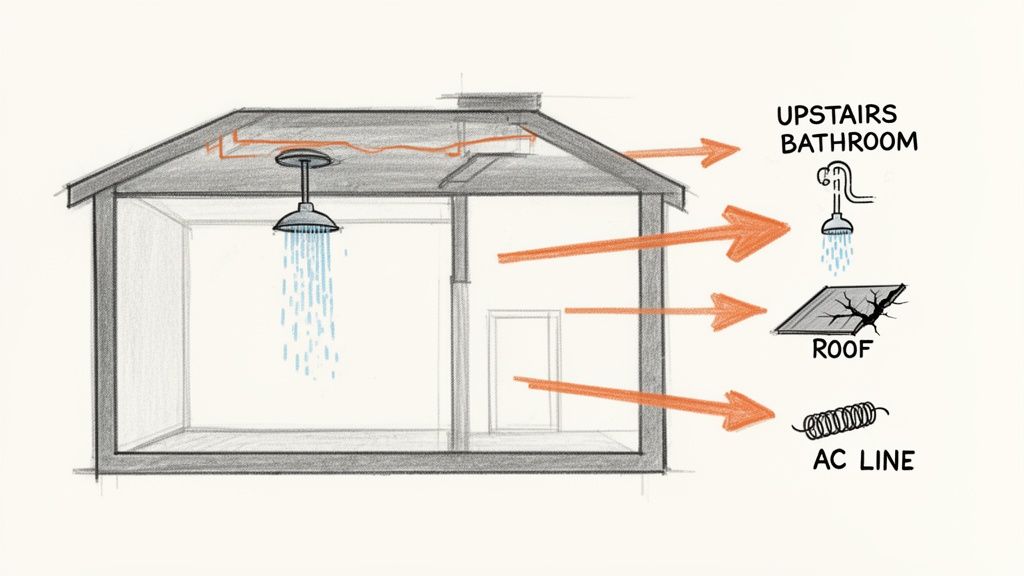
How to Investigate the Source of the Leak
Okay, the power is off and you've got a bucket catching the drips. Now it's time to put on your detective hat. Finding where the water is actually coming from is the only way to get this fixed for good. A water leak from a ceiling light is almost never an issue with the light itself—the fixture is just the path of least resistance for water that started its journey somewhere else.
This part is more important than you might think. The clues you gather now can give a professional a massive head start, which saves you time, money, and prevents the damage from getting worse. For those of us in Phoenix, the usual suspects are almost always a plumbing failure, a roof leak after a monsoon storm, or a problem with an overworked AC unit in the attic.
Is It a Plumbing Problem?
If the soggy light fixture is underneath an upstairs bathroom, kitchen, or laundry room, your best bet is a plumbing problem. These kinds of leaks can show up as a sudden gush or a slow, sneaky drip that builds up over time, but they usually leave a trail.
Pay attention to when it leaks. Does the dripping start up or get worse right after someone takes a shower, flushes a toilet, or runs the washing machine? If you see a connection, you’re almost certainly looking at a faulty drain or supply line.
A leak from a ceiling light often points to a plumbing disaster upstairs. In fact, these types of leaks from supply lines and drains account for 14% of U.S. water damage claims, with the average fix costing over $10,000. Here in Arizona, data shows those claims can jump by 20% after our heavy monsoon seasons. You can learn more about water-related hazards on the United Nations Office for Disaster Risk Reduction website.
Pro Tip: Head upstairs and check the floor around the base of the toilet and inside the cabinet under the sink. A tiny damp spot, warped flooring, or even just a musty smell can be the smoking gun. Slow leaks from a toilet's wax ring are infamous for causing hidden damage for months before being discovered.
Could It Be Your AC Unit?
During a blistering Phoenix summer, our AC units are true workhorses. A very common side effect of all that hard work is a clogged condensate drain line—the little pipe that’s supposed to carry condensation safely away. When that line gets gunked up with dust and algae, the drain pan in your attic overflows.
And where does that water go? It soaks right into your attic insulation and ceiling drywall until it finds the easiest way out… which is often through your light fixture.
If the leak seems to be at its worst when your air conditioner has been running nonstop, the condensate line is your prime suspect. If you can do so safely, take a peek in your attic. Look for a drain pan near the main AC unit that’s full or overflowing. You'll likely see that the surrounding insulation is soaked, too.
Clues Pointing to a Roof Leak
After one of our classic monsoon storms rolls through, a new leak can pop up out of the blue. Wind-driven rain is a master at finding tiny, hidden vulnerabilities in your roof that you'd never notice on a sunny day.
Here are a few dead giveaways that your roof is the source:
- The leak only shows up during or immediately after it rains. This is the biggest telltale sign.
- The water dripping down is dirty or brownish. As water travels through your roofing materials and dusty attic, it picks up grime.
- You can see water stains spreading from the ceiling's edge. This could mean water is getting in under the eaves and running down a rafter before it finds a place to drip.
If you can safely check from the ground with binoculars, you might spot missing shingles, cracked tiles, or damaged flashing around vents. These are all common entry points for rain. It can be tough to connect the dots, so our guide on the common signs of water damage on a ceiling can help you figure out what to look for.
Comparing Common Leak Sources
| Source | Telltale Signs | When It's Most Likely |
|---|---|---|
| Plumbing Failure | Dripping is consistent or tied to using water upstairs; water is usually clear. | The light fixture is directly below a bathroom, kitchen, or laundry room. |
| AC Condensate Line | Leak happens in hot weather when the AC is running hard; may have a musty smell. | The leak is located below the attic space where the AC air handler is housed. |
| Roof Damage | Dripping starts during or after it rains; water may be discolored and dirty. | The leak appears after a recent storm, especially a monsoon with heavy wind. |
Figuring this out does more than just satisfy your curiosity. When you call a professional, you can give them specific details that point them in the right direction from the moment they arrive. That targeted approach is the key to getting the leak stopped and the real cleanup started without wasting any time.
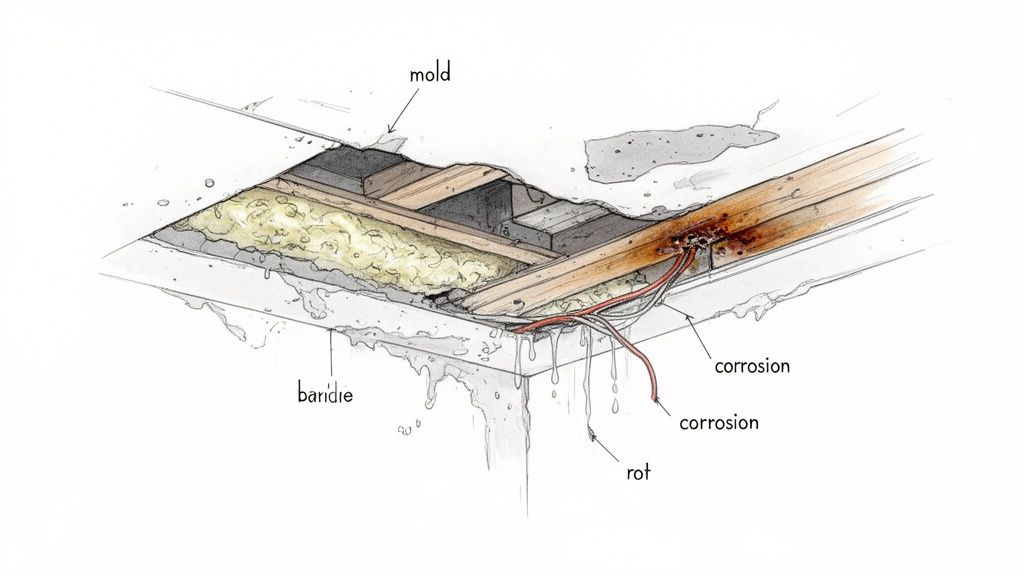
Uncovering the Hidden Damage Behind Your Walls
That drip you see coming from a light fixture? It’s often just the tip of the iceberg. Think of it as the final, desperate signal of a much bigger problem unfolding completely out of sight. While your attention is naturally on the water you can see, the real enemy is the moisture silently spreading through your ceiling and wall cavities.
It's crucial to understand what's really happening behind the drywall. That hidden water is methodically attacking your home’s structure, and knowing the risks makes it clear why a professional assessment is non-negotiable after finding a water leak from a ceiling light.
The Structural Threat to Drywall and Wood
Drywall, which makes up most modern ceilings and walls, is basically a giant sponge. Once it gets wet, it loses its strength and integrity surprisingly fast. You might just see a faint stain or notice a soft spot, but the material is actively breaking down.
A waterlogged ceiling panel can get dangerously heavy, creating a real risk of it collapsing without warning. And it's not just the drywall. The wooden joists and beams holding everything up are also in jeopardy. Constant moisture exposure leads to wood rot, which compromises the very skeleton of your home and can set you up for massive structural repair bills later on. We dive deeper into this in our guide on what happens when drywall can get wet and whether it can be salvaged.
Lingering Electrical Dangers
Flipping the breaker is the right first move, but the electrical hazard isn't completely gone. Any moisture left behind in the light fixture's junction box can cause serious long-term issues. This damp environment is perfect for corrosion, which eats away at wire connections, screws, and other metal components.
Over time, corroded wiring leads to bad connections. That can cause electrical arcing, a major cause of house fires. This isn't a threat that disappears when the water stops dripping; it’s a hidden danger that can surface months down the line if the area isn't professionally dried and inspected. Leaks like this are often signs of hidden plumbing leaks that can cause widespread issues behind the scenes.
The biggest mistake homeowners make is thinking the problem is solved once the dripping stops. Without specialized drying equipment, moisture can stay trapped for weeks, creating a perfect breeding ground for even worse problems.
The Rapid Onset of Mold Growth
Of all the hidden threats, mold is often the most serious. All it needs is a dark, damp space, and the cavity inside your ceiling is the perfect environment. Mold can start to grow and colonize in as little as 24 to 48 hours. It doesn't just create a musty smell—it actively consumes organic materials like the paper backing on drywall and the wood framing itself.
This fungal invasion tanks your home's indoor air quality and, if you don't stop it, can spread far beyond the original leak. The fallout from a mold problem includes:
- Health Concerns: Spores are known to trigger allergies, asthma attacks, and other respiratory problems.
- Structural Degradation: Mold literally eats away at your home, accelerating the decay of wood and drywall.
- Difficult Remediation: Getting rid of a major mold infestation is a much more invasive and costly job than simply drying out the initial water damage.
Because of these hidden structural, electrical, and biological risks, fixing a leak from a ceiling light involves more than just a bucket and some towels. It requires a professional-level investigation to find and fix the full scope of damage lurking behind your walls.
Knowing When to Call a Water Restoration Professional
A small drip under the sink might feel like a weekend DIY project. But a water leak from a ceiling light? That's a completely different animal. You're dealing with a mix of water, electricity, and hidden spaces, a recipe for serious trouble that usually goes way beyond a simple bucket-and-mop fix.
Knowing where to draw the line between a small problem and a genuine emergency is crucial for your home's safety.
Some situations are clear red flags. If you see any of the following, your first move is to cut the power, and your very next move should be to call in a certified professional.
- There's a Lot of Water: We're not talking about a slow drip. If water is streaming down or, even worse, the ceiling is starting to sag or bulge, that's a sign of immense weight. The risk of a collapse is very real.
- You Can't Pinpoint the Source: If you’ve done a quick check and can't figure out where the water is coming from, it’s time to stop. Professionals have specialized tools to trace a leak's path without tearing your house apart.
- The Problem Isn't New: See big, ugly brown stains? Smell a musty, damp odor? Those are tell-tale signs that water has been sitting for a while, which means mold has likely already started to grow.
Handyman vs. Water Damage Restoration Company
It’s tempting to call your local handyman, and for good reason—they’re great for patching drywall or swapping out a faucet once everything is dry. But they aren't equipped to handle the hidden aftermath of water damage.
A professional water damage restoration company comes prepared for the whole crisis. They don’t just fix what you can see; they tackle the unseen moisture trapped in your walls and ceilings that causes rot, mold, and structural decay down the road. You can learn more about the critical role of a certified water damage restoration contractor to understand why their specialized skills are so important.
Waiting just 48 hours can be a costly mistake. Research shows that mold growth begins in about 70% of untreated water damage cases, turning a water problem into a much more expensive mold remediation nightmare.
The Specialized Equipment That Makes a Difference
The real secret to proper water damage recovery isn't just about stopping the leak—it's about the technology used to dry everything out. Certified restoration teams show up with an arsenal of tools designed to find moisture you can't see and remove water you can't reach.
- Moisture Meters: These aren't your basic hardware store gadgets. Technicians use them to get precise moisture readings deep inside materials like drywall, wood studs, and insulation. This data tells them exactly what's wet and how wet it is.
- Thermal Imaging Cameras: This is where the real magic happens. These cameras show temperature differences, allowing a technician to literally "see" the cold trail of water hiding inside a wall or ceiling without having to demolish it first.
- Industrial Air Movers & Dehumidifiers: Forget your little box fan. We're talking about high-velocity air movers that blast air across wet surfaces and powerful LGR (Low-Grain Refrigerant) dehumidifiers that can pull gallons of water vapor from the air and structure.
Here's a common mistake I see homeowners make: they assume if something feels dry to the touch, it's fine. The truth is, drywall and wood can feel dry on the surface while holding onto a dangerous amount of moisture internally. Professional moisture detection isn't just a fancy extra—it's absolutely essential to prevent future rot and mold.
When you understand the science behind it, you see why calling in a pro is so valuable. They take the guesswork out of the equation and replace it with a proven strategy to make sure your home is truly dry, safe, and stable again.
What to Expect With Insurance and Restoration
Finding water dripping from a light fixture is jarring enough. The last thing you want to deal with is a complicated insurance claim. But getting a handle on the financial and restoration side of things can bring back a sense of control. Think of it as a team effort between you, your insurance company, and a professional restoration crew.
Before you even pick up the phone to call your agent, grab your smartphone. Your first job is to become a detective. Take tons of clear photos and videos of everything—the leak itself, the light fixture, the soggy ceiling, and any water stains running down the walls or pooling on the floor. Don’t forget to list out any personal items that got damaged. This evidence is crucial and will be your best friend when you file the claim.
Working With Your Insurance Company
With your initial evidence gathered, it's time to call your insurance agent and get the ball rolling. They'll open a claim and assign an adjuster to your case. The adjuster's job is to visit your home, evaluate the extent of the damage, and figure out what your specific policy might cover.
This is where a good restoration company proves its worth. They act as your advocate, speaking the same technical language as the insurance adjuster. They'll come in with moisture meters, thermal cameras, and other tools to provide a detailed, data-backed report on the full scope of work needed. This professional documentation can seriously speed up the claims process and helps ensure nothing gets missed.
Keep in mind that not all water damage is created equal in the eyes of an insurer. Most standard homeowner's policies may cover sudden and accidental damage, like a pipe that bursts unexpectedly. They are far less likely to cover damage from a slow, neglected leak that’s been dripping for months. For more on this, check out our water damage insurance claim tips.
Getting a Handle on Restoration Costs
The final bill for a water damage job is rarely just the cost of patching a ceiling. Several things can dramatically impact the total expense.
The final cost really boils down to:
- How Much Water and Where It Went: A small leak caught early is one thing. Water that has soaked through drywall, insulation, and framing across multiple rooms is a completely different (and more expensive) ballgame.
- What Kind of Water It Is: Water from a clean supply line (Category 1) is straightforward. But if the source is a drain or toilet overflow (Category 2 or 3), the cleanup is much more involved due to contamination.
- If Mold Has Started to Grow: If that leak has been hidden for a while, mold is a real possibility. Mold remediation is a specialized process that will add a separate and significant cost to the project.
The real budget-buster is almost always the damage you can't see. A simple ceiling stain might be hiding saturated electrical wiring, compromised structural joists, or a hidden mold colony inside a wall.
It's smart to prepare for the financial reality of a claim. Sometimes, an insurance company's first offer might not cover everything needed for a proper, safe repair. If you feel the offer is too low or your claim is denied, getting some professional insurance water damage claim help can give you the leverage you need. Understanding these moving parts from the start will help you navigate the entire recovery process with a lot more confidence.
Alright, you've dealt with the immediate mess of a water leak coming through a ceiling light. Now, let's make sure it never happens again. A little proactive maintenance goes a long way, especially here in Phoenix where our homes battle both scorching heat and intense monsoon downpours.
Think of it as a quick health checkup for your house. Get in the habit of glancing at the braided steel hoses behind your washing machine and dishwasher, or the one feeding your fridge's icemaker. These are common culprits, and spotting a small bulge or a bit of rust early can save you a world of hurt.
Crucially, everyone in your household should know where the main water shutoff valve is and how to use it. In a real emergency, shutting the water off in seconds is your single most powerful move.
Here's a pro tip I share with all homeowners: test your main water shutoff valve twice a year. Just turn it off and on again. This keeps it from seizing up with our hard water mineral deposits, ensuring it will actually turn when you desperately need it to.
Your Phoenix-Specific Seasonal Checklist
Living in the Valley means your home's got a unique set of challenges. A bit of seasonal prep work can make all the difference.
- Before the Summer Heat Arrives: Your AC is about to go into overdrive. This is the perfect time to have a professional inspect and flush the condensate drain line. Trust me, a clog in that line is one of the top reasons we see attic leaks showing up in ceiling fixtures.
- Before the Monsoons Roll In: Don't let the first big storm be the thing that reveals a roof leak. Take a walk around your house and look up. Can you spot any cracked, loose, or missing tiles? Pay close attention to the metal flashing around vents and your chimney—that's a weak spot where water loves to creep in.
- Check Your Water Heater Annually: The average water heater lasts about 8-12 years. Once they get older, the risk of the tank failing goes up significantly. Keep an eye out for any rust or corrosion near the bottom. If it's getting up there in age, it might be time to think about a replacement before it fails spectacularly.
Taking these small steps and turning them into regular habits is honestly the best defense for your home. It’s how you stop being reactive and start preventing the kind of damage that has you searching for "water dripping from a light fixture" in the first place.
Common Questions About Leaks From Ceiling Lights
Finding water dripping from a ceiling light fixture is alarming, and your mind immediately jumps to a dozen questions. Getting straight answers is key to handling the situation without making things worse. Let's tackle some of the most common worries we hear from homeowners.
The first thing everyone wants to know is, "Is it safe to stay in the house?" If you've managed to cut the power to that circuit and the drip is small and contained, the immediate electrical hazard is lower. But—and this is a big but—if you see the ceiling bulging or sagging, get out from under it. That's a sign it's waterlogged and could collapse.
Can I Just Fix It Myself?
It’s tempting to think you can handle it, especially if it seems like a minor drip. You might find a loose pipe fitting under the upstairs sink and tighten it, stopping the source. Problem solved, right? Not quite.
The real issue is the water you can't see. That moisture has been soaking into your drywall, insulation, and wooden joists. Simply stopping the leak leaves a hidden swamp in your ceiling, creating a perfect breeding ground for mold and rot. Without professional equipment to find and dry that trapped moisture, you're solving one problem while creating a much bigger one down the road.
Another question we get all the time is about the light fixture itself. Is it ruined? Almost certainly, yes. Water and electricity are a dangerous mix. Moisture causes corrosion and can lead to shorts. For safety's sake, you should always plan on replacing the fixture after the entire area has been professionally dried and an electrician has given the wiring the all-clear.
Remember, the visible drip is only the endpoint of the water's journey. By the time it exits through your light, it has already saturated drywall, insulation, and potentially structural wood, creating a complex problem that extends far beyond the fixture itself.
It's easy to underestimate the risk, but the statistics paint a clear picture. Water damage is one of the most frequent homeowner insurance claims in the U.S. When that damage involves recessed lighting, it can short out circuits, which is a major factor in a surprising percentage of electrical fires. You can dig into more water damage trends on globalwater.online. The data confirms why treating a water leak from a ceiling light with the seriousness it deserves is so important.
If you're dealing with a leak or water damage anywhere in the Phoenix area, the Restore Heroes team may be able to help. Give us a call for a free, no-obligation onsite inspection at https://www.restoreheroesaz.com.