A lot of Phoenix property owners read about documentation requirements after a long night. The AC pan overflowed while everyone was asleep. A monsoon pushed water in through a weak roof section. A supply line behind the washing machine let go and soaked drywall before anyone noticed. By morning, the damage is obvious, but the next step usually isn't.
What settles people down fastest is a clear record of what happened, what got damaged, and what was done in response. Good documentation gives the claim a backbone. It also helps keep the cleanup process organized when you're juggling a carrier, a contractor, family schedules, tenants, or a business that still has to open tomorrow.
That administrative burden is real. Data shows that reducing documentation burdens improves access to relief funding for businesses and individuals, which is one reason these requirements shouldn't be treated like minor paperwork hurdles but as barriers that can be managed with the right help through the GSA relief distribution project findings. If the loss is active, the first priority is safety and stopping further damage. After that, organized records matter immediately, especially when emergency mitigation starts the same day. If you need that first response handled quickly, use a team that can document as it goes, such as 24/7 emergency response in Phoenix.
Your First Step After a Property Disaster
The first step isn't arguing with the insurer, and it isn't throwing damaged materials out in frustration. The first step is to document before conditions change. In Phoenix, conditions change fast. Wet drywall starts to deform, baseboards swell, odors set in, and emergency drying equipment can make a room look very different a few hours later.
A simple sequence works well in the field. Take overview photos first. Then capture close-ups of the source, affected materials, and damaged contents. After that, start a written timeline. Include when you discovered the loss, who was present, who you called, and what immediate actions were taken to protect the property.
What to record in the first hour
- The cause if visible: A broken angle stop, roof intrusion, appliance leak, smoke spread from a kitchen flare-up, or visible mold growth.
- The spread of damage: Which rooms were affected, how far moisture or soot traveled, whether flooring, cabinets, drywall, insulation, or contents were involved.
- Immediate protection steps: Water shutoff, power shutoff where appropriate, towels or buckets placed, board-up, tarp, or emergency extraction.
- People involved: Occupants, tenants, maintenance staff, plumber, roofer, mitigation crew, or fire department.
Practical rule: Document the scene in the condition you found it, then document every meaningful change after that.
Many claims go sideways when property owners clean up too much before recording the damage, or they rely on memory later. Memory gets fuzzy. Time-stamped photos, notes, and saved messages don't.
Phoenix realities that make early documentation important
Phoenix losses often come with local wrinkles that national guides barely mention. Hard water can leave scale around leaking valves, supply lines, and appliance fittings. Monsoon events can involve roof, window, stucco, and drainage issues at the same time. In commercial spaces, rooftop units and condensate lines can affect ceiling tile, insulation, and multiple tenant suites before anyone sees the stain below.
When the situation is chaotic, documentation becomes the part you can control. It won't remove the stress, but it gives everyone the same factual starting point.
Why Your Insurance Claim Depends on Good Documentation
Insurance carriers don't evaluate a loss based on how stressful it felt. They evaluate what can be shown. That's why documentation requirements are the evidence side of the claim, not a side task.
For water losses in particular, the restoration industry doesn't treat documentation as optional. IICRC S500 standards for water damage restoration mandate a complete set of records, including drying logs, moisture maps, and photos. Those records serve as the evidentiary basis for insurance billing and show that the work met a professional standard of care.
What the adjuster is looking for
An adjuster usually needs to understand four things quickly:
| Question | What proves it |
|---|---|
| What happened? | First photos, source photos, incident timeline, emergency call records |
| How bad is it? | Room-by-room photos, moisture readings, affected material list, scope notes |
| What was necessary? | Mitigation records, equipment placement, demolition notes, daily monitoring |
| When was it complete? | Final moisture verification, completion records, final photos |
If one of those categories is thin, delays become more likely. Not always because someone is being difficult. Often it's because the file doesn't clearly support the decision.
Why signatures and approvals matter too
Documentation isn't only photos and meter readings. It also includes work authorizations, change approvals, tenant notices, contents sign-offs, and completion acknowledgments. If you're signing forms electronically, it's worth taking a few minutes to learn about electronic signature law so you understand what makes a digital signature enforceable and practical during a fast-moving loss.
A claim file should tell the whole story without asking people to fill in the missing parts from memory.
That applies to homeowners and large commercial losses alike. A clean file helps the carrier follow the sequence of events. It also helps your contractor justify the scope of mitigation and drying, especially when hidden moisture or secondary damage changed the job after day one.
What doesn't work
These are the weak points I see most often:
- Only after photos: By then, extraction has happened, debris is gone, and the worst conditions are no longer visible.
- No written timeline: People remember the broad story but forget timing, who gave instructions, and when conditions changed.
- Scattered communication: Important approvals buried in texts, emails, and voicemails are easy to miss.
- No technical records: Photos alone don't prove drying conditions or moisture progress.
If you want a practical overview of how the claim side and mitigation side fit together, this guide on water damage insurance claim tips is useful.
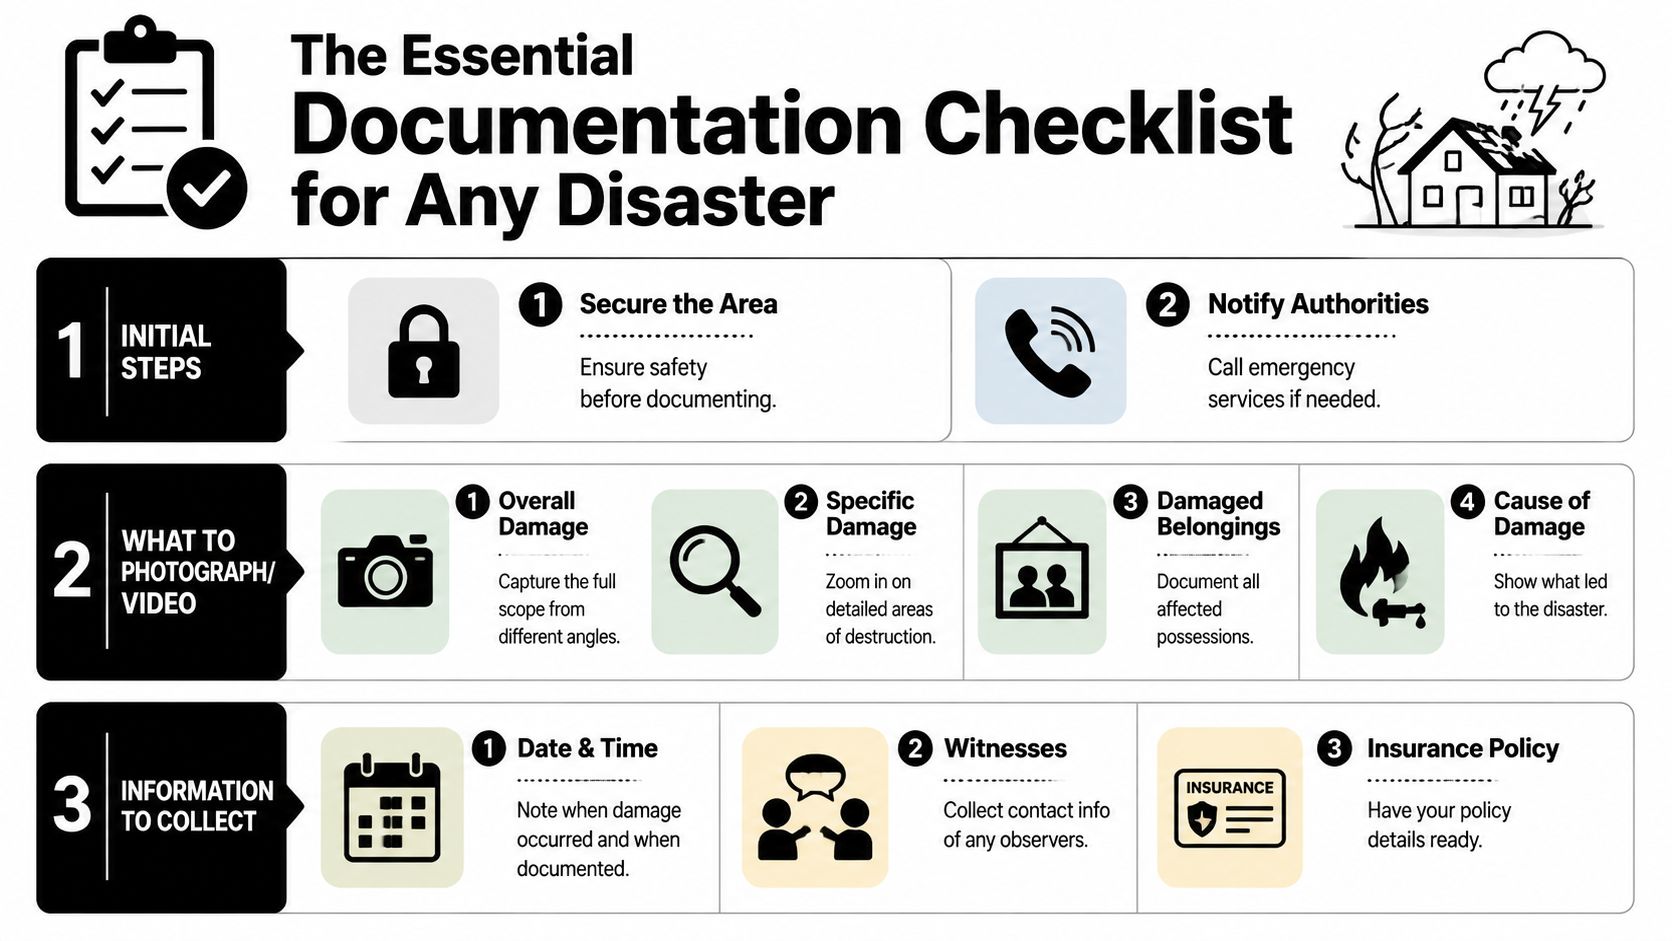
The Essential Documentation Checklist for Any Disaster
Most documentation requirements fall into the same core buckets. You need records of conditions, actions, costs, communication, and completion. The exact file changes by property type, but the structure stays consistent.
A key item many owners don't know about is the drying log. For active drying, industry standards require psychrometric data such as temperature and humidity to be logged at least once every 24 hours, which is a critical part of the contractor's file according to Maryland Restoration Authority's summary of restoration documentation requirements. If a contractor is drying a structure, that log matters.
Homeowner checklist
Start simple and be thorough.
- Initial scene photos and video: Capture each affected room from the doorway, then from inside the room. Include ceilings, floors, walls, cabinets, and contents.
- Cause of loss evidence: Photograph the leaking pipe, failed appliance hose, roof leak area, or burn origin if it's safe to do so.
- Personal property list: Write down damaged contents room by room. Include brand, model, age if known, and whether the item is wet, smoke-damaged, stained, warped, or no longer functioning.
- Emergency expense receipts: Save receipts for hotel stays, supplies, board-up, tarping, or emergency plumbing.
- Claim communication log: Record adjuster names, claim numbers, dates of calls, and what was discussed.
- Mitigation records: Ask for moisture maps, equipment placement notes, and daily progress updates.
Landlord and property manager checklist
Rental properties need a broader paper trail because multiple parties are involved.
- Tenant communication records: Save emails, text screenshots, notices of entry, relocation discussions, and any habitability-related communication.
- Unit condition records: Pull move-in photos if available, maintenance history, and recent work orders related to plumbing, roofing, HVAC, or prior leaks.
- Common area documentation: If a multifamily property is affected, document hallways, adjacent units, shared mechanical areas, and any containment setup.
- Vendor coordination notes: Keep a running record of plumber findings, roofer findings, mitigation scope, and rebuild recommendations.
- Lease and occupancy details: Preserve documents that identify the unit, occupant, and any interruption issues tied to the loss.
Field note: On rental jobs, the communication log can matter almost as much as the damage photos.
Commercial business owner checklist
Commercial claims usually rise or fall on organization.
- Incident timeline: Note when the problem started, when staff noticed it, whether operations stopped, and what areas were isolated.
- Affected operations list: Identify impacted offices, retail areas, treatment rooms, storage, server rooms, or production spaces.
- Equipment and inventory records: Photograph damaged machinery, electronics, stock, and packaging before disposal or relocation.
- Access and safety records: Keep records of shutoffs, restricted areas, containment barriers, and occupancy decisions.
- Daily restoration updates: Ask for concise progress notes that tie actions to specific areas and dates.
- Final completion package: Keep all reports, photos, readings, invoices, and certificates together in one project folder.
Documents every property owner should keep
| Document type | Why it matters |
|---|---|
| Photos and video | Shows conditions before cleanup changes the scene |
| Written timeline | Connects events, decisions, and dates |
| Communication log | Tracks instructions, approvals, and disputes |
| Receipts and invoices | Supports out-of-pocket and project costs |
| Moisture and drying records | Shows technical basis for mitigation work |
| Final completion documents | Helps close out the file cleanly |
A complete file doesn't have to be fancy. It has to be consistent.
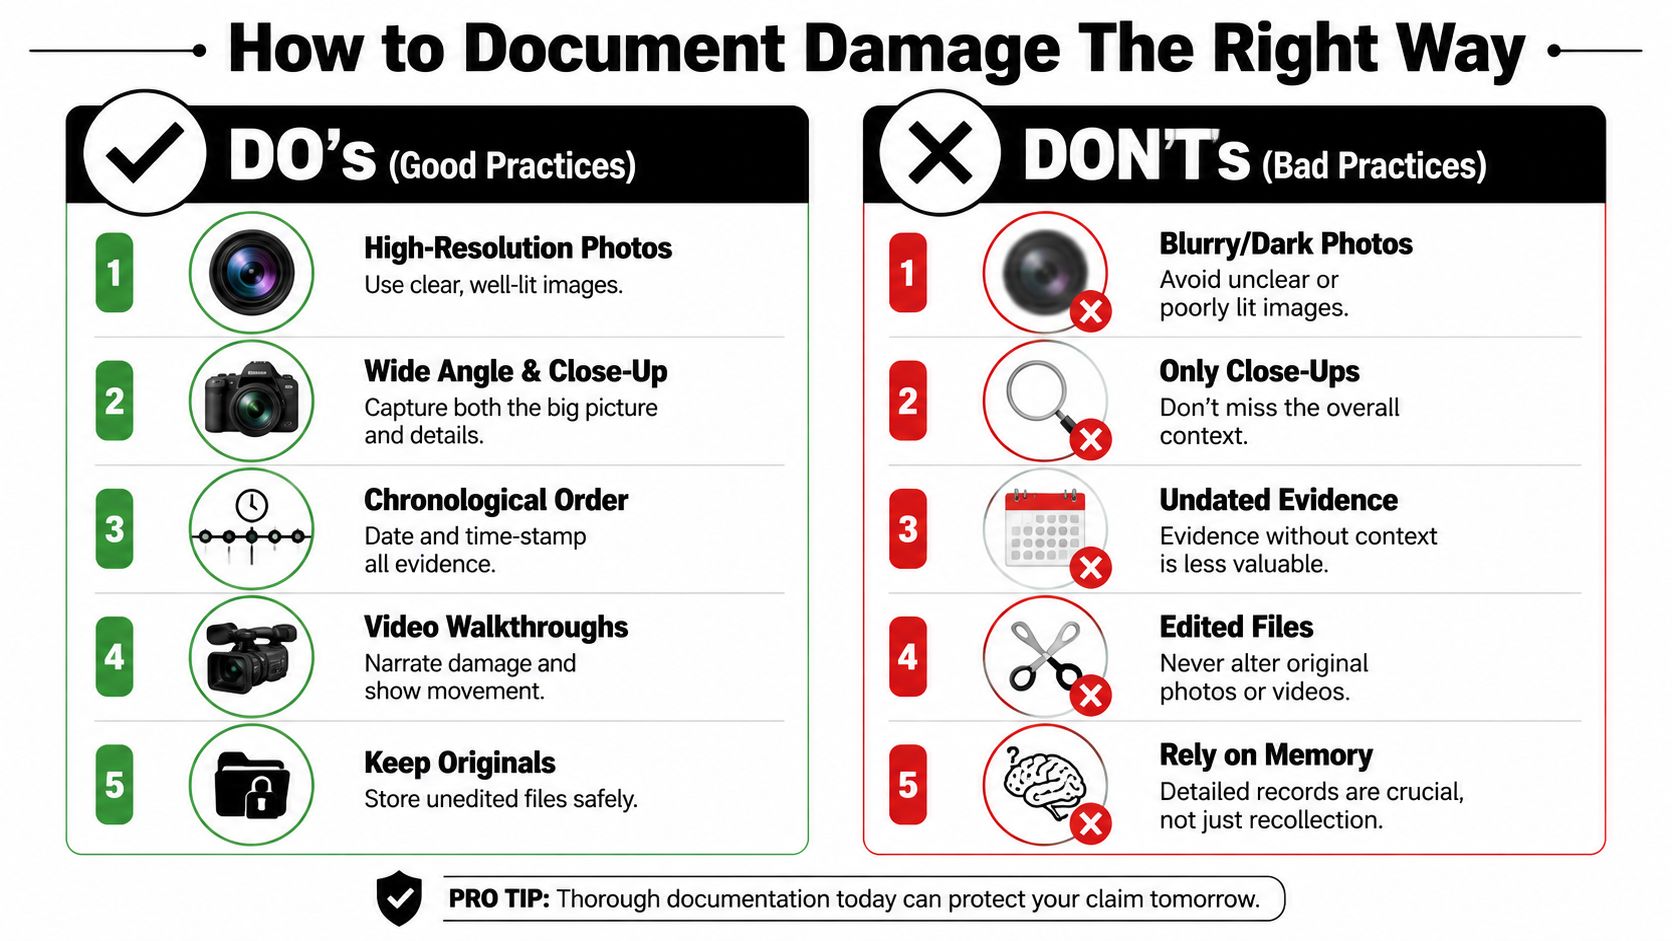
How to Document Damage The Right Way
Good evidence is clear, chronological, and easy for another person to understand without standing in the room. That's the standard to aim for.
Take photos with a purpose
Start with wide shots. Stand in the doorway or corner and show the entire room. Then move into medium shots that isolate affected walls, flooring, cabinets, or contents. Finish with close-ups of details like staining, swelling, cracked tile, soot residue, rust marks, or a failed supply line.
A strong photo set usually includes:
- Overview images that show where the damage sits in the room.
- Detail images that show severity.
- Source images that show what likely caused it.
- Identifier images such as appliance labels, model numbers, or affected room numbers in commercial buildings.
If you want a practical comparison of what strong trade photo records look like, this resource on photo documentation for home service pros is worth reviewing.
Use video to show what still photos miss
Video helps when damage affects function. Open and close a swollen cabinet. Show water dripping from a ceiling penetration. Walk from the source area to the affected rooms while narrating what you're seeing.
Keep the narration plain. State the date, location, room, and what changed. Avoid guessing about coverage or cost on camera.
This walkthrough gives a helpful visual example of what organized evidence gathering looks like in practice.
Organize files so someone else can follow them
Create folders by date and area. A simple structure works well:
- Day 1 initial damage
- Day 1 emergency mitigation
- Daily drying or cleanup updates
- Receipts and invoices
- Carrier communication
- Completion photos and final documents
Save original files. Don't crop, edit, filter, or rename everything into vague labels like "damage1" and "damage2." Use names that make sense later, such as "Kitchen north wall swelling" or "Suite 204 ceiling leak near RTU."
Match the documentation to the kind of water loss
The amount of proof needed changes with the severity and complexity of the job. Under the ANSI/IICRC S500 Standard, documentation requirements change based on the water's contamination level and moisture load. A Class 4 loss involving concrete needs far more extensive drying and data logging than a simple Class 1 carpet spill. In the field, that means denser records for specialty drying, hard-to-dry assemblies, and more contaminated losses.
For Phoenix properties, this matters in slab-adjacent materials, tile assemblies, block construction transitions, and rooms where moisture travels farther than owners expect.
If you want to see how visual records support scope discussions, review examples of before and after restoration photos.
Modern Documentation Tools and Phoenix-Specific Factors
The old approach was a clipboard, a separate camera, handwritten notes, and a pile of files to sort later. That still happens, but it doesn't scale well on active losses. Modern restoration work relies much more on digital capture in the field, where the technician records photos, readings, notes, and equipment details in one job file.

For insurer Preferred Vendor Programs, mobile app usage for digital documentation is a mandatory requirement in 90% of programs, according to Capterra's iRestore listing. That requirement makes sense in practice because one job can involve a huge stack of photos, daily readings, floor plan notes, and equipment tracking. Digital systems keep that from turning into a mess.
What digital tools do better than paper
Digital documentation systems help teams:
- Capture photos in sequence: The image stays tied to the job and often to the area documented.
- Record readings on site: Moisture and psychrometric entries are less likely to be lost or transcribed incorrectly.
- Track equipment placement: Air movers, dehumidifiers, and specialty drying gear can be mapped and updated.
- Build a cleaner final file: Adjusters and owners can review one organized record instead of piecing together texts and PDFs.
This is also where one local contractor option can be useful. Restore Heroes documents each stage of mitigation and restoration as part of the job file, which is the kind of process owners should look for from any vendor handling an insurance loss.
Phoenix conditions that need special attention
Phoenix isn't a generic water-damage market. Local documentation requirements should reflect local failure patterns.
Monsoon intrusion
Monsoon losses often affect multiple assemblies at once. A roof leak may also involve window perimeters, insulation, framing, drywall, and flooring. Document exterior indicators early if it's safe. Water marks on parapets, roof drains, flashing transitions, and window heads can matter before temporary repairs change the evidence.
Hard water and long-term leak clues
In Phoenix homes, hard water can leave mineral buildup at shutoffs, supply lines, valves, ice maker connections, and water heater fittings. That buildup doesn't prove every claim issue, but it can help explain failure points and leak duration clues. Photograph it before a plumber replaces the part.
Dry climate and hidden moisture
People assume desert air means everything dries on its own. Interior structural drying doesn't work that way. Behind baseboards, under cabinets, inside wall cavities, and beneath certain flooring systems, trapped moisture can stay put. Tools such as thermal imaging inspection help identify temperature differences that support a closer moisture investigation, especially when damage isn't obvious on the surface.
In Phoenix, the visible stain is often smaller than the actual wet area.
That's why local experience matters. Good documentation doesn't just record damage. It records how moisture behaved in this structure, under these conditions, in this climate.
Frequently Asked Questions About Restoration Documentation
Property owners usually ask the hardest questions after the initial emergency is under control. That's a good time to tighten the file and make sure nothing important gets missed.
How long should I keep my documentation after the claim closes
Keep everything well after the claim appears finished. Store the full file digitally and, if possible, one printed summary set with the key documents. That includes photos, videos, invoices, moisture records, approvals, emails, text screenshots, and completion records.
Why keep it longer than you think you'll need it? Supplemental issues can come up. A buyer may ask for records during a sale. A tenant dispute can surface later. If hidden damage is found during repairs, the original timeline and first-day evidence become useful again.
What if the adjuster disputes the damage shown in my photos
Stay calm and get more specific. A photo dispute usually means the evidence lacks context, not necessarily that the issue is dead.
Use this sequence:
- Request clarity: Ask exactly what part of the damage, scope, or cause is being questioned.
- Add context: Provide room identifiers, wider-angle shots, and a dated timeline.
- Support with contractor records: Moisture maps, daily notes, and source documentation often answer questions that homeowner photos alone can't.
- Preserve the disputed materials if possible: Don't rush disposal if the issue hasn't been resolved.
If the claim process itself feels confusing, this guide on how to file a homeowners insurance claim helps organize the basics.
What are the biggest documentation mistakes that hurt claims
The biggest problems are usually preventable.
| Mistake | Why it causes trouble |
|---|---|
| Cleaning up before documenting | Removes visible evidence of severity and spread |
| Throwing materials away too early | Eliminates proof of what was affected |
| Keeping no communication log | Creates conflict over who said what and when |
| Missing receipts | Weakens reimbursement support for emergency spending |
| Disorganized files | Slows review and increases confusion |
| No ongoing repair photos | Makes it harder to tie discovered conditions back to the original loss |
Save first, sort later. The worst time to wish you had a record is after the room is dry and the debris is gone.
Do I need to document repairs as they happen
Yes. Initial loss photos are only part of the file. Ongoing repair documentation matters because conditions often change once materials are opened up. A wall cavity may reveal additional moisture, microbial growth, char depth, or insulation damage that wasn't visible on day one.
Repair-stage photos also help show:
- What was removed
- What remained salvageable
- What hidden conditions were uncovered
- What was rebuilt or replaced
- What the property looked like at completion
This is especially important on landlord, multifamily, and commercial jobs where multiple parties may review the file later.
Should I use a spreadsheet, an app, or just my phone
Use the system you'll maintain. For most homeowners, a phone plus cloud folders and a simple note document is enough if you're disciplined. For landlords and facility managers, a spreadsheet or property management platform helps tie dates, units, vendors, and invoices together.
What matters most is consistency. Pick one primary place for photos, one for documents, and one for communication notes. If your texts, invoices, and photos all live in different places with no naming system, the file gets harder to defend.
What belongs in a final project file
A solid final file usually includes:
- First-day photos and videos
- Incident timeline
- Carrier and contractor communication
- Drying or cleanup records
- Moisture or inspection documentation
- Invoices and receipts
- Repair progress photos
- Final completion photos
- Any signed authorizations or acknowledgments
If your contractor gives you scattered attachments instead of one coherent package, combine them yourself into a single digital folder. Name it clearly with the property address and date of loss.
Can professional help reduce the burden
Yes, and that matters more than many owners realize. Documentation work takes time, and during a property loss people are already stretched thin. The strongest support isn't just cleanup. It's cleanup paired with records that are consistent, timely, and easy to review.
A contractor who documents while the work is happening can remove a lot of friction from the claim process. That's often the difference between a file that moves and a file that stalls.
If you're dealing with water, fire, mold, or biohazard damage in the Phoenix area, Restore Heroes can be a practical resource when you need emergency mitigation paired with organized project records. The goal isn't just to dry or clean the property. It's to leave you with a clear, usable documentation trail that supports the next step of your claim.