From Disaster to Done: A Look Inside Real Restorations
A picture is worth a thousand words, especially when the picture shows soaked baseboards, blackened cabinets, or mold spreading across drywall. In the first hours after you find damage, it's hard to know what matters most. Do you call insurance first, start moving furniture, or begin taking photos?
That's where before and after photos help. Good restoration photos do more than show a dramatic cleanup. They show sequence, method, and proof. They help homeowners understand what happened, what was affected, and what professional drying, cleaning, decontamination, or rebuilding looks like in real conditions.
They also matter for documentation. In restoration, photo records can verify pre-loss conditions and post-mitigation outcomes, and many professionals now pair photos with annotated floor plans or digital scans to build a clearer record of the work performed, as described in Matterport's overview of disaster restoration and mitigation documentation.
Strong visuals also hold attention. Content with compelling images gets 94% more views than content without visuals. In restoration, that matters because homeowners need to see real change, not just read a promise.
The examples below aren't just a gallery. They break down the damage, the equipment, the timing, and the homeowner steps that make claims, cleanup, and communication easier.
1. Water Damage Restoration Burst Pipe Recovery
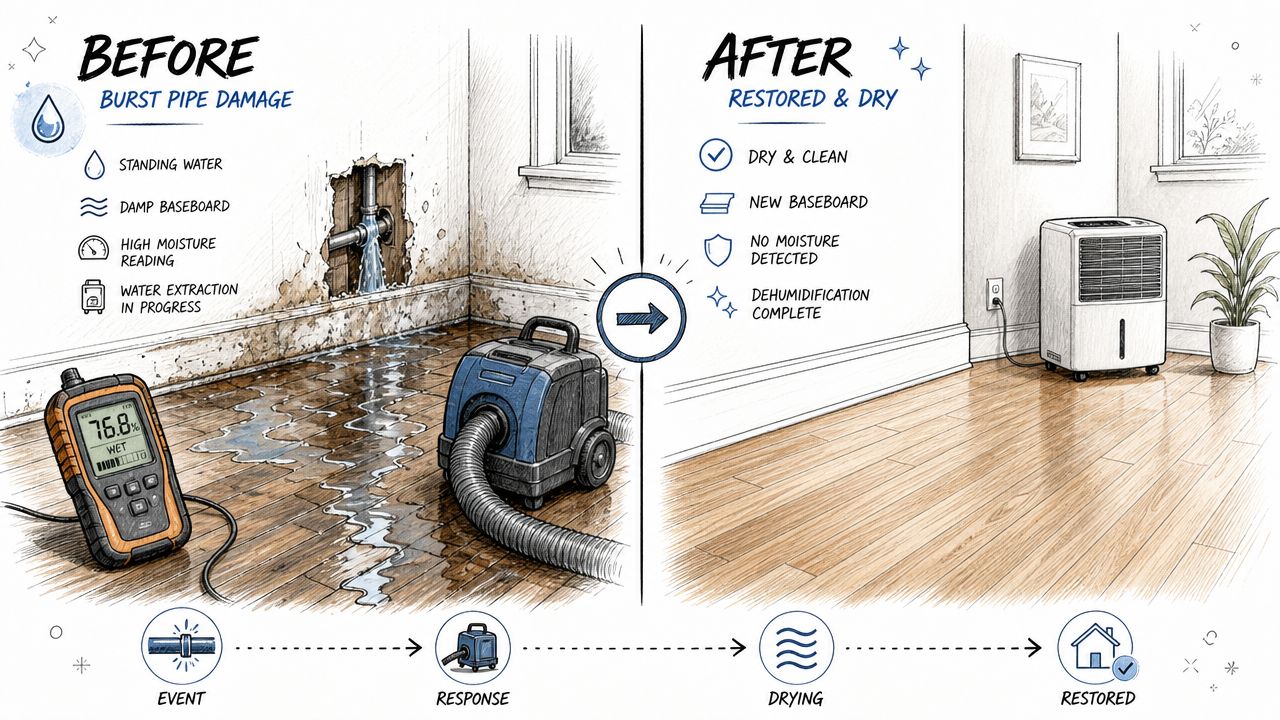
A burst supply line usually looks worse by the hour, not the day. In a Chandler bedroom, I'd expect the first photos to show swollen baseboards, wet carpet seams, and water tracking under furniture. The after photos should show a dry structure, removed unsalvageable materials where needed, and clean lines where repairs can begin.
The best before and after photos in these jobs show the middle, not just the end. Water extraction, air movers, dehumidifiers, and moisture checks are what turn a soaked room into a stable one. If those steps are missing from the photo record, the gallery may look polished but it doesn't teach the homeowner much.
What a strong photo sequence includes
- Initial spread: Show where the water started and how far it traveled across flooring, drywall, and contents.
- Drying setup: Capture extraction, equipment placement, and any removed materials.
- Completion point: Photograph the room once structural drying is finished and surfaces are ready for repairs.
Practical rule: Shut off the water source first, then start taking wide shots before anyone begins moving items around.
If you're sorting out claim questions, this overview of whether homeowners insurance covers busted pipes is a useful starting point. If the house may eventually go on the market, this guide for water-damaged homes helps you think through disclosure and presentation issues later.
For homeowners, the trade-off is speed versus hesitation. Waiting to “see if it dries on its own” often hides moisture in pad, subfloor, cabinet toe-kicks, and wall cavities. Good photos catch the problem early. Better restoration work confirms it with drying documentation.
2. Fire and Smoke Damage Restoration Complete Structural Cleanup
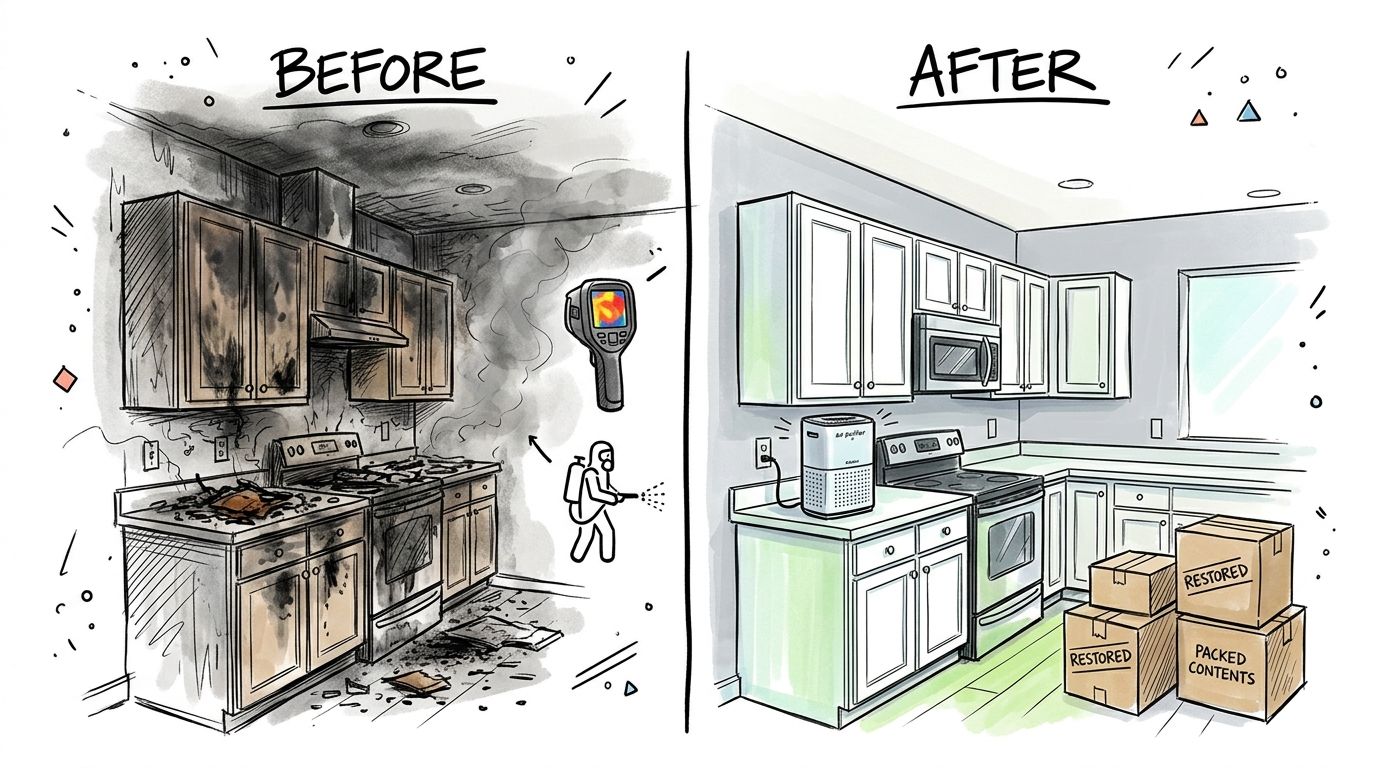
Fire jobs fool homeowners because the worst damage often isn't the burned cabinet or charred microwave. It's the soot migration, smoke odor, and contamination that reached rooms the flames never touched. A Scottsdale kitchen fire might start small, but the before photos often show residue on ceilings, inside cabinet faces, and around HVAC registers.
The after photos should show more than a repainted room. They should reflect debris removal, detailed soot cleaning, odor treatment, and replacement of materials that couldn't be restored. Clean appearance alone isn't enough.
What works and what doesn't
What works is a room-by-room record. One set of wide photos for layout, then mid-range photos for wall and ceiling residue, then close-ups of burned or heat-affected materials. That sequence helps both the homeowner and the adjuster.
What doesn't work is DIY wiping before documentation. Rubbing soot into painted walls or upholstery can make salvage harder and can confuse the damage record.
After a fire, don't judge the loss by burn marks alone. Smoke often tells the real story.
If you want a clearer sense of sequencing, this walkthrough of the fire damage restoration process explains how mitigation and repairs are typically separated. For properties with heavy lingering odor concerns, some owners also research tools like specialized smoke air cleaning units, though those don't replace full professional decontamination.
One more point matters with before and after photos here. Facebook posts with images can receive 37% to 53% more likes and 104% more comments than text-only posts. That matters for restoration companies, but it also explains why homeowners see so many dramatic fire cleanup galleries online. Use them for education, not as proof that every fire follows the same path.
3. Mold Remediation Containment and Complete Removal
Mold before and after photos are only useful when they show the moisture problem behind the visible growth. In a Chandler attic after a roof leak, the “before” image may show staining on sheathing and dark growth along framing. The “after” image should show containment, removal of affected materials where required, cleaning, and the corrected moisture path.
A weak gallery only shows black spots gone. A strong one shows barriers, negative air setup, removed drywall or insulation, and the rebuilt area after the source issue is addressed.
What homeowners should look for
If a contractor's photos skip containment, be cautious. Mold work isn't just a cleaning exercise. Disturbing colonies without control measures can spread spores into nearby rooms and HVAC pathways.
The same caution applies to timing. Some industries now emphasize timeline transparency in before and after photos, including noting when the after photo was taken, and one 2026 Instagram post highlighted how lighting, angles, and makeup can create false narratives. The same consistency issue applies in restoration, especially when moisture conditions change over time, according to this discussion of photo consistency and timeline transparency.
- Photograph the moisture source: Roof leak, plumbing leak, condensation, or poor ventilation.
- Ask for pre and post documentation: Air quality discussions, containment photos, and moisture verification all help.
- Keep the focus on cause: Mold is usually the symptom. Moisture is the main problem.
For homeowners comparing options, this page on how much mold remediation costs helps frame the scope questions to ask. Don't accept a photo set that only shows a cosmetic wipe-down. In real mold remediation, the process should be visible.
4. Storm Flood Recovery Large-Scale Water Extraction and Restoration
Storm flooding looks different from a single-room pipe loss. In Phoenix and surrounding areas, monsoon water can push into multiple rooms at once, carry debris, and soak lower wall cavities across a large footprint. Before and after photos from these jobs should show the scale. Hallways, adjoining bedrooms, garages, and contents often tell the story better than one dramatic puddle shot.
In larger losses, I want to see progression. Standing water. Extraction. Disposal piles. Drying chambers. Open cavities where needed. Final cleaned and stabilized interiors. Without that sequence, the homeowner misses how much coordination the job really required.
Here's a flood recovery clip that shows the kind of large-loss work many people never see until they need it.
Homeowner moves that help on day one
- Go to safety first: If water is still rising, move to higher ground and stay out.
- Capture water lines: Photograph wall marks, flooring saturation, and affected contents before cleanup starts.
- Keep communication organized: Save claim numbers, adjuster contacts, and photo folders in one place.
Systematic photo documentation can also reduce disputes. One industry reference notes that using wide, mid, close-up, and source-area shots can reduce claim disputes by 30–40%. That's one reason detailed flood photo sets matter so much. They aren't just for marketing. They support the record of what was damaged and what was done.
The trade-off in flood jobs is that homeowners often want immediate tear-out everywhere. Sometimes that's necessary. Sometimes targeted drying and selective removal protect more of the structure. The photos should make that judgment visible.
5. Appliance Leak Damage Rapid Response to Hidden Water Sources
Appliance leaks create some of the most misleading before and after photos because the visible damage is often minor at first. A dishwasher leak under kitchen cabinets in Scottsdale might show one stained kick plate and a slightly cupped plank floor. Once the toe-kick comes off and moisture readings are taken, the hidden damage can be much broader.
That's why the best photo sets include the concealed areas. Underlayment, cabinet bases, wall cavities behind the refrigerator line, and the flooring transition into adjacent rooms matter more than the puddle you can see.
Where hidden water usually shows up
- Under cabinets: Water can sit against particleboard and swell it from the bottom up.
- Behind appliances: Supply lines and drain connections can leak slowly for days.
- At wall bases: Small leaks migrate sideways before they show obvious surface damage.
I tell homeowners to check under high-risk appliances regularly and learn the shut-off locations for those supply lines. That's simple advice, but it prevents delay when a hose splits or a pan overflows.
Before and after photos are particularly persuasive in jobs like this because they show a transformation people wouldn't otherwise understand. Every project can become a useful visual story, and some marketing guidance for service companies notes that every sale is a potential before-and-after story. That's a smart mindset for documentation too. If you photograph appliance areas well before demolition, you preserve details that are easy to lose once cabinets come apart.
6. Trauma and Biohazard Cleanup Professional Decontamination and Restoration
This category needs the most restraint. Before and after photos in trauma and biohazard work should educate, not sensationalize. A proper photo set documents affected zones, containment, removal of impacted materials, cleaning, disinfection, and safe restoration of the space to a usable condition.
In a Phoenix residence or a Chandler unattended death scene, the public-facing photos should stay respectful. The strongest images focus on procedure. PPE, sealed work areas, removed porous materials, cleaned structural surfaces, and final room condition.
What homeowners and property owners should ask for
Biohazard work must be handled by trained professionals, and the documentation should reflect that discipline. You want a record of what areas were affected, what materials were removed, and how disposal was handled.
The relevant restoration standard here is S540, one of the IICRC standards used by Arizona restoration contractors, alongside S500, S520, and S700, as summarized in this review of IICRC standards applied to Arizona restoration. Those standards matter operationally, but they don't create binding guarantees on pricing, coverage, or outcome.
If you need specialized help, this biohazard remediation company page outlines the type of response homeowners and managers usually seek. Never attempt this cleanup yourself. In these jobs, the process matters more than the visual drama.
7. Sewage and Contaminated Water Cleanup Hazardous Material Remediation
Sewage backups create the kind of before and after photos that homeowners often underestimate. The room may not look catastrophic in a phone picture. A small amount of black water in a bathroom, utility room, or lower hallway can still affect flooring, baseboards, drywall, and contents in ways that require removal and decontamination.
The after photos should show a clearly defined cleanup path. Containment, extraction, disposal of porous materials that can't be salvaged, cleaning of structural surfaces, and drying. If all you see is a mopped floor and a deodorized room, the gallery isn't telling the whole story.
The key difference in sewage losses isn't appearance. It's contamination level.
Smart questions to ask on a sewage loss
- Was containment used: You want to know how the crew limited cross-contamination.
- Which materials were removed: Carpet pad, drywall bottoms, insulation, and cabinetry may all be affected.
- How was disposal handled: Proper hazardous waste handling should be documented.
This is also where homeowners need to stay realistic about certifications and claims. In the United States, the restoration industry does not legally require a state license to operate a restoration service company, which is why you should be careful with broad promises from unverified operators, as explained in this overview of what the IICRC is and why it matters.
A clean-looking after photo is not enough. On contaminated water jobs, safe remediation is the standard that matters.
8. Moisture Intrusion and Structural Drying Hidden Damage Prevention
Some of the best before and after photos aren't dramatic at all. A roof leak in Scottsdale, a foundation seep in Phoenix, or rain intrusion through wall cracks in Gilbert may begin with a faint stain or slight paint blistering. The main work starts when the technician confirms moisture inside the assembly.
That's where structural drying photos become valuable. The strongest records show the affected elevation, meter readings, thermal imaging or other diagnostic findings, controlled opening of cavities when needed, and drying equipment placed with a purpose.
What separates good documentation from weak documentation
Good documentation keeps camera distance and angle consistent. It also avoids distortion. A wide-angle lens can exaggerate depth and shape, and inconsistent lighting can make damage look better or worse than it is. One discussion of image authenticity points out concerns around lens distortion, altered angles, and even pupil reflection checks in some visual fields, including a cited figure that 68% of misleading photos use altered angles.
That same principle applies to property damage. If the before photo is shot low and close and the after photo is shot straight-on from farther back, the comparison is weaker.
For hidden moisture concerns, this page on thermal imaging inspection gives homeowners a practical look at one common diagnostic tool. Ask for moisture readings and image consistency. If a contractor can't explain what changed between photos, the visual proof isn't strong enough.
9. Contents Cleaning and Restoration Salvage and Remediation Services

Homeowners often focus on walls and floors first, but contents losses are where the emotional weight usually sits. Family photos, documents, upholstered furniture, electronics, keepsakes, and children's items can all end up in the damage path. Before and after photos of contents restoration help people see that “damaged” doesn't always mean “trash.”
A good contents gallery shows sorting, inventory, pack-out, cleaning, deodorization, specialty treatment, and protected storage. In a Chandler water loss, that might mean drying and cleaning documents and photographs. After a Mesa soot loss, it may mean detailed cleaning of salvageable household items before they return to the home.
What to document before anything leaves the house
- Whole-room views: Show where items were located before pack-out.
- Item groups: Photograph shelves, closets, drawers, and furniture surfaces in sections.
- Priority pieces: Take extra photos of sentimental or high-value belongings.
Ask for an inventory. Ask where items will be stored. Ask how fragile contents will be labeled and separated. Those questions matter just as much as the room drying plan.
Some of the most meaningful restoration work isn't structural at all. The return of cleaned family belongings often tells the before-and-after story of recovery.
10. Commercial Property Restoration Multi-Space Remediation and Business Continuity
Commercial before and after photos should show control, not just cleanup. In a downtown Phoenix office loss, a Mesa warehouse mold issue, or a Scottsdale retail fire cleanup, the challenge isn't only damage removal. It's sequencing work around staff, tenants, inventory, and reopening demands.
The best images show zones. Occupied versus unoccupied spaces. Containment around active operations. Staged drying or decontamination. Final turnover of each area. For facility managers, that kind of visual record is often more useful than a single dramatic after shot of the lobby.
What strong commercial galleries usually reveal
Commercial projects involve more decision-makers. Owners, managers, insurers, tenants, maintenance teams, and sometimes regulators all need a common record. Before and after photos help create that shared view when the scope changes from room to room.
Technician qualifications also matter. IICRC-certified technicians must complete 14.0 continuing education credit hours every four years to maintain certification. That doesn't guarantee a result, but it does show that ongoing qualification isn't automatic.
For business owners, the most useful photo set answers practical questions. What's affected, what's isolated, what can stay in service, and what has to remain offline. In commercial restoration, clear visuals reduce confusion and speed up decision-making across the whole property.
Before & After Photo Comparison: 10 Restoration Scenarios
| Service | Implementation Complexity 🔄 | Resource Requirements ⚡ | Expected Outcomes ⭐📊 | Ideal Use Cases | Key Advantages ⭐ |
|---|---|---|---|---|---|
| Water Damage Restoration: Burst Pipe Recovery | Moderate, time‑sensitive extraction and drying | High‑capacity pumps, dehumidifiers, moisture meters, trained crew | High restoration success, mold prevention; typical 3–7 days, ⭐⭐⭐⭐ | Burst pipes, supply‑line failures, localized flooding | Rapid mitigation, structural preservation, clear insurance documentation |
| Fire and Smoke Damage Restoration: Complete Structural Cleanup | High, decontamination, odor removal, reconstruction | Thermal imaging, industrial decontamination, content restoration teams | Comprehensive cleanup; may require reconstruction, odor removal, ⭐⭐⭐ | Kitchen fires, electrical fires, heavy smoke penetration | Specialized decontamination, content salvage, safety restoration |
| Mold Remediation: Containment and Complete Removal | High, containment, testing, selective demolition | HEPA filtration, containment barriers, lab air testing, certified techs | Removes visible colonies and reduces spores if source corrected, ⭐⭐⭐⭐ | Crawlspaces, attics, HVAC contamination, prolonged humidity issues | Health hazard elimination, spore containment, long‑term prevention |
| Storm Flood Recovery: Large‑Scale Water Extraction and Restoration | Very high, logistics for large footprints and prolonged projects | Extraction trucks, many dehumidifiers/air movers, large crews, staging | Restores large areas; timelines weeks–months; extensive replacement possible, ⭐⭐⭐ | Monsoon/flash flooding, multi‑room inundation, multi‑unit loss | Rapid large‑scale deployment, insurance coordination, mass extraction |
| Appliance Leak Damage: Rapid Response to Hidden Water Sources | Low–Moderate, focused, confined‑space work | Moisture meters, cavity drying tools, small specialist crew | High prevention of secondary damage when caught early, ⭐⭐⭐⭐ | Dishwasher/washing machine leaks, water heater or refrigerator failures | Detects hidden damage, lower restoration cost with early action |
| Trauma and Biohazard Cleanup: Professional Decontamination and Restoration | Very high, strict protocols, regulatory compliance | PPE, certified biohazard techs, hazardous waste disposal, specialized equipment | Complete decontamination and certified clearance; sensitive handling, ⭐⭐⭐⭐ | Unattended deaths, bloodborne hazards, decomposition incidents | Regulatory compliance, compassionate handling, liability protection |
| Sewage and Contaminated Water Cleanup: Hazardous Material Remediation | High, hazmat procedures and extensive decontamination | Disinfectants, containment, HEPA filtration, certified technicians | Restores habitability, pathogen removal; may require material replacement, ⭐⭐⭐ | Sewage backups, contaminated floodwater, septic failures | Eliminates health risks, documented safe disposal, regulatory adherence |
| Moisture Intrusion and Structural Drying: Hidden Damage Prevention | Moderate–High, detection plus targeted drying operations | Thermal imaging, moisture meters, cavity drying equipment | Prevents mold and structural decay if source fixed; extended dry times, ⭐⭐⭐⭐ | Roof leaks, foundation cracks, wall cavity moisture | Early detection, preserves structure, prevents costly future repairs |
| Contents Cleaning and Restoration: Salvage and Remediation Services | Moderate, inventorying, specialized cleaning workflows | Cleaning labs, specialized cleaners, climate‑controlled storage | Recovers many valuables, reduces replacement costs, ⭐⭐⭐⭐ | Fire/smoke affected items, water‑damaged documents, sentimental goods | Recovers valuables, detailed insurance inventory, protects possessions |
| Commercial Property Restoration: Multi‑Space Remediation and Business Continuity | Very high, multi‑stakeholder coordination, staged remediation | Large crews, project management, industrial equipment, compliance experts | Enables phased reopenings and business continuity; timeline varies, ⭐⭐⭐⭐ | Office buildings, restaurants, retail centers, warehouses | Scalable resources, minimizes business interruption, regulatory coordination |
Key Takeaways for Homeowners Facing Damage
The biggest lesson from strong before and after photos is simple. Good restoration is a process you can see. Water damage should show extraction, drying, and moisture verification. Fire damage should show soot cleanup and odor treatment, not just fresh paint. Mold remediation should show containment and source correction. Biohazard and sewage losses should show controlled removal, decontamination, and safe handling.
That's why your own photo documentation matters so much in the first hours after a loss. Start with wide shots of the affected area. Then move closer and capture specific materials, appliance connections, visible staining, water lines, soot residue, or mold growth. If it's safe, photograph adjoining rooms too. Damage often travels farther than homeowners expect.
Consistency matters almost as much as quantity. Try to keep your angles logical and your lighting as even as possible. Don't clean first and photograph later. Don't throw away damaged materials until your insurer and restoration team have advised you. And don't assume a clean-looking surface means the structure underneath is dry or decontaminated.
Homeowners should also be careful about promises. This industry uses important standards, but standards are not the same as guarantees. A professional can explain likely steps, likely concerns, and likely next actions. They should not promise coverage, pricing, or a perfect outcome before the work and claim review unfold.
For practical next steps, focus on four priorities:
- Stay safe: Keep out of unsafe areas, especially after fire, flooding, sewage, or biohazard events.
- Document early: Take before photos before moving contents or starting cleanup.
- Ask process questions: What's wet, contaminated, unsalvageable, or still under evaluation?
- Choose qualified help: Look for a company that can explain standards, equipment, and documentation clearly.
If you're in the Phoenix area and facing water, fire, mold, sewage, or trauma-related damage, Restore Heroes can provide a free onsite inspection to help you understand your next steps. That kind of inspection won't replace a claim decision or create a guarantee, but it can give you a clearer picture of the condition of the property, the likely restoration path, and the documentation you should keep moving forward.
If your home or property has been damaged, Restore Heroes can help you assess the situation, document what's affected, and move into mitigation with a clear plan. Their team serves the Phoenix metro area with restoration support for water, fire, mold, and biohazard losses, and they can walk you through what the before and after photos should show before work begins.