
You've wiped the fireplace face once already. The gray haze smeared instead of lifting. Now you're looking at a spray bottle, a stiff brush, and a pressure washer, and you're not sure which one makes it worse.
That hesitation is useful. Soot removal from brick goes wrong when you clean first and identify the deposit later. Loose soot, greasy smoke film, and a bonded crust look similar at a glance. They don't respond the same way, and the wrong method can drive color deeper, erode mortar, or strip the fired face off the brick.
Start with a cloth. Let the test patch set your method.
Identify the Soot Type Before You Clean
What is the deposit on this brick? Answer that before you add water.
Rub a dry white cloth on a small spot. Check what you lift. Then dampen a clean corner and rub the same spot again. Note which step moves the mark, whether it smears, and whether a sheen remains.
Loose dry soot transfers to the cloth and leaves no shine. Greasy smoke residue smears, feels tacky, and often sits on upper walls above a fireplace or window. Glazed or painted brick shows a shine or a coating, so your detergent test matters more than pressure. A black crust doesn't wipe away at all.
Why a Black Crust Is Different
A black crust is a hardened layer, not loose dust. The National Research Council of Canada digest on masonry soiling notes that brick buildings in heavily polluted industrial environments could become visibly dirty after only about 10 years of service, and that airborne soot, fly ash, and other particles can become incorporated into sulfate minerals. In sheltered areas that hold moisture, pollutants can react with masonry and form insoluble gypsum. The soot is then chemically bonded into the surface.
That distinction decides your tools. Light deposits may respond to controlled washing. Older sulfated crusts need testing and, often, specialist cleaning. Record the brick type, mortar condition, and any moisture damage before you choose, because soft mortar and damp brick change what you can safely use. For background on how deposits form after a fire, see this guide to soot left behind by fire.
| Deposit type | How to recognize it | First method to try |
|---|---|---|
| Loose dry soot | Wipes onto a cloth, no sheen | Vacuum, then dry brush |
| Greasy smoke residue | Smears, feels tacky, often on upper walls | Non-ionic detergent with low-pressure water |
| Black crust | Hard, bonded layer that does not wipe away | Test first; may need specialist cleaning |
| Glazed or painted brick | Shiny or coated surface | Gentle detergent test; no abrasives |
If the mark doesn't respond to dry brushing and vacuuming, stop and identify it before you add water or chemicals.
Cleaners and Tools That Suit Brick
Match the cleaner to both the stain and the brick. Most soot needs water and a brush before anything stronger.
| Cleaner or tool | Best for | Caution |
|---|---|---|
| Natural-bristle brush and clean water | Loose soot and light residue | Rinse the brush often so soot is not redeposited |
| Mild non-ionic detergent | Greasy smoke film on sound brick | Test first and rinse thoroughly |
| Low-pressure water at 300 psi or less | Wetting and rinsing | Higher pressure can erode the brick face and joints |
| Steam or hot-pressurized water | Heavy soot or crust, after testing | Set temperature, dwell time and distance from the test patch |
| Trisodium phosphate (TSP) | Stubborn soot when detergent fails | Use only when necessary and rinse completely |
| Muriatic acid | Not recommended on brick | Can dissolve lime mortar and leave chloride deposits |
| Caustic soda or lye | Not recommended on older brick | Can cause efflorescence and loss of surface |
The National Park Service preservation brief on cleaning masonry states that water-based cleaning is generally among the gentlest options and that soot and smoke shouldn't automatically be treated like oil or metallic stains. Hydrochloric, or muriatic, acid is specifically discouraged for historic masonry because it can dissolve lime-based mortar, damage brick and stone, and leave chloride deposits behind.
The Basic Kit and the Order to Use It
Gather a natural-bristle brush, a soft sponge, two buckets, a low-pressure sprayer, and plastic sheeting. Add a HEPA vacuum for loose particles. Wear gloves, goggles, and a dust mask for dry brushing.
Start with water and the brush. Add a non-ionic detergent only if the test patch shows a greasy film. Consider steam or trisodium phosphate only after the patch shows that detergent fails. For a useful comparison of products and process order, see this resource on choosing the right brick cleaning process from Water Works Power Washing.
Change your rinse water often. Follow every product label exactly. Also avoid caustic soda or lye on older brick, since they're linked to efflorescence and loss of the surface. High-pressure water and abrasive additives can erode the face in one pass.
A product that works on one wall may not suit a wall with a different brick or mortar. That's normal after a fire, and it's why planning for cleaning up fire damage starts with identification rather than a single product.
Clean Soot Off Brick Step by Step
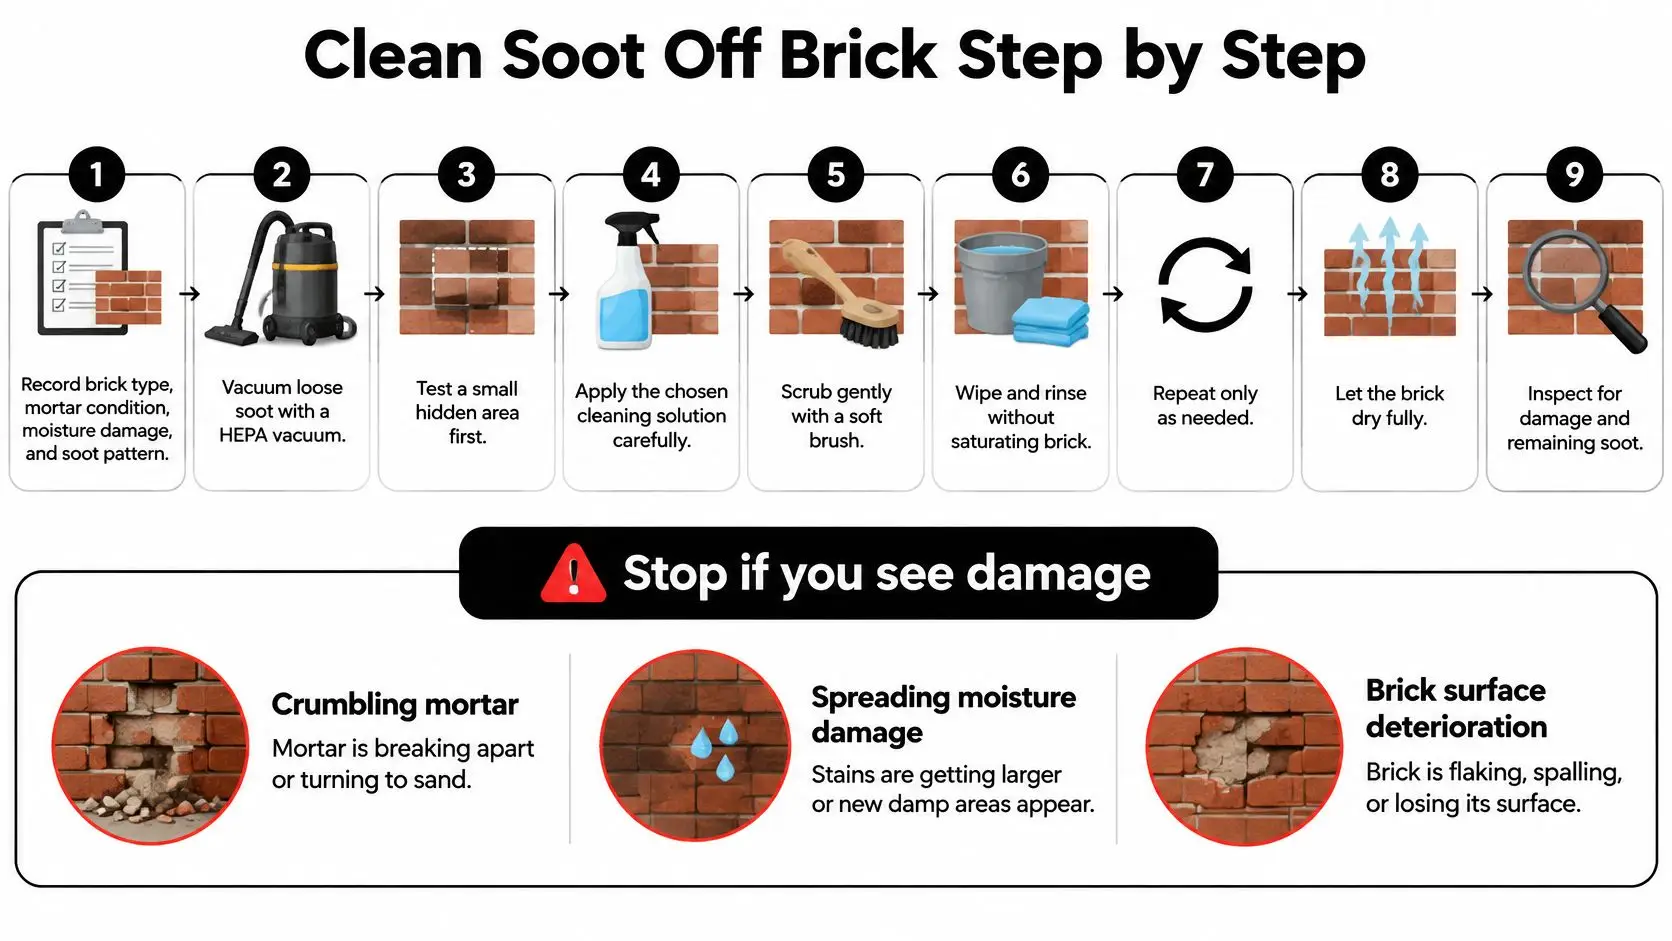
Loose soot, greasy smoke film, and a bonded black crust need different cleaning methods. Start with the least aggressive approach, then let a test patch determine what to do next. The National Park Service guide to keeping masonry clean identifies water cleaning as generally the gentlest approach and advises matching the cleaning agent to the stain. Brick type, surface finish, and fire severity all affect the result.
The steps below help prevent soot from being pressed into the pores and show when to stop.
The infographic summarizes the order before you start.
Nine Steps in Order
- Record and remove loose material first. Note the brick type, mortar condition, moisture damage, and soot pattern. Vacuum loose soot with a HEPA vacuum, then dry-brush gently with a natural-bristle brush. Lift particles without grinding them into the pores.
- Protect the area and plan runoff. Cover wood trim, glass, floors, and plants with sheeting. Plan where rinse water will go. Runoff left to dry can leave soot on the wall again.
- Test one inconspicuous patch and photograph it. Choose a hidden spot with the same brick, mortar, and staining. Photograph it before and after cleaning. Use the dry result to decide whether the method is safe and effective before treating more brick.
- Pre-wet the brick and adjacent masonry. Mist or rinse with clean water so the pores are damp, not bone dry. Dry brick can draw detergent and dirty water deeper. Wetting also helps reveal the surface color as you clean.
- Use detergent only if the test patch shows a greasy film. Apply a mild non-ionic or phosphate-free detergent in sections of about 1 to 2 square feet, brushing from the bottom upward with a natural-bristle brush. If the patch shows loose soot instead, continue with water and gentle brushing.
- Rinse the brush often. Swirl it in clean water between passes. A brush loaded with soot can redeposit it on the brick and joints. Change the water when it turns dark.
- Rinse each section before moving on. Use clean, low-pressure water. Rinse thoroughly, including recessed joints, before detergent or loosened soot can dry on the face.
- Repeat only where soot remains. Compare the dry section with your test patch photo. A second light pass on a stubborn area is safer than scrubbing the whole wall harder. Leave clean sections alone.
- Let the wall dry fully before sealing or painting. Damp brick can trap moisture and salts under a coating. Judge the color when the wall is dry; wet brick often looks darker and cleaner than it will later.
The video below shows the brushing and rinsing rhythm in practice.
What a Clean Result Looks Like
The brick and joints should have an even tone. The face should not feel soft or powdery, and the mortar should not crumble when rubbed. Watch for a white salt bloom as the wall dries.
Judge the test patch in daylight after it is fully dry. Compare it with the starting photo. If the color is patchy, adjust the section size, rinse water, or brushing direction on the test area before continuing. The same care with residue and rinsing applies to soot removal from walls.
Steam or hot-pressurized water may be considered for heavy soot or sulfate and gypsum crusts. Choose pressure, temperature, dwell time, and nozzle distance based on the test patch. More heat or pressure will not fix a cleaner that is wrong for the deposit.
Stop rule: If the test patch shows a powdery face, lost glaze, receding joints, or salts after drying, stop using that method.
Methods That Cause Irreversible Damage
The National Park Service restoration guide for historic masonry buildings warns that sandblasting can remove an original protective layer from historic brick and permanently change the surface. It also identifies bead blasting, wheel blasting, and bristle blasting as unsuitable preservation methods. Abrasive cleaning can remove brick along with soot.
Avoid these shortcuts:
- High-pressure water and mechanical scrapers: They can erode the face, open pores, and force water into the wall cavity.
- Sand, soda, or ice crystal additives: Their abrasive action can cut mortar and glaze.
- Stiff wire brushing: It scratches the fired surface and leaves marks that collect dirt.
Two common errors cause avoidable streaking: cleaning the visible brick face while leaving soot in recessed joints, and letting dirty runoff dry on the wall. Work in small sections, keep the brush clean, and rinse each area before moving on.
Exterior and Interior Brick Need Different Methods
An exterior wall is a runoff problem. An interior fireplace is a containment problem. Don't work them the same way.
The split view below contrasts the two settings.
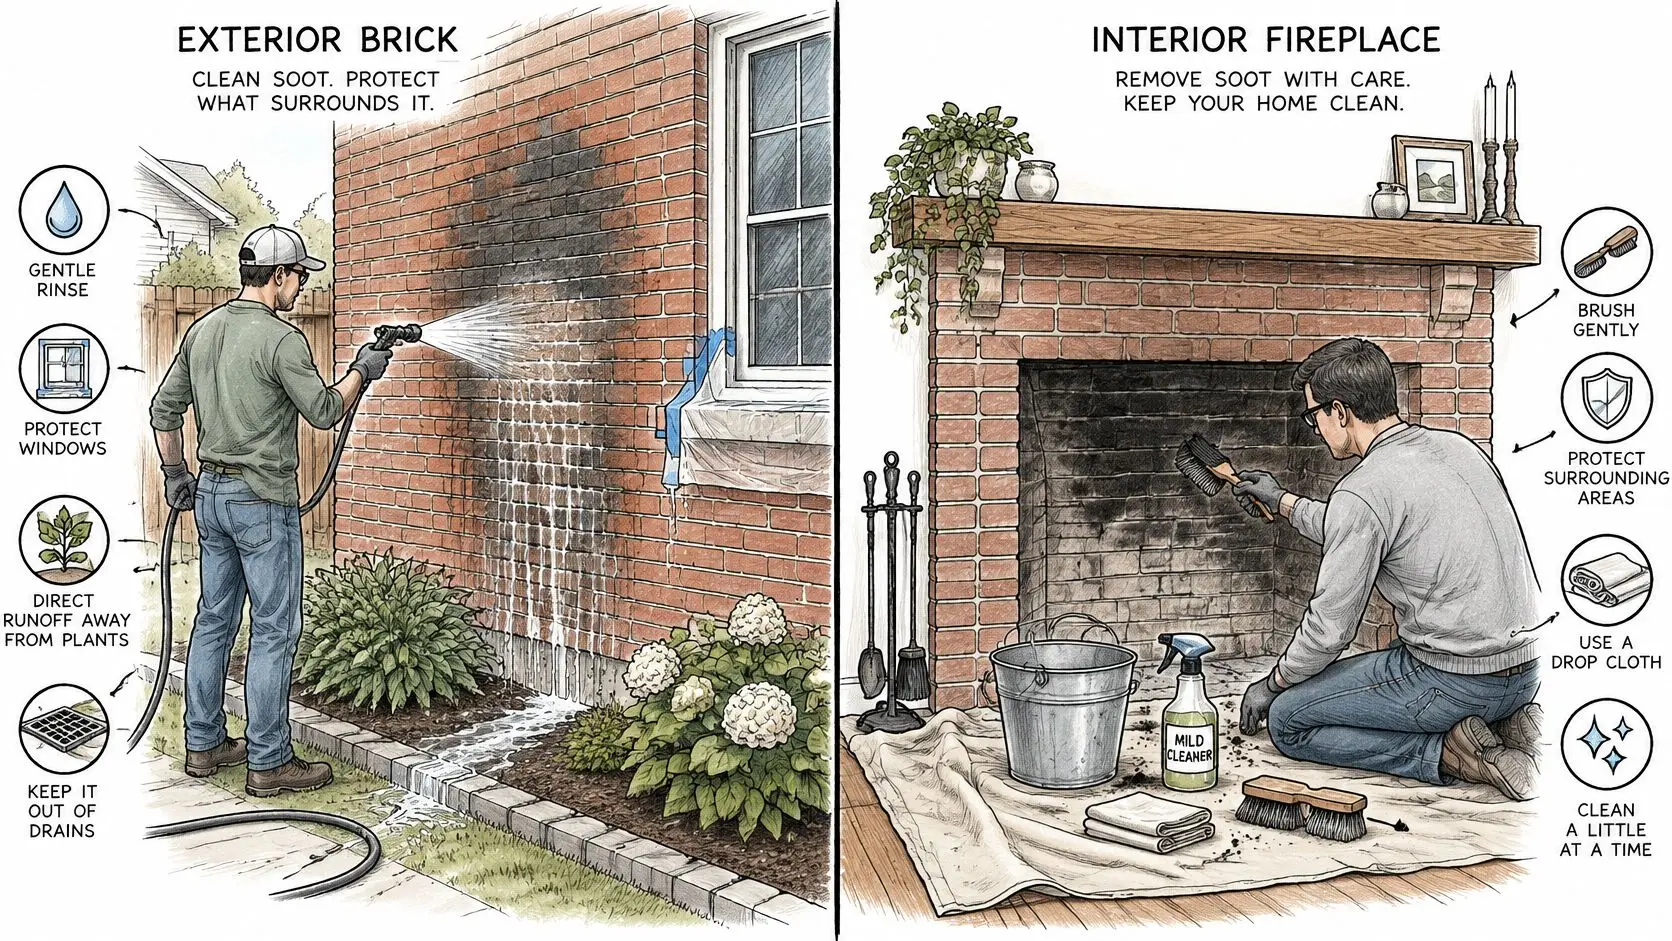
For exterior brick, plan where rinse water will go before you start. It can reach landscaping, a neighbor's property, and window sills. Avoid direct midday sun and freezing temperatures. In Phoenix heat, brick can dry fast enough to concentrate detergent on the face, so work shaded morning hours and rinse thoroughly.
The Timed Exterior Rinse
For a fire-stained exterior wall, the National Park Service guidance on removing wildland fire chemicals identifies low-pressure rinsing at 300 psi or less as the least aggressive starting point, working in areas of approximately 1 to 2 square feet, wetting the surface and allowing it to sit for 10 minutes, rinsing, then gently brushing in a circular motion for about 30 seconds before rinsing thoroughly. On vertical walls, that guidance proceeds from the top downward, with repeated brushing and rinsing as needed.
Use that timed rinse on its own. Don't add a detergent pass on the same area the same day, and don't mix both runoff directions in one session. Mixing them leaves stripes. Keep the bottom-up detergent sequence for greasy film on sound brick on a separate occasion if the rinse alone isn't enough.
The Interior Fireplace Approach
Inside, dry-brush and vacuum first. Use only a light mist after that, so water doesn't soak the hearth, floor, or wall cavity. Skip pressure washers entirely, cover the flooring, ventilate the room, and keep heat sources off damp masonry. Inspect the flue and firebox separately before using the fireplace again.
| Factor | Exterior brick | Interior brick (fireplace) |
|---|---|---|
| Water volume | Controlled rinsing with runoff plan | Light mist only, to avoid soaking floors and walls |
| Pressure | Start at 300 psi or less | No pressure washer; brush and detergent only |
| Work pattern | Small sections, top down on walls | Dry brush and vacuum first, then small damp sections |
| Drying | Shade, avoid heat and freezing | Ventilate; keep heat sources off wet masonry |
Say one house has a gray haze on the fireplace face and a black smear above an exterior window. The fireplace needs containment and minimal water. The window wall needs runoff control and the timed rinse. If smoke has spread beyond one surface, assess the wider pattern of smoke damage in the house before you seal or repaint anything.
Decide Between DIY Cleaning and Professional Restoration
Decide after the test patch, not before it.
Stay with DIY only when three things are true together. The deposit is loose soot on one accessible wall. The patch responds to water and a natural-bristle brush. The mortar joints still look sound. If any one of those fails, reassess.
Call for restoration help when any one of these is true:
- Hard black crust: The deposit is bonded and doesn't lift with dry methods.
- Historic facade: The brick or mortar is old, soft, or previously repaired.
- Large or spread-out soot: Staining covers a large area, several rooms, or has reached ductwork or interior walls.
- Patch damage: The test shows surface loss, powdering, or soft mortar.
- Unassessed fire or water damage: The building has other damage that hasn't been checked yet.
A professional visit should identify the brick and the deposit first. It should check how far moisture went. It should then choose the least aggressive method the patch will tolerate. Our IICRC-certified professionals assess the extent of the damage, develop a customized restoration plan, and make sure all moisture is properly removed. Restore Heroes is a Phoenix-metro restoration firm, and you can review its soot cleaning services when you're deciding whether to request that kind of assessment.
Photograph the patch, write the deposit name beside the photo, and follow the stay-or-call rule that matches those notes.
Don't let a clean-looking test patch rush you. Check it dry. Check the joints. Then commit. That's the decision point that protects the wall.
If your test patch shows a bonded crust, soft mortar, or soot spread across several rooms, Restore Heroes can assess the brick, the deposit, and any related fire or moisture damage and set out the least aggressive cleaning approach for that masonry. Visit Restore Heroes to request an assessment through the contact form by selecting Fire & Smoke Damage.