
The puddle under the dishwasher was small enough for two towels. You soaked it up, ran a fan for an hour, and by the next morning the planks felt flat and dry under bare feet. Eight days later, one plank edge near the toe kick has lifted enough to catch a sock, and the seam beside it has gone a shade darker than the rest of the floor.
Nothing about that floor was lying to you, exactly. The top of a laminate plank is built to shed water, so it dries quickly and feels normal while the layers beneath it stay wet. That gap between what the surface reports and what the assembly is doing is where most of the expense starts.
The way out is to stop trusting how the floor looks and start checking it. A flashlight, a paper towel, a slow walk in socks, and a moisture meter will tell you more in ten minutes than a week of pressing on the surface ever will.
Why Water Hides Under Laminate Flooring
A laminate plank is a sandwich, and only the top slice is built to repel water. The clear wear layer shrugs off spills. Under it sits a printed decor layer that supplies the grain. The thick middle is the core, pressed fiberboard or particleboard, and it behaves like a compressed sponge. Below the planks runs an underlayment pad, foam or fibre, and beneath that is the subfloor, which across much of the Phoenix metro is a concrete slab.
The layer you can't see is where the story really happens.
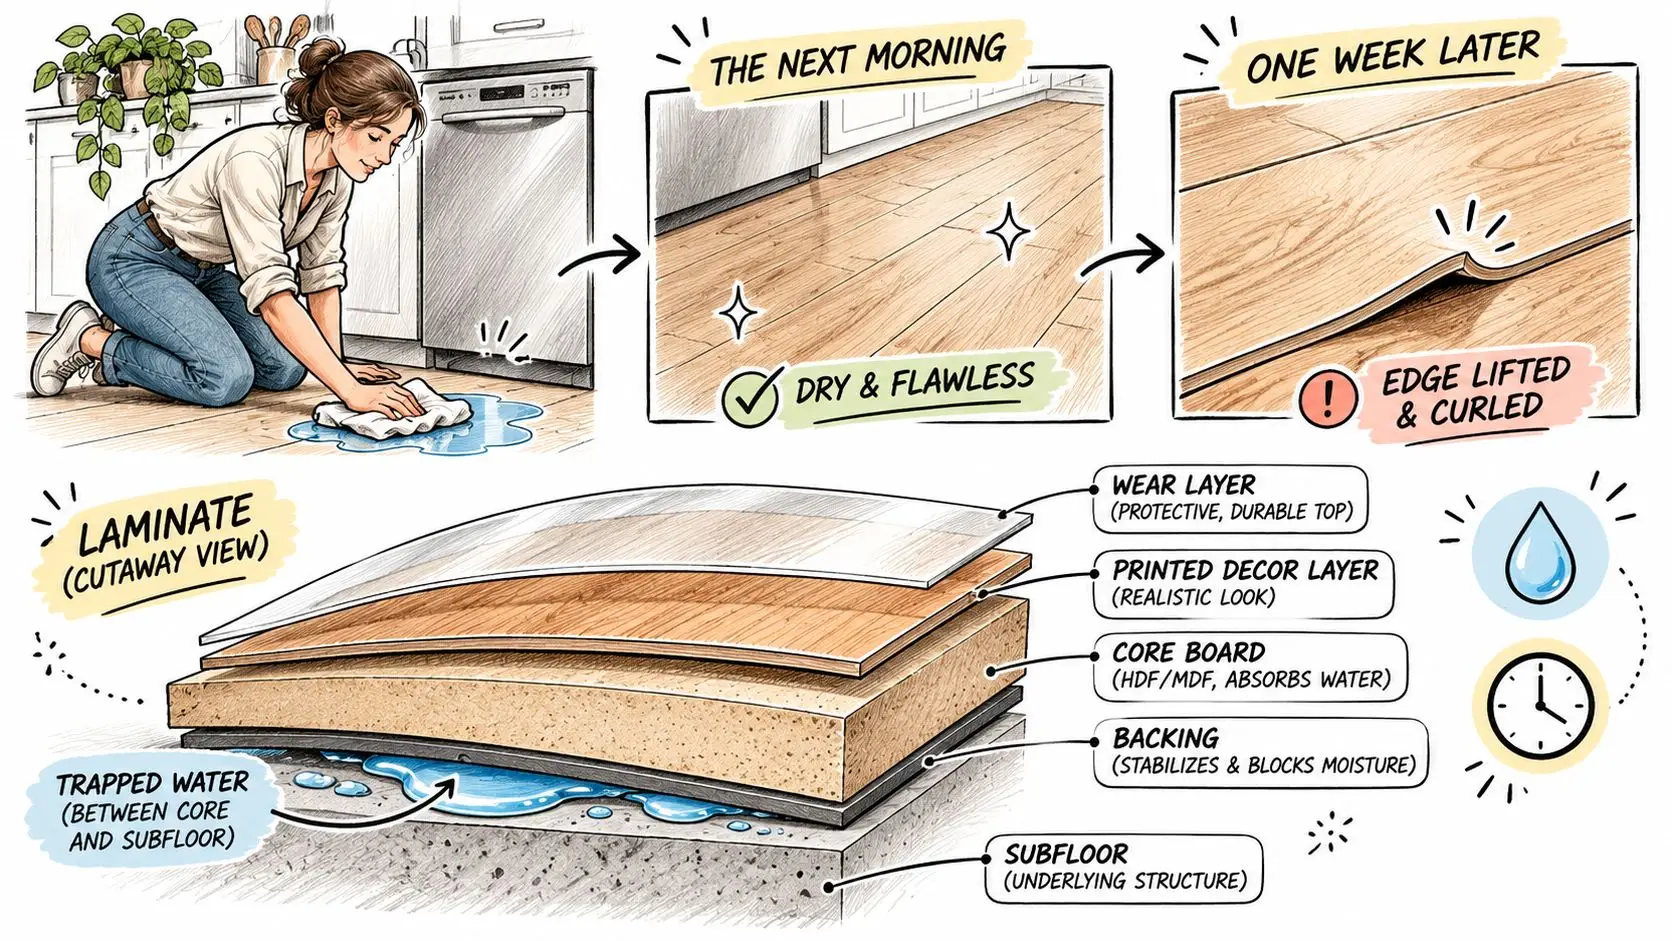
The wear layer does its job so well that it becomes the problem. It keeps surface water out, dries within minutes, and hands you a floor that reads dry to the touch. The core has no such protection at cut edges and open joints, which is exactly where water gets in. Think of a wet towel left under a tablecloth. The cloth on top feels fine. The towel is soaked.
According to the U.S. Environmental Protection Agency's guide to mold, moisture and your home, the visible surface can appear relatively dry while moisture stays trapped below the boards, underlayment or subfloor. The same guidance advises drying wet or damp materials within 24 to 48 hours to prevent mold growth in most cases, and fixing the leak promptly, since mold needs moisture to grow.
When the fiberboard core takes on water it swells, loses dimensional stability, and shows the damage from the outside in: edge peaking along the seams, joints that separate, boards that buckle, and in bad cases permanent deformation that no amount of drying reverses.
Water also refuses to stay put. It travels sideways along joints, through transitions, and into the expansion gap at the perimeter, then wicks upward into baseboards and drywall. The wet footprint is usually wider than the stain you can see, and it often reaches behind a cabinet or under a toe kick where nobody looks.
So the look of the floor isn't the test. Each layer gets its own verdict, and the only way to reach one is to check the planks, the underlayment and the subfloor separately.
Warning Signs Water Is Trapped Below
Trapped water announces itself in two stages, and the early one is quiet. A faint musty smell at floor level near a baseboard, a plank edge that feels rough under a fingertip, a spot that gives slightly when you step on it. None of that looks like an emergency. By the time staining shows at the seams or a row of planks rises, the water has been sitting a while.
The difference between the two groups is mostly time.
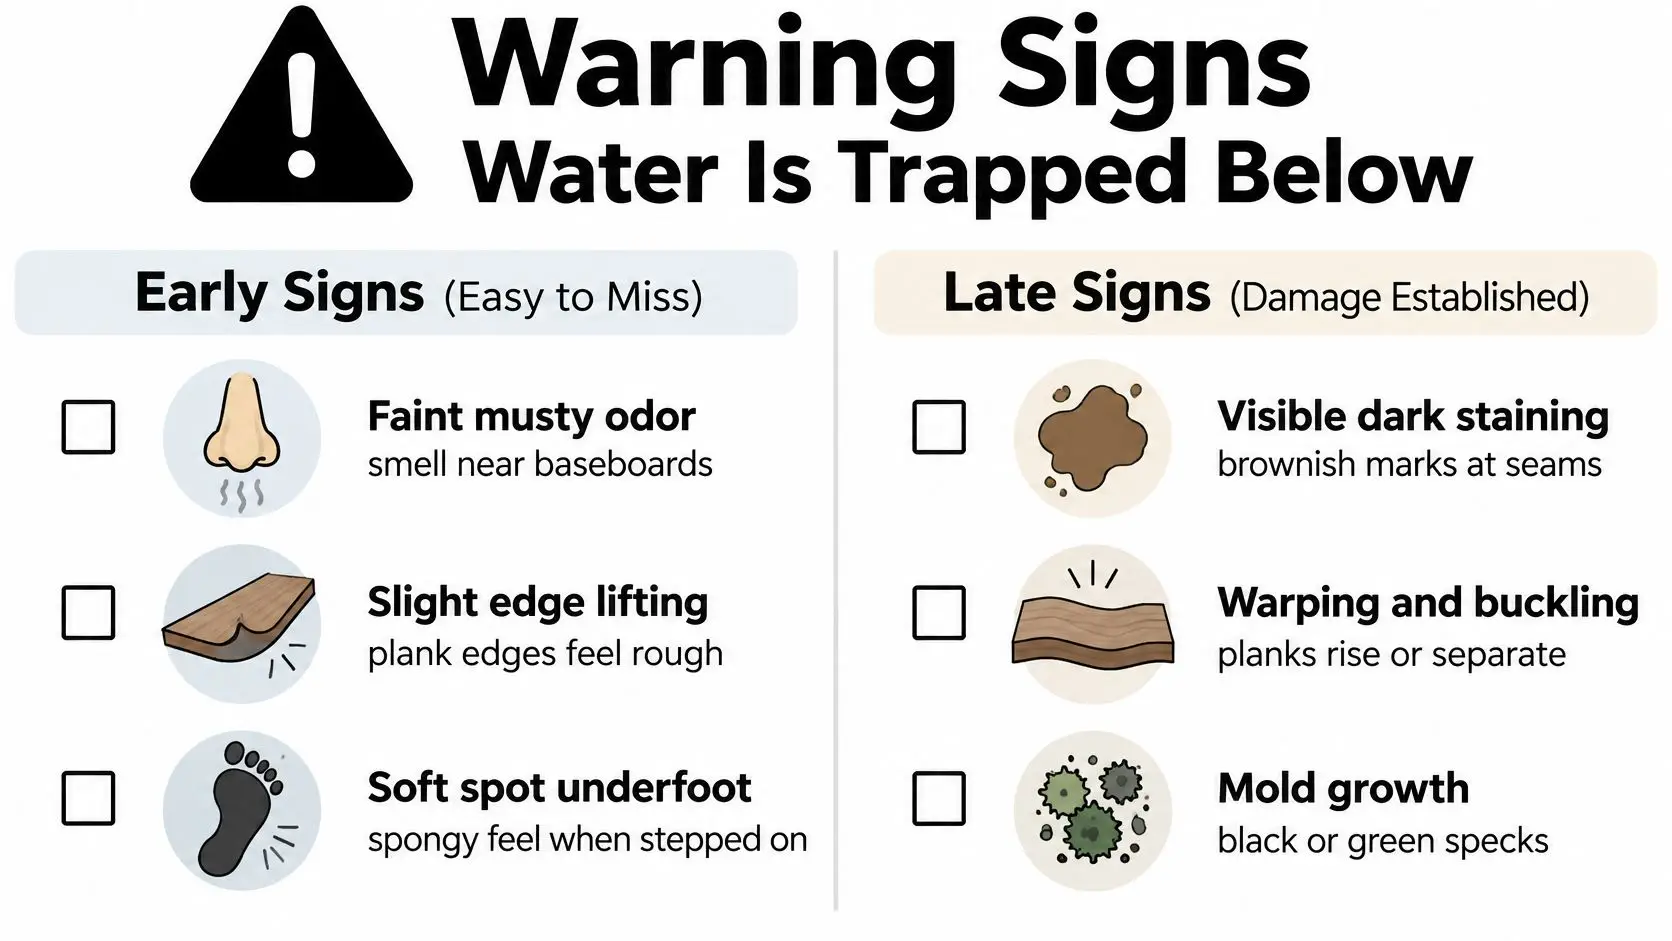
Use this table as a starting point rather than a verdict.
| Sign | What It Usually Means | How to Check It |
|---|---|---|
| Plank edges lifting or peaking along a wall | Core swelling from absorbed water | Sight along the edge with a flashlight at a low angle |
| Water seeping from seams when pressed | Water trapped in the underlayment | Press a dry paper towel along the seam and watch for moisture |
| Soft or springy spots underfoot | Wet underlayment or subfloor | Walk the room slowly and mark any give with tape |
| Squishing or hollow sound when stepping | Trapped water or pad saturation | Step on the area and compare the sound with a dry section |
| Musty smell near baseboards or vents | Hidden moisture, possibly early mold | Smell at floor level near the wall and under cabinets |
| Gaps opening between planks | Core loss or joint movement | Measure the gap at several points along the same plank row |
Planks can look completely intact while water moves through joints, perimeter gaps and transitions into the layers below, as RW Supply's guide to water-damaged floors describes. That guide also notes that even flooring marketed as waterproof may need removal after prolonged exposure or whole-floor flooding, because the subfloor still has to be dried.
The walk-through, in order
- Start at the wall. Press firmly along the baseboard and the first row of planks, where water wicks upward first. Watch your fingertips for dampness and feel for a soft give.
- Work the seams. Lay a dry paper towel along each seam and press. Moisture that appears on the towel came from below, not from your hand.
- Listen as you step. A squish or a hollow tone compared with a dry section of the same room is a strong field indicator, and it's the check that catches what the eye misses.
- Sight down the floor. Put a flashlight on the floor at a low angle and look along the plank edges. Peaking shows up as a shadow line you can't see from standing height.
- Check the water appliances. Toe kicks under the dishwasher, the sink cabinet base, the refrigerator water line, the laundry closet and any floor transition are the spots that collect water first.
- Confirm with a meter. Pin or probe meters suit wood subfloors, while non-penetrating meters screen a floor without drilling it. Compare the suspect area with an unaffected area of the same construction.
One sign on its own can have a harmless explanation, such as a spilled drink on a sealed floor. Two or more signs in the same square of floor point to moisture underneath. Write down the date, the location and a photo of each sign as you find it, because a professional inspecting the floor later will use that record to work out how long the water has been there.
A meter reading compared with a dry reference area is the only way to confirm what your feet and nose already suspect.
Common Causes and How Water Travels Underneath
Water almost never stops where it lands. It follows the path of least resistance, which on a floating floor means the subfloor, the gaps under baseboards, the transitions between rooms, and the dead space inside cabinet bases.
Appliance leaks are the most common source in kitchens. Dishwasher supply and drain hoses, washing machine hoses, refrigerator water lines and ice maker feeds all fail slowly rather than dramatically. A leaking dishwasher connection can keep the cabinet base wet for a week while the floor in front of it looks perfectly normal.
Plumbing failures show up under sinks, at toilet wax seals, and at tub or shower overflows where water spills over the rim and runs down beside the flooring rather than across it.
Air-conditioning condensate deserves its own line item in Phoenix. A clogged condensate drain line or an overflow pan that drains poorly can drip for weeks inside a closet or hallway ceiling, and the first sign is often a stain on the floor rather than water anywhere visible.
Storm and monsoon intrusion pushes water in through door thresholds, sliding door tracks, window frames and roof leaks that travel down inside the wall before reaching the floor. The wet area can be several feet from the point where the water entered.
Slab moisture is the slowest of the group. Where a floating laminate sits directly on a concrete slab without a proper vapour barrier, moisture moving through the concrete has nowhere to go except into the underlayment and the plank cores.
Blockquote: a slow leak versus a burst pipe.
A slow, steady leak and a burst pipe can cost the same in the end. The slow one just gives you no warning and a much bigger head start.
If you can't trace the source yourself, leak detection services can narrow down where water is entering before anyone starts pulling planks up, which saves both the floor and the guesswork.
How Long Wet Flooring Can Wait
The clock starts when water touches the floor, not when you notice it. A dishwasher that leaked overnight has already used eight hours of its window before the first towel comes out.
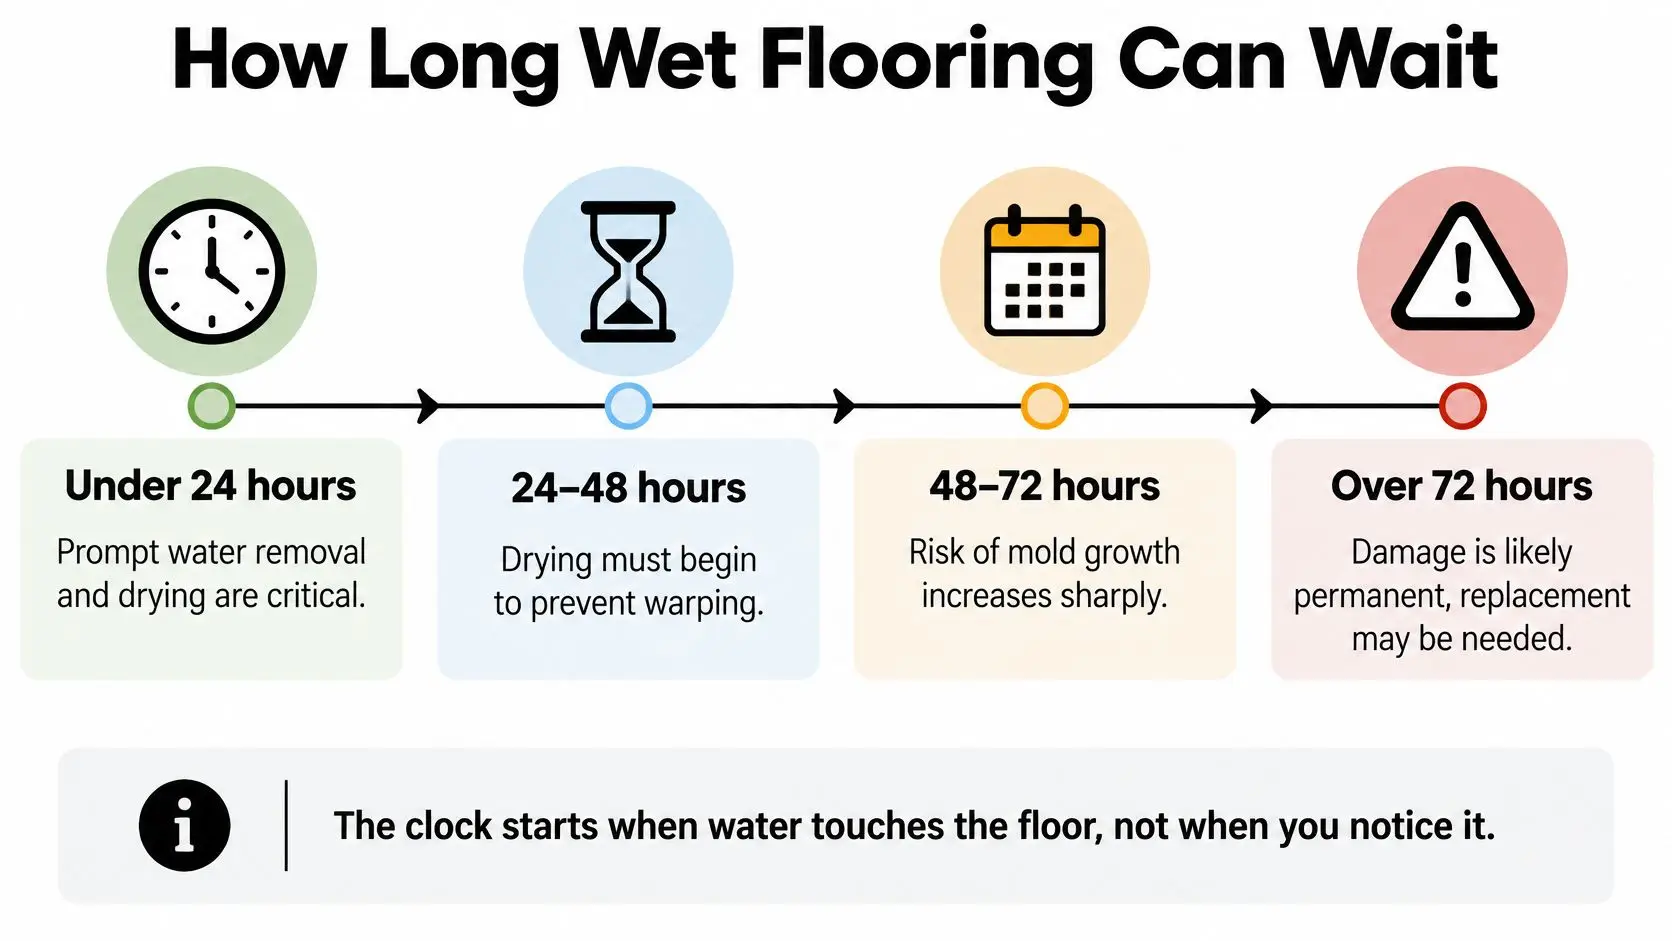
| Time Since Water Exposure | What to Expect | Action to Take |
|---|---|---|
| Under 24 hours | Drying is most likely to prevent mold growth | Remove standing water and start drying at once |
| 24 to 48 hours | Mold risk rises, especially for porous materials | Dry aggressively, lift test areas and take moisture readings |
| 48 to 72 hours | Porous materials that cannot reach a dry reading should be removed | Remove and replace materials that fail the moisture check |
| Over 72 hours | Hidden mold and subfloor rot become more likely | Call a professional for inspection immediately |
| Any time, after flood or sewage exposure | Contamination may require removal of more materials | Treat as urgent and get a professional assessment |
What each window actually changes
Under 24 hours, the odds are on your side. Prompt extraction and steady airflow give the assembly its best chance of drying before the core swells and before anything biological gets a foothold.
From 24 to 48 hours, the focus shifts to porous layers. Underlayment and drywall hold water far longer than a laminate surface does, so this is when lifting a test section and taking readings beats waiting to see what happens.
The 48 to 72 hour mark is where the standard becomes concrete. CDC guidance on water and wind damage says building materials that can't be thoroughly dried within 48 to 72 hours and brought below 20% moisture content should be removed and replaced. The same guidance points to moisture meters and borescopes for checking structural materials and concealed cavities, which for a laminate floor means the underlayment, the subfloor and the base of the walls.
Past 72 hours, you're managing risk rather than preventing it. Hidden mold, softened subfloor panels and odour that survives surface cleaning all become more likely, and an inspection stops being optional.
Why measurement beats the calendar
These windows are about readings, not just dates. Missing a deadline doesn't mean mold is guaranteed, and drying inside 48 hours doesn't mean the floor is safe to keep. A plank can be dry to the touch and still have a swollen core, and a subfloor can read wet long after the visible floor has stopped looking damp.
Say a refrigerator water line drips and wets a two-foot strip along one wall. The visible puddle is gone by lunchtime. What you have is a strip of underlayment holding water against the slab, a run of plank cores sitting in it, and a baseboard wicking it upward. The right move that afternoon is to pull two or three planks at the wettest point, measure the subfloor there and in a dry part of the same room, and let those numbers decide what comes up.
What to Do in the First Hour
Stop first, dry second: No fan outruns an open supply valve.
- Shut off the source. Close the supply valve under the sink or behind the dishwasher or fridge, unplug the appliance, and switch off the air conditioner if its condensate line or pan is overflowing.
- Check the electrical risk. If water has reached outlets, cords or the appliance itself, stay out of the wet area and call an electrician before you step back in.
- Remove standing water. Towels, a wet vacuum or extraction equipment, working from the far edge of the wet area toward the exit so you don't walk through what you just pulled out.
- Document before you disturb anything. Note the date and time water first reached the floor, photograph each sign and the full wet footprint, and mark the wet edge with painter's tape. That record is the clock everything else is measured against.
- Lift only a test area. Take the photos first, then pull a couple of planks and a piece of underlayment at the wettest point so air can reach the layers underneath.
- Start air movement. Fans plus a dehumidifier, doors and windows closed, with indoor relative humidity kept between 30% and 60%, the range the EPA recommends for reducing mold risk.
- Keep a short log. Each reading, each change in the floor, and every call you make. Whoever inspects the floor later will want it.
For a second opinion on which boards can realistically be saved, J.R. Hardwood Floor Refinishing & Cleaning's water damage floor repair guide walks through the same keep-or-replace judgment from a flooring contractor's side of the job.
Once the water is out and the air is moving, the work shifts from stopping the damage to reversing it, which is the water damage mitigation phase and the point where readings start to matter more than towels.
How Professionals Dry Laminate and the Subfloor
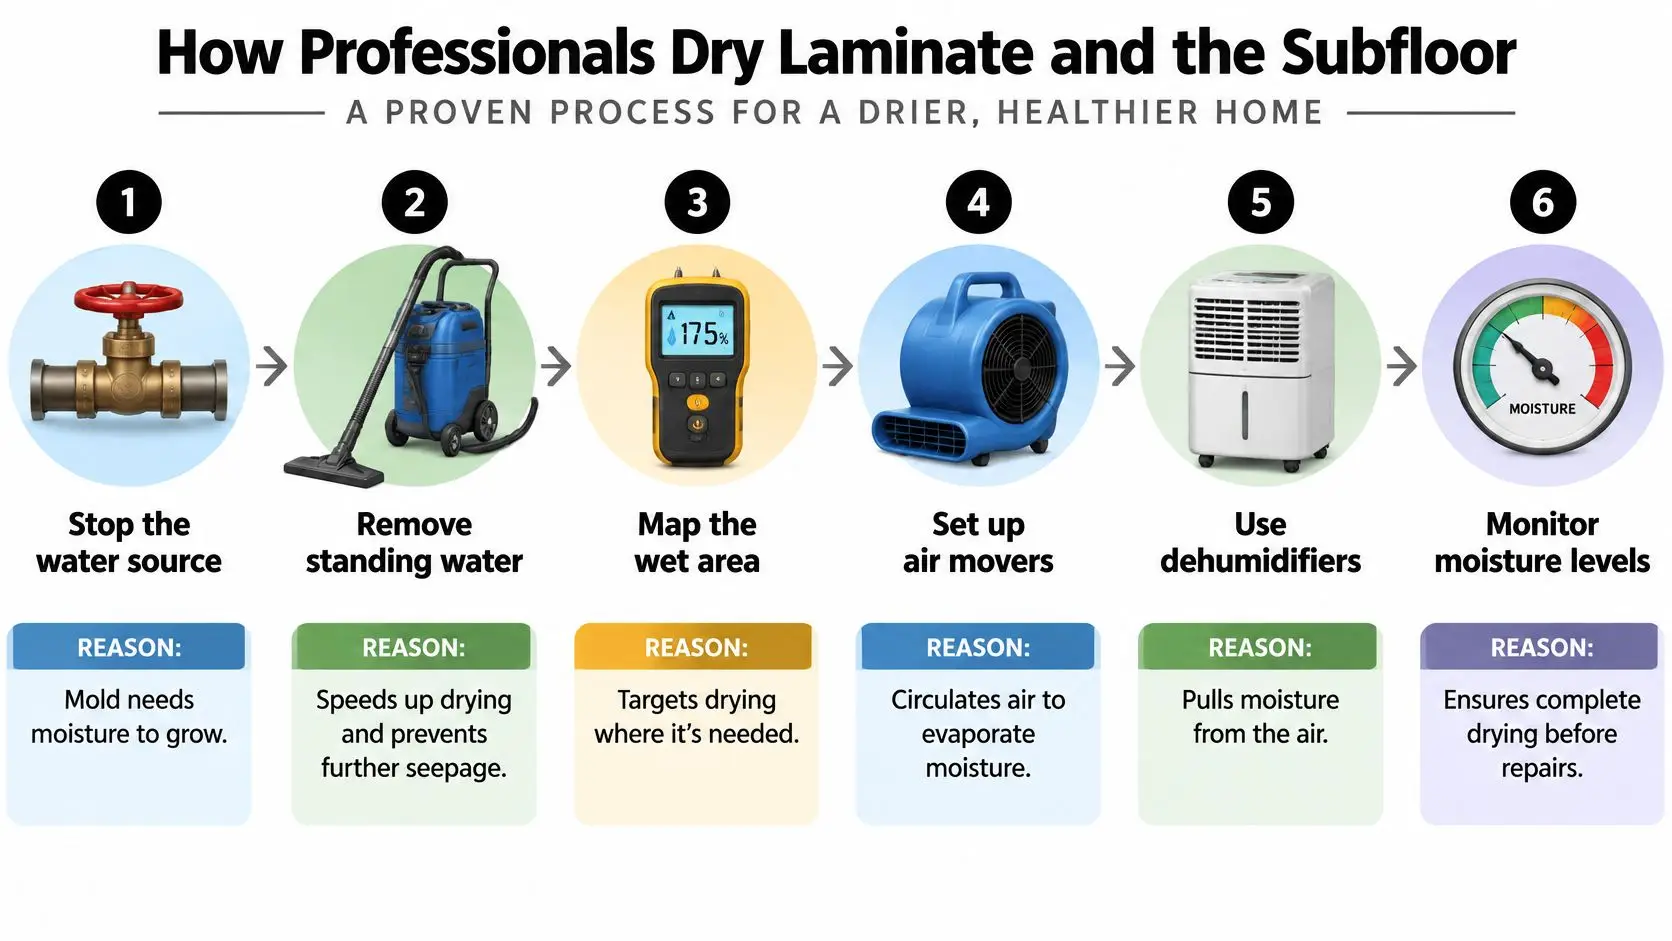
A laminate floor can feel dry on top while water is still sitting between the layers, the way a closed book feels dry on the cover while the pages inside stay damp. Laminate is a hygroscopic composite, so it takes moisture in and later gives it back to the air. Installation guidance for these products describes the swelling, edge deformation, and loss of core integrity that follow a moisture change, and it specifies a stable indoor environment around 18 to 20°C and roughly 45% to 65% relative humidity for normal conditioning. Those figures describe a healthy room once the assembly is already dry. They describe the climate you return the room to, not a shortcut for a soaked underlayment.
Drying is a sequence of checks. Each step answers a different question: where the water still is, whether air can reach it, and when the wet layers match a dry part of the same floor.
The eight steps, with the reason for each
- Stop the water source. Anything left dripping resets the clock and keeps feeding the moisture mold needs.
- Extract standing water. Extraction removes bulk water in minutes, which is time the underlayment does not spend soaking.
- Map the wet area with a meter. Pin or probe meters suit wood subfloors. Non-penetrating meters are for a quick screen. Readings go in several places and at several depths, including the subfloor and the wall base where water may have travelled.
- Lift a test pattern of planks and underlayment. A small opening lets each layer be checked directly instead of guessed from the surface, and it gives air a path to the subfloor.
- Set air movers and dehumidifiers. Moving air evaporates moisture from the exposed layers. The dehumidifier takes that moisture out of the room, so the floor is not drying into air that is already full of water.
- Establish a reference area. Readings from an untouched part of the same floor construction become the drying target.
- Keep drying and re-measuring. Expect several days of measurement, not one visit. Materials give up water at different rates depending on the substrate and the climate.
- Reinstall only after the layers match the reference. Planks that go back down over a damp subfloor trap the moisture underneath and bring back swelling, odour, and mold.
Why the reference area is the real target
Readings shift with substrate type, climate, temperature, and meter calibration. The benchmark worth chasing is equilibrium with an unaffected area of the same construction, not a single percentage pulled from a general guide.
That comparison is what tells you when to stop. Drying continues until the affected subfloor and underlayment match the reference and no hidden wet pockets remain. A floor put back a few points high shows it later in raised seams and a smell that will not leave.
The same reference-area logic applies to solid wood, and Savera Wood Floor Refinishing's Setauket water damage repair steps show how a wood floor is read against a dry control before anyone sands or refits a board.
A useful drying plan names what is being measured, where the reference readings were taken, and when each reading will be repeated. Ask for that in writing and you can judge the result yourself. The methods behind those checks are the ones covered under structural drying techniques, applied to the layers under your floor.
Deciding What Stays
The decision isn't one decision. It's four or five separate ones, made layer by layer, and they don't all go the same way.
The one-layer rule: A floor is only as dry as its wettest layer.
| Layer and Condition | Likely Decision | Reason |
|---|---|---|
| Planks dry, flat, with undamaged edges | Keep and reinstall after drying | The core has not lost its shape |
| Planks with swollen or peaked edges | Replace the affected planks | Core swelling and deformation are usually permanent |
| Soaked foam or fibre underlayment | Replace the underlayment | Porous material that is hard to dry fully |
| Wet or soft subfloor | Dry to the reference target or repair | Structural material that must match a dry reference reading |
| Drywall or baseboards at the perimeter with long exposure | Remove and replace if they will not dry | Porous materials that retain moisture and odour |
| Musty odour or visible mold after drying | Professional remediation and removal of porous materials | Mold can persist in porous layers after surface cleaning |
Why porous layers are the usual exception
The principle behind the whole table comes from public health guidance. The CDC's mold prevention guidance advises removing porous items that have been wet for more than 48 hours when they can't be thoroughly cleaned and dried, because they can keep feeding mold growth. The examples it gives include carpeting, carpet padding, drywall, insulation, wallpaper, upholstery, and some wood and wood products.
That list maps neatly onto a laminate floor. Foam underlayment, wood-based subfloor panels, baseboards and the drywall at the perimeter are all porous, and they're all sitting under or beside the planks. A dry plank above a soaked pad is still a wet assembly, and cleaning the laminate surface doesn't change that.
The deciding questions are always the same three: is the material porous, can it be cleaned, and can it be completely dried. A subfloor panel that dries flat and firm can stay. One that swelled, went soft or kept an odour gets replaced rather than sealed under new flooring.
One more thing worth knowing before you buy anything. Routine mold sampling is usually unnecessary when visible growth is present, and there are no federal limits for indoor mold or spores, so a test kit can't tell you whether your floor is safe. As the EPA's mold course material on sampling puts it, moisture verification and source control are the more actionable steps.
If replacement turns out to be the answer, current laminate flooring replacement costs give you a realistic range before you commit, and if you'd rather not repeat the experiment, a water-tolerant product such as vinyl flooring replacement changes how the next leak behaves.
Call a Pro for a Moisture Check Before You Reinstall
Call for an inspection today if any of these fit your situation.
- The water has been under the floor for more than 72 hours, or the 48 to 72 hour mark has passed without readings showing the floor is dry.
- The water came from a sewage line or from floodwater. Contamination changes the decision, often toward removing more material.
- Planks are swollen, peaked, lifting or visibly deformed. That's core damage, and it doesn't reverse.
- A musty odour persists after surface drying, or you can see mold anywhere along the baseboard or under a lifted plank.
- The same area keeps getting damp after a repair, which usually means a source is still running.
- Anyone in the home has asthma or allergies, or another health concern about mold exposure.
- The floor feels soft or springy underfoot. That's a subfloor signal, not a flooring one.
Restore Heroes' IICRC-certified professionals assess how far the moisture has travelled, build a plan around your property, and make sure all moisture is properly removed before anything goes back down. Restore Heroes is IICRC certified, licensed, bonded and insured, and serves the Phoenix metro area.
Ask for moisture readings, a written drying plan with a stated target, and the reference readings that target was set against, so you can judge the result yourself. Our own approach to moisture meter readings explains what those numbers mean and when a second set should be taken.
Make the call, and put the planks back only after the floor has been measured dry.
When water has worked its way under your laminate, the difference between a small repair and a full replacement usually comes down to readings taken in the right places at the right time. Restore Heroes brings IICRC-certified technicians, extraction and drying equipment, and a documented moisture plan to homes across Phoenix, Mesa, Gilbert, Scottsdale and Chandler, so you know which layers can stay before anything goes back down. Visit Restore Heroes to schedule an inspection and get a clear, measured answer about your floor.