You walk into the basement to grab a box, and the smell hits first. Not sewage. Not dust. A damp, earthy, stale odor that wasn’t there before, or maybe has been there long enough that you’ve started making excuses for it.
That smell matters.
In Phoenix, homeowners sometimes assume basement mold is mostly a problem in wetter climates. Then monsoon season arrives, a pipe sweats behind a wall, a slow plumbing leak keeps feeding one corner, or water finds a path through a crack after a storm. Arizona’s dry air can make mold in a basement more deceptive. When mold shows up here, it often points to a specific moisture source that needs to be found, not just masked.
Basement mold removal isn’t just about scrubbing a stain and moving on. The hard part is deciding what you can safely handle yourself, what needs certified containment, and how to avoid paying twice because the moisture source was missed the first time.
That Musty Smell In Your Basement Is A Warning Sign
Most basement mold calls start the same way. A homeowner notices a smell near the stairs, around stored boxes, or in one finished room that always seems a little off. They don’t always see mold right away. That’s normal.
Mold often announces itself with odor before it becomes obvious on drywall, baseboards, carpet tack strips, or wood framing. In a basement, that smell usually means moisture has been sitting long enough to support growth somewhere out of sight.
What that smell usually points to
In Phoenix homes, I look for three broad categories first:
- Hidden plumbing leaks behind walls, near water heaters, under bathroom lines, or around laundry connections
- Foundation or exterior intrusion after storms or poor drainage
- Humidity trapped in enclosed spaces where airflow is poor and surfaces stay cool
If a musty basement smell appears suddenly, treat it as a clue, not a mystery. If you suspect a pipe issue and need help understanding how leak tracing works before mold cleanup even starts, a practical reference is this guide to Plumbing Leak Detection Services. Finding the water source early is what keeps a mold job from turning into a repeat job.
A lot of homeowners also worry about whether dark staining means something especially hazardous. Color alone won’t tell you that. What matters more is where it’s growing, how far it’s spread, and whether the material is wet and deteriorating. If you want a clearer overview of common risks, this page on https://restoreheroesaz.com/dangerous-molds-in-basements/ is a useful starting point.
Musty odor in a basement is rarely a “just air it out” problem. It usually means moisture is active now or was active recently.
The right response is calm and methodical. Confirm the moisture source. Inspect the full area. Then decide whether this is a small cleanup or a real remediation project.
How to Inspect Your Basement for Mold
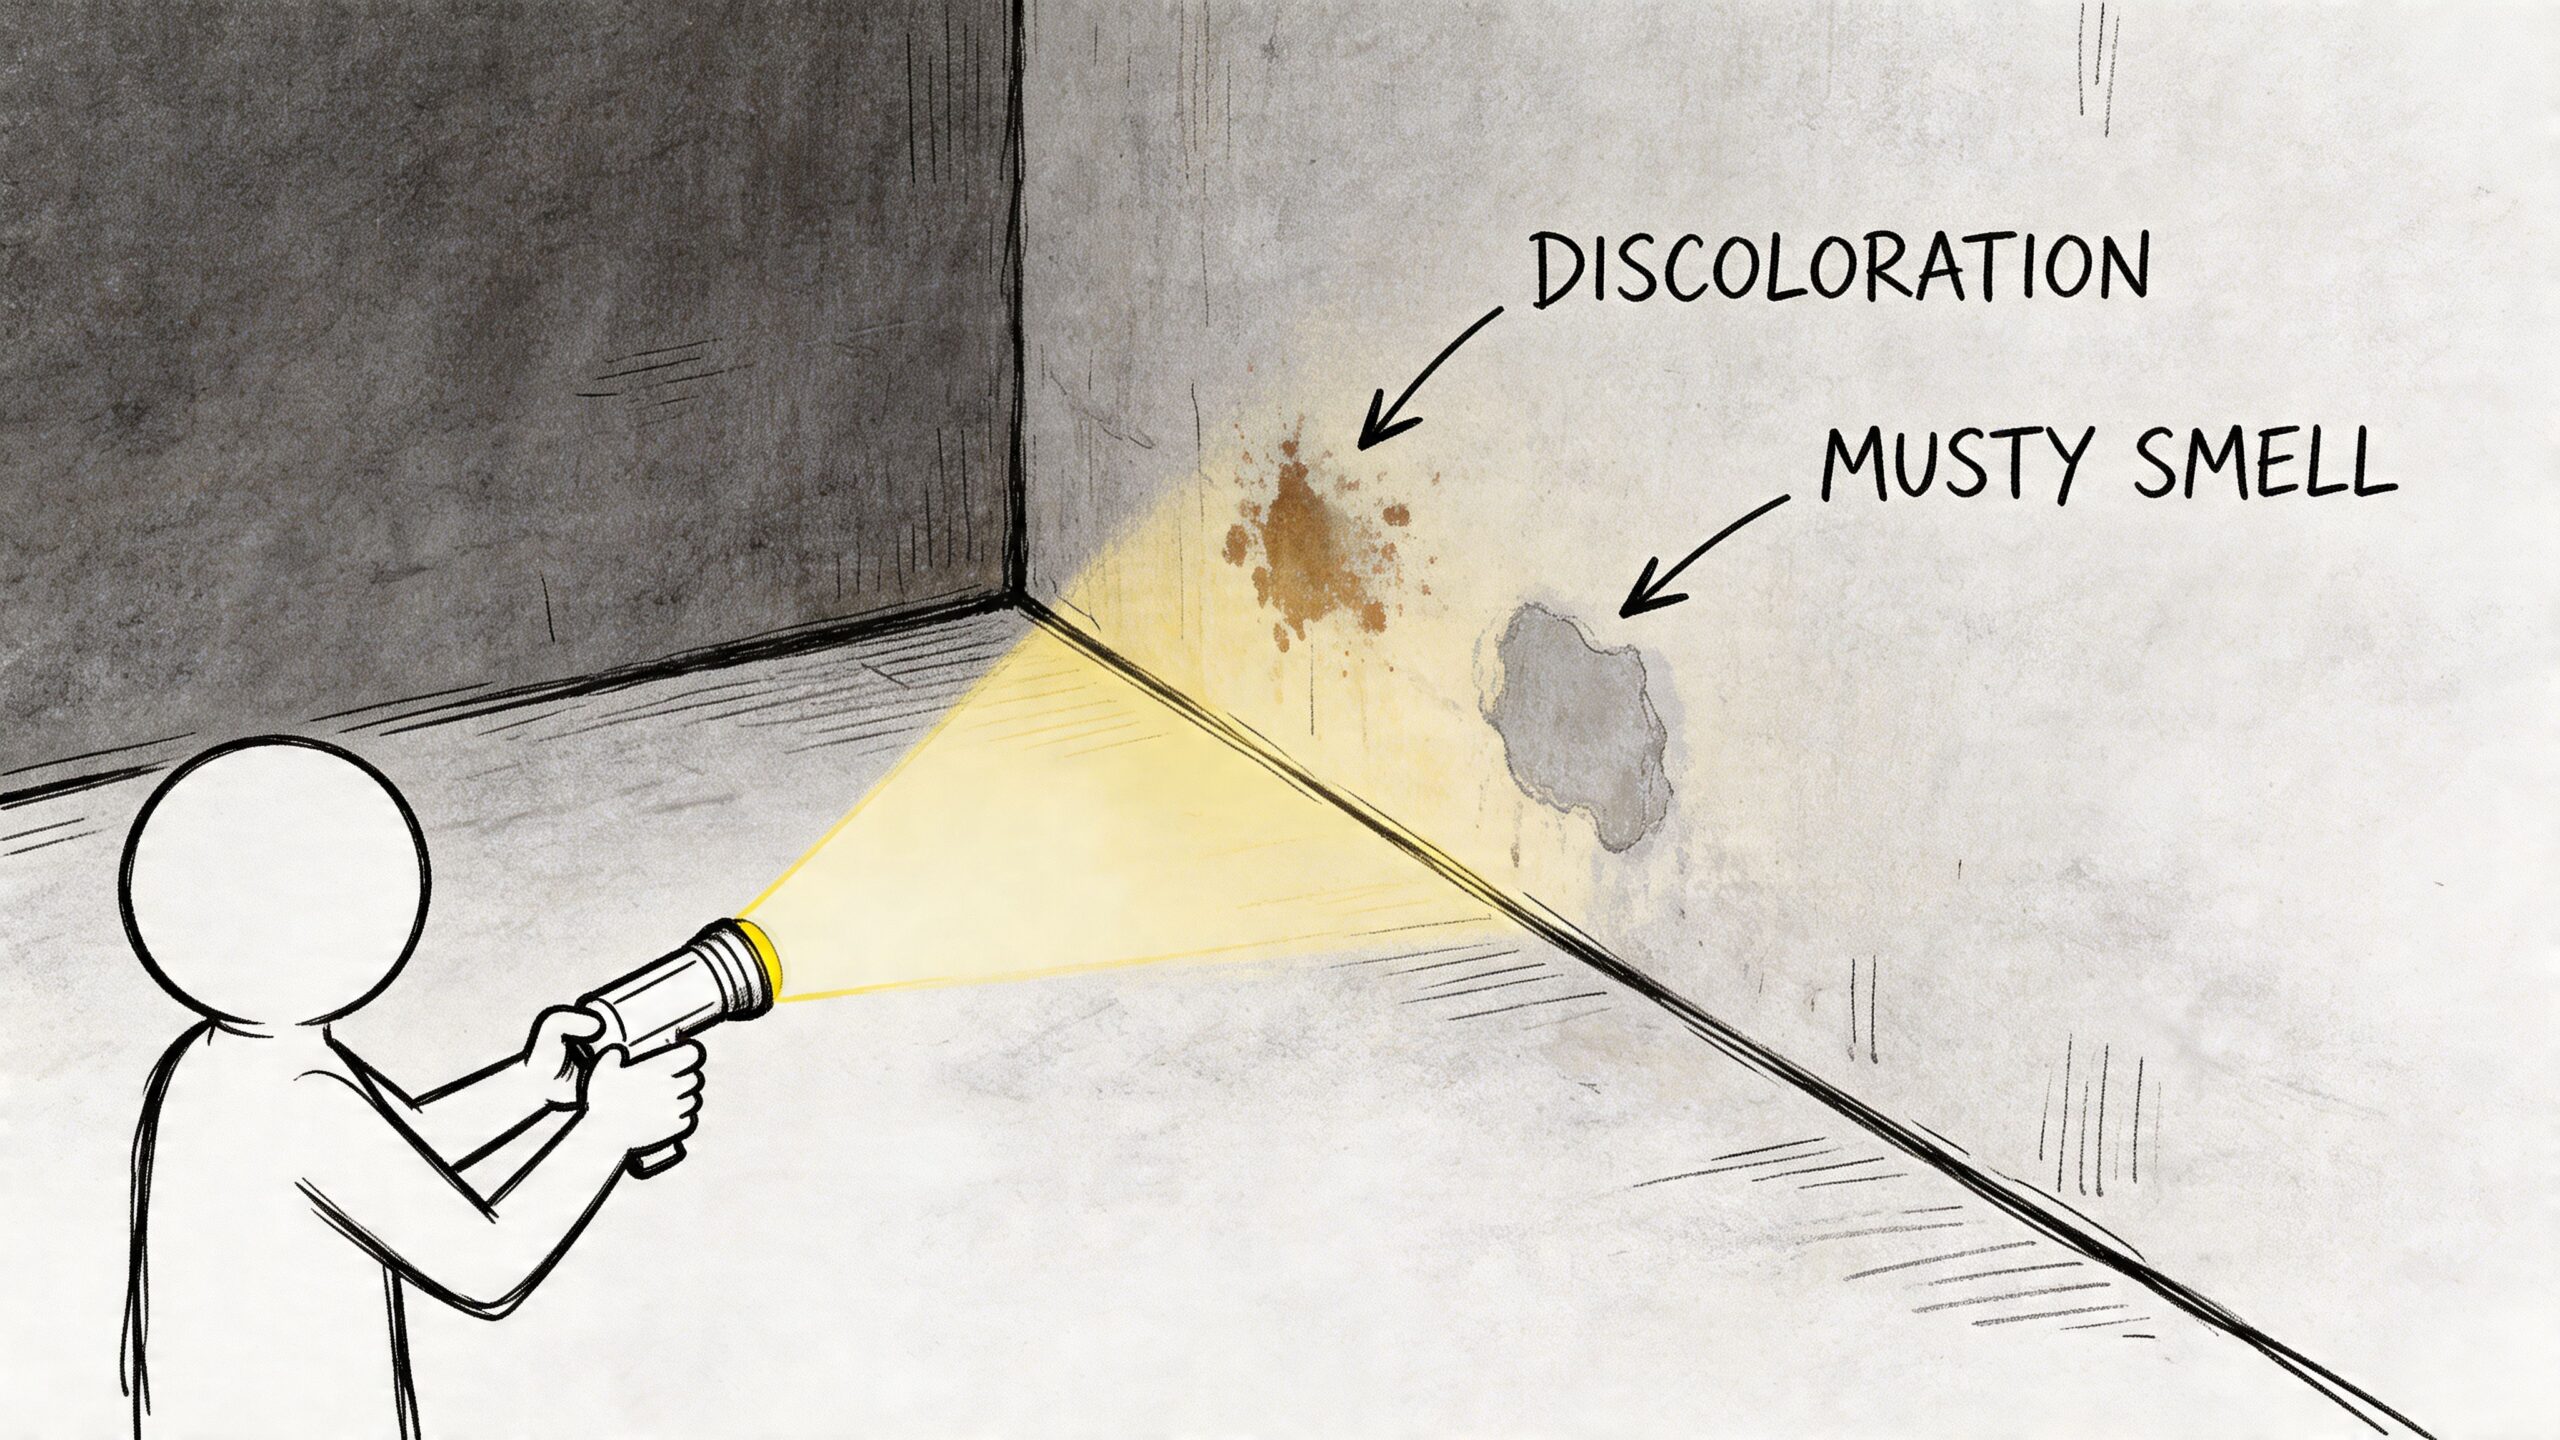
Start with a flashlight, your eyes, your nose, and enough time to inspect slowly. A rushed basement inspection misses the places mold prefers most.
Start with the areas that stay damp
Mold usually follows moisture, not convenience. Check the spots that stay dark, cool, enclosed, or poorly ventilated.
Look closely at:
- Base of exterior walls where seepage or condensation shows up first
- Around plumbing penetrations under sinks, behind toilets, near water heaters, and at hose bib lines
- Behind stored items especially cardboard, fabric, or furniture pressed against walls
- Under flooring edges where water can sit unnoticed
- Ceiling corners below bathrooms or kitchens if your basement sits under living space
- Wood joists and sill plates where staining and fuzzy growth often appear before drywall shows it
- HVAC areas where condensation or duct issues can hide contamination
Different mold growth can look powdery, fuzzy, speckled, or slimy. It may appear black, green, white, gray, or brown. Don’t try to identify severity by color alone. What you’re really assessing is scope and material damage.
Use a simple inspection sequence
A good homeowner inspection follows a practical order:
Smell first
Walk the basement slowly and note where odor gets stronger.Scan with a flashlight
Shine light at a low angle across walls and trim. Side lighting makes staining, texture changes, and water marks easier to see.Touch surfaces carefully
Drywall that feels soft, swollen trim, warped paneling, or damp carpet edges suggest moisture has been active long enough to matter.Move stored items
Don’t just inspect the open room. Mold often grows behind bins, under rugs, and inside crowded corners.Check for a moisture pattern
A single isolated patch can mean a local leak. Repeated spotting along one wall may suggest intrusion from outside.
Where a moisture meter helps
Many guides say professionals use “various techniques,” but they never explain what that means. That’s frustrating for homeowners trying to decide whether they need testing or just a better look. The gap is real, especially in Phoenix, where basement mold often points to hidden water intrusion rather than consistently high ambient humidity, as noted in this discussion of practical inspection limits and homeowner decision-making: https://www.youtube.com/watch?v=DiON0SqsZLA
A basic moisture meter can help you compare one area to another. It won’t replace a full professional assessment, but it can tell you whether a suspicious wall section is behaving differently from nearby dry materials.
Use it this way:
- Test a known dry area first so you have a baseline
- Check around visible staining to see if moisture extends beyond what the eye sees
- Compare multiple spots on the same wall
- Pay attention to edges and transitions near floor lines, windows, and plumbing openings
If meter readings stay high around one section, don’t assume the visible spot is the whole problem. Moisture often travels inside wall cavities or under flooring.
For a more systematic walk-through, this inspection resource can help you organize what you find: https://restoreheroesaz.com/mold-inspection-checklist/
Know the DIY boundary
EPA and CDC guidance allow DIY cleanup only for patches under 10 square feet, as summarized in the basement remediation cost and scope overview here: https://bukrestoration.com/average-cost-of-mold-removal-in-basement/
That threshold matters because once growth goes beyond a small isolated surface area, the risk changes. Disturbing a larger contaminated area can spread spores into clean rooms, HVAC pathways, and stored belongings.
Red flags that mean stop and call a pro
Some findings should end the DIY debate right away.
| Situation | Why it changes the job |
|---|---|
| Mold covers more than a small isolated patch | Cleanup becomes containment work, not surface cleaning |
| Drywall or insulation is affected | Porous materials often need removal, not wiping |
| You see sagging, rot, or crumbling material | Moisture damage may be structural |
| The HVAC system or ductwork is involved | Contamination can spread through the home |
| The odor is strong but growth isn’t visible | Hidden mold may be inside walls, under flooring, or in cavities |
| Anyone in the home is medically sensitive | Exposure risk may outweigh DIY savings |
Practical rule: If you’re asking whether you might make it worse by cleaning it yourself, that’s often a sign the job needs professional containment.
A good inspection doesn’t end with “yes, that’s mold.” It answers two better questions. How far did the moisture travel, and what can be cleaned versus removed?
Setting Up a Safe Work Zone for Mold Cleanup
Containment is where careful work starts. If you skip this part, even a small cleanup can turn into a house-wide contamination problem.
What you need before touching anything
If the area is small enough for DIY, suit up before you disturb growth. Once scrubbing starts, spores and dust become airborne.
Basic protective gear should include:
- Respirator with at least N95 protection. P100 is a stronger option for messy removals.
- Eye protection with non-vented goggles
- Gloves that cover wrists and forearms
- Disposable coveralls or clothing you can bag and wash separately
- Trash bags for contaminated wipes, debris, and disposable materials
Don’t use a standard shop vacuum. That often blasts fine particles back into the room.
Why containment matters so much
Professional remediation standards treat visible mold as a spore source, not just a stain. According to this containment methodology overview, visible mold can involve 1,000,000 spores per square inch, and technicians use 6-mil plastic barriers plus negative air machines set to ≤ -5 Pascals so spores don’t spread into clean areas: https://valormold.com/the-complete-mold-remediation-process-done-right/
That’s why pros spend time on setup before removal starts.
For a homeowner handling a very small patch, the goal is simpler but based on the same principle. Keep contaminated air and debris from moving through the basement and into the rest of the house.
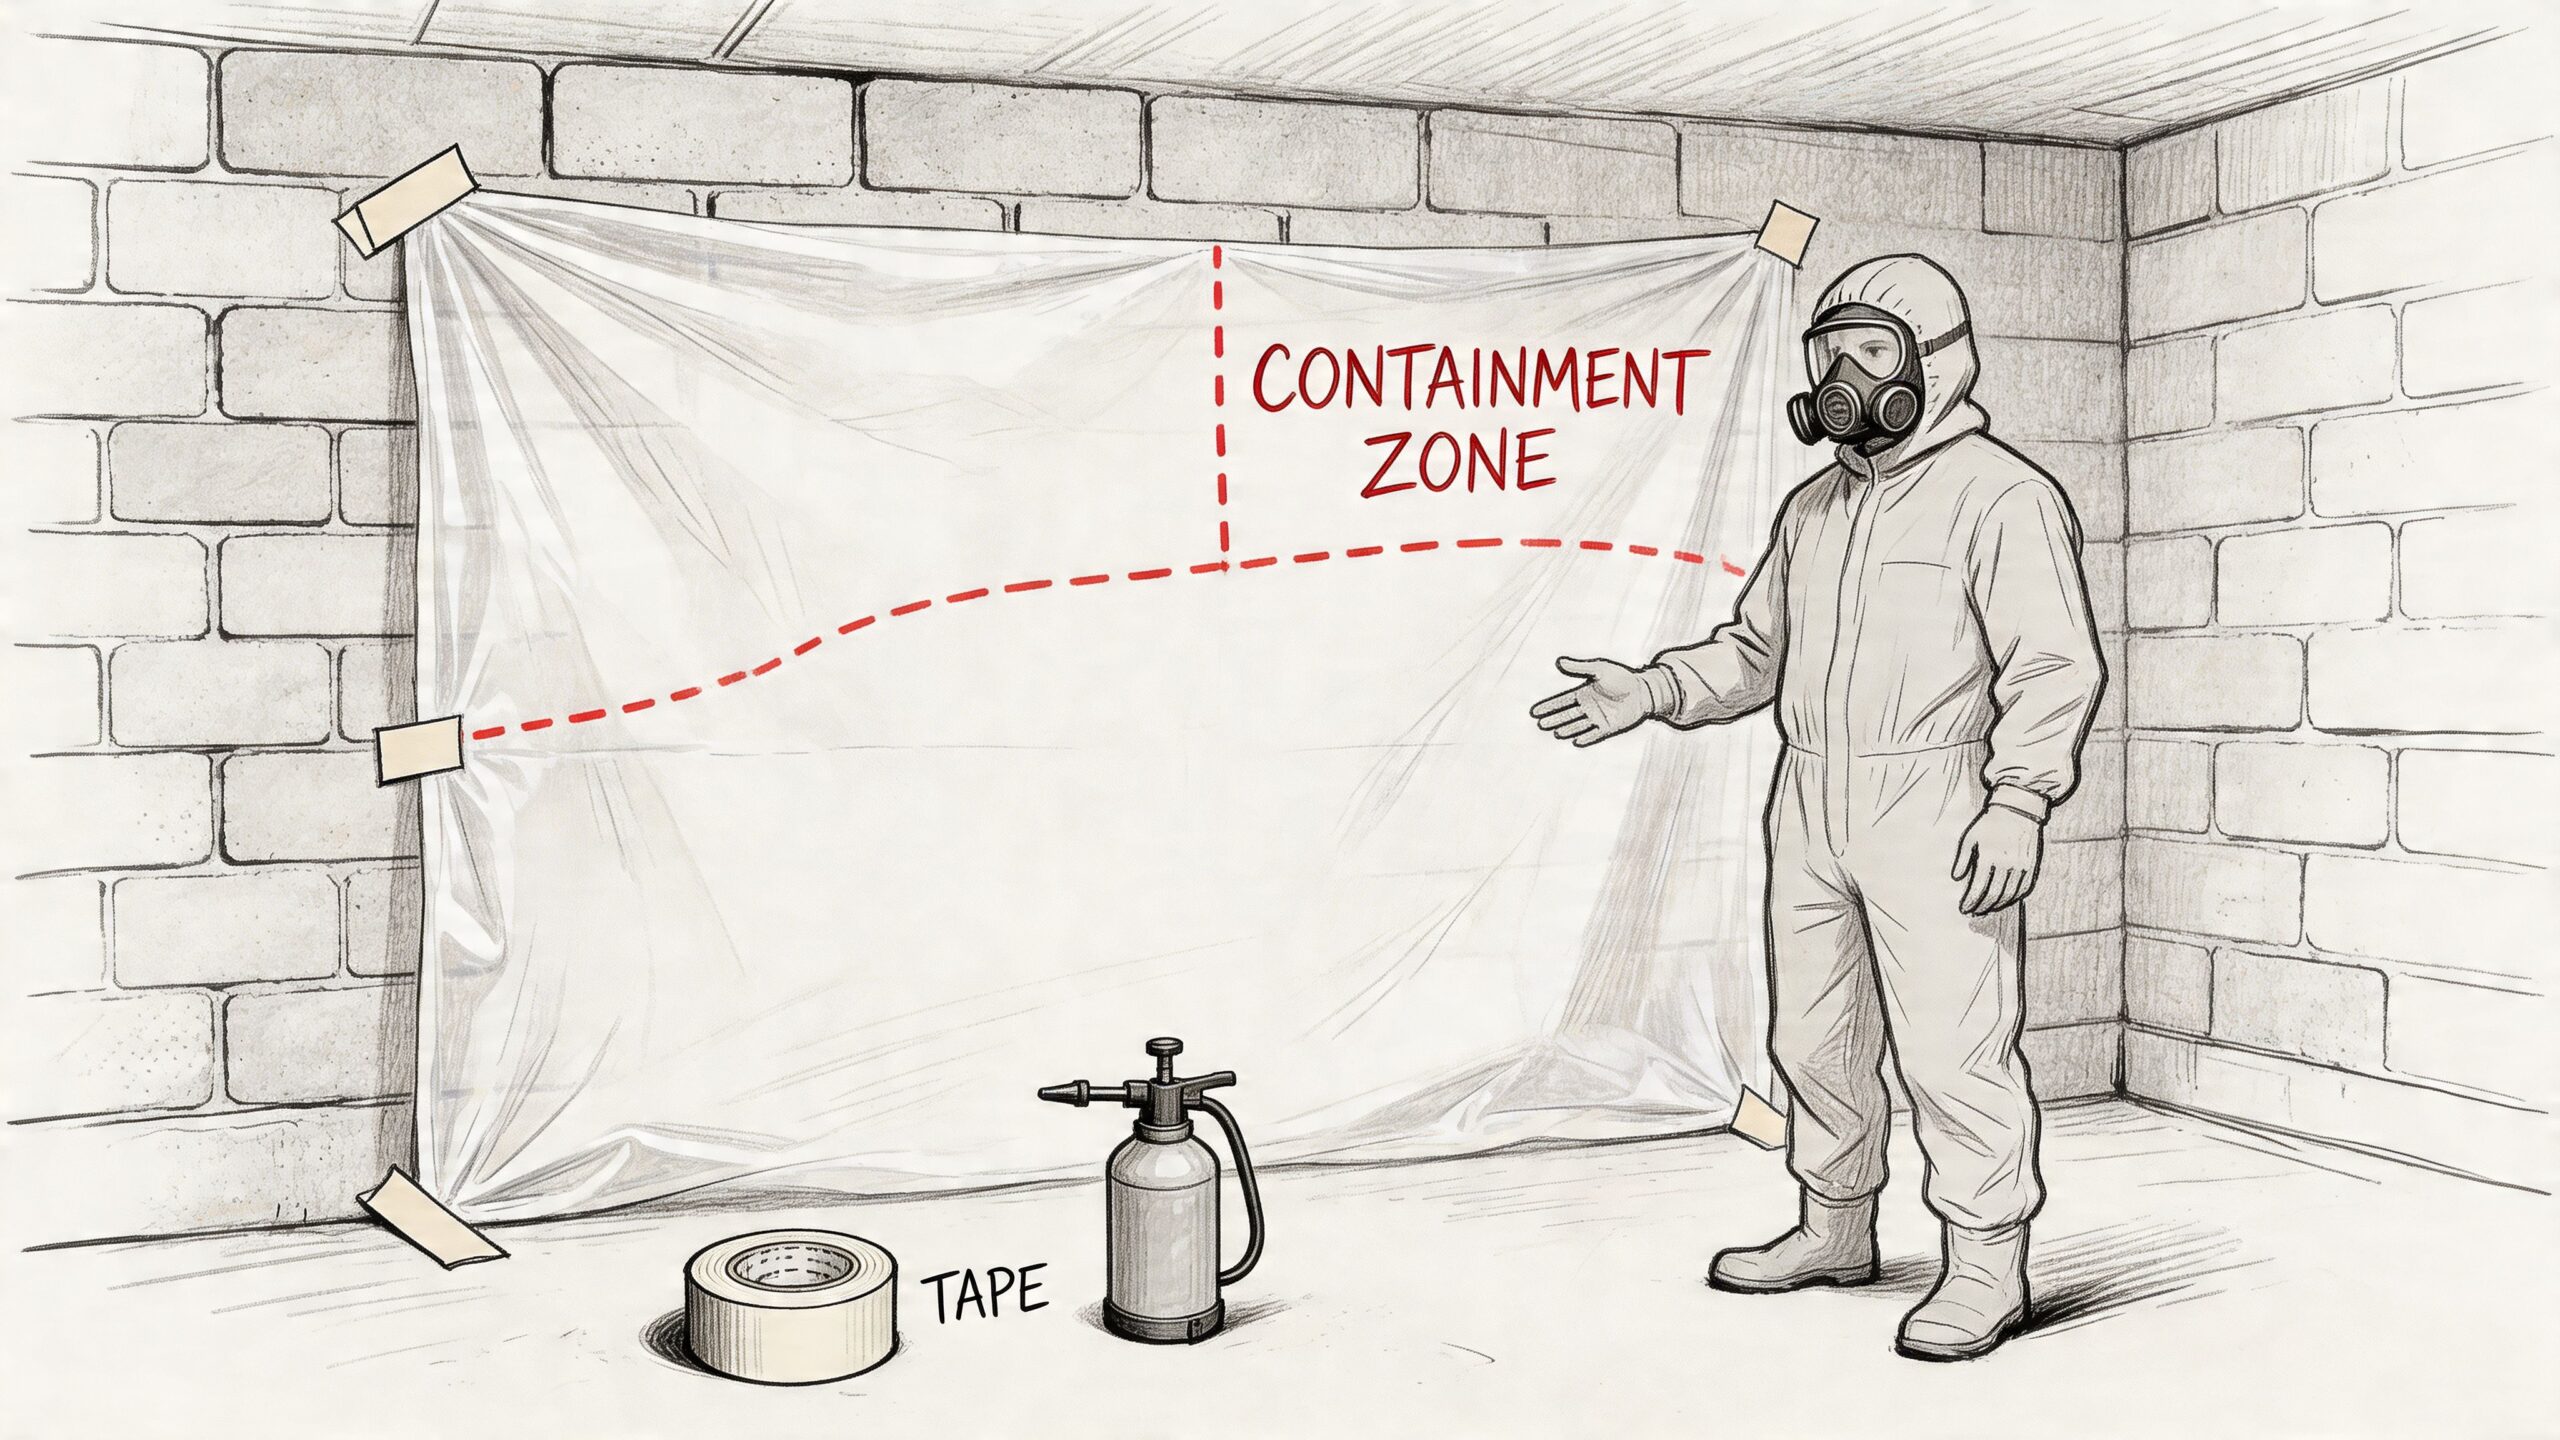
Build a small containment area
For a limited cleanup, isolate the work zone as much as the layout allows.
- Seal the opening with plastic sheeting and tape if the area has a doorway or defined entrance
- Cover nearby vents and returns so spores don’t enter the air system
- Remove clean belongings first from the surrounding area
- Keep foot traffic out until cleanup is done and waste is bagged
If the affected area is open to the rest of the basement, that’s one sign the job may be a poor DIY candidate. Open plans make containment harder.
The mistake I see most often is homeowners starting with cleaner and a brush, then realizing too late they never isolated the room.
Negative air is the professional difference
When contamination is larger, hidden, or tied to demolition, professionals don’t just “ventilate the area.” They create controlled airflow using a HEPA-filtered negative air machine exhausting outside. The target is pressure low enough to pull air from clean zones into the containment, not the other way around.
That detail matters. The same methodology source notes that inadequate pressure can lead to 100% project failure by spreading contamination beyond the work area.
This video gives a useful visual of how proper setup and work-zone separation should look in practice:
What homeowners can do safely
For a very small area, your setup should stay simple and disciplined.
A workable checklist looks like this:
- Turn off air movement from HVAC serving that space if possible
- Use plastic and tape to isolate the immediate area
- Work damp, not dusty so you don’t aerosolize debris
- Bag waste inside the zone before carrying it out
- Clean yourself and your tools last so you’re not spreading residue upstairs
What doesn’t work:
- Box fans blowing across the room
- Dry brushing mold
- Sweeping debris
- Walking in and out repeatedly without changing gloves or bagging waste
- Opening the area to “let it breathe” during cleanup
When a safe work zone isn’t realistic
If the mold is behind drywall, under flooring, in a ceiling cavity, or spread through stored contents, containment becomes a technical job. That’s where an IICRC-style process matters. Companies such as Restore Heroes use inspection, containment, safe removal, antimicrobial cleaning, and moisture control as part of basement mold removal on larger or hidden-loss projects.
A safe cleanup zone should feel controlled and inconvenient. If it feels casual, it probably isn’t contained well enough.
Basement Mold Removal and Cleaning Methods
Cleaning mold and remediating mold are not the same thing. Homeowners get into trouble when they treat a contamination problem like a housekeeping problem.
What DIY can handle
DIY basement mold removal is only reasonable when the growth is small, isolated, and limited to non-porous or lightly affected surface materials. Think a minor patch on painted concrete, metal, or another cleanable surface.
A careful small-area process usually looks like this:
Contain the area first
If you skipped the previous section, stop here.Use detergent and water for surface cleaning
The goal is physical removal from the surface, not just bleaching the color.Wipe, don’t aggressively scatter debris
Controlled wiping creates less airborne mess than dry scrubbing.Dry the area completely
If the material stays damp, the cleanup won’t hold.Fix the moisture source
Without this, even a good cleanup is temporary.
Why not bleach as the default? On porous materials, bleach often doesn’t solve the underlying growth inside the material. It can lighten staining, but that isn’t the same as proper removal.
What should be removed instead of cleaned
Some basement materials don’t forgive prolonged moisture.
These are common examples:
- Drywall that’s moldy, soft, swollen, or repeatedly wet
- Insulation that has visible growth or trapped moisture
- Carpet and pad that stayed damp long enough to support contamination
- Ceiling tiles and fiberboard materials that absorb moisture easily
- Cardboard storage boxes and low-value porous contents
The practical question is simple. Can the material be cleaned back to a sound condition, or has contamination moved into the material itself?
If growth has penetrated, removal is usually cleaner and more reliable than repeated treatment attempts.
If the project creates a pile of contaminated materials, planning disposal matters. A straightforward homeowner's guide to junk removal can help you think through sorting, hauling, and getting damaged contents out of the way without turning the basement into a staging mess.
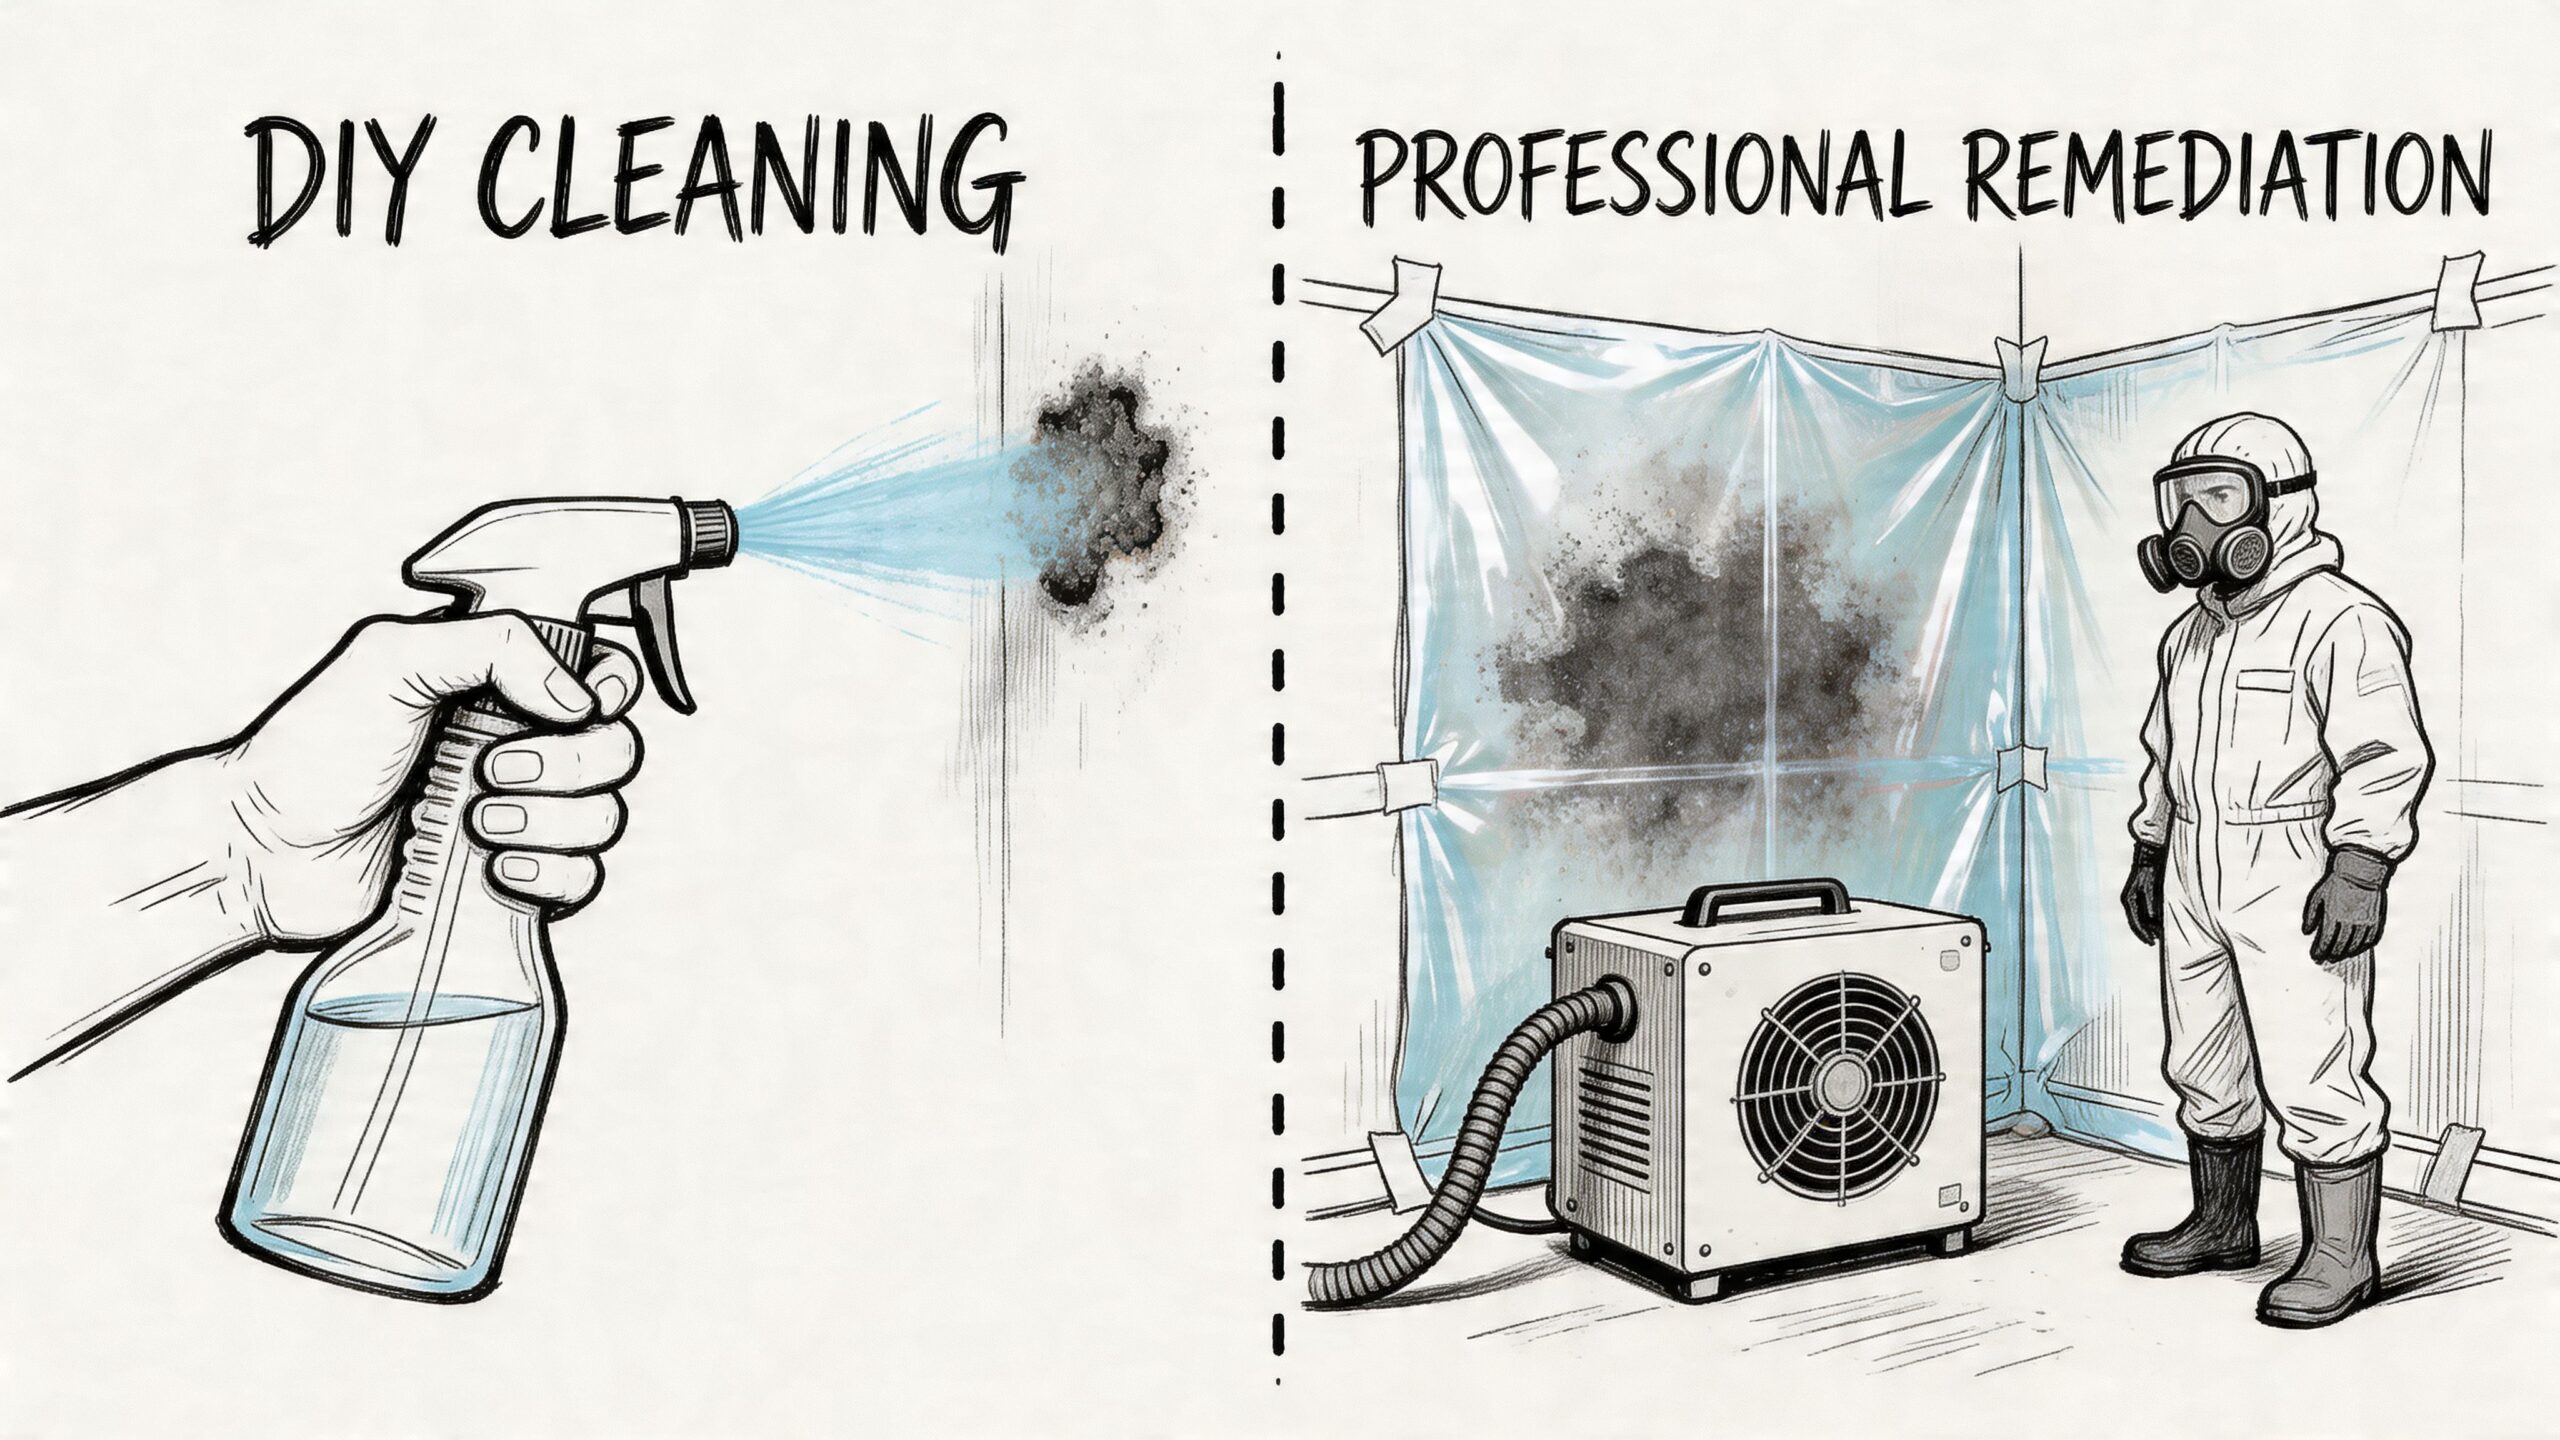
What professionals do differently
Professionals don’t just bring stronger chemicals. They change the entire method.
A proper remediation workflow may include:
| Task | DIY small patch | Professional remediation |
|---|---|---|
| Surface cleaning | Wipe and detergent | HEPA vacuuming, controlled removal, detailed cleaning |
| Air control | Basic isolation | Full containment and negative air |
| Hidden moisture detection | Limited | Moisture meters, infrared inspection, cavity checks |
| Material removal | Minimal | Selective demolition of unsalvageable porous materials |
| Fine particle capture | Rare | HEPA filtration before and after removal |
| Odor and residue treatment | Limited | Targeted treatment based on material and contamination level |
On unfinished wood or concrete, pros may use specialty methods designed to remove contamination while preserving the material where possible. On a heavily affected basement framing package, for example, the work often involves HEPA vacuuming first, then detailed cleaning, then post-cleaning verification steps before rebuild decisions are made.
Cleaning what you can see is the easy part. Figuring out what you can’t safely leave behind is where remediation experience matters.
Where newer tools fit in
The remediation industry keeps improving because contractors need better coverage, fewer application errors, and more consistent treatment. One example is electrostatic sprayer technology. In a market projected to reach $1,516.8 million by 2030, this type of sprayer has been highlighted for improving solution distribution and reducing chemical use in mold and odor removal projects: https://biocleanofutah.com/why-mold-remediation-and-abatement-are-growing-3-a-year-as-utah-families-choose-healthier-homes/
That doesn’t mean every basement needs every tool. It means professional remediation has moved well beyond “spray something and hope.”
What works and what doesn’t
A quick reality check helps.
Usually works for very small issues
- Targeted surface cleaning on a hard, cleanable material
- Fast drying after cleanup
- Correcting one obvious leak
Usually fails or creates bigger work
- Painting over staining without drying and cleaning
- Using fragrance to cover odor
- Cleaning mold but leaving wet drywall in place
- Running a fan across contamination
- Treating an HVAC-related issue like a wall stain
If you suspect hidden wall cavity growth, cleanup advice changes fast. This guide on https://restoreheroesaz.com/how-to-remove-mold-from-behind-walls/ is useful because behind-wall mold isn’t a wipe-down problem. It becomes an access, containment, and material-removal problem.
Good basement mold removal is selective. You don’t remove everything. You remove the wrong materials, clean the salvageable ones correctly, and stop the moisture that fed the issue.
Keeping Your Basement Dry and Mold-Free for Good
Removing mold without controlling moisture is a short-term fix. The basement stays clean only if the space stays dry enough that mold doesn’t get another foothold.
The prevention habits that matter most
Basements don’t need perfect conditions. They need stable ones.
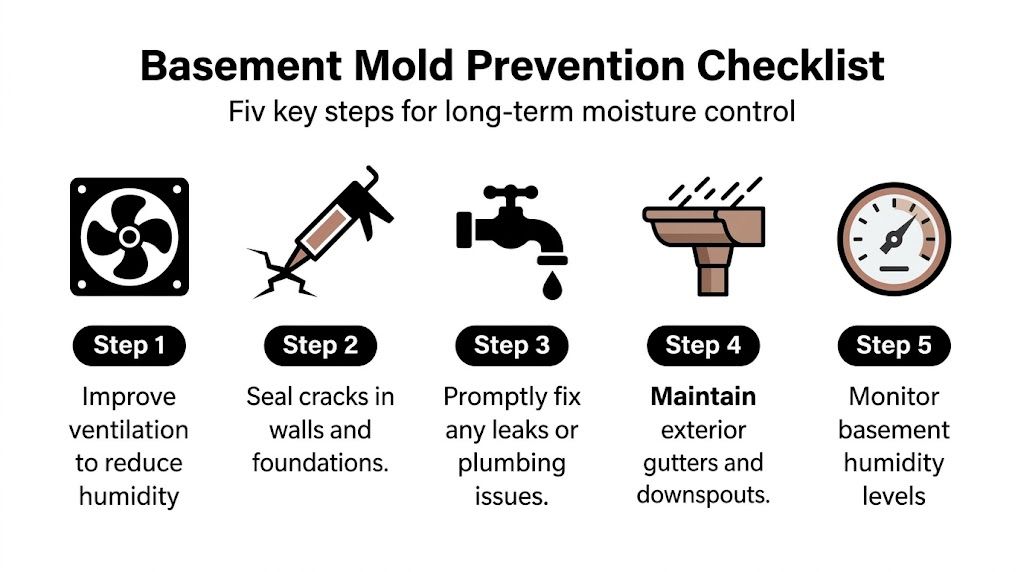
The most useful prevention steps are practical, not fancy:
- Run a dehumidifier when needed and keep basement relative humidity below 50%, a target included in the containment and prevention guidance here: https://valormold.com/the-complete-mold-remediation-process-done-right/
- Fix plumbing leaks quickly instead of monitoring them for weeks
- Keep storage off exterior walls so air can move and inspections stay easy
- Insulate cold pipes if condensation forms on them
- Vent appliances properly so moisture isn’t dumped back into the basement
Stop outside water before it gets inside
Many repeat mold problems start outdoors.
Check these conditions around the home:
- Gutters and downspouts should move roof runoff away from the foundation
- Soil grading should slope away from the house, not toward basement walls
- Foundation cracks should be evaluated and sealed if they allow moisture entry
- Window wells and exterior penetrations should stay clear and watertight
The point isn’t to make the basement waterproof by wishful thinking. It’s to remove as many water entry paths as possible.
Build a routine that catches changes early
Most homeowners don’t need a complicated maintenance plan. They need a repeatable one.
Try this:
| Monthly check | What to look for |
|---|---|
| Walk the perimeter | New staining, peeling paint, or odor changes |
| Check utility areas | Drips, rust, damp insulation, or wet concrete |
| Review stored items | Soft cardboard, damp fabric, musty bins |
| Watch humidity | Rising moisture after storms or appliance use |
| Inspect after monsoons | Water marks, seepage lines, damp corners |
A dry basement is easier to keep dry than a damp basement is to rescue.
If your basement has a history of moisture, don’t wait for smell alone. Use your nose, but also use routine inspection. A problem that’s found early usually stays smaller, cheaper, and easier to control.
For a broader prevention checklist relevant to this issue, https://restoreheroesaz.com/how-to-avoid-mold-in-basement/ is a solid reference.
Store things like moisture is always possible
This matters more than homeowners expect.
Use plastic bins instead of cardboard when possible. Keep furniture, boxes, and soft contents slightly off the slab floor if the area has ever had seepage or minor water entry. Leave enough gap at walls that you can inspect behind items without emptying the whole basement.
Finished basements need the same mindset. A nice baseboard and fresh paint don’t change what moisture does behind them.
Long-term prevention is less about one perfect product and more about habits. Dry air, quick leak response, clean drainage outside, and regular checks beat emergency cleanup every time.
The Financial Side of Basement Mold Removal
This is the part most homeowners want answered first. What’s this likely to cost, and will insurance help?
The hard truth is that basement mold removal pricing varies because the actual job isn’t just “remove mold.” The work can include inspection, containment, demolition of unsalvageable material, cleaning, moisture correction, drying, and rebuild coordination. Two basements can both have mold and still be completely different projects.
What national cost ranges actually tell you
The average cost of basement mold removal in the United States ranges from $500 to $6,000, with a national median around $3,500 for standard infestations in small to mid-sized areas, according to this 2026 cost breakdown: https://bukrestoration.com/average-cost-of-mold-removal-in-basement/
That same breakdown notes:
- Jobs under 100 sq ft typically cost $500 to $1,500
- Infestations from 100 to 300 sq ft often run $1,500 to $4,000
- Larger projects over 300 sq ft can exceed $10,000
- Full remediation may be priced at $10 to $25 per square foot
- Mold under flooring can run $3,000 to $6,000
- Mold in HVAC ductwork can run $3,000 to $7,000
- Foundation sealing to help prevent recurrence may add $300 to $825
- Wood wall or concrete mold removal can range from $700 to $10,000
Those numbers are useful for expectations, not promises. Your actual scope depends on what’s wet, what’s contaminated, what can be saved, and how hard it is to isolate and access the area.
The same source also notes that 21.5% of mold remediation requests involve basements or crawl spaces, which makes sense. These spaces collect the kinds of moisture problems homeowners don’t always notice quickly.
What usually drives the price up
A basement mold job gets more expensive when the problem is hidden, porous, or widespread.
The biggest cost drivers are usually:
Scope of contamination
A visible patch may be the surface clue for a larger cavity problem.Material type
Cleaning concrete is different from removing wet drywall, insulation, carpet, or subfloor layers.Containment needs
Open finished basements or occupied homes often require more careful isolation.Access and demolition
If crews have to remove flooring, open wall cavities, or work around utilities, labor goes up.Moisture source correction
If the water source is still active, remediation can’t be the only line item.HVAC involvement
Once contamination reaches ductwork or air handling components, the job becomes more specialized.
Why the cheapest estimate can be the expensive one
Low numbers on mold work often leave something out.
Sometimes that missing piece is proper containment. Sometimes it’s post-removal cleaning. Sometimes it’s selective demolition that should have happened but didn’t. And very often, it’s moisture diagnosis.
If a contractor treats the visible growth but doesn’t identify why it grew there, you can end up paying for the same wall twice. Budget matters, but so does scope clarity. Ask exactly what is included, what materials are expected to be removed, how the area will be isolated, and what happens if hidden damage appears after opening the wall.
A fair mold estimate should explain the work, not just list a price.
Will homeowners insurance cover basement mold?
Sometimes yes. Sometimes no. The answer usually depends on the cause of the moisture, not the mold alone.
This is one of the biggest gaps in online advice. A lot of content says a restoration company will work with insurance, but homeowners still don’t get clear guidance on how coverage usually gets evaluated. SERVPRO’s service page highlights coordination through cleanup and remediation, but the broader issue is that many resources don’t clearly explain exclusions, deductibles, and documentation needs: https://www.servpro.com/services/mold-remediation
In practical terms, carriers often look at questions like these:
| Question | Why it matters |
|---|---|
| Was the water event sudden or ongoing | Sudden events are often treated differently from long-term seepage |
| Is there evidence of maintenance neglect | Long-ignored leaks can complicate claims |
| Did outside flooding cause the damage | Flood-related situations may be handled under different policies |
| Was the damage documented early | Photos and records help show timing and cause |
| Is the mold secondary to a covered water loss | That often becomes the key issue |
A burst pipe discovered quickly is a different insurance conversation than moisture entering for months through an old crack or a long-term plumbing drip behind a finished wall. That doesn’t mean a claim will or won’t be covered. It means the source and timeline matter a lot.
How to document the problem before cleanup changes the evidence
If you think insurance may be involved, don’t start tearing everything apart blindly.
Take these steps first:
Photograph the visible damage
Capture wide shots and close-ups of staining, wet materials, and any active leaks.Document the source if visible
A failed supply line, water heater issue, or overflow point matters.Save damaged material samples only if advised
Don’t create extra exposure, but don’t throw away critical evidence too soon.Write a simple timeline
When you noticed the smell, when you found the moisture, and what changed.Notify your carrier promptly
Delay can complicate the conversation.Keep invoices and inspection notes
Moisture findings, emergency mitigation, and containment records all help.
How to think about claims without making assumptions
The safest approach is to separate three things in your mind:
- What caused the damage
- What remediation is necessary
- What your policy may reimburse
Those are related, but they are not identical.
Don’t assume “mold” means denial. Don’t assume “water damage” means approval. And don’t assume a contractor can decide coverage for you. What a qualified remediation company can do is document conditions clearly, explain scope, and coordinate with adjusters so the cause and cleanup needs are easier to understand.
If you want a more detailed look at pricing variables before you start making calls, this page is worth reviewing: https://restoreheroesaz.com/how-much-does-mold-remediation-cost/
Budget decisions that make sense under stress
When homeowners are overwhelmed, I usually suggest focusing on this order:
- Stop active moisture first
- Protect clean areas with containment
- Remove contaminated porous materials if needed
- Clean salvageable structural materials correctly
- Make rebuild choices after the area is dry and clean
That order prevents a lot of waste.
Upgrades, cosmetic finishes, and nonessential basement improvements can wait. Moisture control and proper remediation can’t. If money is tight, ask contractors what is required to make the area safe and dry now, and what cosmetic or rebuild work can be handled separately later.
A calm, documented process usually saves more money than a rushed cheap cleanup.
If you’re dealing with a musty basement, visible growth, or moisture you can’t trace, Restore Heroes can inspect the situation, explain what’s cleanup versus remediation, and help you understand the next step without guessing.