
You come home in Phoenix, step into the kitchen, and find water creeping out from under the fridge. You grab towels, maybe a shop vac, maybe every bath towel in the house. An hour later the floor looks dry. Crisis over, or so it seems.
Then the version of water damage to wood floors starts. Not on top, where you can see it. Under the planks, in the subfloor, and sometimes at the bottom of the wall cavity where drywall starts wicking moisture like a sponge. That's the part homeowners miss, especially here in the Valley, where dry air and constant AC can make the surface look normal long before the assembly underneath is dry.
The Call Nobody Wants to Make
A common phone call starts the same way. The homeowner says the leak happened days ago, sometimes two weeks ago. They cleaned it up fast. The floor looked fine at first. Now the board edges are lifting a little, the seams feel sharp under bare feet, and there's a faint musty smell near the baseboard by the kitchen wall.
That sequence makes sense.
Wood doesn't need dramatic flooding to get into trouble. Independent industry guidance notes that standing water can begin causing visible damage in 1 to 3 hours, and moisture can wick into the subfloor within 24 hours, spreading the wet area beyond what you can see on the surface (water damage spread in wood floor assemblies). By the time the floor starts telegraphing the problem, moisture has often already moved below the finish floor.
Why Phoenix makes this trickier
Phoenix creates a false sense of recovery. Desert air dries the face of the boards fast. Air conditioning helps that happen even faster. Homeowners touch the floor, feel dryness, and assume the structure below followed along.
It often didn't.
The top of the floor can look recovered while the bottom side of the boards and the subfloor are still wet.
That's why the surface can be a distraction. The floor isn't a countertop. It's a layered system. Finish flooring, seams, fasteners or adhesive, underlayment in some assemblies, subfloor, and adjacent wall materials all react at different speeds.
The clock starts early
Several industry sources converge on one practical point: the first 24 to 48 hours matter most, and drying started in that window gives the best chance of recovery, while exposure beyond 72 hours makes salvage much less likely and raises the risk of mold and subfloor damage (critical drying window for hardwood).
If you're reading this while the leak is fresh, that's good news. You're still in the part of the job where decisions can preserve flooring. If you're reading it after the boards have already changed shape, the same logic still helps. It just shifts the question from "how do I dry this?" to "what is still structurally worth saving?"
Your First 24 to 48 Hours on a Water-Damaged Wood Floor
The first mistake I see is people cleaning for appearance instead of drying for structure. Mopping up the surface isn't the same thing as extracting water from the assembly. In the first two days, sequence matters.
Start with the source
Shut off what fed the water. That may be the angle stop behind the fridge, the supply to a dishwasher, or the house valve if a line split and you can't isolate it quickly. If the source is a drain issue, sewage backup, or something you can't identify, treat it as a different level of problem and get a plumber involved fast.
Don't skip this and start drying around an active leak. Wet material keeps drinking water until the source stops.
Then remove water the right way
Use a wet vac, extraction unit, or pump-out setup for pooling water. A household mop spreads water sideways and pushes it into seams. Pull wet rugs, pads, and anything sitting tight to the floor. If baseboards are wet, remove them so you can stop the wall from holding moisture at the bottom edge.

For homeowners deciding whether this is still a cleanup job or already a mitigation job, a practical reference point is water damage mitigation for structural drying and extraction.
Get an early moisture map
The job becomes real. Use a pin or pinless moisture meter on the floor surface, then check beyond the obvious wet area. Test near seams, transitions, appliance footprints, and along the bottom of nearby drywall if you can do it safely. Write down location, time, and reading.
A moisture map doesn't need to be fancy. It just needs to tell you whether the wet area is stable, expanding, or drying.
Try this simple first pass:
- Mark the center of the visible spill area and take readings there first.
- Check a dry room nearby so you have a comparison point in the same house.
- Test the wall line closest to the leak, especially behind the fridge, dishwasher, or sink run.
- Repeat later the same day to see whether readings are falling.
Aim drying at what you can't see
Set fans for airflow across the affected zone and run dehumidification continuously. The goal isn't to blast the face of the wood until it feels dry. The goal is to pull moisture out of the assembly in a controlled way. If you dry the top too hard while the underside stays wet, you can create a new problem instead of solving the first one.
Practical rule: If water sat long enough to reach seams, walls, or the subfloor, you are racing a structural drying clock, not a housekeeping task.
That clock is short. Once water sits longer than roughly the first two days, a lot of jobs stop being "dry it and monitor it" and start becoming "open it, verify it, and remediate it."
Reading What the Wood Is Telling You
A Phoenix floor can fool you fast. By the time you notice the surface starting to flatten or lose that damp look, the boards may be drying from the top while the subfloor and wall base are still carrying moisture. That mismatch is what changes shape, breaks finish, and turns a simple leak into a tear-out.
The pattern matters more than the label. Homeowners often call all of it "warping," but the profile gives away where the moisture is trapped and whether the floor still has a fair chance to recover.
What each pattern usually means
Cupping shows up when the board edges sit higher than the center. In the field, that usually means the underside is wetter than the face. The top may feel dry to your hand and still be losing the battle underneath.
Crowning is the opposite profile, with the center higher than the edges. I see this after aggressive surface drying, or after a cupped floor gets sanded before moisture levels settle back down through the assembly.
Buckling is a different class of problem. Boards lift, break plane, or release from the subfloor enough that you feel movement underfoot. Once that happens, I stop thinking about appearance first and start thinking about fastening, substrate damage, and how far the water traveled.
Staining and odor deserve their own warning label. Dark seams, black spotting, or a musty smell near the baseboard point past the finish layer. They raise concern about prolonged wetting, trapped moisture in the wall line, or contaminated materials that need to be opened and checked.
Wood Floor Water Damage Signs at a Glance
| Sign | What It Looks Like | Typical Moisture Reading | Cosmetic vs. Structural |
|---|---|---|---|
| Cupping | Edges rise, center dips | Higher in affected boards than in unaffected areas of the same home | Often salvageable if readings keep falling and the floor stabilizes |
| Crowning | Center rises higher than edges | Topside may read drier than lower layers or subfloor | Often caused by uneven drying or sanding too soon |
| Buckling | Boards lift, detach, or form ridges | Readings remain elevated instead of trending down | Structural warning sign. Replacement becomes more likely |
| Dark staining or musty odor | Black seams, discoloration, odor at walls or joints | Moisture may still be present below even if surface looks better | Not cosmetic. Investigate for contamination or hidden wet materials |
If you're trying to make sense of what the meter is showing, how moisture meter readings are interpreted in restoration work will help before anyone starts talking about sanding or coating.
The moisture numbers that matter
One reading by itself does not settle much. The useful comparison is between the damaged area, a dry area in the same house, and the subfloor if you can access it safely. What matters is whether those numbers are closing the gap or staying split.
That is the part desert homes hide well. Dry air can pull moisture off the face of the wood quickly enough to give false confidence, while the underside, subfloor, cabinet toe-kicks, and lower wall cavities stay wet longer. A floor that looks better from across the room can still be moving toward cupping or fastener failure.
Wood movement follows moisture loss through the fibers. As noted in NWFA material on water and wood, wood changes dimension as it dries below the fiber saturation range. That is why a floor can look quiet for a day or two, then start showing shape change after the obvious water is gone from the surface.
The practical read is simple. If the face is drying but the assembly below is not, the floor is not winning yet.
How Pros Actually Dry a Wood Floor
A wood floor rarely fails from what you can see on top. The fight is underneath it, in the subfloor, at the wall base, and sometimes in the lower wall cavity where the water stopped and sat. In Phoenix, that matters even more because dry air can pull moisture off the face of the boards fast enough to make the room look better before the assembly below is dry.
That is why a serious drying crew starts with measurement. Not fan placement. Not heat. Measurement.
The setup starts with verification
The first job is mapping where the water went. That usually means moisture checks across the finish floor, checks on the subfloor when there is access, and readings at adjacent wall bases if the leak spread outward. If the wood surface is drying faster than the layer below, surface appearance is a distraction.
Industry guidance for wood flooring says the moisture content difference between flooring and subfloor should be within 4 percentage points for strip flooring and within 2 percentage points for plank flooring because larger gaps increase the chance of movement and bond or fastening problems (NWFA guidance quoted in industry material).
A typical professional drying process looks like this:
- Extraction first: Remove as much standing or trapped water as possible before trying to evaporate what remains.
- Metering next: Establish wet zones, dry comparison zones, and the starting spread between finish floor and subfloor.
- Dehumidification and airflow: Set low-grain refrigerant or desiccant equipment based on the load, room conditions, and materials involved.
- Daily logging: Check whether readings stay high instead of trending down, or whether the gap between materials is closing.
- Demobilization after verification: Equipment comes out when the materials hit target, not when the room feels dry.
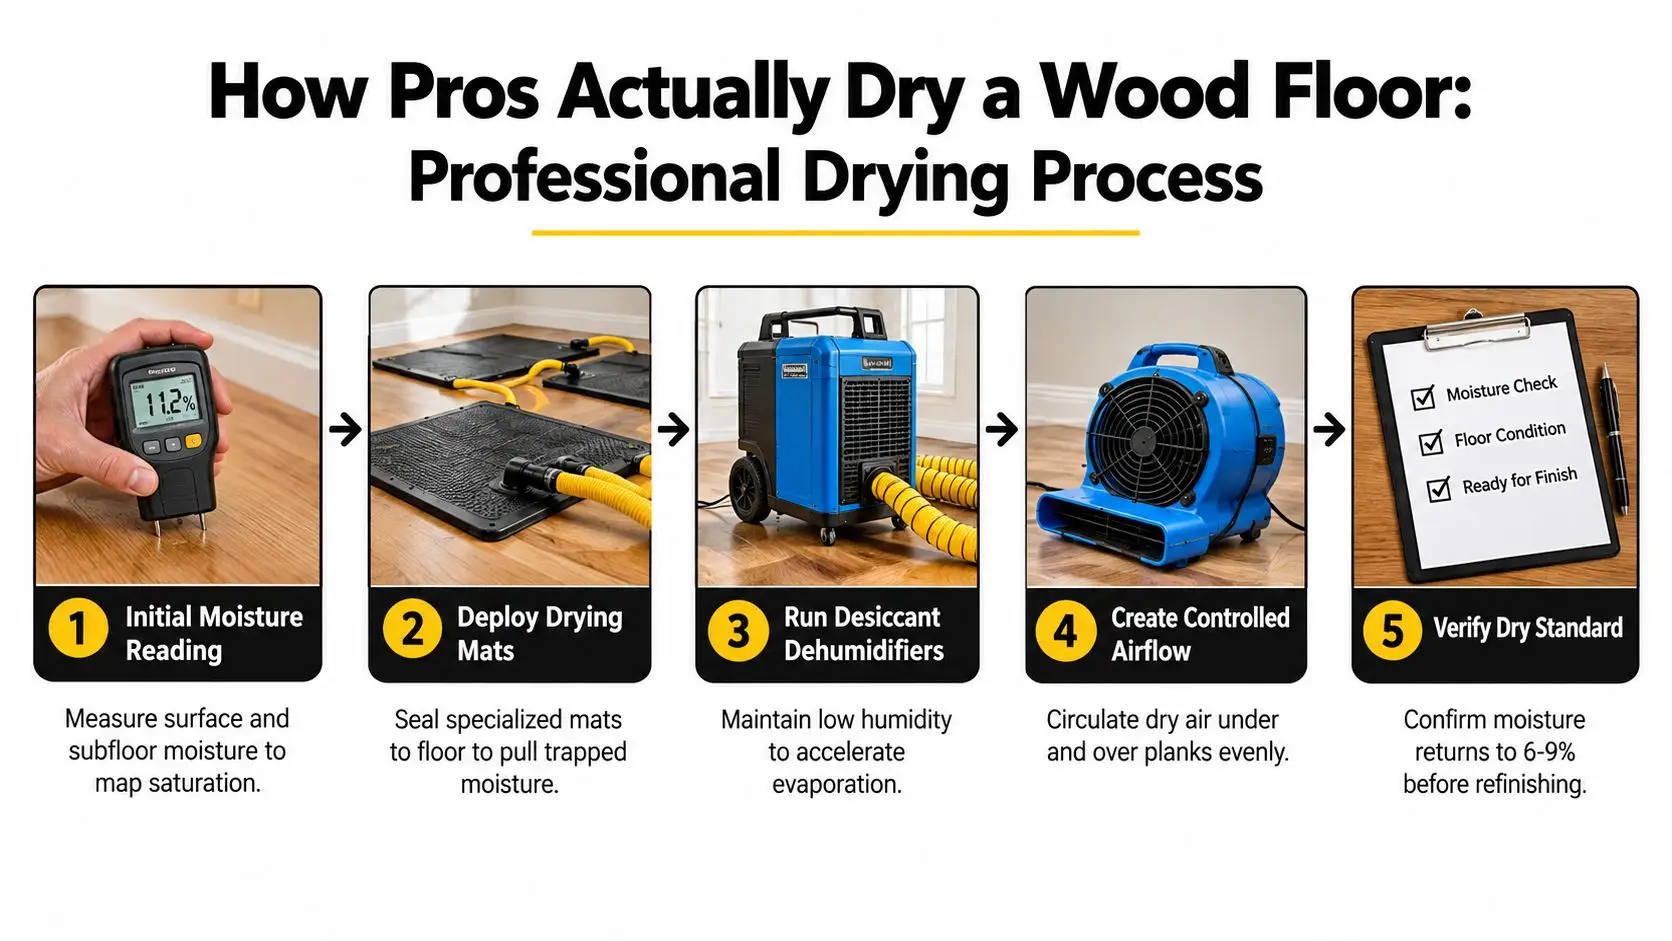
If you want a homeowner-level view of what that work includes, structural drying techniques used in water mitigation lays out the process clearly.
Equipment choice matters
Low-grain refrigerant dehumidifiers are common on standard indoor losses. Desiccants make more sense on some projects that need drier process air or have conditions that limit what refrigerants can do well. Air movers need to support even evaporation across the room, not blast one wet section of floor while leaving the rest of the assembly untouched.
I am more concerned when drying is stopped too early than when a crew chooses between two decent machine types. The expensive mistakes usually come from false confidence.
Dry to target, not dry to touch.
Clean-water hardwood losses often take days, not hours, and thicker or wider planks usually take longer. The schedule also changes if the subfloor took on significant moisture or if cabinets and wall cavities held water.
Later in the process, homeowners often want to understand what that field work looks like in practice:
What doesn't work
A few mistakes show up over and over on these jobs:
- High surface heat: This can dry the face too fast and make cupping or crowning worse.
- Premature sanding: If the floor has not equalized through the full assembly, you can sand it flat and watch it deform again later.
- Ignoring the subfloor: A floor that looks decent on top can still be sitting over wet sheathing.
- Skipping wall checks: Water often wicks into base plates and lower drywall beyond the visible edge of the floor damage.
- Treating every loss the same: A clean appliance leak and a contaminated backup do not get the same drying or salvage plan.
One practical note. Hardwood mats can help on some systems, but they are not an automatic answer, and crews are often careful with factory-finished floors because the wrong setup can create its own problems. The method matters less than whether the plan matches the floor assembly in front of you.
When Refinishing Is the Wrong Fix
A lot of homeowners jump straight to sanding because sanding feels like repair. Sometimes it is. Sometimes it's just expensive denial.
Dry wood can be refinished. Failed wood can't.
If a clean-water event was caught quickly, the boards stayed attached, readings stabilized, and the shape change relaxed as the floor dried, refinishing may be part of the finish line. That's very different from trying to sand away structural failure.
Industry guidance draws a hard line on contamination. Category 3 sewage or floodwater exposure generally means porous wood flooring should be removed rather than dried and saved because contamination changes the scope completely (hardwood flooring salvage and demolition decisions).
Refinish vs. Replace Decision Criteria
| Signal | Refinish Often Works | Replace the Floor |
|---|---|---|
| Water source | Clean water, contained quickly | Category 2 or Category 3 water |
| Board attachment | Boards remain firm and attached | Boards lift, separate, or move underfoot |
| Shape change | Distortion improves as moisture drops | Buckling, severe splitting, broken joints |
| Engineered floor condition | Wear layer still supports corrective work | Delamination or thin wear layer limits repair |
| Moisture behavior | Readings stabilize and continue downward | Readings stall, rebound, or stay elevated |
The red flags I don't talk around
If the floor still telegraphs waves when you walk, the mechanical bond may already be compromised. If the tongue-and-groove has failed, finish won't rebuild it. If the plies on an engineered floor have started separating, sanding doesn't fix adhesive failure inside the board.
Another issue homeowners miss is hidden timeline damage. Some moisture effects don't show up quickly. Independent claims literature notes that dark discoloration can take about two to five months, and black staining can take about six to eight months under continuous moisture exposure (continuous and repeated water exposure evidence). That's why a floor that "looked okay after cleanup" can still become a replacement floor later.
If replacement is smarter, choose the material for the room
Some rooms keep proving they don't forgive wood. Laundry areas, appliance-heavy kitchens, or entries with repeat water exposure may be better candidates for a different finish floor altogether. If you're comparing visuals before making that switch, the Tiles Mate hardwood tile guide gives a useful overview of tile options that mimic wood without taking on the same moisture risk.
A practical cost reality sits behind all this. Published estimates place water-damaged hardwood floor repair at about $4,000 to $10,000, while replacement is often listed around $5 to $8 per square foot depending on scope and source (repair and replacement cost ranges for water-damaged hardwood). Chasing a bad candidate through drying, sanding, and repeat repairs can cost more than admitting early that the assembly failed.
Insurance, Documentation, and Choosing Help in Phoenix
Claims and contractor choice belong in the same conversation. The paperwork is only as good as the field documentation behind it.
What to photograph right away
In the first day, document the source before it gets moved or repaired if it's safe to do so. Photograph the standing water, the affected rooms, the board seams, the wall base, and anything stored on the floor that got wet. If you have moisture meter readings, include a dated photo of the meter at the test location.
Use a simple sequence:
- Start wide: Show the room and where the leak began.
- Then go tight: Capture valves, lines, appliance connections, and visible damage.
- Document readings: Put the meter against the same location each time you record progress.
- Track contents too: Cabinets, rugs, furniture legs, and trim often support the claim story.
The coverage question
Most homeowners don't need a lecture on policy forms while they're standing in water. They need the practical version. Sudden pipe or appliance failures are commonly treated differently than slow seepage or long-term maintenance issues. The cleanest way to help your adjuster is to show cause, timing, and affected materials.
There is real financial context behind fast response. U.S. homeowners insurance data shows that water damage and freezing accounted for 22.6% of homeowners insurance claims from 2019 through 2023, with about 1 in every 67 insured homeowners filing that kind of claim each year. The average claim amount was about $15,400, and reporting tied to FEMA and NFIP notes that 1 inch of water in a typical home can cause up to $25,000 in damage, including flooring (homeowners water damage claim data and loss costs).
Questions to ask before you sign
Ask direct questions. Are they IICRC-certified? Do they run drying in-house or hand it to a subcontractor? Who writes the drying report? Will someone meet the adjuster onsite if needed? In Phoenix, also ask whether they routinely handle slab-leak losses, appliance failures, and monsoon intrusion paths because those details affect where they inspect.
If you're sorting through the claim side while also choosing a contractor, insurance claim tips for water damage in Arizona homes can help frame the questions.
A verbal estimate is not authorization, and an assignment of benefits transfers control in ways many homeowners don't understand until later.
Phoenix-specific judgment calls
The desert changes how these jobs present. During dry stretches, surface readings can drop fast while moisture remains trapped lower in the assembly. During monsoon periods, indoor conditions swing and the floor can move again after seeming stable. Homes on slab construction also deserve a more careful look when water runs under cabinets or wall lines because migration paths aren't always obvious from the finished floor.
The company name matters less than the process. You want documented moisture mapping, daily verification, and a written drying record. One Phoenix-area option is Restore Heroes, which provides water extraction and structural drying for these kinds of losses. That's useful because wood floor claims are won or lost on what was measured and recorded, not on how dry the room looked when someone left.
The One-Page Takeaway
The most important thing to remember is simple. Visible floor damage is usually late. Hidden moisture is early. If you judge the job by the surface, you'll often be wrong.
The checklist that matters most
Read this like a priority list, not a theory list.
- Stop the source first: Shut the valve, isolate the appliance, or get the plumbing problem contained.
- Extract standing water: Use a wet vac or other proper extraction, not just towels and a mop.
- Open the edges if needed: Wet baseboards and trim can hold moisture at the wall line.
- Map moisture, don't guess: Compare the floor, nearby dry areas, and the bottoms of adjacent walls.
- Run dehumidification and airflow: Dry the assembly in a controlled way.
- Log readings daily: Falling readings matter more than a floor that feels dry on top.
- Photograph everything: Source, spread, materials, and meter readings.
- Escalate when the facts say to: If moisture stays high past the early response window, or if the water was contaminated, treat it as a restoration problem.
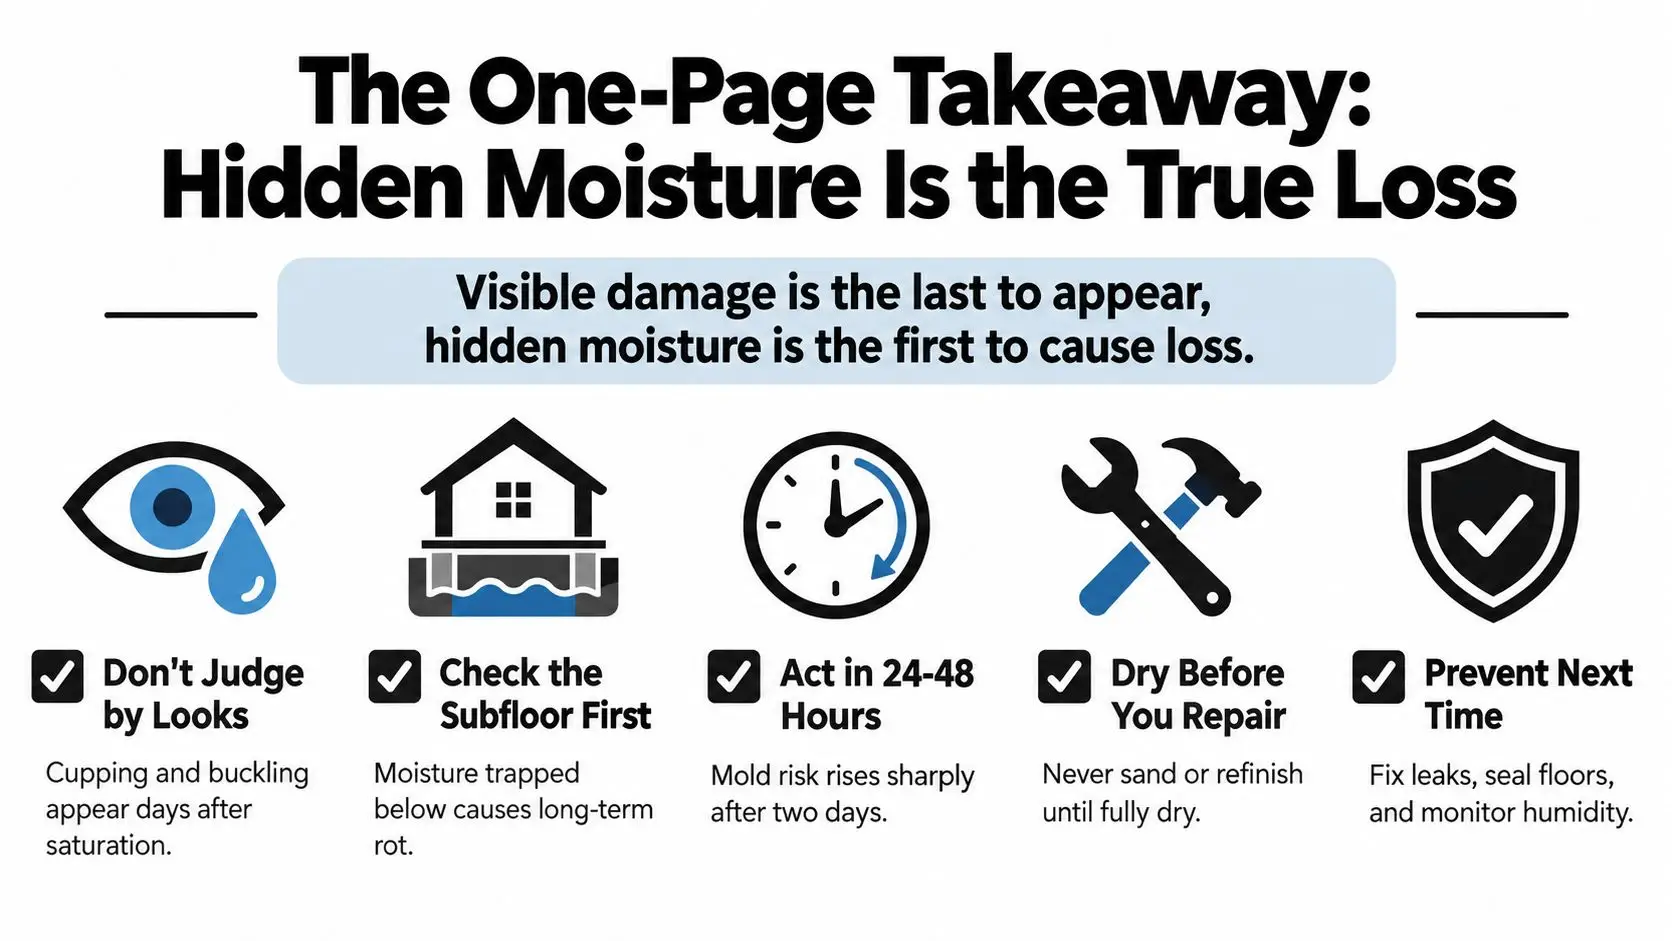
For homeowners who want a practical end-of-job reference, this final walkthrough checklist for safe reentry after water damage is a useful way to verify that the house is ready.
The three decisions that decide the floor
Most wood-floor outcomes come down to three calls.
First, did the drying target get reached in time, before the assembly sat wet too long? Second, was the water clean enough that salvage was still reasonable? Third, once the moisture equalized, did the planks stay flat and firmly attached?
If the answer to all three is yes, the floor often has a path forward. If one or more answers is no, the surface was never the fight. The subfloor, wall base, and hidden moisture already decided it.
If your wood floor leak has moved past towels and guesswork, Restore Heroes handles the parts that usually get missed, including extraction, moisture mapping, structural drying, and documentation for Phoenix-area water losses. If you need help figuring out whether the floor can still be saved or the subfloor needs deeper attention, visit Restore Heroes.