Shut off the main water supply immediately, turn off electricity to the wet area, and call a professional restoration company. A burst pipe can release hundreds of gallons of water, and professional repair alone can run from $200 to $3,000, with major incidents easily exceeding $5,000 once water damage restoration is involved.
If water is spreading across your floor right now, you don't need a long explanation first. You need control. Start with the shutoff valve. If water is near outlets, appliances, or a breaker panel, cut power to that area. Then get a plumber and a restoration crew moving at the same time, because one stops the leak and the other handles the water that already got loose.
A burst pipe emergency gets expensive fast because the pipe itself is only part of the problem. Flooring, drywall, cabinets, insulation, and hidden cavities can all hold moisture long after the visible puddle is gone. The right first moves keep a plumbing problem from becoming a full rebuild.
A Burst Pipe is Flooding Your Home Here's What Matters Now
Panic is normal. Fast action matters more.
A burst pipe emergency usually announces itself in obvious ways. You may hear rushing water in a wall, notice a sudden drop in water pressure, see stains on a ceiling, or find wet spots where nothing should be wet. A plumbing guide also notes that burst pipes can release hundreds of gallons of water, which is why structural damage and mold risk can escalate quickly if you wait (signs of a burst pipe and immediate actions).
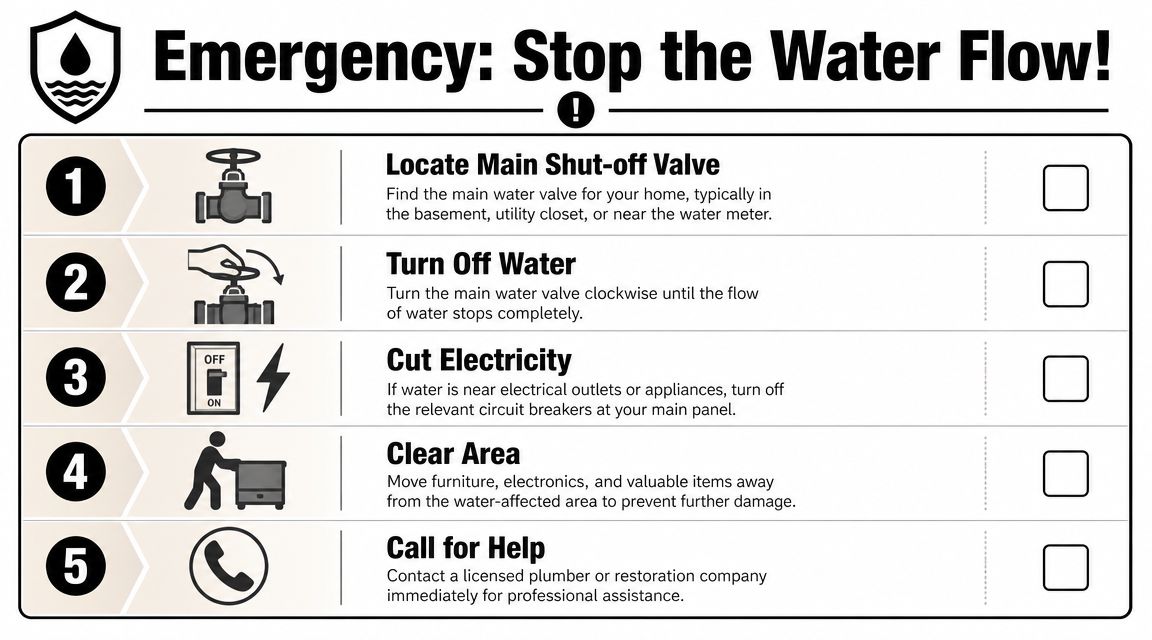
The first three actions are simple:
- Shut off the main water supply
- Turn off electricity to the wet area
- Call a restoration company and a licensed plumber
That order gives you the best chance of limiting the loss.
What to do in the next few minutes
If you're standing in water, stop moving around blindly. Look up first. Ceiling leaks, attic lines, and second-floor bathroom lines often send water far from the actual break.
Then work this short checklist:
- Find the main shutoff: In many Phoenix homes, it's near the front hose bib, at the meter, on a side yard wall, or in the garage.
- Protect yourself first: If water is near outlets or plugged-in appliances, don't step into that area until power is off.
- Get help moving now: Pipe repair and water mitigation are different jobs. Both matter.
Practical rule: If water is still flowing, nothing else you do matters as much as stopping that flow.
After the water is stopped, don't assume the damage is small just because the puddle looks small. Water travels under baseboards, into drywall, beneath vinyl plank, and along framing. If you want a realistic picture of how far water can move through a structure, this walkthrough of what happens inside a flooded house is worth a look.
Stop the Water and Secure the Area Safely
The highest-value response sequence for a burst pipe emergency is to shut off the main water supply immediately, then open faucets to drain the plumbing system and relieve pressure, then turn off electricity in wet areas before cleanup begins. That sequence helps stop active flow and reduces the residual pressure that can keep a split leaking (emergency burst pipe response sequence).
How to shut off the water
Don't overthink this. Your goal is to stop incoming water to the house.
In Phoenix-area homes, the main shutoff is often in one of a few places:
- At the water meter: Usually near the curb or sidewalk in a covered box.
- On an exterior wall: Often at the side yard or near the hose bib.
- In the garage: Common in homes where utilities are grouped together.
Turn the valve until it stops. If it's a lever-style valve, move it to the off position. If it's a round handle, keep turning until it won't go farther.
Once the main is off, open faucets to drain the system. Start with cold water taps. If your setup includes a water heater connection to the affected lines, opening hot taps may also help relieve pressure. Flush toilets too. The goal is to get water out of the lines so the damaged section isn't still under pressure.
How to handle electricity without making it worse
Electricity changes the risk level immediately.
If the wet area is near outlets, extension cords, plugged-in appliances, or your panel, go to the breaker box only if you can reach it without stepping through water. Shut off the affected circuits. If you can't do that safely, stop and wait for qualified help.
Common mistakes make these situations worse:
- Trying a patch before pressure is relieved: Tape, clamps, and wraps often fail if the line still has pressure.
- Walking into standing water to save items: Water near energized equipment can injure you.
- Using household fans too early: If the area isn't electrically safe, don't plug anything in.
Don't test outlets. Don't move appliances while they're energized. Shut power off first.
If the pipe has stopped flowing and the area is safe, start moving contents out of the wet zone. Electronics, rugs, paper goods, and wood furniture should come out first. If you need a clearer sense of what mitigation crews do once they arrive, this overview of water damage mitigation steps lays it out plainly.
What works and what doesn't
A quick comparison helps when you're stressed:
| Action | Works | Usually fails |
|---|---|---|
| Stop active leak | Main shutoff valve | Small patch on a live pressurized line |
| Reduce line pressure | Open faucets and flush toilets | Leaving the system closed and pressurized |
| Make area safer | Shut off breakers to wet area | Stepping into water near outlets |
| Limit loss | Move contents and isolate area | Waiting to see if it dries on its own |
How to Limit Water Spread and Prepare for Your Claim
Once the leak is contained, your job changes. Now you're trying to do two things at once. Limit further damage and create a clean record of what happened.
Restoration guidance puts immediate photo and video documentation right at the top of the list, along with active drying. It also notes that salvageability should be evaluated within 72 hours of the intrusion, because beyond that point the risk of irreversible damage and microbial growth rises materially (documentation and the 72-hour salvageability window).
Start with mitigation, not cleanup theater
You do not need to make the house look better. You need to get water out and stop materials from staying wet.
Focus on these tasks:
- Remove standing water: Use buckets, mops, towels, or a wet/dry vac if the area is electrically safe.
- Lift items off wet flooring: Books, baskets, fabric bins, and cardboard soak up water fast.
- Separate furniture from wet surfaces: Blocks, foil under legs, or moving pieces entirely out of the room can help limit staining and swelling.
- Pull wet textiles aside: Rugs, bath mats, curtains, and cushions hold moisture longer than people expect.
If drywall is soft, bubbling, or swollen, don't assume air alone will save it. The same goes for soaked insulation and carpet pad. Some materials can dry in place. Others can't.
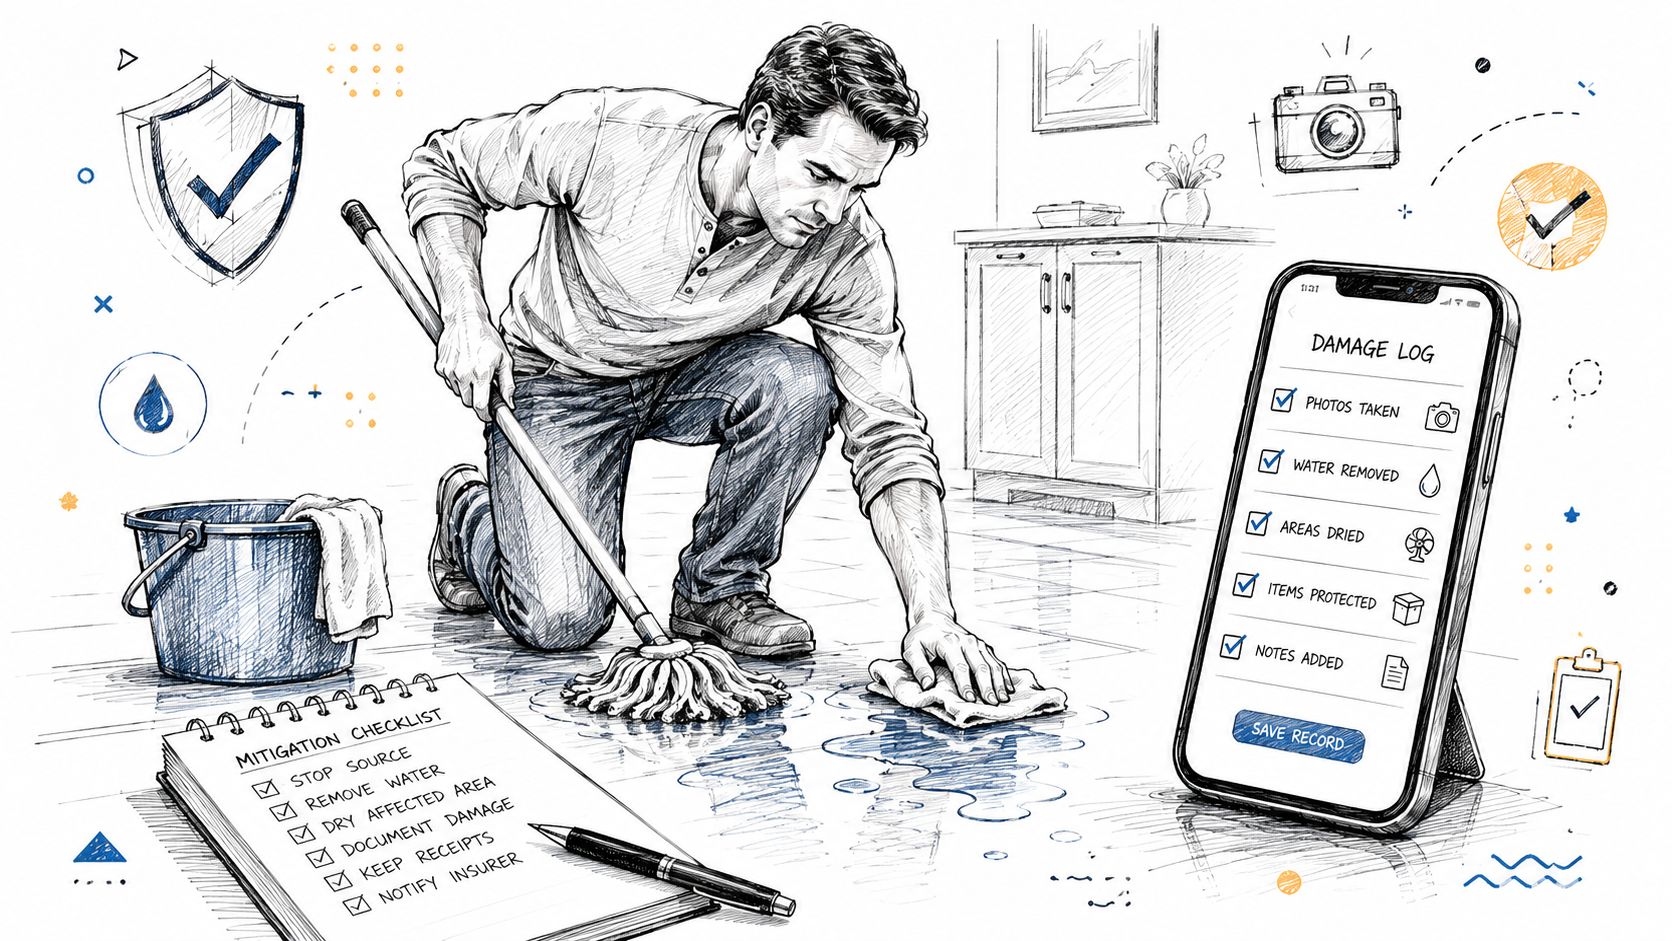
Document like an adjuster will need to see it
Take photos before you throw anything away unless it creates a hazard. Wide shots show the room. Close-ups show the damage.
Photograph and video:
- The source area: The split pipe, wet ceiling, wall cavity, or failed connection if visible
- Water lines and staining: Baseboards, drywall seams, cabinets, flooring transitions
- Damaged contents: Furniture, boxes, electronics, clothing, stored items
- Affected rooms from multiple angles: Doorway view, corner view, and any hidden spread into closets or adjacent halls
Keep notes while it's fresh. Write down when you found the loss, what you shut off, what rooms were affected, and what temporary steps you took. That record helps support a claim and helps the restoration crew decide what needs immediate attention. For homeowners trying to avoid common claim mistakes, these water damage insurance claim tips are practical.
This short video gives a useful visual on water cleanup and why early mitigation matters.
Wet materials don't get safer because the leak stopped. They get riskier the longer they stay wet.
Calling a Restoration Pro and Your Insurance Agent
A burst pipe emergency usually needs two tracks running at the same time. A plumber deals with the failed pipe. A restoration company deals with extraction, drying, material evaluation, and contamination concerns inside the structure.
That distinction matters because the money can climb fast. Professional burst pipe repair typically runs from $200 to $3,000, and major incidents can easily exceed $5,000 once restoration is included. Repairs behind walls can cost $150 to $500 before drywall restoration is even added (burst pipe repair cost ranges and wall access costs).
Who to call first and what to say
If water is still flowing and you need the line repaired, call a licensed emergency plumber. If you're outside Arizona or helping family elsewhere, a resource like EZ Plumbing's 24/7 service shows the kind of round-the-clock response you want to find locally.
When you call, keep it simple:
- State the problem clearly: “I have a burst pipe and active water damage.”
- Name the affected area: Kitchen wall, attic, garage ceiling, upstairs bathroom, slab area
- Tell them what you already did: Main water off, breakers off, standing water present
- Mention access issues: Water behind walls, ceiling sagging, cabinet swelling, flooring affected
For the restoration side, one local option is Restore Heroes water damage restoration contractor services, which covers mitigation and structural drying for burst-pipe-type losses.
What to ask your insurance company
Call your carrier after the immediate hazard is controlled. Have your policy number, address, time of loss, and your photos ready.
Ask practical questions:
- What documentation do you want first
- Should I save damaged materials or contents for inspection
- Do you want emergency mitigation started immediately
- How should I submit photos, videos, and inventory notes
Don't wait for perfect paperwork before starting necessary mitigation. Standing water, wet drywall, and soaked flooring don't pause while you sit on hold. Delay is expensive because water keeps moving into materials you can't see.
Understanding the Clock from Water Damage to Mold Growth
Once the water stops, the clock doesn't. Moisture trapped in framing, drywall, insulation, cabinetry, and flooring keeps changing the job.
A lot of homeowners think a room is “basically dry” because the floor surface feels better. That's not how structural drying works. Surface dryness and internal moisture are not the same thing.
What happens over time
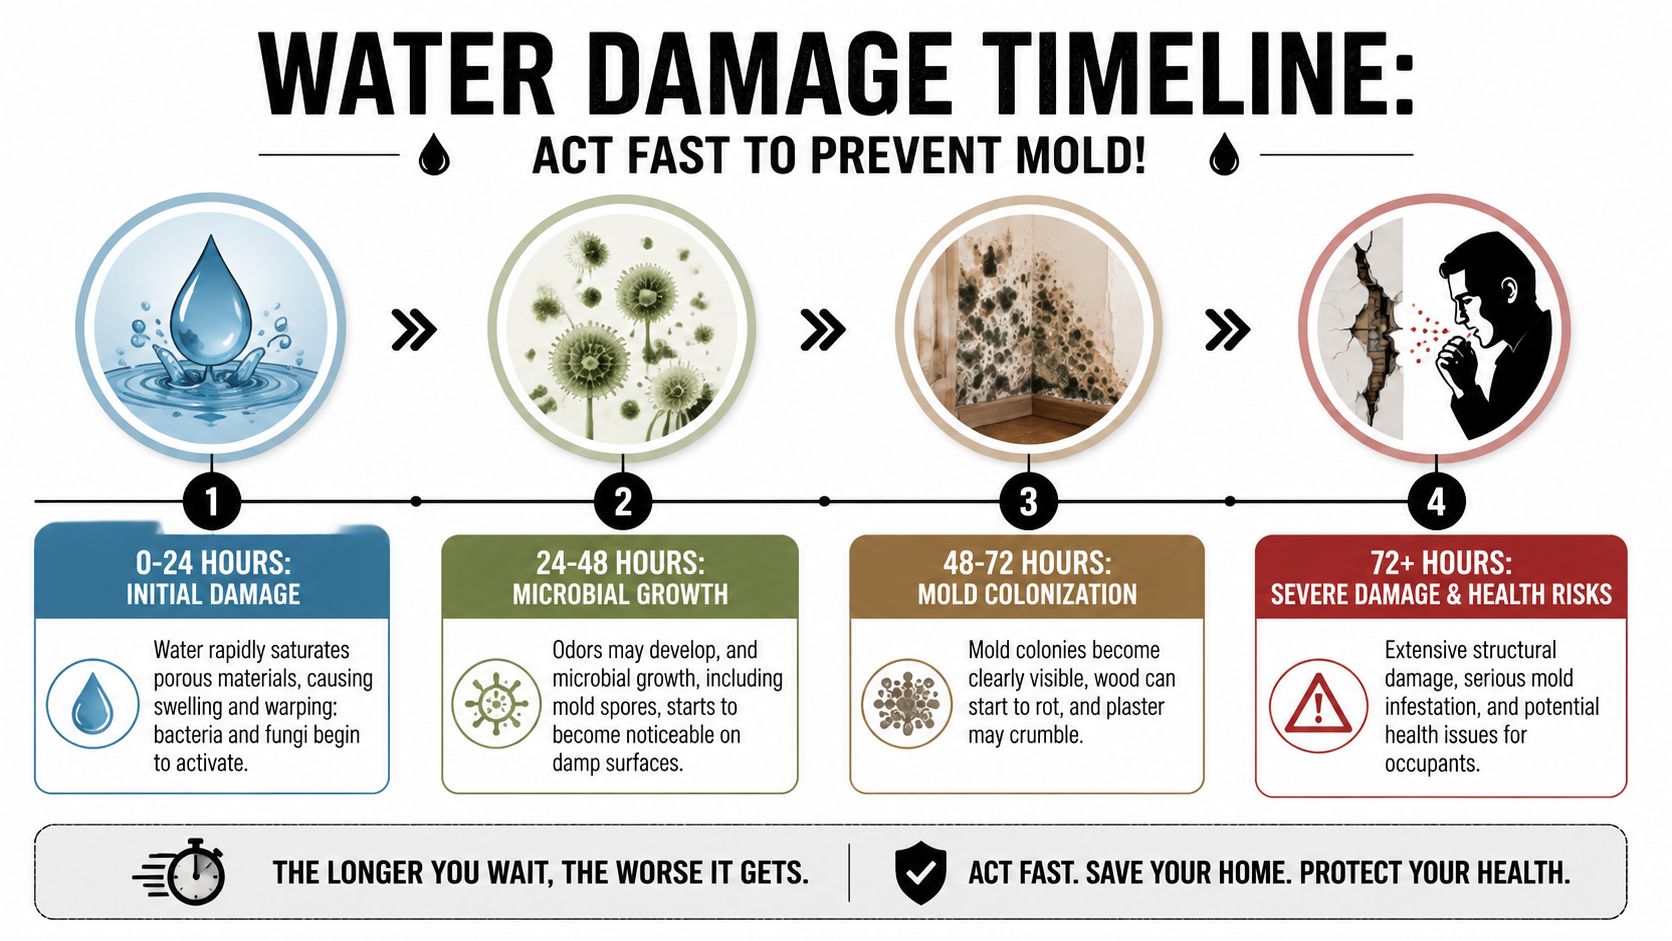
Here's the practical timeline to understand:
| Time from intrusion | What you may see |
|---|---|
| 0 to 24 hours | Wet drywall, swelling trim, cupping floors, damp insulation, musty air beginning |
| 24 to 48 hours | Stronger odor, more material distortion, moisture moving into hidden cavities |
| 48 to 72 hours | Higher chance that salvage decisions become harder and hidden growth concerns increase |
| Beyond 72 hours | More risk that materials need removal instead of drying in place |
That's why the earlier 72-hour salvageability benchmark matters, as noted earlier. It's not a scare line. It's a working deadline for deciding what can still be saved.
Why fans alone often aren't enough
Homeowners often open windows or set up a couple of box fans and hope for the best. Sometimes that helps with comfort. It does not replace a drying plan.
Professional drying uses extraction, targeted airflow, and dehumidification to pull moisture out of materials, not just off the room's surface. In Phoenix, people assume dry outdoor air always solves everything. Sometimes it helps. Sometimes attic heat, closed wall cavities, and trapped moisture under flooring make the situation more stubborn than expected.
The room can feel dry while the wall cavity is still wet.
Hidden moisture is where later problems often show up. Window tracks, sill corners, baseboards, and closet perimeters can become trouble spots if humidity lingers. If you've already seen dark buildup around windows after moisture issues, this guide to black mold on window sills gives a useful homeowner-level explanation of what to watch for.
If you're trying to reduce that risk after extraction and demolition decisions are made, this guide on how to prevent mold after a flood covers the next layer of prevention.
Phoenix-Specific Pipe Protection and Maintenance
Phoenix homes have pipe problems that generic cold-weather guides barely touch. The Valley's mix of hard water, extreme attic heat, and aging plumbing systems creates a different kind of burst risk.
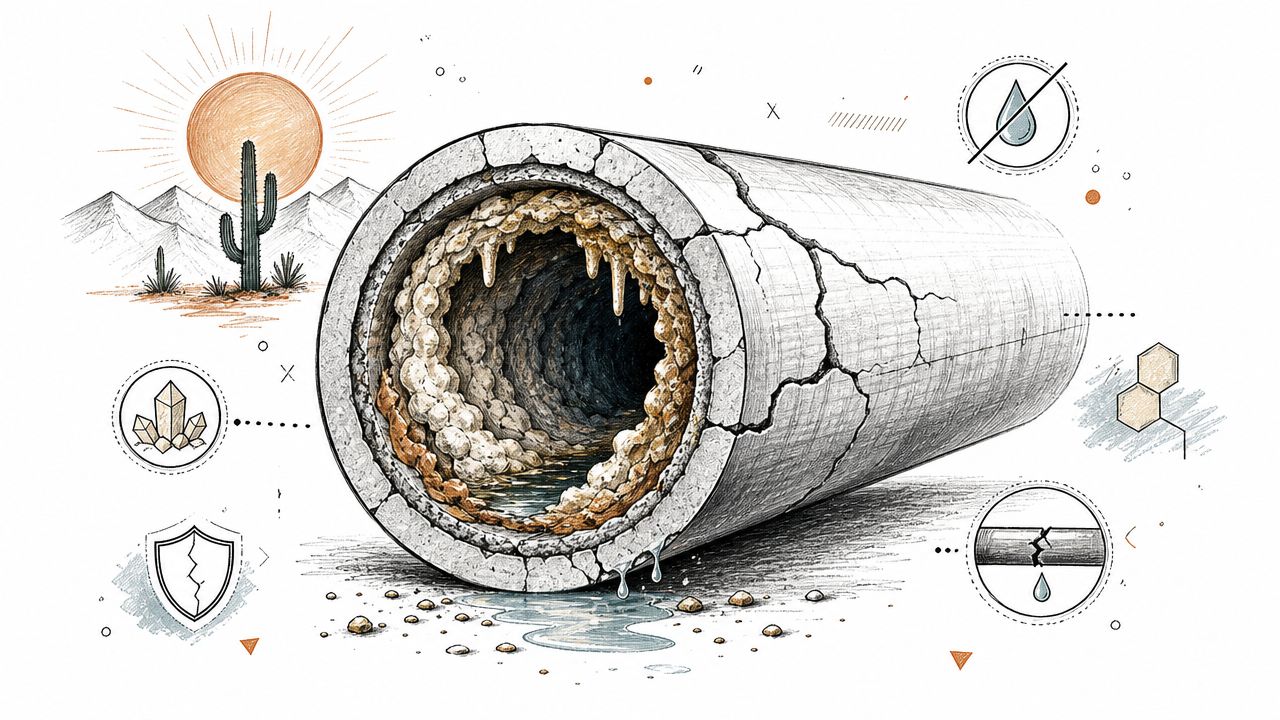
Hard water wears on plumbing differently
Phoenix-area water is tough on fixtures and pipe interiors. Mineral scale can build up over time, especially around valves, connectors, supply lines, and water-using appliances. That buildup can narrow flow paths, stress components, and make shutoffs harder to operate when you need them.
What helps:
- Check shutoff valves yearly: If a valve is seized, that's a problem to fix before an emergency.
- Watch appliance lines: Ice maker lines, washing machine hoses, and water heater connections often show age before a larger failure.
- Consider treatment where appropriate: In hard-water areas, many homeowners look at softening or scale-management options to reduce mineral wear.
Heat and older infrastructure are the Phoenix combination to respect
Attic plumbing in summer deals with harsh conditions. So do garage-adjacent lines and exposed sections near exterior walls. Add an older home in an established Valley neighborhood, and you may have a system with mixed materials, past repairs, and valves that haven't been touched in years.
A smart prevention routine looks like this:
- Insulate vulnerable attic and garage lines: Not for freezing in this case, but for temperature stress and exposure.
- Know your pipe material and age: If you don't know whether you have copper, PEX, or older galvanized sections, find out.
- Pay attention to pressure behavior: If pressure suddenly changes during seasonal demand shifts or after municipal work, have it checked.
- Schedule regular plumbing maintenance: Small issues usually announce themselves before a rupture if someone is looking.
Drain health also matters because neglected plumbing systems rarely fail in isolation. If you're building a maintenance calendar, Regular drain servicing is a useful companion to pipe inspections, especially in older properties with recurring slow drains or backup history.
Phoenix homeowners do best when they treat plumbing as a system, not a collection of separate parts. The homes that avoid major burst pipe emergencies usually have three things in common. The shutoffs work, the vulnerable lines are known, and someone checks the system before a leak forces the issue.
If you're dealing with a burst pipe emergency in the Phoenix area, Restore Heroes can help with water extraction, structural drying, and damage assessment after the plumbing source is controlled. The important thing is to act quickly, document carefully, and keep wet materials from sitting longer than necessary.