
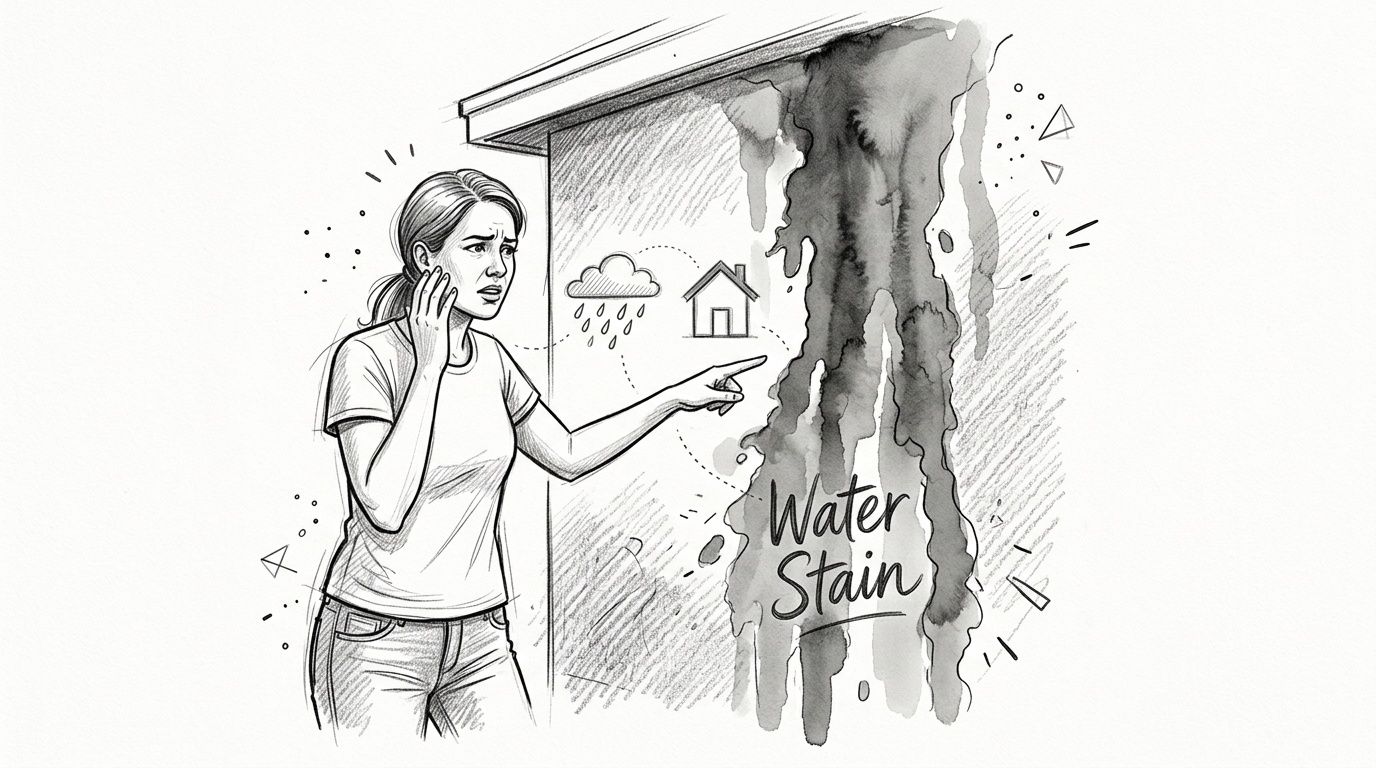
A lot of Phoenix homeowners notice stucco water damage the same way. A monsoon rolls through, the wall dries unevenly the next day, and one stain under a window suddenly looks darker than it did last week. Maybe the paint starts to bubble. Maybe a crack that seemed harmless now has a brown streak running out of it.
That's the point where the question begins to surface: is this a small patch job or the beginning of a much bigger repair? In Arizona, that question matters. The heat bakes exterior walls for months, then storm water finds every weak detail in a hurry. Good stucco water damage repair isn't about smearing patch material over a crack and hoping for the best. It's about finding where water got in, what stayed wet, and whether the wall can still drain the way it should.
Spotting the First Signs of Stucco Water Damage
A common Phoenix call starts the same way. The monsoon passed, the wall looks dry from the street, and one area under a window still reads darker by late afternoon. By the time a homeowner notices a stain inside, moisture has often been in that wall longer than they think.
If you're seeing an exterior stain and an interior mark at the same time, compare what you find with common signs of water damage on a ceiling. Wall leaks often show up indoors before the stucco failure is obvious from outside.
What to look for on the surface
Early stucco water damage usually leaves a pattern, not just one isolated flaw.
- Dark discoloration that lingers: A patch that stays damp-looking after the rest of the wall has evened out often means moisture is trapped behind the finish.
- Blistering or bubbling paint: Paint loses bond when water pressure builds from behind.
- Vertical stains below windows, roof edges, or penetrations: Those lines often trace the route water took into the assembly.
- Cracks that changed shape or color: A hairline crack may be cosmetic. A widening crack, a crack with brown staining, or one that reopens after patching needs closer evaluation.
- Soft, sandy, or hollow spots: Press lightly. If the area sounds hollow or the surface breaks down easily, moisture may have damaged the stucco base or materials behind it.
A crack by itself does not tell the whole story. Location matters. Repeated wetting matters more. So does what surrounds the crack, especially staining, softness, and any sign that the wall is holding moisture longer than it should.
The mistake that keeps repairs from lasting
The failure I see most in Phoenix is the quick patch that makes the wall look better for one season. Caulk in the crack, paint over the stain, then wait for the next hard rain. Under intense sun, those surface fixes dry out, shrink, and separate. Once monsoon wind-driven rain hits the same weak detail again, the stain returns and the repair area is often larger.
That is why DIY stucco patching has a high miss rate here. The visible blemish is rarely the full problem. Water may be entering at a window corner, roof-to-wall joint, hose bib, light fixture, or failed seal higher up, then showing up somewhere else entirely.
I tell homeowners to be careful with cleaning too. Washing a stained wall can help you see the finish better, but high pressure can force more water into cracks and weak joints. If you're comparing cleaning options before touching the wall, review Sparkle Tech's pressure washing prices and make sure the method is appropriate for stucco, not just the price.
Practical rule: Treat recurring stains, bubbling, and soft spots as moisture intrusion until inspection proves otherwise.
If the wall stains after each storm, the patch already failed. At that point, the smart move is to stop guessing and determine where the water is entering, how far it spread, and whether the wall can still dry properly.
Why Stucco Fails in the Arizona Climate
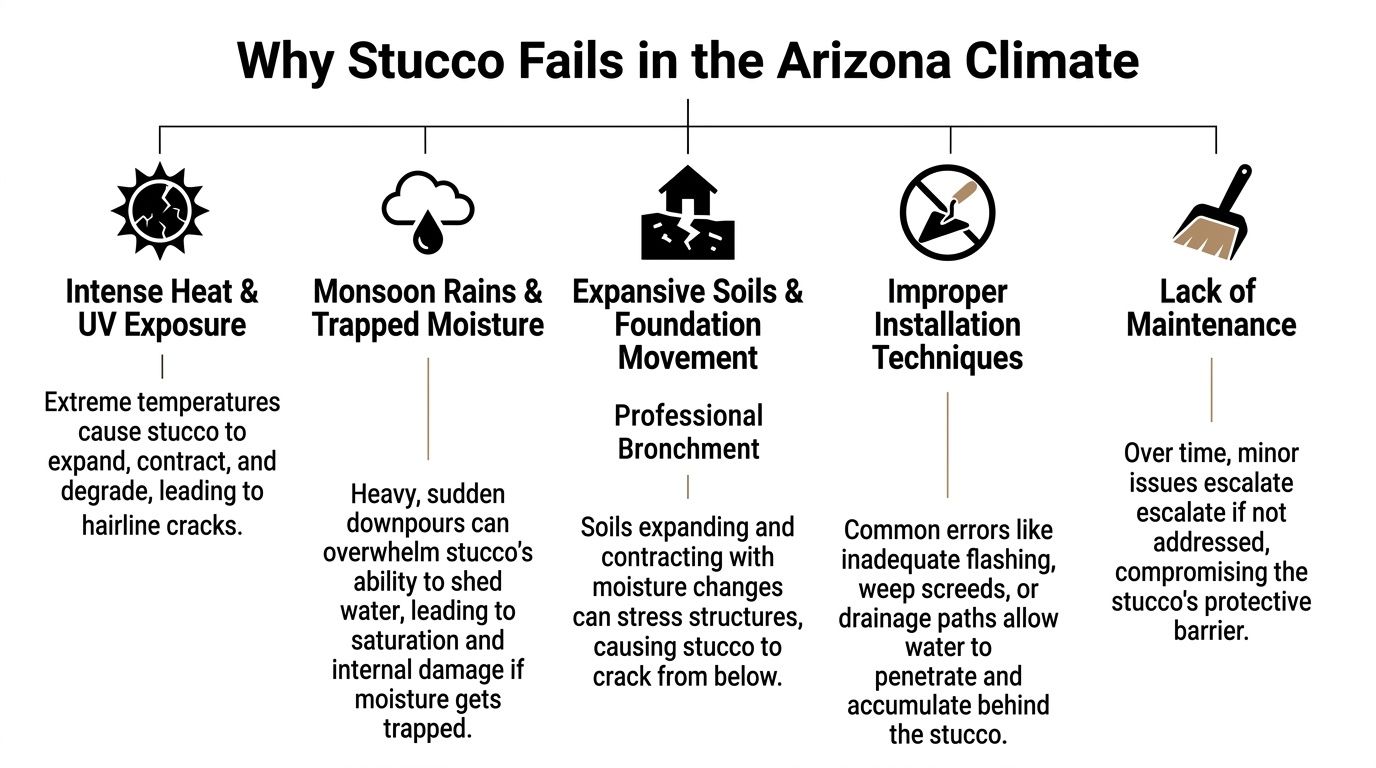
A Phoenix stucco wall can look fine through June, then fail hard in one monsoon. I see it after the first wind-driven storm of the season. Water gets pushed into a hairline crack, a loose window joint, or a bad roof-to-wall detail. The wall then bakes under intense sun, which opens and closes those weak points over and over until a small defect becomes a leak path.
Stucco isn't the waterproofing
Homeowners get misled by the hard outer finish. Stucco sheds a lot of water, but it is not the part of the wall that guarantees a dry interior. Protection comes from the layers behind it, including the water-resistive barrier, flashing, weep details, and the way each penetration was sealed and tied together. If those details were skipped, installed poorly, or have aged out, water finds a way in.
That matters more in Phoenix than people expect. Our climate is dry for long stretches, so hidden moisture can go unnoticed. Then monsoon rain arrives sideways, not straight down, and it tests every joint at once. After that, extreme heat accelerates shrinkage, sealant failure, and cracking.
Why Arizona exposes weak details so quickly
The same wall has to survive two different stress cycles. Daily heat loads cause expansion and contraction. Sudden heavy rain tests drainage and flashing. Simple cosmetic patching rarely holds up for long under that cycle, which is why I caution people against assuming a bagged stucco patch and paint solved the problem.
The trouble spots are predictable:
- Window perimeters: Corners, sill transitions, and failed sealant joints leak often, especially if flashing was weak from the start.
- Roof-to-wall intersections: Concentrated runoff exposes missing kick-out flashing and bad laps fast.
- Parapets, trim bands, and foam details: These areas crack differently, hold water longer, and are common failure points on stucco homes in the Valley.
- Sprinkler-exposed walls: Repeated wetting near hose bibs, side yards, and front elevations keeps stucco from drying between cycles.
- Poor grading and splash-back: Water at the base of the wall can wick up, stain the finish, and keep the assembly damp.
I also see a lot of confusion between surface dirt and true moisture staining. Cleaning has its place, but it does not diagnose a leak. If you're comparing cleaning options, Sparkle Tech's pressure washing prices can help set expectations on maintenance costs, but a low-cost wash will not fix trapped moisture behind stucco.
The real failure is usually behind the finish
What fails first is often the assembly, not the texture coat you can see. Once water gets behind the stucco, it can wet sheathing, framing, insulation, and interior finishes before the outside shows major damage. In older repairs, I often find the visible crack was only the symptom. The actual entry point was higher up or off to one side.
That is why lasting repairs start with moisture mapping, invasive checks where needed, and correcting the drainage and flashing details that allowed the leak. If the wall has stayed wet long enough to affect materials behind the finish, the job moves into moisture damage repair for concealed wall assemblies, not just exterior patching.
In Phoenix, the sun can hide problems for a while. It can also make bad repairs fail faster.
What to Do Immediately When You Find Water Damage
The first job isn't repair. It's control. You're trying to keep the wall from taking on more water before a proper assessment happens.
Start with the source
Work from the outside in and look for the obvious contributors first:
- Shut off or redirect sprinklers if they're spraying the affected wall.
- Check gutters and downspouts for overflow, blockage, or discharge dumping against the house.
- Look above the stain for roof runoff, failed caulk joints, cracked trim, or window perimeter gaps.
- Move water away from the wall with temporary drainage if another storm is expected.
If active rain is involved, don't climb a wet ladder or get onto a roof. Ground-level control is safer than creating a fall hazard.
Protect the inside of the home
If the leak is showing indoors, switch to damage limitation:
- Move furniture and rugs: Keep absorbent materials away from wet walls and floors.
- Use towels or containers under drips: This won't solve the leak, but it can reduce secondary damage.
- Run fans and your HVAC normally: Air movement helps slow the spread of moisture.
- Photograph what you see: Capture exterior stains, interior bubbling, wet flooring, and any visible leak paths.
For immediate stabilization, the principles used in professional water damage mitigation apply here too. Stop the source if you can do it safely, protect contents, and start controlled drying without tearing into materials blindly.
What not to do
A few homeowner actions create bigger problems than the original leak:
- Don't paint over the stain
- Don't break open the wall to “let it breathe” unless a qualified pro has advised it
- Don't scrape or disturb visible mold
- Don't seal a wet crack with random exterior caulk and assume you've fixed it
If the wall smells musty, feels soft, or is leaking near outlets, windows, or upper-story areas, treat it as a professional assessment issue, not a DIY weekend experiment.
A Look Inside the Professional Stucco Repair Process
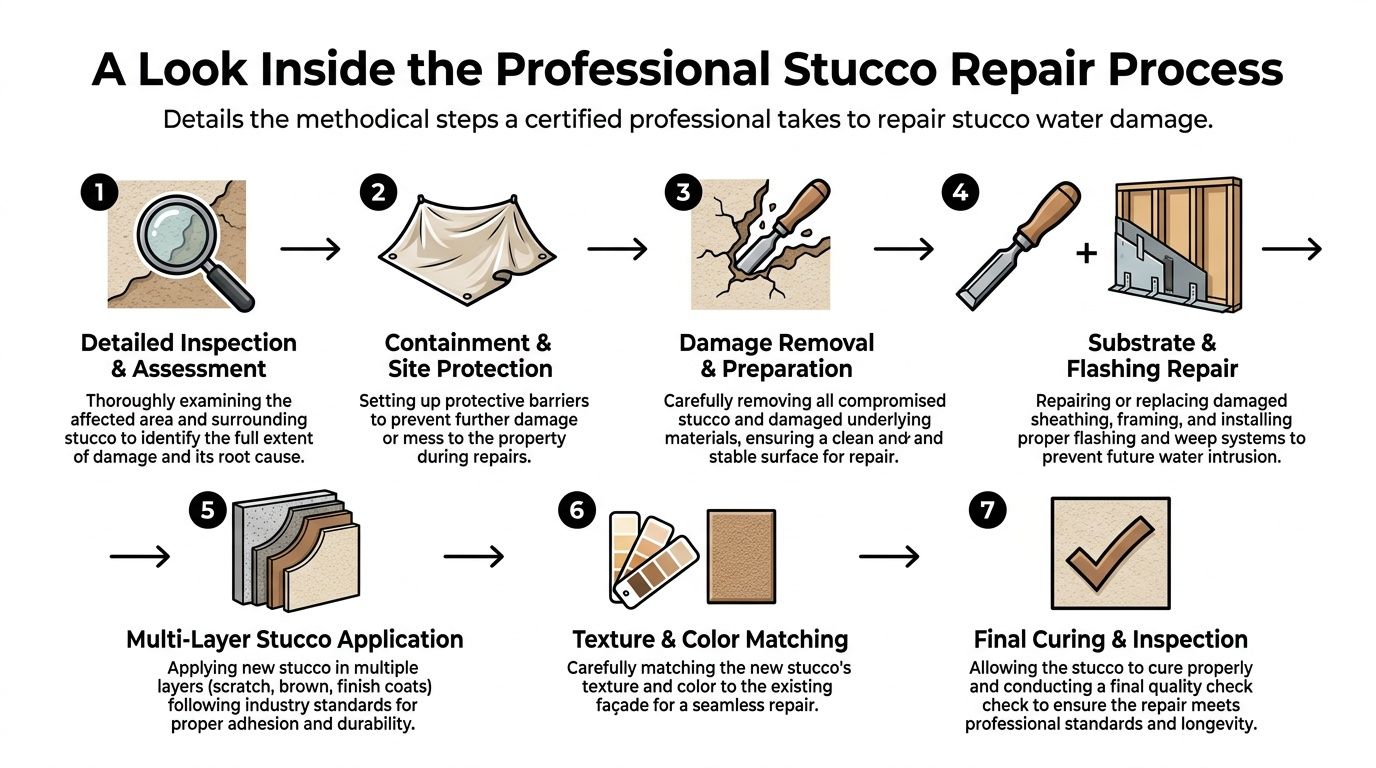
A professional stucco water damage repair job starts long before new finish material touches the wall. The essential work is diagnosis. If you skip that part, you're only guessing where the water came from and how far it traveled.
Diagnosis comes first
Patch repairs that don't address underlying moisture or WRB failure frequently fail within 3 to 7 years. A permanent remediation approach requires stripping stucco to the base layer, repairing the source of failure, and applying new stucco in three lifts per ASTM C926 standards, as outlined by the National Stucco Repair Authority.
That diagnosis usually includes a sequence like this:
- Visual survey: The technician maps cracks, staining, bulges, sealant failure, and suspicious transitions.
- Moisture mapping: Pinless moisture meters help compare wall areas, and suspicious readings get investigated further.
- Infrared scan: Thermography can reveal evaporative cooling patterns that suggest hidden moisture. If you haven't seen how that works, thermal imaging inspection is one of the most useful tools for narrowing down where to open the wall.
- Probe testing: High-risk zones around windows, penetrations, and roof lines are checked to confirm whether the WRB and substrate are still sound.
Here's a practical look at the process in motion:
Removal, correction, and rebuild
Once the damaged area is defined, the crew contains the work area and starts removal. This is the point where hidden conditions often show up. Wet sheathing, decayed trim, failed lath, rusted fasteners, and bad flashing details rarely announce themselves from the surface.
A proper repair usually includes:
Selective demolition of compromised stucco
The damaged stucco gets cut back to stable edges so the repair has a clean boundary. Loose material stays out. Sound material stays in.
Inspection of the substrate
The crew checks sheathing, framing, lath, and the drainage plane. If these are wet or deteriorated, they get repaired or replaced before the finish work begins.
Correction of the water-entry point
This is the step DIY repairs miss most often. If the leak came from failed flashing, bad window integration, poor sill details, or another opening, that detail has to be rebuilt correctly.
Fixing the symptom without fixing the entry point is just delaying the second repair bill.
Reapplication in three lifts
New stucco is applied in scratch, brown, and finish coats. Each layer has a job. The scratch coat keys into the base, the brown coat builds plane and strength, and the finish coat handles texture and appearance.
Texture and color blending
This part takes craftsmanship. Even when the wall is now dry and correctly built, a repair that doesn't blend visually will stand out from the street.
Professional stucco water damage repair is slower than a surface patch because it deals with both building science and finish work. That's the only reason it has a chance of lasting.
Stucco Repair Costs and Project Timelines
Homeowners usually ask two questions right away. How much is this going to cost, and how long is my house going to look like a construction zone? The honest answer is that stucco water damage repair has a wide range because the finish is only part of the job. Hidden damage determines the actual cost.
The national average cost for stucco repair in the United States is approximately $2,550, with typical repair ranges between $900 and $4,200 for standard exterior work in 2025, according to Modernize's stucco repair cost guide. The same source notes that severe moisture damage requiring structural remediation, mold removal, or lath replacement can exceed $10,000. Contractors often charge $8 to $50 per square foot, and labor commonly runs $40 to $50 per hour nationally.
What the numbers usually look like
| Repair Scope | Typical Cost Range | Potential Timeline |
|---|---|---|
| Minor cosmetic patch of 1 to 50 square feet | $150 to $1,200 | Often shorter, depending on drying, prep, and finish matching |
| Medium repair area of 50 to 200 square feet | $800 to $4,200 | Usually several days once demolition, substrate checks, and recoating are included |
| Moisture damage repair | Starts at $1,500 and can reach $8,000 or more | Longer timeline due to drying walls and replacing rot |
| Severe remediation with structural work or mold-related conditions | Can exceed $10,000 | Extended project timeline because removal, repairs, and curing all take time |
Why one bid can be much higher than another
A small crack repair sounds simple until the crew opens the wall and finds failed backing, wet sheathing, or rusted lath. That's why square footage alone doesn't tell the full story.
The biggest cost drivers are:
- How much hidden damage appears after removal
- Whether flashing, WRB, or lath must be rebuilt
- How difficult the area is to access
- Whether mold-related cleanup is needed
- How complex the texture and color match will be
Modernize also notes that mold infestation cleanup can add $265 to $280 to the total bill, which matters when wet stucco has been ignored for too long.
Budget reality: The cheapest estimate is often the one that assumes the least damage. It isn't always the one that reflects what the wall actually needs.
Timelines work the same way. A surface repair moves faster than a remediation project because drying, substrate repair, and cure time can't be rushed without sacrificing the result. If a contractor gives you a very fast answer before discussing moisture checks, removal scope, and wall reconstruction details, that's a warning sign.
When to Call a Pro for Stucco Water Damage
Some stucco issues are maintenance items. Some are restoration problems. The hard part for homeowners is telling the difference before more water gets behind the wall.
In Phoenix metros, an estimated 85% of homes with stucco moisture damage have underlying issues like deteriorated lathing or flashing that patching cannot fix, making professional inspection critical when trying to decide between repair and replacement, according to Choice Exteriors. That number lines up with what professionals see in the field. The stain is often smaller than the actual damage.
Red flags that aren't worth guessing on
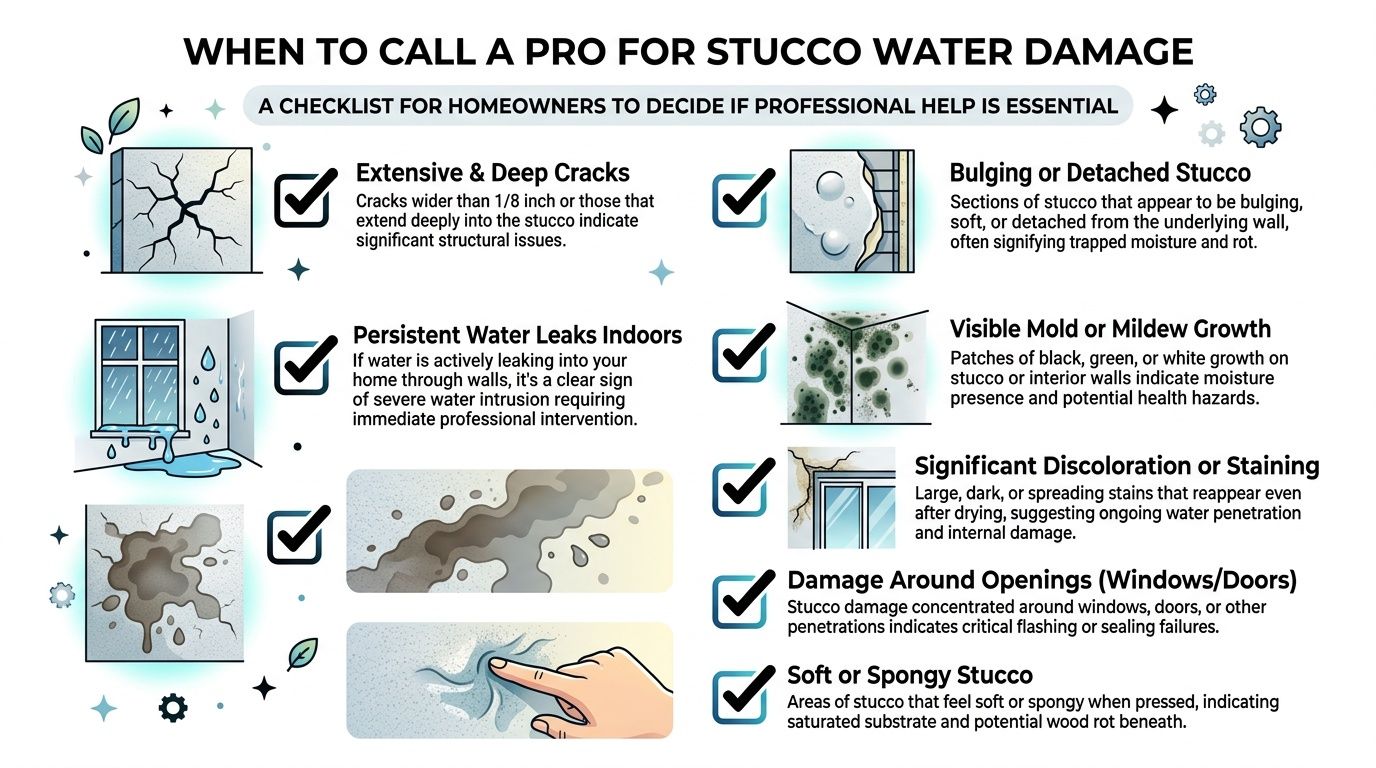
Call a qualified contractor if you see any of the following:
- Bulging or detached stucco: This often means moisture has compromised what's behind the finish.
- Soft or spongy wall areas: Stucco shouldn't feel weak when pressed.
- Visible mold or a musty odor indoors: That suggests moisture has already moved beyond the exterior finish.
- Leaks around windows, doors, or roof intersections: These are classic flashing-failure zones.
- Second-story damage: Access and safety alone make this a professional job.
- Staining that keeps returning after dry weather: Recurring symptoms usually mean trapped moisture or repeat intrusion.
- Damage near electrical components: Water and wiring should never be a DIY combination.
What a competent inspection should include
A real inspection shouldn't be a quick glance from the driveway. It should involve tools and a clear scope. Look for a contractor who is licensed, insured, and IICRC-certified, and who can explain the difference between cosmetic repair, invasive testing, and full remediation.
A solid visit usually includes:
Moisture verification
The contractor should use instruments, not just visual opinion. Moisture meters, infrared imaging, and targeted probing all help define the actual problem.
A written scope of work
You want to know what will be opened, what will be repaired, and what conditions could change the price once demolition begins.
Discussion of adjacent damage
Stucco leaks often affect sheathing, framing, insulation, drywall, flooring, or trim. A narrow exterior-only opinion can miss the full loss.
Insurance coordination when appropriate
A professional should be able to document visible conditions, moisture findings, and affected materials in a way that supports your communication with the carrier.
If you've reached the point where you need a qualified water damage restoration contractor, don't wait for the next storm to confirm what the first one already told you. Water intrusion rarely improves on its own. It just gets harder to see until the wall has to come apart.
Preventing Future Damage and Navigating Insurance
The best stucco water damage repair is the one you never need twice. In Phoenix, prevention comes down to seasonal inspection and catching drainage failures before monsoon rain tests them.
Smart prevention steps for Phoenix homes
Use a simple routine before storm season:
- Check sealant around windows and doors: Look for separation, shrinkage, or hard, brittle joints.
- Watch irrigation patterns: Sprinklers shouldn't soak stucco walls or window trim.
- Clear gutters and downspouts: Water needs to leave the roofline cleanly and move away from the house.
- Inspect for new cracking and staining: Don't just note the crack. Note whether it changed, spread, or started staining.
- Keep grading moving water away from the foundation: Standing water at the base of stucco is never a good sign.
For broader exterior prevention ideas, Atomic Exteriors' water damage guide is a useful reference for building a seasonal inspection habit around the outside of the home.
Insurance basics without false promises
Insurance questions come up fast once walls are wet. Coverage depends on your policy language and the cause of loss. In general, homeowners often have a better chance with sudden and accidental events than with damage tied to long-term deferred maintenance, but that distinction gets decided by the carrier and the facts of the loss.
A few steps help protect your position:
- Document everything early: Take photos of stains, cracks, damaged interiors, and any active water entry.
- Keep notes on timing: Write down when you first noticed the problem and what weather or event happened around that time.
- Save inspection reports and invoices: Clear records matter.
- Call your agent promptly: Late reporting can complicate the process.
Don't assume a claim will be covered, and don't assume it won't be. Get the wall assessed, get the damage documented, and let the facts lead.
If you're dealing with suspected stucco moisture intrusion in the Phoenix area, Restore Heroes is a licensed, bonded, insured, and IICRC-certified restoration company that handles water damage mitigation, structural drying, mold concerns, and the documentation homeowners need when the situation moves beyond a simple exterior patch. When stucco leaks have started affecting the wall assembly or the interior of the home, getting trained eyes on it quickly can limit further damage and make the next step much clearer.