
You're in the room under the bathroom, looking up at a brown ring, a bubble in the paint, or a slow drip near a light. The upstairs toilet kept running, water crossed the floor, and it showed up down here. That is toilet overflow water damage to ceiling below, and the stain is not the decision that matters.
Paint will not tell you if the cavity is sound. A fan aimed at a dark ring will not tell you if the insulation is still wet. In Phoenix heat the paint face can look fine by evening while the joist bay stays damp. Stop the water before anyone cuts drywall or reaches for primer. Then sort the water, the board, and the clock.
What the Ceiling Stain Actually Tells You
A dark ring under an upstairs bathroom is a warning, not a paint project. The useful test is not how dark the stain looks. Three facts decide the ceiling: whether the water was clean supply water or toilet waste, whether the drywall is still sound, and whether wet materials can be dried within 24 to 48 hours.
Walk the table before anyone cuts board. A stuck flapper or fill valve that spilled clear tank water may allow in-place drying if the gypsum has not swollen, split apart, or lost its seams and tape. Water that touched bowl contents, a clogged drain, or a soaked bathroom floor should be treated as contaminated. Keep people out, skip sanding and paint, and plan to remove porous board, ceiling tile, and insulation that stayed wet.
| Water type | How to recognize it | Ceiling action | Time window |
|---|---|---|---|
| Clean supply overflow | Clear water from the tank, fill valve, or supply line with no waste | Map moisture; dry in place only if drywall has not swollen, split, or lost seams | Start at once; mold risk rises after 24-48 hours |
| Toilet bowl overflow with waste | Water that contacted bowl contents | Keep people out, use protection, and plan to remove wet porous board, tile, and insulation | Same 24-48 hour window, with contamination pushing toward removal |
| Drain backup | Water rising from the toilet or another drain | Treat as sewage, isolate the rooms, and notify the landlord or manager in a shared building | Do not scrub waste into the cavity or wash contaminated ceiling tile |
| Unknown mix | Only a stain is visible and the source is unclear | Stop use, photograph, and meter the ceiling and floor above before opening drywall | Do not paint until the category and cavity dryness are known |
The EPA brief guide on mold and moisture treats ceilings, drywall, and insulation as porous materials that are hard to clean fully once contaminated. Materials that stay wet more than 48 hours generally should be removed and replaced. Materials dried promptly may sometimes be evaluated for salvage. A small clean-water overflow does not automatically mean a full ceiling replacement. Painting over a stain is not a repair.
Practical rule: The stain is dry is not an endpoint. Hidden ceilings are easy to overlook, and a meter reading beats a dry hand on the paint.
Phoenix air makes this worse. Fast surface evaporation can leave the face looking better while moisture sits in framing, insulation, or drywall joints. I would not prime a ring until the source is stopped, the water category is known, the cavity is opened only where needed, and readings show the wet spot matches a dry spot of the same material.
The same leak logic shows up next door in the bathroom. A worn joint at the tub or stall can send water the same way a toilet does, and fixing worn shower seals is worth reading if the floor was already damp before the toilet ran. For the ceiling itself, compare what you see with common signs of water damage on a ceiling so a soft seam is not written off as old paint.
How to Stop the Overflow and Hold the Water
Work in this order so the ceiling does not get a second soaking. The EPA mold course on cleanup starts the same way: stop the source, isolate power near wet fixtures, and record both rooms before anyone opens the ceiling.
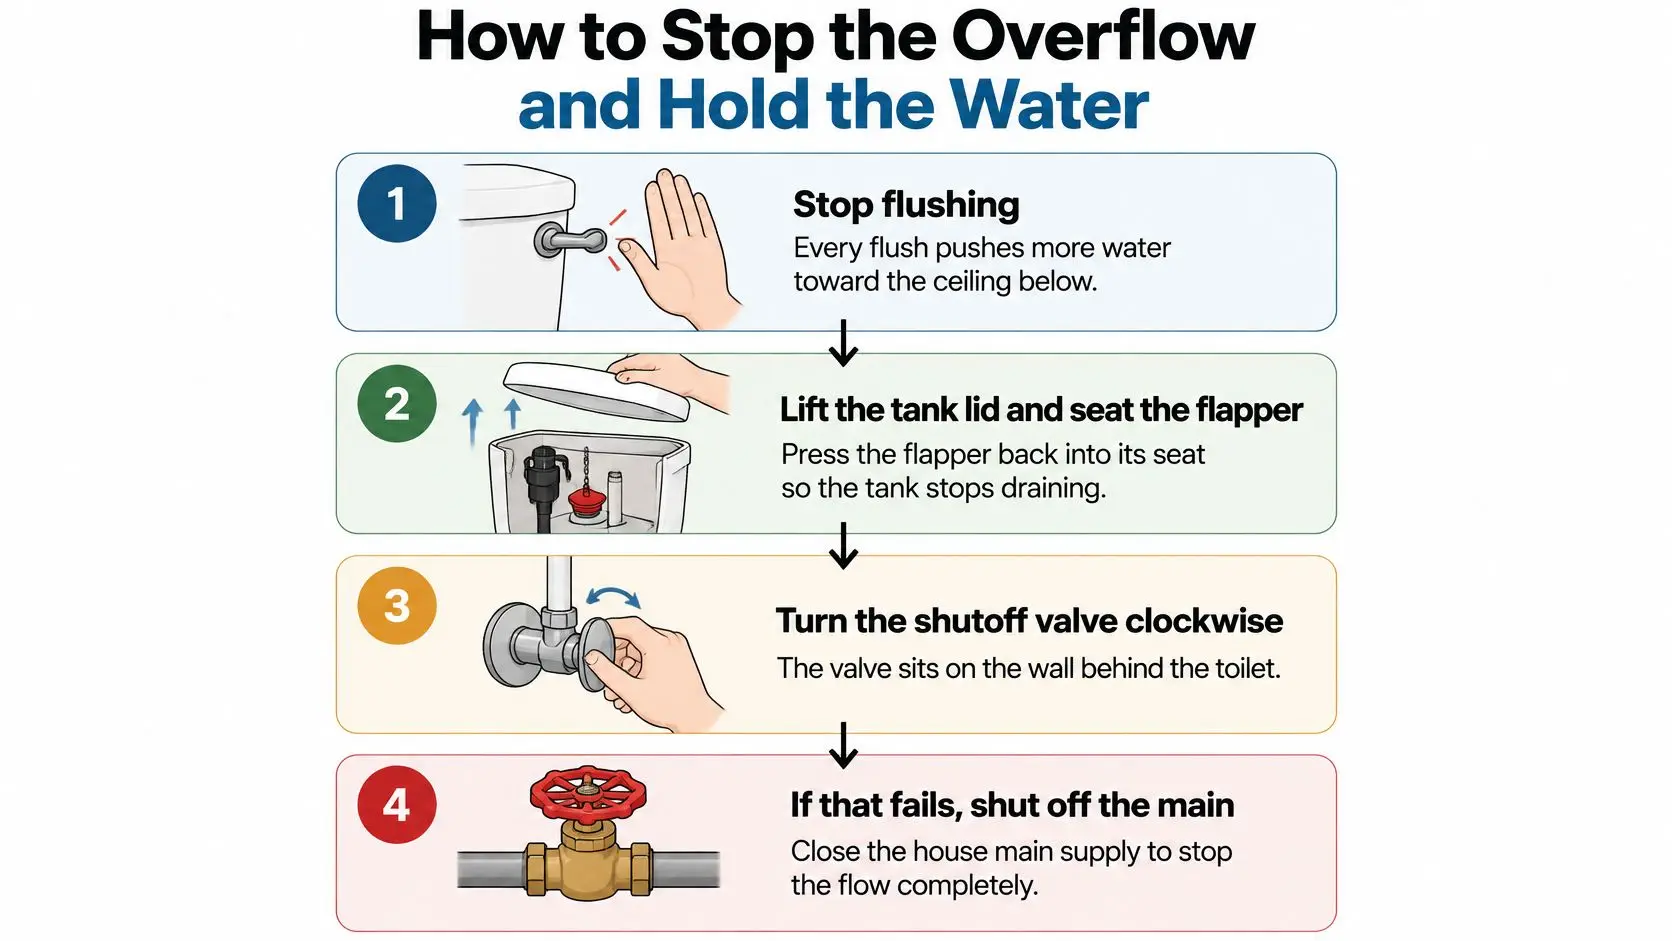
- Stop flushing. Another flush sends more water across the floor and toward the ceiling below. Leave the handle alone.
- Lift the tank lid and seat the flapper. Press the rubber flapper onto the flush opening so the tank stops draining into the bowl. If a float is stuck up, lower it so the fill valve can shut.
- Turn the shutoff valve clockwise. The oval valve sits on the wall behind the toilet, usually low. Turn it until it stops. Do not yank a seized valve hard enough to snap the supply line.
- If that fails, shut off the main. Close the house main so the toilet cannot refill. A stuck angle stop is a plumbing problem, not a reason to keep flushing. If you do not know which valve is the main, use a clear map of the emergency water shut-off before you start turning random handles.
Then protect people and the room below.
- Kill the wet circuit. If water is near a light, fan, or outlet under the stain, switch that breaker off. Do not reach a wall switch while you are standing in water. A licensed electrician should check a fixture that got wet before anyone turns it back on, and a plain guide to emergency electrical repair shows why a damp box is not a DIY reset.
- Keep people and pets out. Close off the wet bathroom and the room under the stain. Lay towels at the bathroom doorway and set a bucket under active drips. Do not stab the ceiling to drain it. A hole in contaminated board spreads waste into the room and can drop wet gypsum on whoever is standing there.
- Suit up if waste is in the water. Wear gloves, eye protection, and a mask. Bag soiled towels where they are. Do not carry them through the kitchen or toss them in the family laundry.
- Photograph before you wipe. Shoot the bathroom floor, the toilet, the shutoff, and the ceiling below. Wiping first hides the path the water took.
Leave that bathroom unused until you know whether a clog, a flapper, or a supply part failed. The source is stopped when no new drip shows for about 15 minutes and the tank is not refilling.
Treat anything that contacted toilet contents as sewage. Do not open the ceiling until saturation and contamination are checked.
Gypsum can stay and dry in place only when there is no swelling, splitting, or failed tape. Porous ceiling tile that touched waste is discarded, not washed. A common miss is drying the stain you can see and leaving wet insulation, a framing pocket, or the bathroom subfloor above.
How to Inspect and Record Ceiling Damage
After the flow stops, document both rooms before demolition or heavy cleaning. Water damage and freezing made up nearly 24% of U.S. homeowners insurance claims in 2021 and ranked as the third-most frequent property claim category, according to Insurance Information Institute figures summarized by ConsumerAffairs. From 2017 through 2021 the average claim in that category was about $12,514, and about 1 in 60 insured homes filed one each year. Toilets sit on the same list as showers, water heaters, clogged drains, roofs, and faulty appliances. Those numbers are not a toilet-ceiling category, but they show why a bathroom spill can become a five-figure loss once water crosses the floor, the subfloor, and the joist bay.
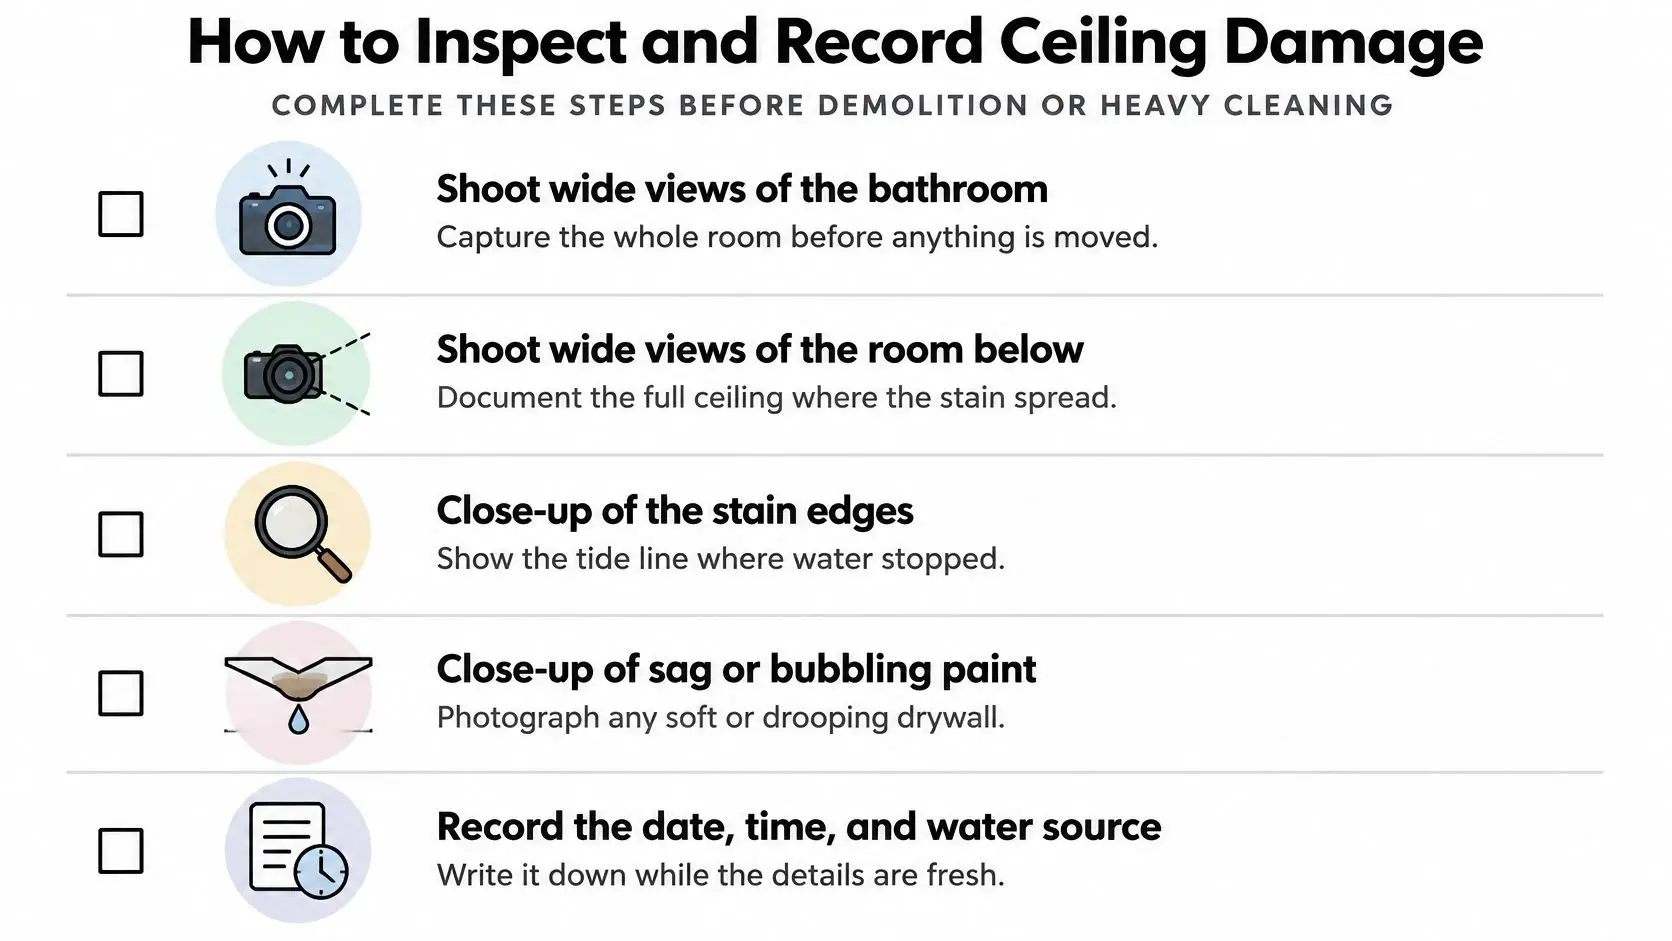
Shot list and a one-page timeline
Shoot wide views of the bathroom and the room below first. Then close-ups of the stain edges, any sag or bubbling paint, and drips at a light or seam. Include the toilet, the shutoff, standing water with a ruler in the frame, and a clock time.
Write one page while the details are fresh.
- Found: when you noticed the overflow.
- Stopped: when the valve or main was closed.
- Water: whether waste was in it, or only clear tank water.
- Told: when the landlord, HOA, or insurer was notified.
That page is the story the photos cannot tell by themselves.
Where to meter
A dry hand on the paint is not a reading. Use a pin or pinless meter on the ceiling face, nearby walls, and the bathroom floor above. Look into the cavity through an existing light opening before you cut a new hole. Photograph wet insulation or stained board before it comes out. The ceiling is often only the visible end of water that crossed the floor assembly.
One reading at the paint is not enough in a Phoenix home. A ring can dry fast on the surface and still hide moisture in insulation. Store the photos with the meter numbers, then repeat the same spots after drying so the file shows the cavity, not just the paint. A thermal imaging inspection can show cool, wet pockets a single pin reading misses, especially around joists and light boxes.
| Record | What to capture | Why it matters |
|---|---|---|
| Source | Toilet, supply line, or drain, and whether waste was present | Sets clean-water drying apart from contaminated removal |
| Both rooms | Wide and close photos with a timestamp | Shows the path from the bathroom to the ceiling |
| Structure | Stain edges, bubbles, sag, and drips at lights or seams | Separates a surface ring from failed drywall |
| Moisture | Readings on the ceiling, nearby walls, and the floor above, before and after drying | Proves the cavity, not just the paint, is dry |
| Notices | Time the insurer, landlord, or HOA was told | Supports a prompt report without assuming payment |
Dry the Ceiling and Avoid the Mistakes That Breed Mold
Drying starts only after you know the water category. Clean tank water and toilet wastewater are not the same job. The EPA tribal indoor-air guidance on mold and moisture lays out a practical order: identify the water, extract and remove what cannot be saved, open trapped cavities, move air along the surface, dehumidify, log readings, and clean or repair only after drying is verified.
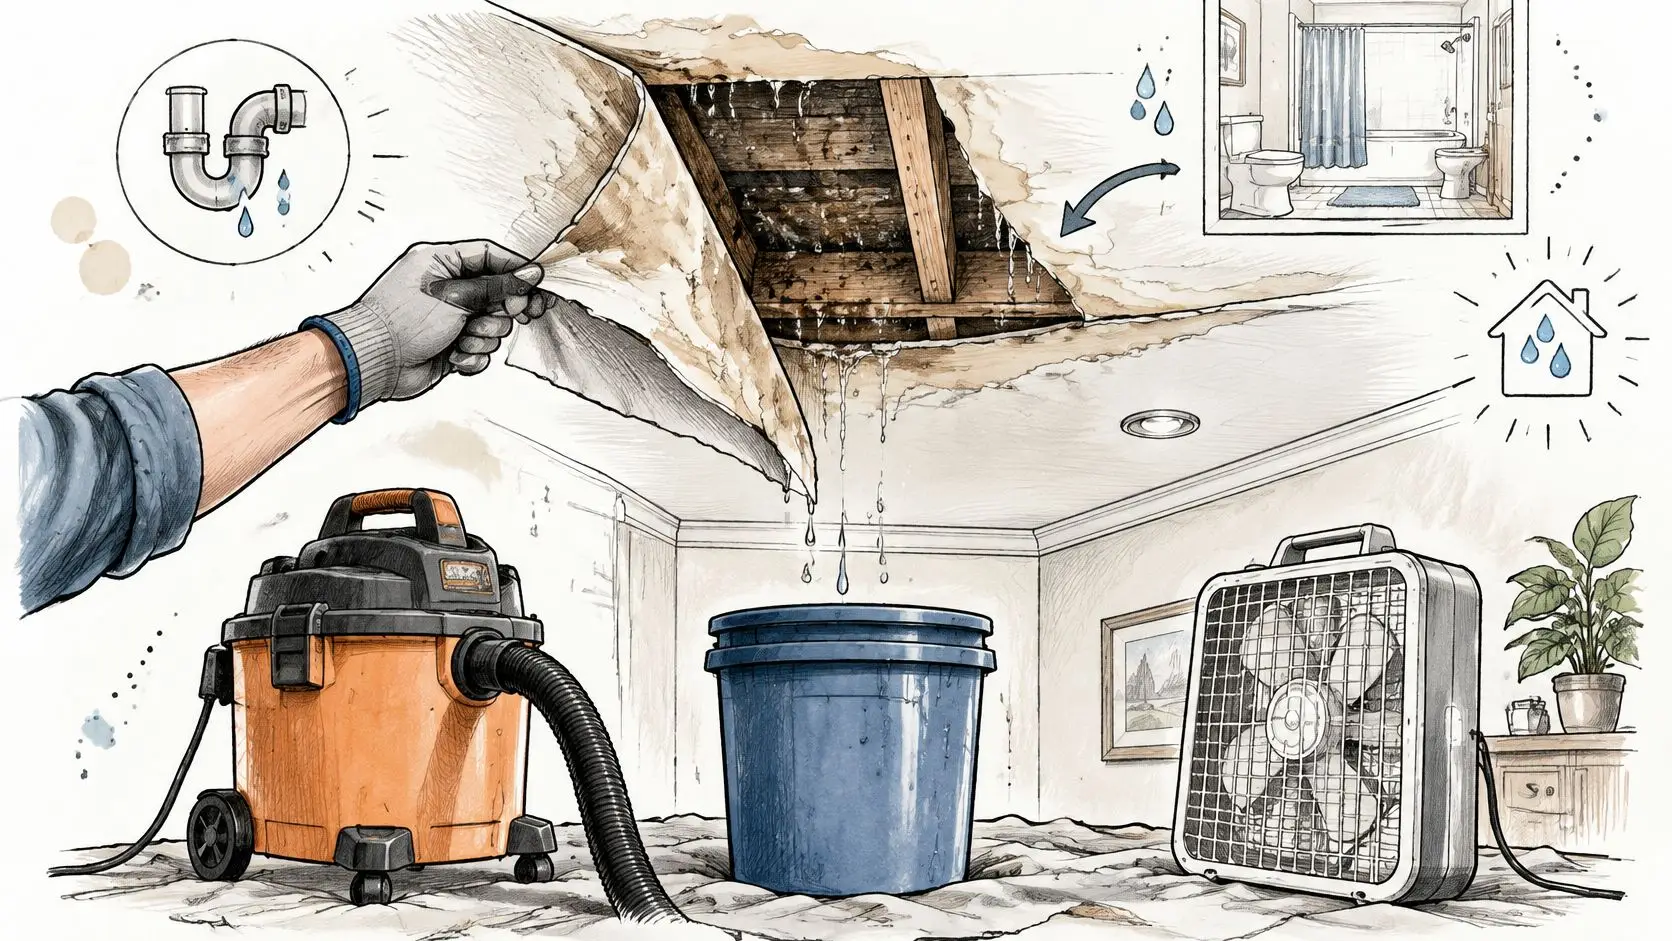
The drying sequence
- Extract standing water in the bathroom and under active drips. Towels pressed into a bucket work for a small puddle. A wet-dry vacuum is better on hard floors. Do not drive waste water into carpet outside the bathroom.
- Remove failed ceiling drywall. Cut out board that is swollen, sagging, soft, or losing screws and tape. Sound board can stay only if the water was clean and drying starts at once. Cosmetic drying is not a substitute for removal when the gypsum has already failed.
- Pull wet insulation from the affected bay. Discard porous ceiling tile that touched waste. Washing it pushes contamination into the grid and the room.
- Open only a wet pocket that air cannot reach. Let the meter pick the spot. A random hole just for curiosity drops debris and can spread a dirty cavity into clean rooms.
- Aim air movers along the ceiling, so they sweep the surface instead of blasting one stain. A fan pointed straight at a ring mostly stirs the room. Low-profile air movers set to graze the gypsum move moisture off the face and out of a controlled opening. Household box fans help a little. They are not a drying system by themselves. See how water damage fans are placed when a ceiling bay is involved.
- Run a dehumidifier and write down room temperature and relative humidity a few times a day. Extraction without dehumidification just moves moisture into the air, where it can settle on cooler framing.
- Record moisture at the start, during drying, and at the end. Compare the wet spot with a dry area of the same material in the same room. Drying is finished when those readings match. It is not finished after a set number of fan hours, and it is not finished because the ring looks lighter.
The EPA school and commercial mold guide is clear on sewage and biological pollutants: containment and appropriate personal protective equipment are required. Drywall, carpet, ceiling tile, and insulation can be difficult to clean completely and may need removal. The downstairs ceiling may be only the visible end. Contamination can run through the upstairs floor and shared cavities. Keep occupants away, notify the landlord, HOA, or insurer promptly, and keep the photos, readings, and a list of what you removed.
Urgency is not a license to gut the whole ceiling. The 24 to 48 hour mark is a prevention guideline, not a promise that growth will or will not happen. Combine elapsed time, water quality, material type, and a verified dry reading. That balance keeps a Phoenix landlord from both an unsafe mop job and a needless full replacement.
Habits that undo the work
Propping a sagging ceiling and calling it stable. Soft gypsum can drop. Shore the area and keep people out until the bad panel is cut back to sound board.
Using only the bathroom exhaust fan. It pulls a little air. It does not dry a joist bay or pull moisture out of insulation.
Pouring bleach into a closed cavity. Bleach does not reach wet insulation, and it does not replace removal of porous material that stayed wet past the prevention window.
Running waste-soiled towels through ordinary laundry. Bag them. A shared washer spreads what you just contained.
Sealing or painting before the plumbing repair is confirmed and the cavity reads dry. Primer can trap residual moisture and hide a leak that returns. If you later need a stain-blocking coat on sound, dry gypsum, covering water stains on drywall is a finish step, not the first one.
Clean and disinfect hard surfaces only after structural drying is verified. Work from cleaner areas toward dirtier ones, and follow the product label for contact time. Occupants should avoid contact with wastewater. Isolate contaminated debris in sealed bags.
A short walk-through of ceiling drying makes the air-mover placement easier to picture than a parts list.
When to Call a Restorer and Notify Insurance
Call a plumber when the toilet still runs, the shutoff failed, or the drain backs up again. Drying a ceiling while the fixture still feeds water wastes the afternoon.
Call a restoration crew when water reached the ceiling cavity, waste was involved, drywall is soft or sagging, or the wet area is larger than a small ring. The same call applies when you cannot confirm the cavity is dry within 24 to 48 hours. Dry indoor air can leave the paint surface feeling normal while insulation in the joist bay stays wet, and household fans cannot prove otherwise. The water category, the moisture reading, and the condition of the board together decide whether the panel gets dried in place or cut out.
| Contact | Trigger | Why |
|---|---|---|
| Plumber | Toilet still runs, shutoff fails, or drain backs up again | Source must be repaired before drying or paint |
| Restoration crew | Water in ceiling cavity, waste involved, soft or sagging drywall, or no reliable moisture readings | Drying and removal need verified measurements |
| Insurer | Any ceiling or contents loss | Prompt report; coverage depends on cause and policy |
Report the loss promptly. Describe the cause, such as a failed flapper, a supply leak, or a clog. "The ceiling got wet" is a symptom, and the adjuster needs the failure behind it. Have photos, the timeline, any meter readings, and a list of damaged finishes ready. A practical set of water damage insurance claim tips helps you organize that packet without guessing what an adjuster will ask.
What a policy can and cannot do
Coverage follows the cause and the wording of your policy, not the fact that paint bubbled. FEMA's National Flood Insurance Program notice explains that sewer-backup damage is covered by flood insurance only when the backup directly results from flooding, so a backup from another cause, such as clogged pipes, falls outside that flood-policy treatment. Building coverage applies to the structure. Belongings generally need separate contents coverage.
A toilet overflow may be an internal plumbing failure, a blocked drain, or, less often, floodwater from outside. Those are different questions sitting under the same ceiling stain. Read the policy, endorsements, exclusions, deductible, and reporting rules. No contractor can promise that a claim will be paid, what it will cost, or how fast an insurer will respond.
Read the cause, the endorsement, and the deductible before you assume the ceiling or the sofa is covered.
In the Phoenix metro, our IICRC-certified professionals assess the extent of the damage, build a customized restoration plan, and make sure all moisture is removed. Restore Heroes is IICRC certified, licensed, bonded, and insured, and the team arrives quickly to stabilize the property, start restoration, and coordinate with insurers so the loss does not spread. If the ceiling below is already wet, or you are not sure whether the water was clean or contaminated, use the contact form and select Water Damage. The assessment tells you what the assembly needs; payment and pricing remain the insurer's call.
If the ceiling under a toilet is already stained, soft, or dripping, Restore Heroes can assess the wet assembly, extract water, and dry or remove damaged material. Our Phoenix-area crew handles the mitigation and confirms the moisture is gone so you are not guessing from the paint alone. Visit Restore Heroes and choose Water Damage on the contact form when you need that next step.