Water on the floor has a way of scrambling your thinking. You see a soaked hallway, hear a drip behind a wall, or step onto carpet that suddenly feels like a sponge, and your brain jumps straight to worst-case scenarios.
Slow down. Inside a flooded house, the first few decisions matter more than any product you buy later or any repair estimate you get next week. The job right now is simple: protect people first, then stop the damage from spreading.
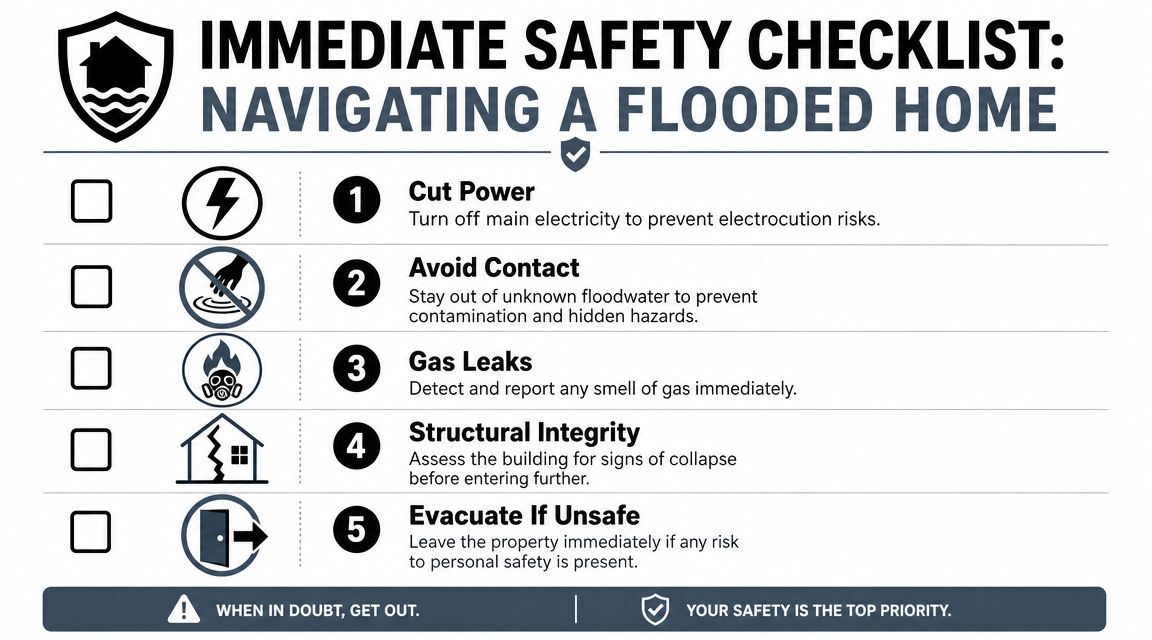
Your First Priority Inside a Flooded House
If you're standing in a wet room wondering whether to grab towels, call insurance, or start moving furniture, start with safety and stabilization. Cleanup can wait a few minutes. A bad decision around electricity, contamination, or structural damage can't.
The financial stakes are real, but they matter because they show how fast water gets into places you can't fully see. Just 1 inch of water in a typical home can cause up to $25,000 in damage, according to U.S. flood guidance. That happens because water doesn't stay politely on the tile. It reaches baseboards, drywall, insulation, carpet pad, cabinets, furniture legs, outlets, and subfloors.
A lot of homeowners make the same early mistake. They focus on the puddle and miss the moisture path. The visible water is only part of the problem. The bigger issue is what the water has already touched and what will keep absorbing moisture if you lose the next few hours.
Practical rule: If you can stop the source safely, do that first. If you can't confirm the area is safe, leave it alone and get help.
When the source appears to be a plumbing failure, a burst line, or an active fixture overflow, fast access to residential emergency plumbing repairs can help stop more water from entering the house before restoration even starts. Once the source is under control, the next step is mitigation, which means extraction, drying, and protecting materials before secondary damage sets in. If you need a clear overview of that process, this guide to water damage mitigation is useful.
What matters in the first minutes
- People over property: Don't step into water until you know the area is safe.
- Source over symptoms: Stopping active water flow does more than mopping ever will.
- Hidden moisture counts: Wet drywall, cabinets, and flooring can become a major repair.
- Speed matters in heat: In Phoenix, indoor conditions can push wet materials toward odor and microbial problems quickly.
Inside a flooded house, calm beats panic every time. The right first move is almost never dramatic. It's controlled, deliberate, and focused on preventing the next layer of damage.
Navigating Safely or Evacuating
You open the front door, see water across the floor, and your first instinct is to start grabbing things. Pause there. The next decision is simpler and more important: can you stay inside safely, or do you need to get out and wait for help?
In the first 24 hours, good flood response is triage. Protect people first. Then protect areas of the house that can still be saved. In Phoenix, that window is shorter than many homeowners expect because wet materials heat up fast and secondary damage starts sooner.
Electrical danger
Water on the floor changes the rules immediately. If outlets, extension cords, appliances, or power strips are wet or close to standing water, do not walk into that area. If you can shut off power from a dry location without crossing wet flooring or touching damp walls, do it. If not, back out.
I tell homeowners to treat low outlets and anything plugged in near the floor as a hard stop. The risk is not just shock from a visible wire. Wet drywall, soaked baseboards, and metal appliance cabinets can all become part of the hazard.
Leave the area right away if you notice:
- Wet electrical devices: TVs, lamps, chargers, fans, or appliances sitting in water
- Water near outlets or power strips: Especially along baseboards
- Ceiling leaks around fixtures: Recessed lights, smoke detectors, fans, and anything else wired overhead
- Burning smell or buzzing sound: Those are evacuation signs, not inspection signs
Water category matters
Do not assume the water is clean because it looks clear. If it came from outside, a drain backup, a toilet overflow, or an unknown source, treat it as contaminated. Keep children and pets out. Avoid skin contact. Do not drag belongings through it unless you have a clear reason to save them and a clean path to move them.
This matters for triage. A suitcase in clean supply-line water may be worth moving. Baby items, porous furniture, rugs, cardboard boxes, and anything soaked by sewage or outside floodwater usually move into the discard category much faster. Saving the wrong items spreads contamination into dry rooms and makes the cleanup larger.
Structural warning signs
Most household water losses do not mean the structure is failing, but some conditions call for immediate evacuation and a professional assessment.
Leave the house if you see any of these
- Sagging ceilings: Water can pool above drywall and bring it down suddenly
- Bulging walls or swollen trim: Often a sign that wall cavities are holding water
- Soft or shifting floors: Subfloor damage can be hidden under laminate, wood, or tile
- New cracks around doors, windows, or ceiling joints: Especially if they appeared with the flooding
- Gas smell: Leave at once and call from outside
If the house is stable and you can enter safely, move slowly and choose your route. Step on firm surfaces. Wear boots with solid soles if you have them. Use gloves for wet debris. Keep one dry exit path clear so you are not trapped deeper in the house if conditions change.
For homes that are safe enough to enter but risky to handle without proper equipment, a professional emergency flood cleanup team can extract water, control contamination, and help you avoid turning one damaged room into a whole-house cleanup.
How to Stop the Water and Isolate Damage
Once you've confirmed it's safe to be inside, switch from emergency thinking to containment. The goal isn't to make the house look better. The goal is to keep one wet area from becoming five.
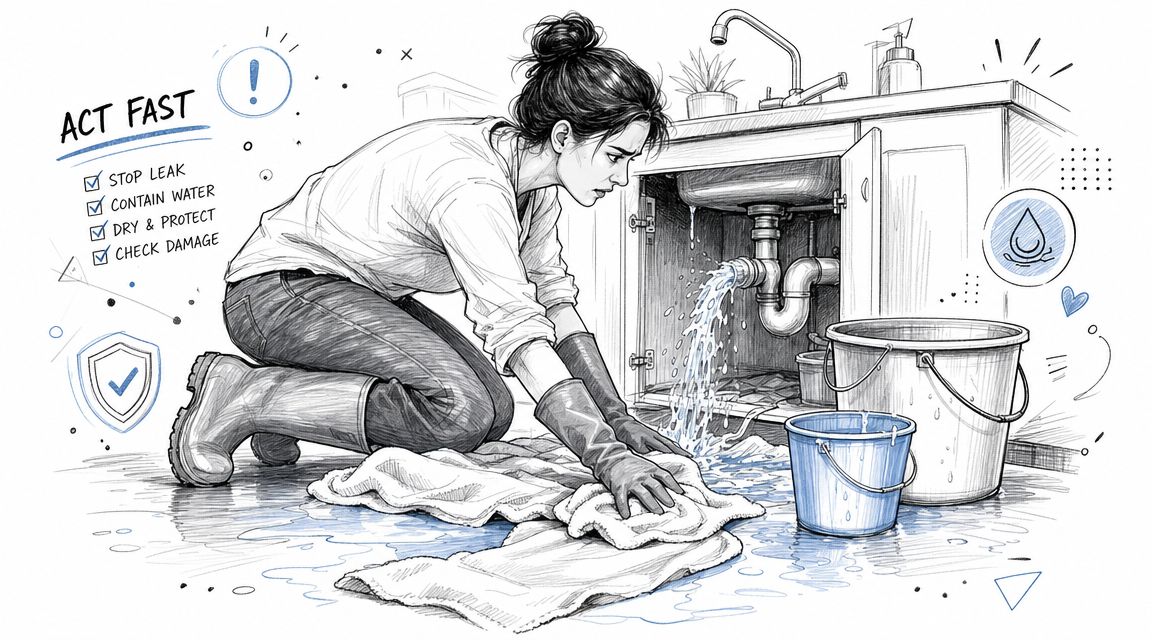
Shut off the source if you can do it safely
If the flooding came from a plumbing line, appliance supply hose, toilet, water heater, or fixture, stop the supply first. In many homes that means turning off the local stop valve under a sink or behind a toilet. If the leak is still active or the source isn't obvious, shut off the main water supply.
A few practical notes matter here:
- Use local shutoffs first when the source is obvious and reachable.
- Use the main shutoff if the leak is hidden, overhead, or still feeding from somewhere unknown.
- Don't open walls blindly unless you know what utilities are inside.
- Don't ignore ceiling leaks around light fixtures. Those need extra caution. If that's your situation, this page on water leak from a ceiling light covers the immediate risk factors.
Triage what stays and what goes
In the first day, the smartest homeowners don't try to save everything. They separate materials into three groups: save now, document then remove, and leave untouched until assessed.
Usually worth trying to save quickly
- Solid wood furniture if only the legs or lower sections are wet
- Metal, glass, plastic, and other nonporous items
- Clothing and washable textiles if the water source was relatively clean
- Valuable papers and photos, moved carefully to dry staging areas
Often headed for removal
- Wet drywall
- Insulation
- Particleboard furniture
- Swollen MDF cabinets or shelving
- Carpet pad and heavily saturated carpet, depending on water source
- Pressed-wood baseboards and trim that are expanding or falling apart
FEMA and restoration guidance emphasize that wet porous items like drywall, insulation, and particleboard can start growing mold within 24 to 48 hours, making rapid triage essential, especially in hot climates where growth can accelerate, as described in this restoration guidance summary.
Don't waste your first hours trying to rescue low-value porous materials that are already failing. Use that time to protect what still has a realistic path to cleaning and drying.
Create a wet zone and a clean zone
Pick one nearby dry area and keep it protected. That becomes your staging space for salvageable items. Move wet contents out of the flooded room in an organized way. Keep contaminated items separate from cleaner household contents.
A simple layout helps:
| Area | Use |
|---|---|
| Wet zone | Flooded room, demolition debris, unsalvageable porous items |
| Transition zone | Gloves, contractor bags, cleaning supplies, tool drop |
| Clean zone | Dry contents, paperwork, electronics, boxed valuables |
Later, if you want a visual walkthrough of stopping a leak before cleanup expands, this can help:
Documenting Damage Before You Clean
Once active hazards are controlled, put the mop down for a few minutes and build the record first. Homeowners frequently jeopardize their own claim at this juncture. They clean too fast, throw damaged materials in the dumpster, and erase the evidence of what happened inside a flooded house.
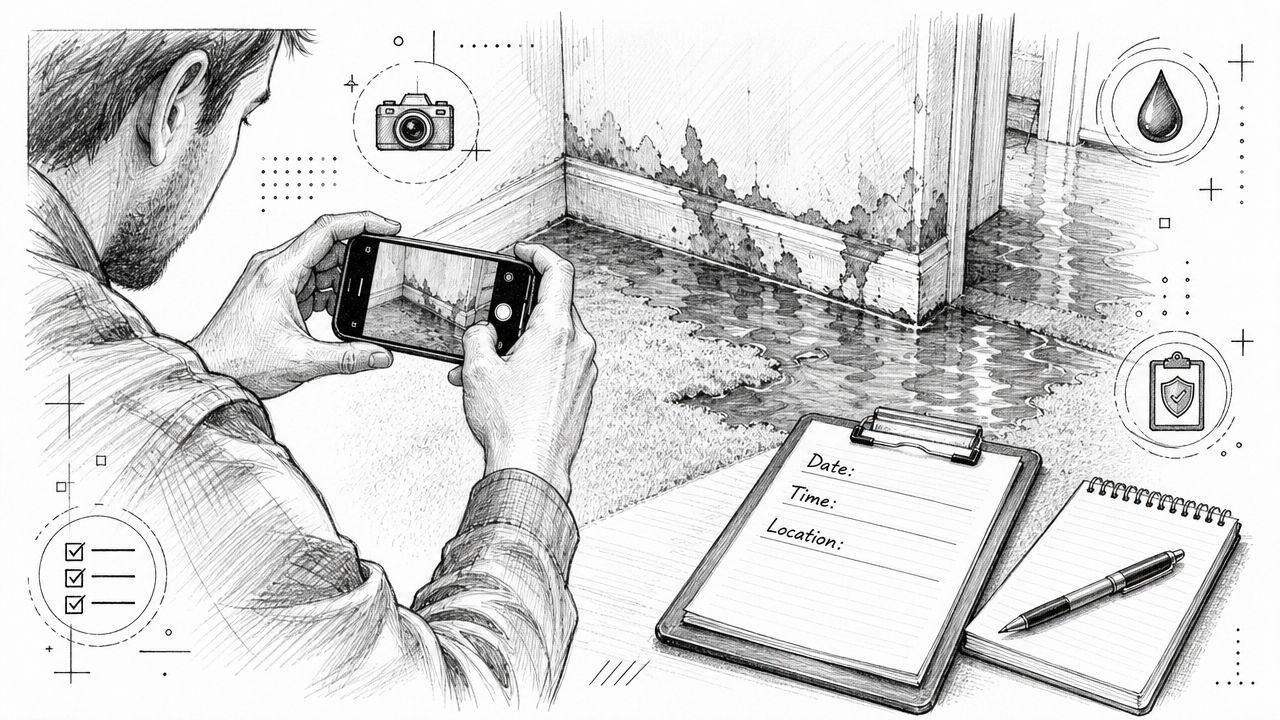
What to photograph right away
Use your phone and take more images than you think you need. Start wide, then move in close.
Get these first:
- The source area: The broken supply line, leaking appliance, roof entry point, or overflow location.
- Room-wide shots: Stand in each corner and capture the whole room.
- Floor damage: Water lines, soaked carpet, cupping floors, detached trim.
- Wall evidence: Staining, swelling, bubbling paint, and baseboard damage.
- Contents: Furniture, electronics, storage bins, rugs, and personal items where they were found.
- Appliance labels: Model and serial tags if appliances took on water.
Document the likely demolition line
This one gets missed all the time. If drywall is wet, photograph the high-water mark and the surrounding wall area before anyone starts cutting. Restoration professionals often mark drywall about one foot above the visible waterline and make a clean cut, which is a useful benchmark to document because it often indicates the minimum section likely to be removed, according to Team Rubicon's flood cleanup guidance.
That photo can become important later when you're trying to show the full extent of affected material, not just what was visibly soaked at floor level.
Photograph the room before you make it look better. Cleanliness helps your home. Evidence helps your claim.
Keep a simple written log
You don't need a formal report. You need a reliable timeline.
Write down:
- When you discovered the water
- Where it started
- What rooms were affected
- What you shut off
- What you removed
- What smelled, sagged, swelled, or stopped working
If water reached off-site belongings, it also helps to review how protection applies to stored property. For people comparing household coverage with off-site storage protection, this overview of storage unit contents insurance gives useful context.
For claim preparation focused on water losses, this resource on water damage insurance claim tips is worth reading before demolition picks up speed.
Deciding When to Call Restoration Professionals
Some water losses are manageable with careful cleanup. Others look small, then turn into wall-cavity odor, ruined subfloors, and recurring mold because the visible water was only the beginning.
The line between DIY and professional work usually isn't about effort. It's about risk.
Signs the job is bigger than it looks
If the water came from outside floodwater, sewage, or a drain backup, professional help moves from helpful to necessary. The same is true when water has traveled through several rooms, affected ceilings, soaked cabinets, or entered wall cavities.

A few conditions should push you toward expert assessment:
- Contaminated water: Especially anything involving sewage or outdoor floodwater.
- Hidden moisture likely: Water under flooring, behind walls, or inside insulation.
- Large material loss: Multiple wet rooms, ceiling collapse, saturated cabinetry.
- Sensitive occupants: Respiratory issues, immune concerns, infants, or older adults in the home.
- Persistent signs after cleanup: Odor, staining, buckling, or repeated moisture readings.
Why surface drying isn't enough
A room can look dry and still be unhealthy. Indoor floodwater can leave behind sewage, bacteria, mold fragments, and chemical residues in wall cavities and under flooring even after surfaces look dry, which means a house may appear cleaned while still posing health risks from hidden contaminants, as noted in this flood contamination overview.
That's where homeowners get trapped. They wipe the floor, run a box fan, and assume they're done. Meanwhile, insulation stays wet, subfloor layers hold moisture, and the HVAC system may pull contaminated particles through the house.
If water touched materials you can't fully see or clean, you don't have a cosmetic problem. You have a drying and contamination problem.
What professionals actually add
A qualified restoration crew doesn't just remove water. They assess moisture migration, isolate affected areas, extract standing water, remove unsalvageable porous materials, monitor drying, and verify when materials are ready for rebuilding. In the Phoenix area, Restore Heroes is one example of a contractor that handles that type of water-damage restoration workflow.
That matters most when the loss involves hidden moisture, contamination, or demolition decisions that homeowners shouldn't guess at.
Taking Your First Steps Toward Recovery
At this stage, recovery is a triage job. The goal in the first 24 hours is simple. Dry what can still be saved, remove what will keep feeding moisture or contamination, and keep a clean record for the insurance claim.
Inside a flooded house, people often lose time on the wrong tasks. They start scrubbing floors, tossing random items, or setting fans everywhere. A better approach is to sort the space into three categories: save, discard, and document.
Start with a practical salvage decision
Non-porous items like metal, glass, and some hard plastics can often be cleaned and dried if the water was clean and you act quickly. Porous materials are different. Carpet pad, insulation, swollen particleboard, saturated drywall, and upholstered furniture usually do not reward delay, especially in hot climates where moisture stays trapped below the surface and mold follows fast.
Paper goods, cardboard boxes, and fabric stored low to the floor should be treated the same way. If they stayed wet for long, they usually belong in the discard pile unless they have clear financial or sentimental value and you plan to send them to a specialty cleaner.
Do not guess based on touch alone. A baseboard, cabinet toe-kick, or laminate floor can feel dry and still hold moisture behind or beneath it.
Dry the structure without spreading the problem
Open interior doors, cabinets, and drawers so enclosed surfaces can release moisture. Use dehumidification once standing water is gone and electricity is confirmed safe. If the water involved sewage or heavy contamination, avoid blowing that air through the house with standard fans.
Keep traffic controlled. Carry debris out along one path if possible, and do not stack wet contents in rooms that were not affected. That one decision can save a lot of secondary cleanup.
A good first-pass recovery routine looks like this:
- Sort contents by material: Hard surfaces to clean, porous items to evaluate, and heavily saturated items to discard.
- Separate what supports a claim: Save samples, labels, model numbers, and damaged sections when that helps prove loss.
- Open enclosed areas: Closet doors, vanity cabinets, and drawers trap moisture.
- Remove obvious moisture reservoirs: Wet rugs, cushions, cardboard, and pad keep the humidity up.
- Watch the air: A stronger musty or sour odor usually means hidden wet material is still in place.
Keep the insurance file as organized as the cleanup
Homeowners usually regret two things after a flood. Throwing out evidence too early, and failing to list damaged contents while they can still remember what was there.
Before you haul materials away, photograph each room again in better light. Then take closer shots of damaged flooring, wall lines, furniture, appliances, and boxed contents. If you discard items, make a written list with brand, approximate age, and condition before the loss. In practice, a simple room-by-room inventory on your phone is far better than trying to rebuild the claim from memory a week later.
If you keep receipts for emergency purchases, drying equipment, hotel stays, or temporary repairs, store them in one folder. Insurance adjusters do not need a perfect system. They need a clear one.
The house does not need to look normal today. It needs to become drier, cleaner, and easier to document today.
In Phoenix-area losses, heat speeds up odor and microbial growth, but it also creates false confidence. Surfaces dry first. Cavities dry last. That is why early recovery should be measured by what has been removed, separated, documented, and properly dried, not by how the room looks.
If you need help sorting the salvage decisions and drying plan, Restore Heroes handles water damage, structural drying, and flood cleanup for Phoenix-area properties. When a loss is beyond a safe DIY response, experienced restoration crews can help determine what can be saved, what should be removed, and what needs to be documented before repairs begin.